


 40Likes
Making your own tires
 11-28-2019, 08:11 PM
#1
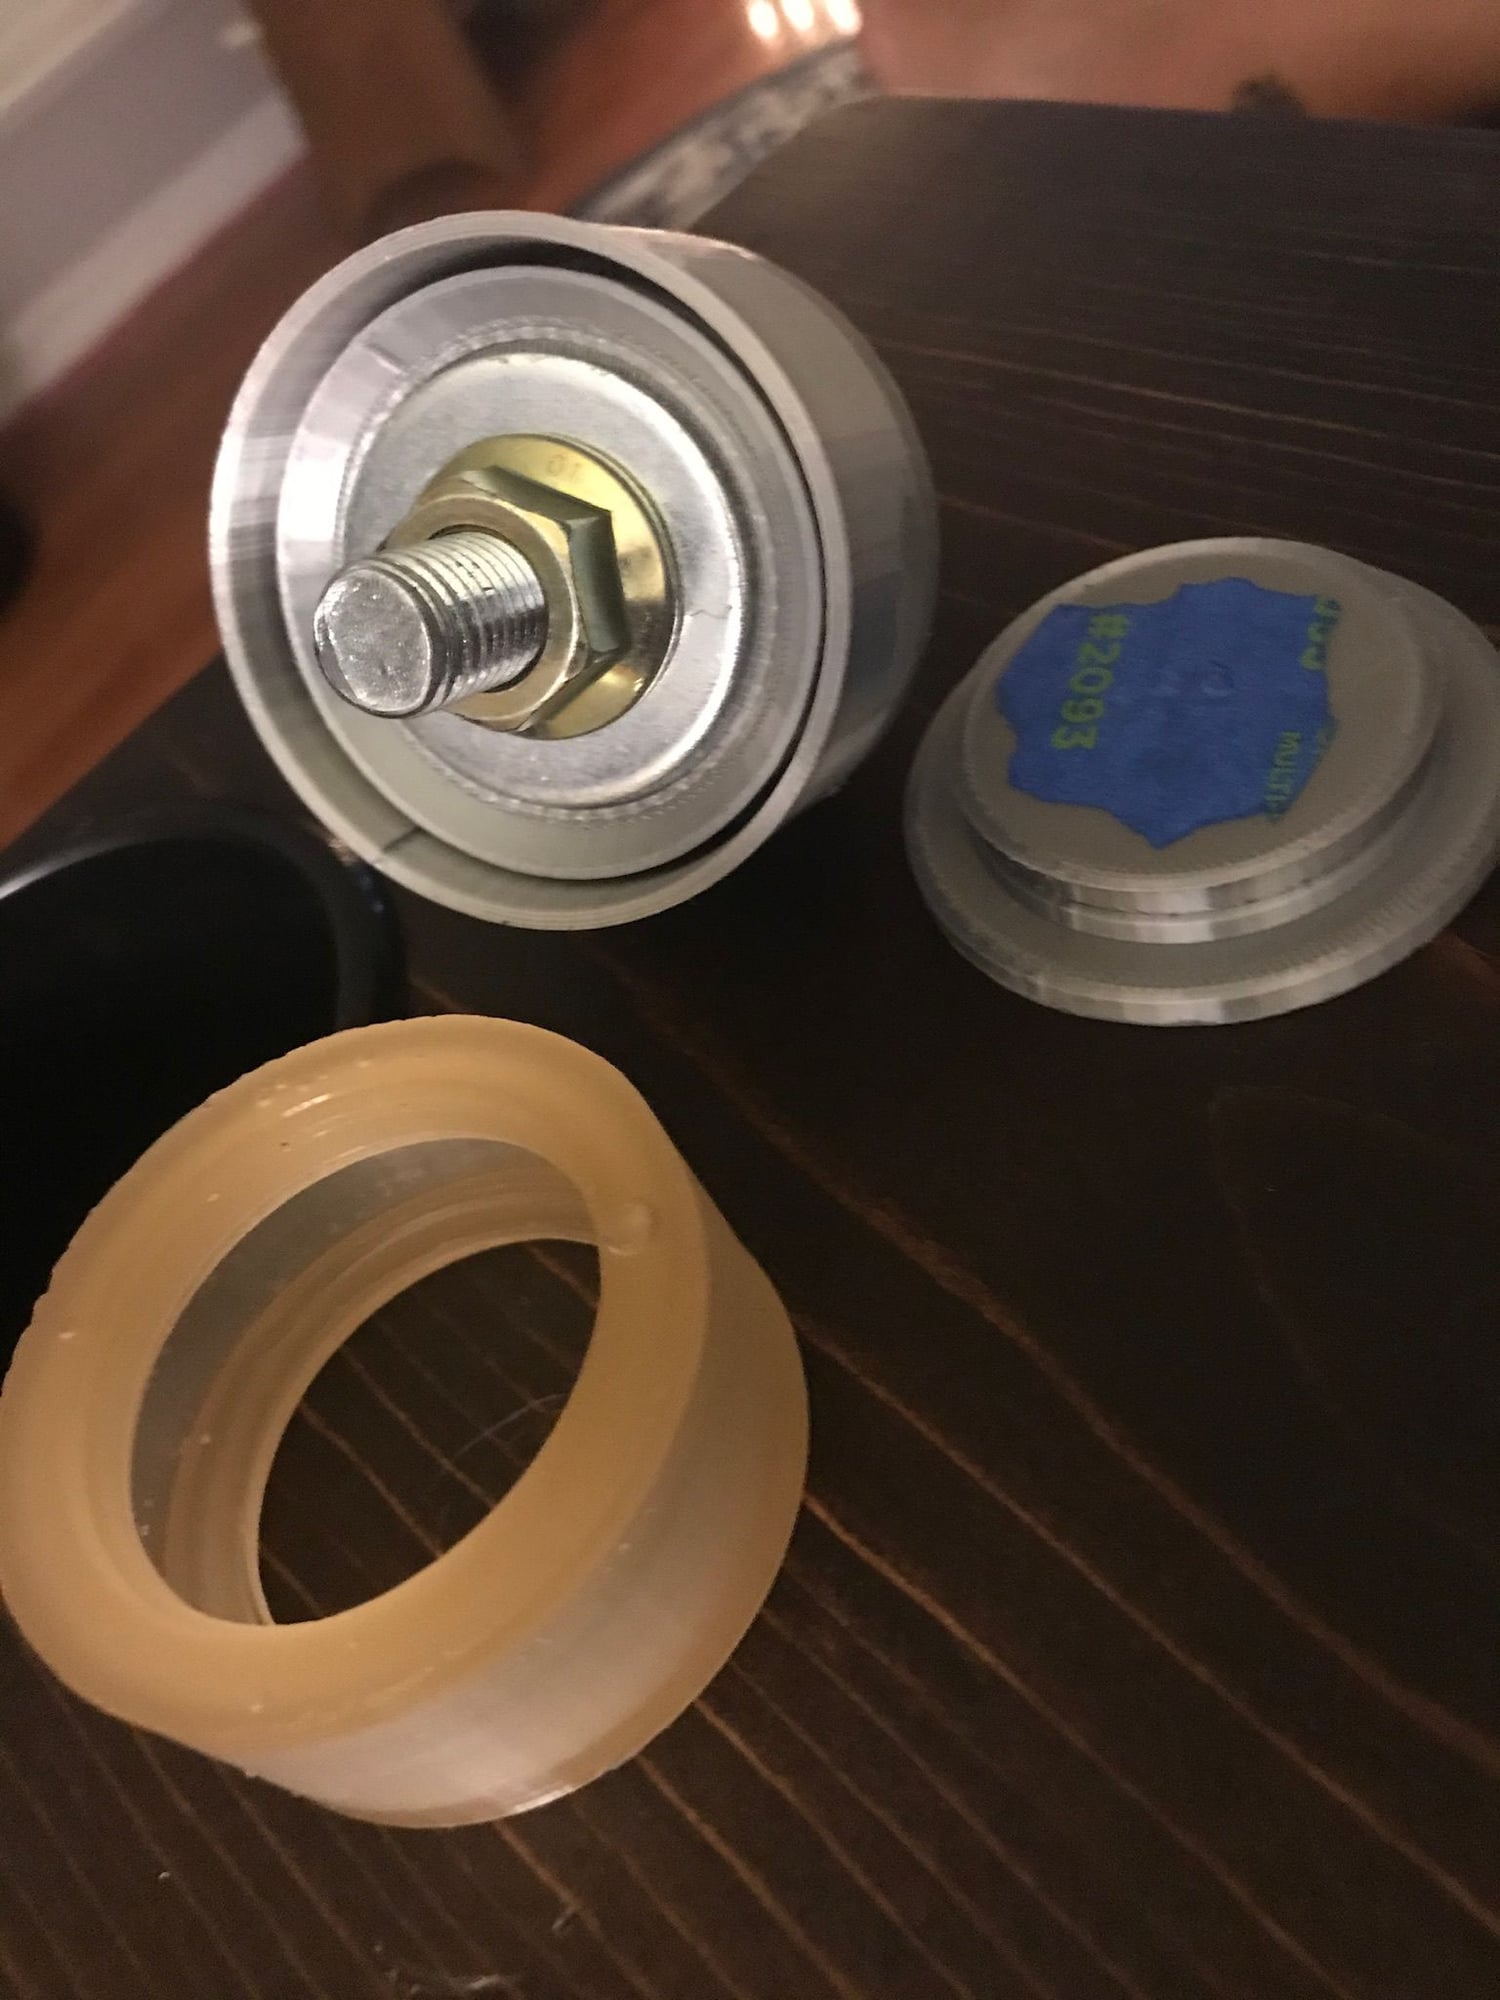 That tan thing is a 62mm touring car tire. No seam around the center. Its molded from 44 shore rubber and it feels about right just the carcass is thin. i wont know until I refine the design and mold more. There are a couple of trapped bubbles but I know how to remove them. i removed most but the mold needs to be modified to off gas in a vacuum better. i got most out but I didnt want to mess up the whole mold and the off gassing messed with the mold so next rev will breathe better. Help me out and tell me what I need to know. Im an electrical guy not a tire guy.
do I need to have a foam insert? This tire is designed around a standard foam but i was looking at the way the tire cones in a corner and thought maybe there is a better way to keep the tire from rolling over the edge in a corner than a foam. Like something between solid core and hollow. I have to add weight to the car anyways.
Does anyone know the trade offs of a round versus square shoulder tire. Obviously more contact patch is more traction. Im guessing that it will take more work to turn the car.
 11-29-2019, 03:21 AM
#2
That tan thing is a 62mm touring car tire. No seam around the center. Its molded from 44 shore rubber and it feels about right just the carcass is thin. i wont know until I refine the design and mold more. There are a couple of trapped bubbles but I know how to remove them. i removed most but the mold needs to be modified to off gas in a vacuum better. i got most out but I didnt want to mess up the whole mold and the off gassing messed with the mold so next rev will breathe better. Help me out and tell me what I need to know. Im an electrical guy not a tire guy.do I need to have a foam insert? This tire is designed around a standard foam but i was looking at the way the tire cones in a corner and thought maybe there is a better way to keep the tire from rolling over the edge in a corner than a foam. Like something between solid core and hollow. I have to add weight to the car anyways.
Does anyone know the trade offs of a round versus square shoulder tire. Obviously more contact patch is more traction. Im guessing that it will take more work to turn the car.

I'm not sure on how to remove bubbles, normally in such a process you would try and prevent bubbles from forming in the first place. I *think* in plastics they have chemical agents to remove air bubbles.
Examine your process carefully to see where air is entering the molten rubber. Do not "beat"/whisk the rubber like you would an omelette lol. That is a prime way of introducing air. Stir vigorously instead. Instead of using an injection pump to inject rubber into the mold, why not try using a vacuum/suction pump to suck rubber into the mold, or use it in conjunction with the injection pump to suck out as much air as possible. You can also try creating an "exit" in the form of a 'gate' or 'runner' so excess rubber gets pushed out of the mold along with the air. You will have to trim off the excess rubber from the gate/runner later of course. Careful position of the runner is critical, mind.
The seam around the center is actually a good thing because it will probably have been injected into the mold from both sides of the tire, and the excess leaking out between the 2 halves of the mold. This shows that the tire is probably evenly molded all the way around with equal amounts of rubber all over. The seam gets worn out the moment you do a full bore standing start and do a burnout anyway, so it doesn't matter. What you have done is created an asymmetrical mold so the parting seam is at the edge. This MUST be trimmed off/dremeled because it will act all kinds of weird on the first corner(see below for full mansplanation). This will take a long ass time to wear out because of the limited corners and asymmetrical layout of most tracks. Also potentially an unevenly shaped tire.
You probably will need an insert, maybe a softer one because your tire shore is super hard @44. Unless if you somehow managed to mold in a steel wire carcass like a 1:1 car tire. You could substitute foam for any sort of soft material really and report back with the results!
 As a suggestion, paper type masking tape or cloth/fabric layered up will provide some give. Or silicone, soft-ish/squishy plastic or some kind of plastic/metal mesh type material that deforms but not permanently.
Round or square shouldered tire depends very much on the surface you are running on and camber curves of the car itself. A rounded tire is more forgiving on bad surfaces/ lower grip and grips easier on bumpy ground. A square tire may very well throw you off track altogether as the square edge will catch on all kinds of things. Best suited for smoother, high grip tracks.
However, your tire appears to be too square. You will notice that even a "square" shouldered tire is rounded off at the edge with a small radius. This is because a sharp edge like on your tire will cause all kinds of hell to break loose as that sharp edge WILL NOT play nice around corners at anything above a walking pace because it will flex about in weird ways and try to fold over on itself and essentially lift the rest of the tire off the surface.
This will cause you to understeer into a wall. Which is Not Cool. You may want to hit that with a dremel, or better still, redesign that mold to include a radius.
Other than that, count me impressed. Black tyres are so passe and overrated anyway...
 11-29-2019, 03:47 AM
#3
That tan thing is a 62mm touring car tire. No seam around the center. Its molded from 44 shore rubber and it feels about right just the carcass is thin. i wont know until I refine the design and mold more. There are a couple of trapped bubbles but I know how to remove them. i removed most but the mold needs to be modified to off gas in a vacuum better. i got most out but I didnt want to mess up the whole mold and the off gassing messed with the mold so next rev will breathe better. Help me out and tell me what I need to know. Im an electrical guy not a tire guy.do I need to have a foam insert? This tire is designed around a standard foam but i was looking at the way the tire cones in a corner and thought maybe there is a better way to keep the tire from rolling over the edge in a corner than a foam. Like something between solid core and hollow. I have to add weight to the car anyways.
Does anyone know the trade offs of a round versus square shoulder tire. Obviously more contact patch is more traction. Im guessing that it will take more work to turn the car.
 11-29-2019, 06:37 AM
#5
Well done on such a thing! I would not have had the time/skills/nous to do such a thing. Having a brown tire is simply inspired!
I'm not sure on how to remove bubbles, normally in such a process you would try and prevent bubbles from forming in the first place. I *think* in plastics they have chemical agents to remove air bubbles.
Examine your process carefully to see where air is entering the molten rubber. Do not "beat"/whisk the rubber like you would an omelette lol. That is a prime way of introducing air. Stir vigorously instead. Instead of using an injection pump to inject rubber into the mold, why not try using a vacuum/suction pump to suck rubber into the mold, or use it in conjunction with the injection pump to suck out as much air as possible. You can also try creating an "exit" in the form of a 'gate' or 'runner' so excess rubber gets pushed out of the mold along with the air. You will have to trim off the excess rubber from the gate/runner later of course. Careful position of the runner is critical, mind.
The seam around the center is actually a good thing because it will probably have been injected into the mold from both sides of the tire, and the excess leaking out between the 2 halves of the mold. This shows that the tire is probably evenly molded all the way around with equal amounts of rubber all over. The seam gets worn out the moment you do a full bore standing start and do a burnout anyway, so it doesn't matter. What you have done is created an asymmetrical mold so the parting seam is at the edge. This MUST be trimmed off/dremeled because it will act all kinds of weird on the first corner(see below for full mansplanation). This will take a long ass time to wear out because of the limited corners and asymmetrical layout of most tracks. Also potentially an unevenly shaped tire.
You probably will need an insert, maybe a softer one because your tire shore is super hard @44. Unless if you somehow managed to mold in a steel wire carcass like a 1:1 car tire. You could substitute foam for any sort of soft material really and report back with the results! As a suggestion, paper type masking tape or cloth/fabric layered up will provide some give. Or silicone, soft-ish/squishy plastic or some kind of plastic/metal mesh type material that deforms but not permanently.
Round or square shouldered tire depends very much on the surface you are running on and camber curves of the car itself. A rounded tire is more forgiving on bad surfaces/ lower grip and grips easier on bumpy ground. A square tire may very well throw you off track altogether as the square edge will catch on all kinds of things. Best suited for smoother, high grip tracks.
However, your tire appears to be too square. You will notice that even a "square" shouldered tire is rounded off at the edge with a small radius. This is because a sharp edge like on your tire will cause all kinds of hell to break loose as that sharp edge WILL NOT play nice around corners at anything above a walking pace because it will flex about in weird ways and try to fold over on itself and essentially lift the rest of the tire off the surface.
This will cause you to understeer into a wall. Which is Not Cool. You may want to hit that with a dremel, or better still, redesign that mold to include a radius.
Other than that, count me impressed. Black tyres are so passe and overrated anyway...
I'm not sure on how to remove bubbles, normally in such a process you would try and prevent bubbles from forming in the first place. I *think* in plastics they have chemical agents to remove air bubbles.
Examine your process carefully to see where air is entering the molten rubber. Do not "beat"/whisk the rubber like you would an omelette lol. That is a prime way of introducing air. Stir vigorously instead. Instead of using an injection pump to inject rubber into the mold, why not try using a vacuum/suction pump to suck rubber into the mold, or use it in conjunction with the injection pump to suck out as much air as possible. You can also try creating an "exit" in the form of a 'gate' or 'runner' so excess rubber gets pushed out of the mold along with the air. You will have to trim off the excess rubber from the gate/runner later of course. Careful position of the runner is critical, mind.
The seam around the center is actually a good thing because it will probably have been injected into the mold from both sides of the tire, and the excess leaking out between the 2 halves of the mold. This shows that the tire is probably evenly molded all the way around with equal amounts of rubber all over. The seam gets worn out the moment you do a full bore standing start and do a burnout anyway, so it doesn't matter. What you have done is created an asymmetrical mold so the parting seam is at the edge. This MUST be trimmed off/dremeled because it will act all kinds of weird on the first corner(see below for full mansplanation). This will take a long ass time to wear out because of the limited corners and asymmetrical layout of most tracks. Also potentially an unevenly shaped tire.
You probably will need an insert, maybe a softer one because your tire shore is super hard @44. Unless if you somehow managed to mold in a steel wire carcass like a 1:1 car tire. You could substitute foam for any sort of soft material really and report back with the results!
As a suggestion, paper type masking tape or cloth/fabric layered up will provide some give. Or silicone, soft-ish/squishy plastic or some kind of plastic/metal mesh type material that deforms but not permanently.Round or square shouldered tire depends very much on the surface you are running on and camber curves of the car itself. A rounded tire is more forgiving on bad surfaces/ lower grip and grips easier on bumpy ground. A square tire may very well throw you off track altogether as the square edge will catch on all kinds of things. Best suited for smoother, high grip tracks.
However, your tire appears to be too square. You will notice that even a "square" shouldered tire is rounded off at the edge with a small radius. This is because a sharp edge like on your tire will cause all kinds of hell to break loose as that sharp edge WILL NOT play nice around corners at anything above a walking pace because it will flex about in weird ways and try to fold over on itself and essentially lift the rest of the tire off the surface.
This will cause you to understeer into a wall. Which is Not Cool. You may want to hit that with a dremel, or better still, redesign that mold to include a radius.
Other than that, count me impressed. Black tyres are so passe and overrated anyway...
@ Marcos-no minreg for me. Maybe next year. Making the tire is super easy and quick. Designing the mold is another thing. Ive probably gone through 10 revisions to get to this point. But once its done making tires will be rinse and repeat easy.
@sideways-the color is a dye that is added. I just didnt add any color because I wanted to see through it. The rubber is a 2 part chemical that gets mixed and hardens. Pour it in the mold and the next day you�ve got this. The chemicals are bought according to the finished shore hardness and you can get just about any hardness from gummy bear to boot heel. I havent figured out how to mix and pour in 5 minutes without whipping air in. Its not too much of an issue though because if you put it in a vacuum for a minute the bubbles come out. The issue I had was that all the bubbles jump out of the rubber at once and the mold is sealed. I forgot to put vent holes in the mold so that the mold doesnt explode!
the only articles ive found on the shoulder squareness was dirt racing. They said you get more traction and less turn in but you dont get a warning before you roll over the edge other than a little squirming before its too late.
@gigaplex-good point. I was fixated on the support it provides to the suspension. I forgot about the ballooning.
11-29-2019, 07:45 AM
#7
Bry, you never cease to amaze me, great job. In the old days a friend and I decided to make our own foam tires, but that was much easier, only hard thing was finding the right foam rubber. How does the tread thickness compare to other rubber tires you can buy?
11-29-2019, 08:21 AM
#9
Tech Prophet

iTrader: (9)
Join Date: Nov 2014
Location: Far south suburbs of Chicago area
Posts: 17,642
Trader Rating: 9 (100%+)
Very cool. I see both sides to it. It could be convenient, but will they perform and last.
Then there’s the would they be allowed question
Then there’s the would they be allowed question
11-29-2019, 10:03 AM
#10
@ Marcos-no minreg for me. Maybe next year. Making the tire is super easy and quick. Designing the mold is another thing. Ive probably gone through 10 revisions to get to this point. But once its done making tires will be rinse and repeat easy.
@sideways-the color is a dye that is added. I just didnt add any color because I wanted to see through it. The rubber is a 2 part chemical that gets mixed and hardens. Pour it in the mold and the next day you�ve got this. The chemicals are bought according to the finished shore hardness and you can get just about any hardness from gummy bear to boot heel. I havent figured out how to mix and pour in 5 minutes without whipping air in. Its not too much of an issue though because if you put it in a vacuum for a minute the bubbles come out. The issue I had was that all the bubbles jump out of the rubber at once and the mold is sealed. I forgot to put vent holes in the mold so that the mold doesnt explode!
the only articles ive found on the shoulder squareness was dirt racing. They said you get more traction and less turn in but you dont get a warning before you roll over the edge other than a little squirming before its too late.
@gigaplex-good point. I was fixated on the support it provides to the suspension. I forgot about the ballooning.
11-29-2019, 11:08 AM
#11
the one you see is only 1mm thick in the flat spot. It will end up being 3mm. USGT tires are 3mm. And I just realized my sorex have that band gigaplex was talking about but the USGT do not. In any case the tires are dimensionally exactly the same as the USGT. My intention is to use USGT rims.
anthony-I bought a vacuum pot. Maybe I need a pressure pot to.
billy-Marcos said im good so I�ll throw his name around if anyone gives me trouble. But if they are too good I see a ban hammer in my future.
marcos-naw im just Being lazy. Im trying to get out on the boat. Pick these avocados off the tree. I might go and check out minreg for a minute.
11-29-2019, 05:04 PM
#12
@sideways-the color is a dye that is added. I just didnt add any color because I wanted to see through it. The rubber is a 2 part chemical that gets mixed and hardens. Pour it in the mold and the next day you�ve got this. The chemicals are bought according to the finished shore hardness and you can get just about any hardness from gummy bear to boot heel. I havent figured out how to mix and pour in 5 minutes without whipping air in. Its not too much of an issue though because if you put it in a vacuum for a minute the bubbles come out. The issue I had was that all the bubbles jump out of the rubber at once and the mold is sealed. I forgot to put vent holes in the mold so that the mold doesnt explode!
the only articles ive found on the shoulder squareness was dirt racing. They said you get more traction and less turn in but you dont get a warning before you roll over the edge other than a little squirming before its too late.
the only articles ive found on the shoulder squareness was dirt racing. They said you get more traction and less turn in but you dont get a warning before you roll over the edge other than a little squirming before its too late.
But you definitely want mold holes to vent gasses and allow excess rubber to flow through.
11-29-2019, 08:09 PM
#13
Wait, hol' up a min. Rubber doesn't come in 2 parts! I think what you have is a silicone/urethane "rubber" isn't it? Do you really have a 5min working time? Is one of the chemicals a hardener? Can you use less for a longer working time? Can I suggest pouring a bit of part A, then a bit of part B, repeat as necessary for required volume. That way you build up layers and can mix evenly quicker. Or pour both simultaneously/ with a mixing syringe? Basically stir the mixture, don't lift the stirrer out of the mixture no matter what. Only lift it a few mm but always keep it submerged...
But you definitely want mold holes to vent gasses and allow excess rubber to flow through.
But you definitely want mold holes to vent gasses and allow excess rubber to flow through.
Maybe I will vacuum again once its pumped up to the second level.
I put chamfers in the molds so the tire edge will be rounder next time. Not allot but a little. The molds are 90% right now and its just little modifications to make it easier to mold and de-mold in a hurry. Once they work without a hitch and i confirm the right shore urethan to use I�ll probably just get a set made in aluminum. Maybe incorporate a pressure vessel.
There is very little cleanup required after it cures. i figure there would be allot of flash or sprue but 2 minutes with a razor and its done.
This tire is super soft but its only about 36 hours cured. and when i was skipping directions i think I saw something about putting them in the oven on 150 for awhile.
11-30-2019, 05:28 AM
#14
yea its a urethane. Im printing up molds with vents as we speak. I just assumed 5 minutes. i guess I really should read the directions. The new molds will have 3mm contact patch depth. The 1mm only needed 20ml of urethane. If I have more than 5 minutes Ill just fill the bottom of the mold before I assemble and set it in the vacuum pot. I wasnt thinking real hard about making this first one perfect. I knew it wouldnt be because the molds are complicated and you find out what doesnt work as you go. The whole thing fits together like a puzzle. All the urethan sits in the bottom of the mold (sidewall). When I screw the center section down it pumps urethane up to the opposite side wall via the contact patch area. I screw the last section on (opposite side wall) and I should get some urethane out the vents. I�ll vacuum it when its sitting in the bottom mold before it gets pumped up to opposite side wall.
Maybe I will vacuum again once its pumped up to the second level.
I put chamfers in the molds so the tire edge will be rounder next time. Not allot but a little. The molds are 90% right now and its just little modifications to make it easier to mold and de-mold in a hurry. Once they work without a hitch and i confirm the right shore urethan to use I�ll probably just get a set made in aluminum. Maybe incorporate a pressure vessel.
There is very little cleanup required after it cures. i figure there would be allot of flash or sprue but 2 minutes with a razor and its done.
This tire is super soft but its only about 36 hours cured. and when i was skipping directions i think I saw something about putting them in the oven on 150 for awhile.

You have to be careful, as what you are doing is pouring in the urethane and assembling the mold at the same time. Very high chance of trapped air pockets unless if you are very careful....
Perhaps a vid would be nice.
11-30-2019, 05:36 AM
#15
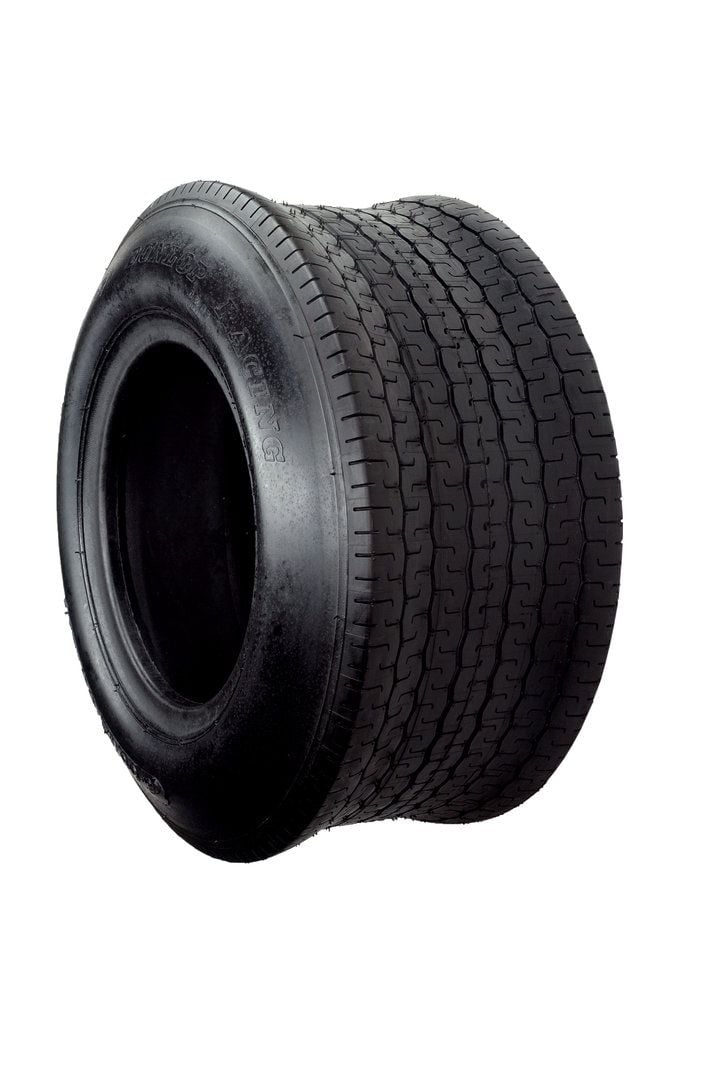
Check the attached image to see a good shaped race tyre, you want way more sidewall stiffness than tread stiffness, the opposite of street tyres.
The sidewall is thick and because the tread is buckling in for stiffness reasons is also pulled in,once you put the insert it's shaped like a normal tyre.
You should run a textile/synthetic reinforcement like a net to prevent ballooning.
https://images.app.goo.gl/A9GPq52zdy4eC23d6
Good luck!