


Losi 8ight building and setup
 12-30-2006, 10:25 AM
#1201
Over all with all of the other cars I have ran it with the Losi had the following feel.
It is very nimble in side to side movement. There is almost no body roll when getting into a corner.
It steers very well and can be made to rotate as much or little as you want.
It is very durable.
Parts are cost effective.
Suspension is off the hook. However the shocks leak and need to be checked regularly.
The clutch is not very good. Out of the box it wears way too quick.
I run the works clutch.
The K car felt very soft when I ran it next to the Losi. Even stiffened up, the K car would steer well but when it started to slide (rotate) it was hard to deal with. It is my understanding that in loamy conditions the K car really shines. I just drive on a local indoor clay track.
It did not have no where near the acceleration or cornering prowess of the Losi.
The Jammin car felt more planted and easier to drive than the K car. The suspension is good but it did not land as smooth as the Losi if you were off the line a little. I'm always off the line when I'm driving a car for the first time.
The Hyper 8 steered better than the Losi. It was very planted but bottomed out easily.
They are not very durable chassis wise. The other parts were great. I owned this car and found it very easy to deal with.
Alll in all the Losi is the best car I have driven to date.
It is easy to live with and runs great in adverse conditions.
TEX
 12-30-2006, 01:21 PM
#1202
Has anyone tried putting the throttle linkage on top of the horn to get it straight? I haven't run mine yet, but it seems more logical that if you rotate the carb ball to the top and put the linkage to the top of the horn you can get the linkage more level.
 12-31-2006, 12:09 AM
#1205
Tech Initiate
hey guys, im sure this has been asked before, but wich starter box will work well with the 8ight without me having to dremel out the chassis? thanks
12-31-2006, 12:11 AM
#1206
Originally Posted by mikezap
hey guys, im sure this has been asked before, but wich starter box will work well with the 8ight without me having to dremel out the chassis? thanks
12-31-2006, 12:40 AM
#1207
I'm using the Kyosho box. Fits well and has a small diameter wheel.
12-31-2006, 04:59 AM
#1208
Tech Adept
ofna 10256 works great and is not expensive.
12-31-2006, 12:48 PM
#1209
Originally Posted by zeteckat
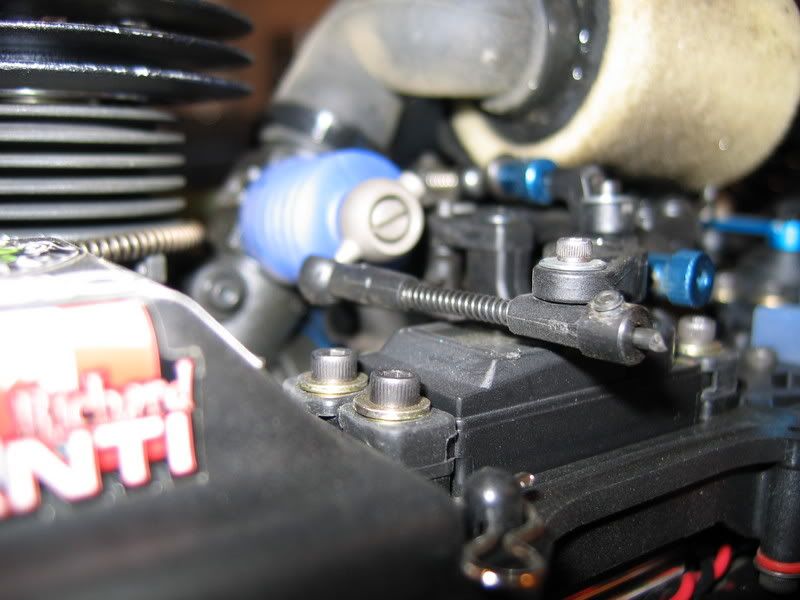
Here is a better pic of my linkage. Still learning my new camera. The linkage came slightly angled from the factory. It is angled more now that I put the rubber grommets in. It has never been in line.
No wonder my throttle servo failed !!
No wonder my throttle servo failed !!
12-31-2006, 12:55 PM
#1210
Tech Addict
hey guys, I'm finishing up putting my 8ight together. I like the tires that Losi included. Can't wait to hit a loamy track with those step pins. Just curious, are the foams that are included any good or should I change to a more appropriate longer lasting foam?
12-31-2006, 01:47 PM
#1211
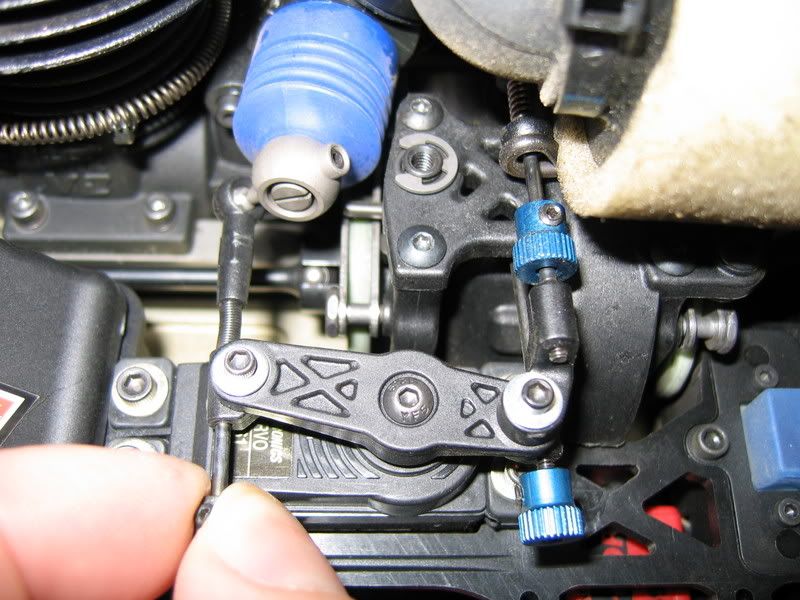
Alright, here is my run threw on how I setup my throttle/brake servo, linkage and brakes..... I now have over 6 hours track time and 1 1/2 gallons threw my car getting over 10 minutes per tank with zero issues on my car! :cheers: No leaky shocks, no leaky diffs and no servo issues. I've beat this car hard!! Only thing I've broken is one upper front shock standoff and that was from landing upside down off the big "quad" jump on concrete like clay!!
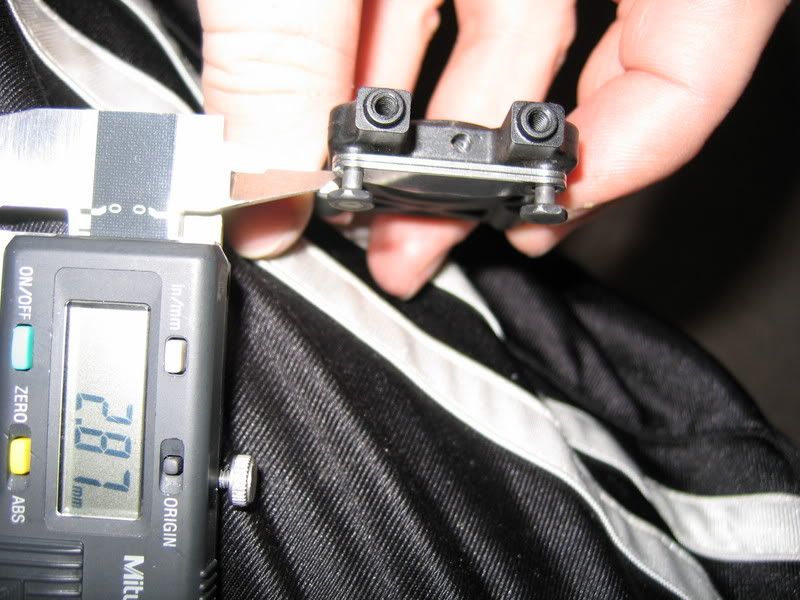
We'll start off with the brakes. I'm sure most of you know how to setup your brake pad clearance but I mine as well run threw the whole setup. There is no need for more than 0.5mm brake rotor to pad clearance. First measure your brake pad
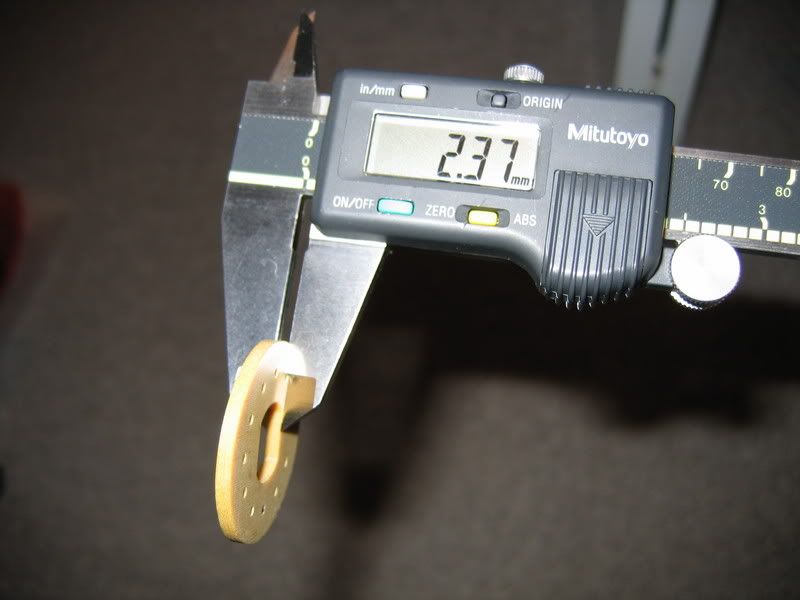
Then add 0.5mm to your brake pad measurement and then set your clearance by measuring between the head of the screw and both pads combined. make sure to make both sides as equal as possible as this will result in better pad contact to the rotor.
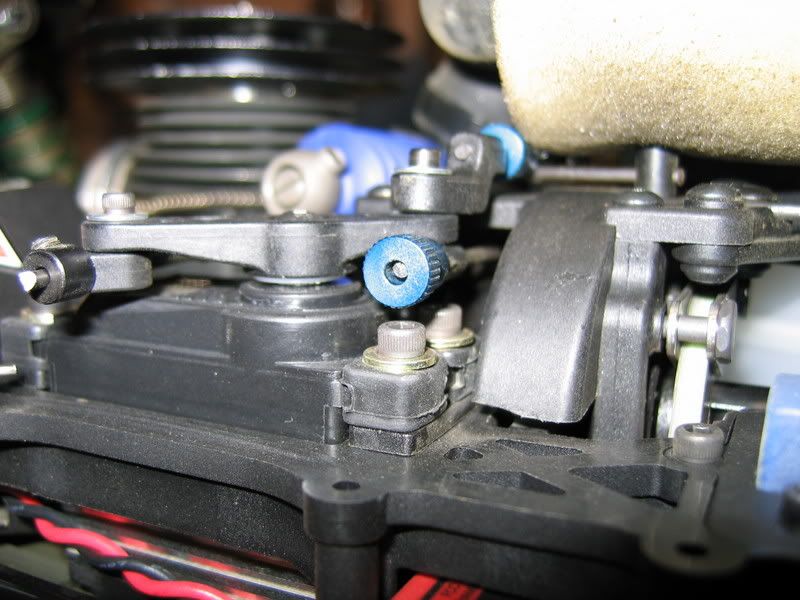
Now install your throttle/brake servo onto the radio tray. Use the rubber grommets and spacers. The rear of the radio tray is slotted to allow for different sized servo's. You want to make sure that the slotted portion of the radio tray is 2-3mm away from the servo case to allow for flex. In this picture you can see that the rear of my radio tray has this 2-3mm clearance.
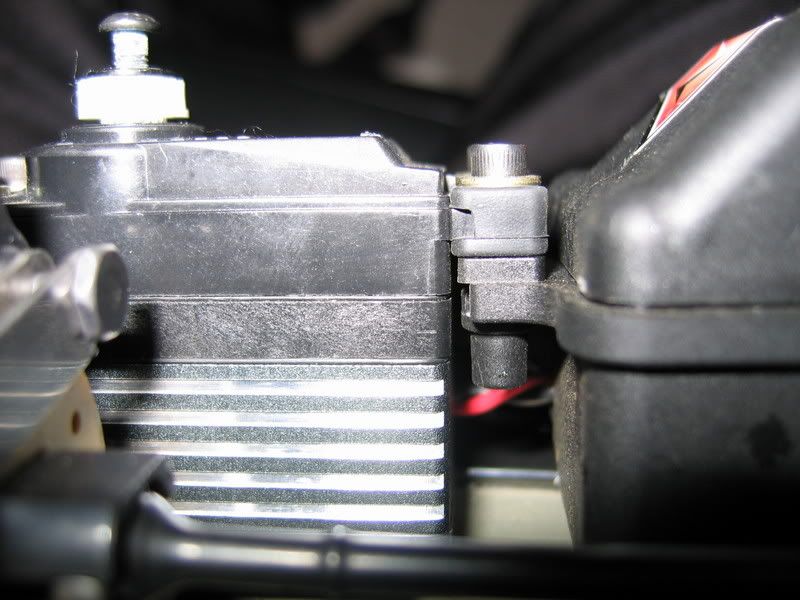
In this picture I am compressing the radio tray to simulate chassis flex and you can see the rear of the radio tray has slid about 2mm towards the servo.
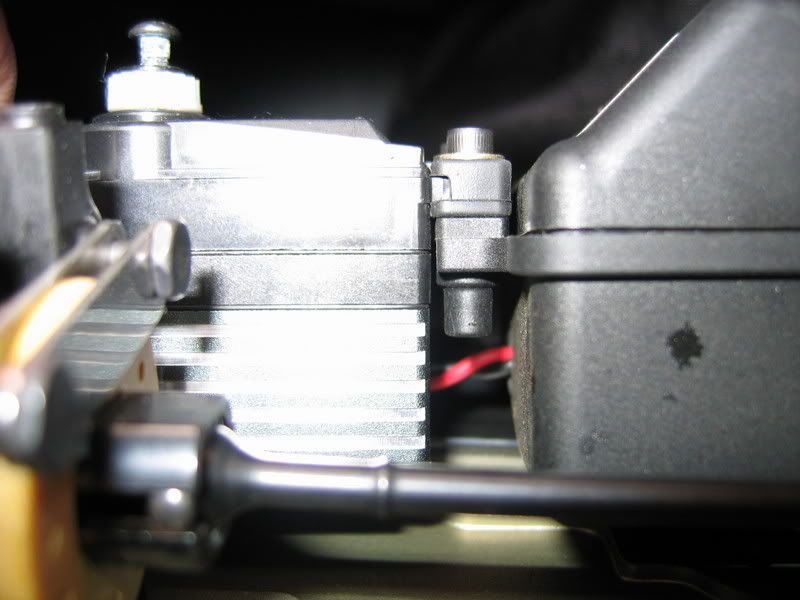
This is the area that you have to make sure you have enough clearance. If your servo fits tight into the radio tray, grind back this part of the radio tray so that you have this 2-3mm clearance. You'll also want to make sure that the slots for the rear bolts are deep enough to allow the rear of the radio tray to slide as well. When bolting your servo to the radio tray, just wind the scews down until they touch the washers. Then maybe another 1/8 to 1/4 turn after that. You should be able to slide the washer around with your finger nail or small screw driver quite easily. Take your time on this step making sure the radio tray slides back and forth easily when you simulate chassis flex.
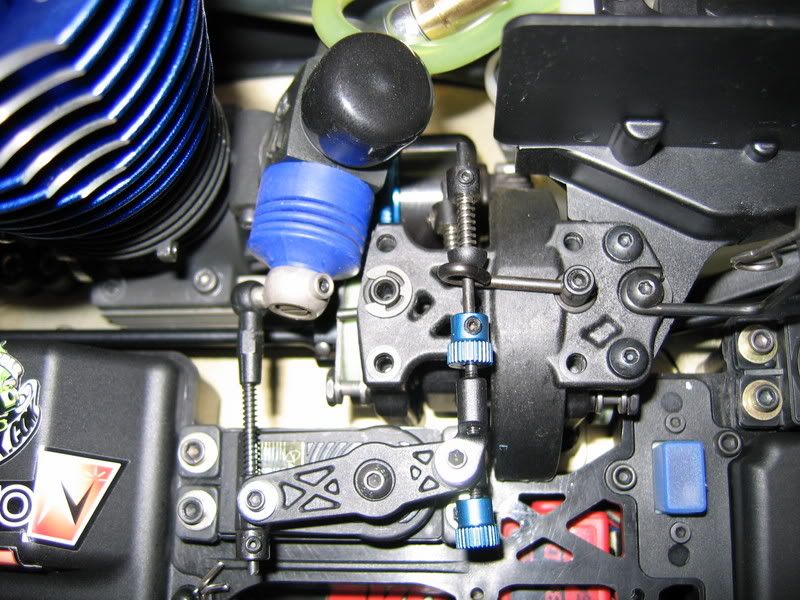
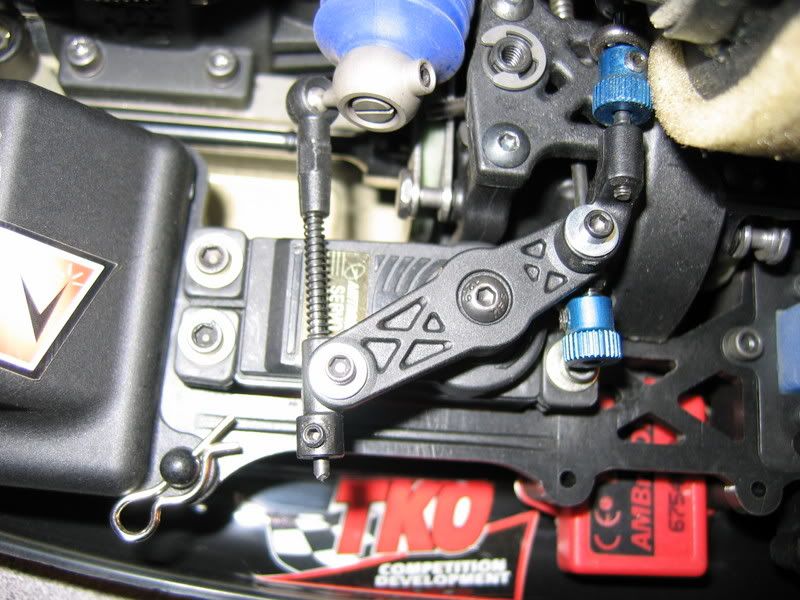
The angle of the picture is a little off but my carb has about another 1mm clearance than what the picture shows. I spent some time grinding the top diff plate so I wouldn't have to angle my carb as much. Again, the more time you spend doing things like this the more you will be rewarded
Also when installing the rear brake cam insert into the top diff plate make sure it "pops" in all the way(sometimes it takes 2 "pops") or when you tighten the rear screws down your rear brake cam will bind! There is no need to run the rear top diff plate screws loose when the rear brake insert has been installed properly.
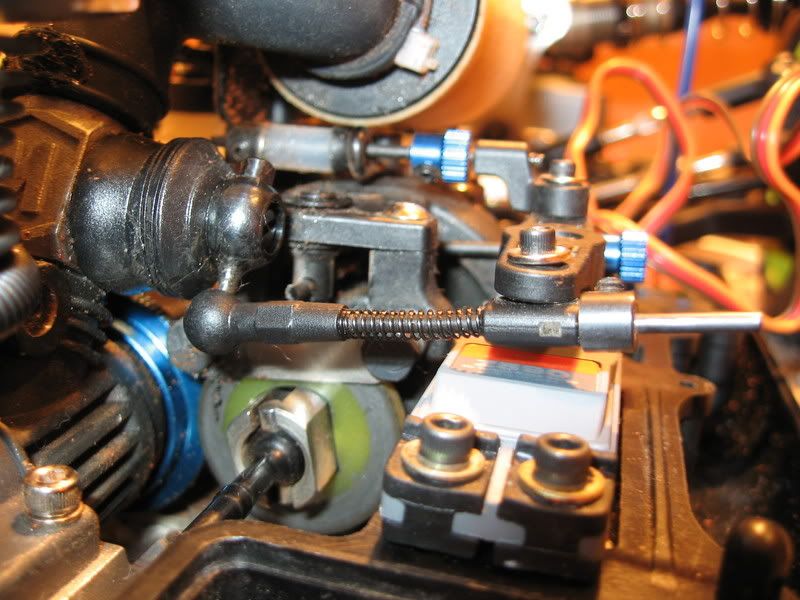
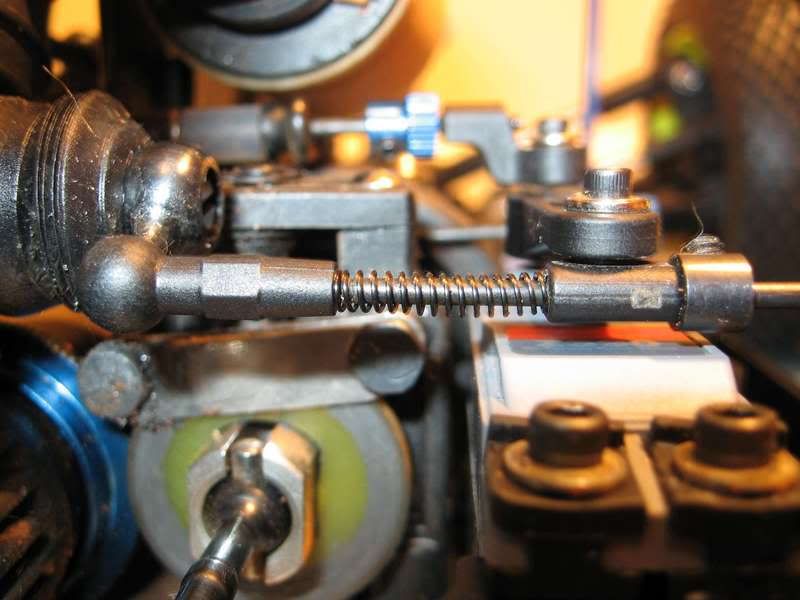
Now we move onto the linkage. If using the stock throttle return spring you must trim down the ball cup 2-3mm. You want to make sure you have enough clearance for your linkage "stops" to servo case. Here you can see that I thought I had enough cearance(I had 1mm clearance first time around) but after running the car on the track for a bit you can see that my throttle "stops" made some contact with the servo case. Not good.
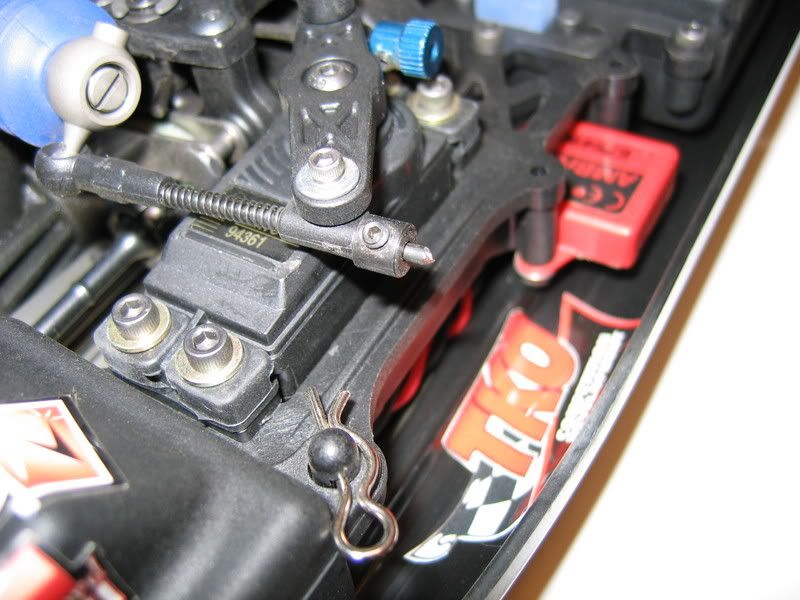
When I first assembled the linkage it would actually touch the servo case barely. What I did to make room was grind some material away from the plastic part that the washer touches when screwing the throttle and brake linkages to the servo horn. There is quite a bit of play there in stock form so you want to take your time grinding a little off this area at a time until you have around 0.5mm clearance. This is enough clearance to prevent binding and it helps raise the "stops" about 1mm from the servo case. After realizing that 1mm clearance was not enough I installed a small washer I had that was 1mm thick between the servo horn and servo horn insert. After running my car at the track again my "stops" have not made contact again. Here is what the clearance looks like now after installing the washer.
Also this is the time to rotate your carb "pivot" where the linkage attaches too to make sure your linkage is 100% parallel so you don't have any binding.
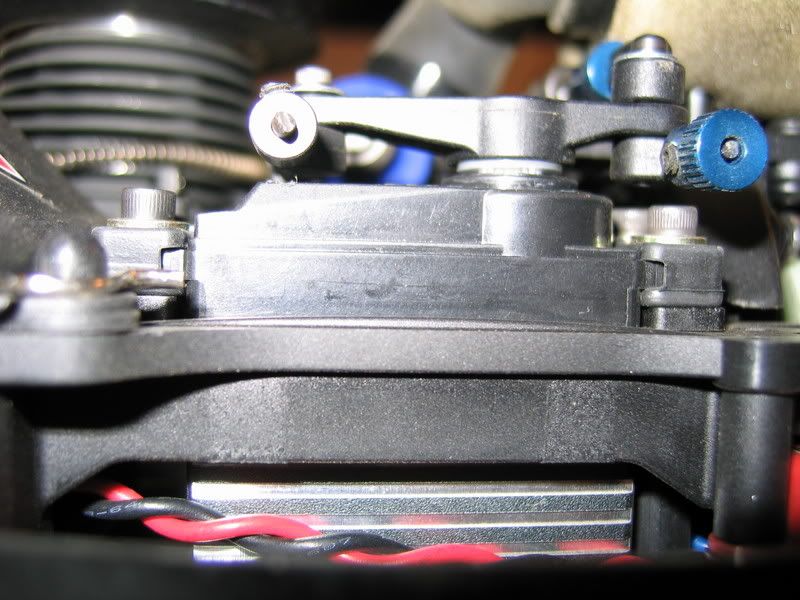
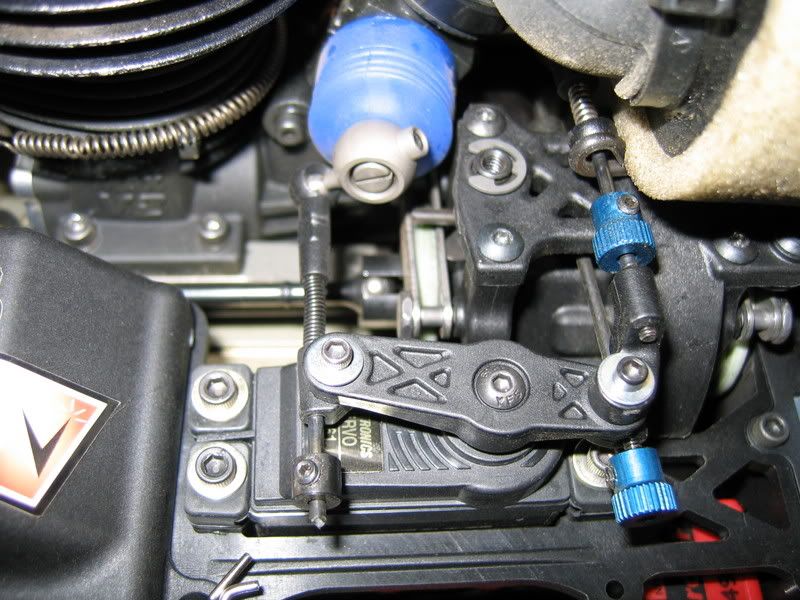
Now take your time and set your brake "stops" so that the brakes start applying pressure after very little servo movement. I make both front and rear brakes feal about equal right now and will adjust my bias to what I like with the brake collars at the track. Also take your time now to make sure that you have at least 2mm clearance everywhere for your brake linkage on both the servo side and on the other side of the centre diff where the brake "stops" are.
So now that your brake linkage is set pretty close we can move on to setting your epa's. You NEVER want your throttle opening 100%. All thats needed is about 90-95%. Chassis don't just flex front to back. They also flex side to side so if your throttle is open 100% and your chassis is flexing your servo is being strained quite a bit! Here is how to check this out. With your radio on set your epa to what you think is 90-95% fully open.
Now with the throttle still fully opened you should be able to grab the throttle "stop" and pull the carb open at least 1mm more.

We're almost there. The 8ight doesn't take much brake pressure to make it stop. How I ruff this in is just by putting my finger threw the opening on the bottom of the chassis and spin the spur gear over with my finger. I increase the epa on the brakes until I can barely turn the spur over with my finger. This will get you pretty close on the track. You may have to add 5% or so once on the track. So now that the brake epa is set we can move onto to checking any possible binding in the brakes. Again with the radio on apply the brakes 100%(with epa set properly of course).
Now grab the throttle linkage again and pull it towards you. The carb should open a minumum of 0.150 of an inch(close to 3/16 of an inch) to allow for flex and that you will probably apply more brakes at the track once the car has been run.
Now go out and enjoy the fastest buggy to hit the track :cheers: I can pretty much garuntee if you follow these steps you will NOT have any throttle servo issues that are related to the car. If you have any questions please feal free to post hear or email me I did use Kyosho linkage springs on my car as I feal the brake springs make the braking a little more "linear" and the throttle return spring has about 50% of the pressure of the stock Losi spring. Being that I used the Kyosho throttle return spring I did not need to trim down the ball cup as the Kyosho spring is much shorter than the stock Losi one. Again this is not neccessary but something I wanted to do. I hope this helps out at least a few of you out there.
We'll start off with the brakes. I'm sure most of you know how to setup your brake pad clearance but I mine as well run threw the whole setup. There is no need for more than 0.5mm brake rotor to pad clearance. First measure your brake pad
Then add 0.5mm to your brake pad measurement and then set your clearance by measuring between the head of the screw and both pads combined. make sure to make both sides as equal as possible as this will result in better pad contact to the rotor.
Now install your throttle/brake servo onto the radio tray. Use the rubber grommets and spacers. The rear of the radio tray is slotted to allow for different sized servo's. You want to make sure that the slotted portion of the radio tray is 2-3mm away from the servo case to allow for flex. In this picture you can see that the rear of my radio tray has this 2-3mm clearance.
In this picture I am compressing the radio tray to simulate chassis flex and you can see the rear of the radio tray has slid about 2mm towards the servo.
This is the area that you have to make sure you have enough clearance. If your servo fits tight into the radio tray, grind back this part of the radio tray so that you have this 2-3mm clearance. You'll also want to make sure that the slots for the rear bolts are deep enough to allow the rear of the radio tray to slide as well. When bolting your servo to the radio tray, just wind the scews down until they touch the washers. Then maybe another 1/8 to 1/4 turn after that. You should be able to slide the washer around with your finger nail or small screw driver quite easily. Take your time on this step making sure the radio tray slides back and forth easily when you simulate chassis flex.
The angle of the picture is a little off but my carb has about another 1mm clearance than what the picture shows. I spent some time grinding the top diff plate so I wouldn't have to angle my carb as much. Again, the more time you spend doing things like this the more you will be rewarded
Also when installing the rear brake cam insert into the top diff plate make sure it "pops" in all the way(sometimes it takes 2 "pops") or when you tighten the rear screws down your rear brake cam will bind! There is no need to run the rear top diff plate screws loose when the rear brake insert has been installed properly.
Now we move onto the linkage. If using the stock throttle return spring you must trim down the ball cup 2-3mm. You want to make sure you have enough clearance for your linkage "stops" to servo case. Here you can see that I thought I had enough cearance(I had 1mm clearance first time around) but after running the car on the track for a bit you can see that my throttle "stops" made some contact with the servo case. Not good.
When I first assembled the linkage it would actually touch the servo case barely. What I did to make room was grind some material away from the plastic part that the washer touches when screwing the throttle and brake linkages to the servo horn. There is quite a bit of play there in stock form so you want to take your time grinding a little off this area at a time until you have around 0.5mm clearance. This is enough clearance to prevent binding and it helps raise the "stops" about 1mm from the servo case. After realizing that 1mm clearance was not enough I installed a small washer I had that was 1mm thick between the servo horn and servo horn insert. After running my car at the track again my "stops" have not made contact again. Here is what the clearance looks like now after installing the washer.
Also this is the time to rotate your carb "pivot" where the linkage attaches too to make sure your linkage is 100% parallel so you don't have any binding.
Now take your time and set your brake "stops" so that the brakes start applying pressure after very little servo movement. I make both front and rear brakes feal about equal right now and will adjust my bias to what I like with the brake collars at the track. Also take your time now to make sure that you have at least 2mm clearance everywhere for your brake linkage on both the servo side and on the other side of the centre diff where the brake "stops" are.
So now that your brake linkage is set pretty close we can move on to setting your epa's. You NEVER want your throttle opening 100%. All thats needed is about 90-95%. Chassis don't just flex front to back. They also flex side to side so if your throttle is open 100% and your chassis is flexing your servo is being strained quite a bit! Here is how to check this out. With your radio on set your epa to what you think is 90-95% fully open.
Now with the throttle still fully opened you should be able to grab the throttle "stop" and pull the carb open at least 1mm more.
We're almost there. The 8ight doesn't take much brake pressure to make it stop. How I ruff this in is just by putting my finger threw the opening on the bottom of the chassis and spin the spur gear over with my finger. I increase the epa on the brakes until I can barely turn the spur over with my finger. This will get you pretty close on the track. You may have to add 5% or so once on the track. So now that the brake epa is set we can move onto to checking any possible binding in the brakes. Again with the radio on apply the brakes 100%(with epa set properly of course).
Now grab the throttle linkage again and pull it towards you. The carb should open a minumum of 0.150 of an inch(close to 3/16 of an inch) to allow for flex and that you will probably apply more brakes at the track once the car has been run.
Now go out and enjoy the fastest buggy to hit the track :cheers: I can pretty much garuntee if you follow these steps you will NOT have any throttle servo issues that are related to the car. If you have any questions please feal free to post hear or email me
I did use Kyosho linkage springs on my car as I feal the brake springs make the braking a little more "linear" and the throttle return spring has about 50% of the pressure of the stock Losi spring. Being that I used the Kyosho throttle return spring I did not need to trim down the ball cup as the Kyosho spring is much shorter than the stock Losi one. Again this is not neccessary but something I wanted to do. I hope this helps out at least a few of you out there.
12-31-2006, 03:36 PM
#1212
Tech Rookie
Thanks for everyone's help on here. Supermaxxrich, Excellent post!!
Anyway,
So how are we looking now??
This throttle spring I've shown. Is the the one that needs 1/8" taken off of it?
Anyway,
So how are we looking now??
This throttle spring I've shown. Is the the one that needs 1/8" taken off of it?
12-31-2006, 05:10 PM
#1213
I think that looks great alignment-wise.
The Losi stock throttle return spring is just like the spring in the front of my grandfather's 58' Caddy.
It is way too heavy for what it needs to do. The problem is it is actually strong enough to push on the servo when at neutral. This strains the servo when the car is just on and at neutral. I switched to the Traxxas servo return springs. They are very light and will close the carb fine if you have it lined up correctly.
Being on the longer side of the throttle servo arm, this spring causes the servo to strain when applying breaks. Contrary to some post on here, this spring being further away from the rotational center actually amplifies its stiffness when breaks are applied. Therefore, it requires more force from the servo to apply breaks using this spring.
I run a throttle return spring that is a Losi pull type designed for gas trucks.
Once the carb is closed it no longer has to be overcome by the rotational force of the throttle servo when applying breaks. Then only a very light spring needs to be compressed.
You will notice the pull spring wraps around and attaches to the opposite side motor mount screw.
Also you can see where the top plate was ground down and the rear break arm was shortened to provide more clearance for the carb boot's actuation.
Hope this helps,
TEX
Nice post Supermaxx!
12-31-2006, 09:16 PM
#1214
Rich-thanks for the excellent photos.
Best views I've seen for linkage
Best views I've seen for linkage
01-01-2007, 03:04 AM
#1215
Originally Posted by downtown
Rich-thanks for the excellent photos.
Best views I've seen for linkage
Best views I've seen for linkage
