


Project Team Kassanova K2 buggy


 after school and work and stuff.
  02-12-2009 | 11:17 PM
#79
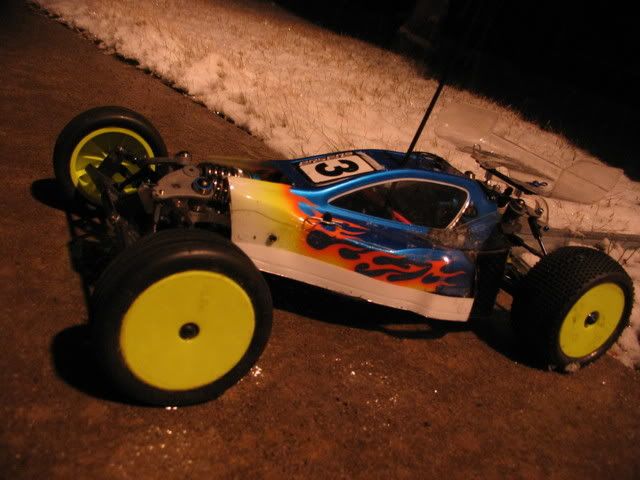
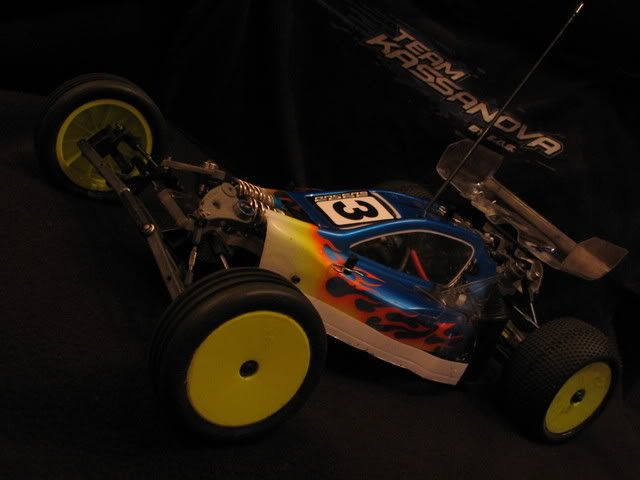
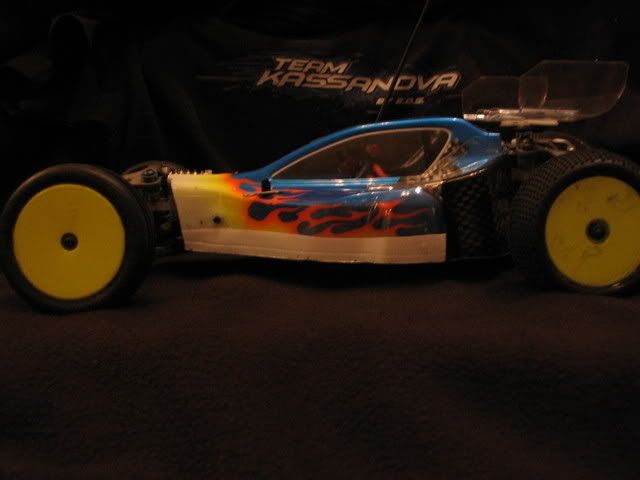
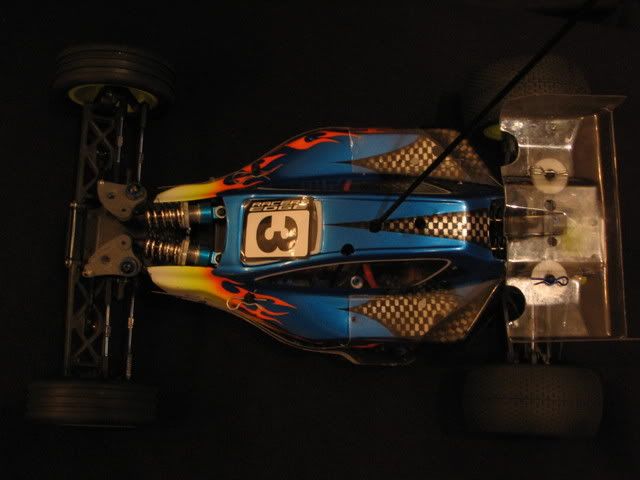
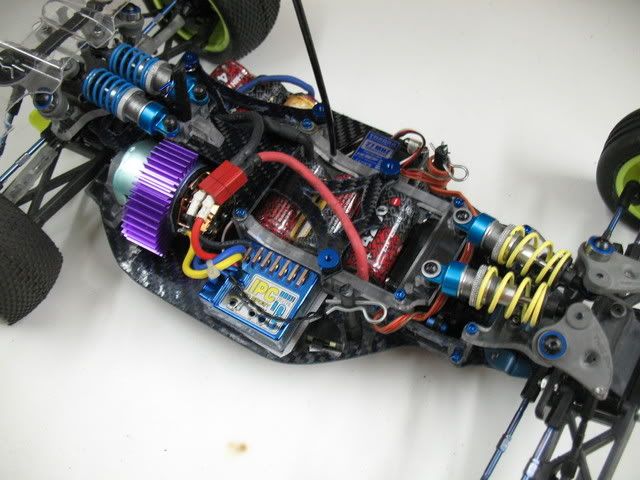
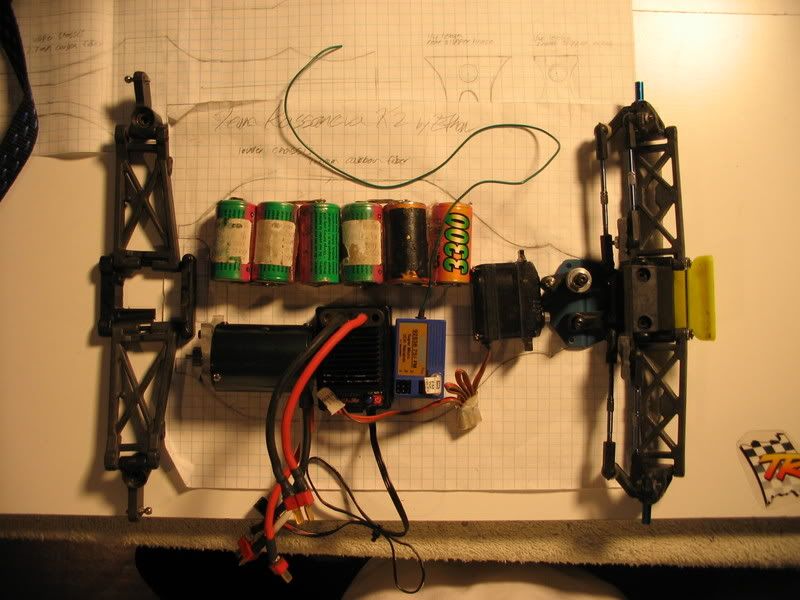
I apologize for not giving you guys an update though much progress has been made on the buggy. I successfully had the buggy in running condition by the biggest race in the state. I raced the buggy in it and my goal was just to finish one race. Unfortunately, I was not able to achieve this goal becuase of minor issues such as Cvds popping out, motor mount moving, motor getting too hot , etc. I ended up taking the rear end completely apart 3 times during the race. I have been working to resolve these problems and I think they will be taken care of after a few small tweaks here and there along with a few aluminum parts that will be coming soon. Any way though its about 98% done I just have a few small touch ups and setting up to do along with extensive testing. Here are some pictures of it 98%. When its a 100% I will be having even better pictures taken by a friend of mine. Along with a video of a racer friend of mine driving it. The future for this machine is unsure but it got aton of weird stares and alot of attention at the race. After I get the aluminum motor mount and custom modified Cva's and get some extra parts this is going to be shipped down to Florida for a photo shoot and testing and then up to Michigan for more testing and a video. Enough of me talking and on to the pictures. I would like to thank my friend Kyle for painting me up the body
Ethan
Team Kassanova

Ethan
Team Kassanova
02-13-2009 | 11:51 AM
#81
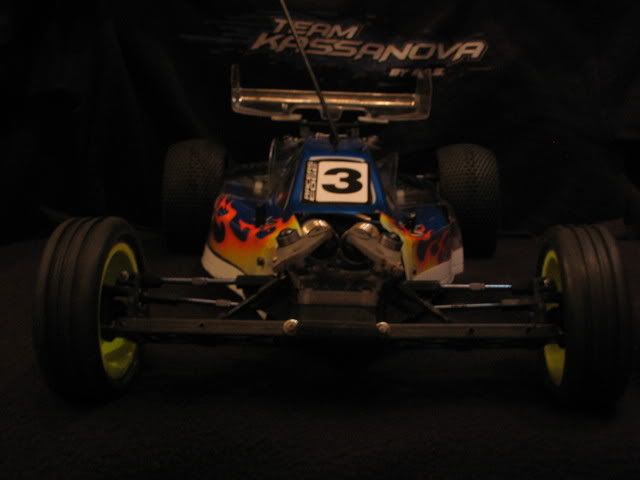
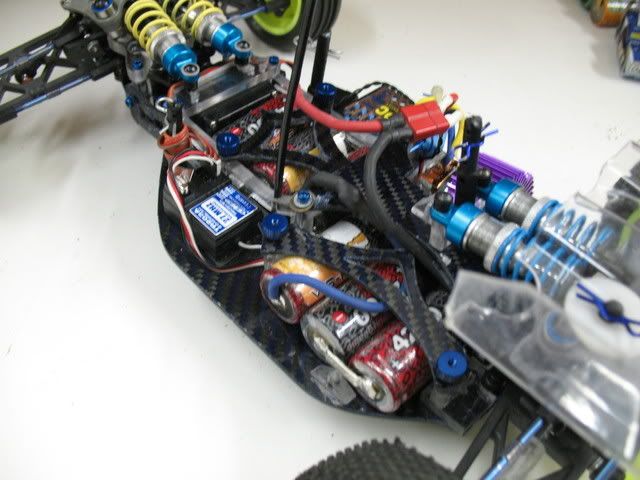
Its about 1644 grams with nimh batteries in it if I remeber correctly. The roar minimum is 1499 grams.
I also noticed that in the last picture. I think when I was tightening the mounting screws the motor mount tilted alil bit. Thicker screws and am aluminum motor mount will fix that.
I also noticed that in the last picture. I think when I was tightening the mounting screws the motor mount tilted alil bit. Thicker screws and am aluminum motor mount will fix that.
02-13-2009 | 07:01 PM
#83
Joined: Jun 2008
Posts: 3,301
From: Conducting aggressive board meetings at my local track
Killer idea for a car. Reminds me of the X-11 Predator 4wd. I like the F-1 style suspension.
If there was a possible way to modify the rear input slipper shaft to allow the cells to run in a straight line it would allow the use of a wider variety of LiPo cells. LiPo saddles aren't too plentiful and the extra wires on them may make installing them in the car difficult.
If there was a possible way to modify the rear input slipper shaft to allow the cells to run in a straight line it would allow the use of a wider variety of LiPo cells. LiPo saddles aren't too plentiful and the extra wires on them may make installing them in the car difficult.
 02-14-2009 | 11:24 AM
#86
Robk: Thanks 
SpraydbySprague:Yea I have gotten that it looks like the X11 quiet abit. And it does look like it and I like sleek with out shock towers.
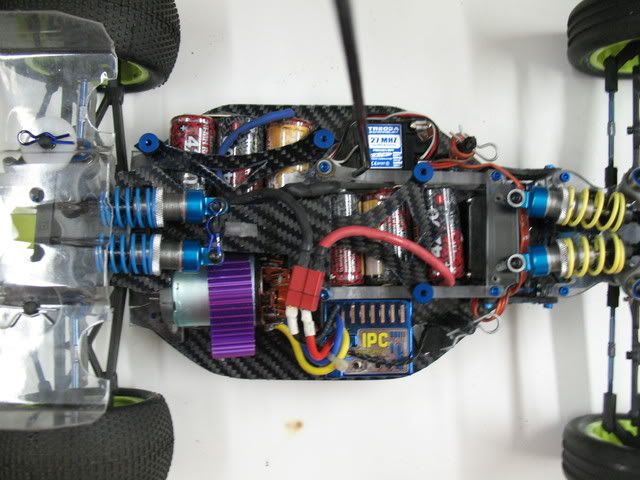
As far as a stick pack...I am still considering making a new upper deck and chassis stiffeners to accommodate this layout..
I made sure the chassis is wide enough to fit a stick pack in just in case I wanted to run a stick pack instead of saddles. So I may or may not try that layout.
Joaf: Haha actually quiet afew people have been asking about a production model. I would love to make a CNC'ed production model if this turns out to handle well. Its a possibility down the road.. so we will see
I do plan on getting a new Reedy 5100mah HardCase saddle for this and my other projects once it becomes in stock and once funding allows it. I'm done with nimh and brushed. Definatly going brushless and lipo. My goal though with weight is with lipo packs to make it about as light as a B4 of XXX-cr with Nimh packs.
Jammin: Yea the things on my list to do is getting shorter and shorter..
but then I keep on thinking of more and more stuff that I have to do on it. Like make parts for different battery layouts. But right now for this layout I just have a few cosmetic things left to do.
Ethan
Team Kassanova
SpraydbySprague:Yea I have gotten that it looks like the X11 quiet abit. And it does look like it and I like sleek with out shock towers.
As far as a stick pack...I am still considering making a new upper deck and chassis stiffeners to accommodate this layout..
I made sure the chassis is wide enough to fit a stick pack in just in case I wanted to run a stick pack instead of saddles. So I may or may not try that layout.
Joaf: Haha actually quiet afew people have been asking about a production model. I would love to make a CNC'ed production model if this turns out to handle well. Its a possibility down the road.. so we will see
I do plan on getting a new Reedy 5100mah HardCase saddle for this and my other projects once it becomes in stock and once funding allows it. I'm done with nimh and brushed. Definatly going brushless and lipo. My goal though with weight is with lipo packs to make it about as light as a B4 of XXX-cr with Nimh packs.
Jammin: Yea the things on my list to do is getting shorter and shorter..
but then I keep on thinking of more and more stuff that I have to do on it. Like make parts for different battery layouts. But right now for this layout I just have a few cosmetic things left to do.
Ethan
Team Kassanova
04-02-2009 | 10:22 PM
#87
Since my last update I have been busy with School,work,running track,and ofcourse spending time with my girlfriend. I haven't had much time to work on r/c's but I'm on spring break right now so I have gotten a chance to catch up with this project along with others.Last couple of days I have started to plan out how to fix the problems that I was having at the track a couple months ago. I finally got this thing torn down to inspect for where my problems where coming from. After tearing it down I have realized that major changes need to be made and my current design can not offer these solutions.. thus I have started to plan Version 2.
If you prefer to not read all the boring details please scroll down and read the bolded section to find the main points and changes that will be made.
The problems that I experienced wile testing for the first time included:
-Motor getting so hot the wires came unsoldered
This later was fixed by installing a larger spur gear and smaller pinion. I will continue to research a desired FDR but a brushless esc and motor should help with this problem.
-Cvd's popping out of the outdrives
The angle of the cvd going down from the outdrive to the hub carrier was too great when the a-arms are parellel to the ground causing a large amount of "plunge" in the outdrive during down travel and up-travel. At full down travel this causes the Cvd to come out of the outdrive while the full up travel cannot be achieved becuase the end of the cvd hits the end of the outdrive.
-Un-realiable gear mesh
-weak rear chassis plate
These two problems go hand and hand. Both have to do with the weakness of the rear chassis plate and how it was mounted. I made a seperate carbon fiber rear chassis plate so if the rear of the chassis broke this is the only part that would need to be replaced instead of the entire chassis. Unfortunatly the way I mounted the piece to the main chassis caused alot of flex and movement. When landing from jumps the gear-mesh was up-set. Partly this may be becuase of the motor mount but it might also because of the movement and flexibility in this area.
-Bump-steer
Caused by a difference of angles and heights between the servo saver and the steering blocks.
-bottoming out front end
Even with my stiffest touring car springs up front the front kept bottoming out even when dropped from a foot or so. There is too much leverage in the rockers.
Though these problems maybe small ones they kept me from being able to run the car and are caused by major design flaws. My plan of action to eliminate thoughs problems are quiet exstinsive and will require a re-design of most of the car. This is a major set back but I am finding it is part of making custom cars.
Plans for the Team Kassanova K2 V2 are as follows:
-Laydown suspension
-Entire new chassis
-Team Associated Gt2 front chassis plate and bulkhead along with all the steering components.
-B44 Slipper clutch
-B44 rear end
-Custom body
-Electronic/motor layout similar to the B44 the layout can be seen here:
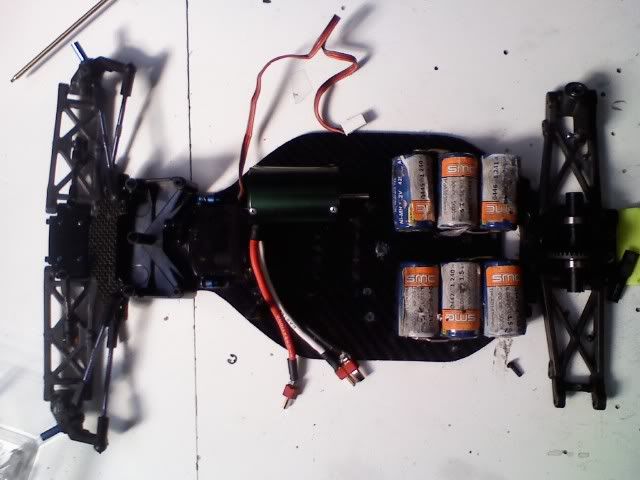
The Gt2 front end,New layout, and B44 rear end will require a completely new upper and lower chassis along with many other associated parts like rocker mounts. Yes, I the new version will have laydown shocks in the front and rear.
The Gt2 front end will add durability and eliminate most of the bump steer because the servo saver/steering is at an angle. This also eliminates the modifications that I had to do to the b4 a-arms to fit the T3 bulkhead.
The B44 Slipper clutch will fix the problems I was having with the motor mount and will spin more free than the Tc3”0” slipper clutch and it will also be more adjustable.
The new electronic layout and b44 rear end are my solutions to the Weak rear chassis plate, inconsistent gear mesh, and cvd plunge. All these problems go hand and hand along with the solutions. The b44 rear chassis plate will be much stronger than my carbon rear plate and is much easier replaced. This will also solve any other gear mesh problems I was having caused by the flex in my rear plate and how it was mounted . This requires a B44 differential case that would lower the clutch too lower and cause the spur gear to stick out of the bottom of the car if I used the same motor and clutch location as my last design. Thus I have to move the motor forward on the chassis so that the spur can be at the right height. The B44 diff case and will lower the differential and decrease the angle that the Cvd’s are at thus decreasing the Cvd plunge.
After trying to bolt too bodies together (b4 and xxx-4) I have decided to make my own body. The body shown in my pictures worked well but it turned out to be very hard to paint and I feel making my own body will be a nice challenge and will help make this project more professional.
To conclude this giant mess of words I’m redesigning most of this project. And I have found that this is a part of engineering and making your own cars. There is a lot of trial and error that must take place. In the end though I believe these major changes should give me an over all better car that will handle better, be more durable, and be more reliable. I will be inputting more factory made parts and this should help with the problems I have been having and make part replacement much easier.
Ethan
Team Kassanova.
If you prefer to not read all the boring details please scroll down and read the bolded section to find the main points and changes that will be made.
The problems that I experienced wile testing for the first time included:
-Motor getting so hot the wires came unsoldered
This later was fixed by installing a larger spur gear and smaller pinion. I will continue to research a desired FDR but a brushless esc and motor should help with this problem.
-Cvd's popping out of the outdrives
The angle of the cvd going down from the outdrive to the hub carrier was too great when the a-arms are parellel to the ground causing a large amount of "plunge" in the outdrive during down travel and up-travel. At full down travel this causes the Cvd to come out of the outdrive while the full up travel cannot be achieved becuase the end of the cvd hits the end of the outdrive.
-Un-realiable gear mesh
-weak rear chassis plate
These two problems go hand and hand. Both have to do with the weakness of the rear chassis plate and how it was mounted. I made a seperate carbon fiber rear chassis plate so if the rear of the chassis broke this is the only part that would need to be replaced instead of the entire chassis. Unfortunatly the way I mounted the piece to the main chassis caused alot of flex and movement. When landing from jumps the gear-mesh was up-set. Partly this may be becuase of the motor mount but it might also because of the movement and flexibility in this area.
-Bump-steer
Caused by a difference of angles and heights between the servo saver and the steering blocks.
-bottoming out front end
Even with my stiffest touring car springs up front the front kept bottoming out even when dropped from a foot or so. There is too much leverage in the rockers.
Though these problems maybe small ones they kept me from being able to run the car and are caused by major design flaws. My plan of action to eliminate thoughs problems are quiet exstinsive and will require a re-design of most of the car. This is a major set back but I am finding it is part of making custom cars.
Plans for the Team Kassanova K2 V2 are as follows:
-Laydown suspension
-Entire new chassis
-Team Associated Gt2 front chassis plate and bulkhead along with all the steering components.
-B44 Slipper clutch
-B44 rear end
-Custom body
-Electronic/motor layout similar to the B44 the layout can be seen here:
The Gt2 front end,New layout, and B44 rear end will require a completely new upper and lower chassis along with many other associated parts like rocker mounts. Yes, I the new version will have laydown shocks in the front and rear.
The Gt2 front end will add durability and eliminate most of the bump steer because the servo saver/steering is at an angle. This also eliminates the modifications that I had to do to the b4 a-arms to fit the T3 bulkhead.
The B44 Slipper clutch will fix the problems I was having with the motor mount and will spin more free than the Tc3”0” slipper clutch and it will also be more adjustable.
The new electronic layout and b44 rear end are my solutions to the Weak rear chassis plate, inconsistent gear mesh, and cvd plunge. All these problems go hand and hand along with the solutions. The b44 rear chassis plate will be much stronger than my carbon rear plate and is much easier replaced. This will also solve any other gear mesh problems I was having caused by the flex in my rear plate and how it was mounted . This requires a B44 differential case that would lower the clutch too lower and cause the spur gear to stick out of the bottom of the car if I used the same motor and clutch location as my last design. Thus I have to move the motor forward on the chassis so that the spur can be at the right height. The B44 diff case and will lower the differential and decrease the angle that the Cvd’s are at thus decreasing the Cvd plunge.
After trying to bolt too bodies together (b4 and xxx-4) I have decided to make my own body. The body shown in my pictures worked well but it turned out to be very hard to paint and I feel making my own body will be a nice challenge and will help make this project more professional.
To conclude this giant mess of words I’m redesigning most of this project. And I have found that this is a part of engineering and making your own cars. There is a lot of trial and error that must take place. In the end though I believe these major changes should give me an over all better car that will handle better, be more durable, and be more reliable. I will be inputting more factory made parts and this should help with the problems I have been having and make part replacement much easier.
Ethan
Team Kassanova.
Last edited by eds24; 04-02-2009 at 10:53 PM.
04-27-2009 | 08:39 AM
#88
Tech Apprentice
iTrader: (3)
Joined: Apr 2009
Posts: 52
From: Indiana, USA
Just found this project while searching a few other things...
Very nice work, and creative layout/design. You could have a real weapon on your hands when it's all said and done.
Too bad you don't have access to a mill and some aluminum stock, you could probably beef things up quite a bit beyond the lexan bits.
Anyway, as said, very nice work, keep it up!
Very nice work, and creative layout/design. You could have a real weapon on your hands when it's all said and done.
Too bad you don't have access to a mill and some aluminum stock, you could probably beef things up quite a bit beyond the lexan bits.
Anyway, as said, very nice work, keep it up!
04-27-2009 | 02:37 PM
#89
Joined: Jun 2008
Posts: 3,301
From: Conducting aggressive board meetings at my local track
Instead of the GT2 front kick up, how about using the front of a B4 chassis. Obviously you would need to cut the front clip off and somehow bolt it to your graphite chassis. I think the narrower profile of the B4 chassis kick up would be better for a 2wd buggy. Just a thought.
05-06-2009 | 09:57 PM
#90
I have alil less than a month of school left and unfortunatly its the busiest month of the school year so I won't be able to work on this or my other projects until school is over but.. once summer comes watch out..
Digitalsolo: Thanks alot for your comments.
Yea I also wish I had access to a mill to make aluminum parts. Though on the finished one I plan on replacing the lexan with delrin depending on the weight difference. Most of the parts that I used lexan on aren't really high stress area's though. I also haven't had problems with the lexan breaking on me just the carbon fiber.
Again thank you for your kind words.
Sprayd: Unfortunatly if cut the front off a B4 chassis then it wouldn't be flush with the bottom of the chassis. Also I have seen this done and it sorta looks a bit hack. It would probaly be better as far as width goes in the front but other than that I don't see a huge advantage. I will keep that in mind though.
Thanks,
Ethan
Team Kassanova
Currently Active Users Viewing This Thread: 1 (0 members and 1 guests)
