


Rookie Build


 03-12-2014, 06:41 PM
#17
Ok, here we go. Just like my last post, eliminate the space between the https and the colon to fix the link.
Pic of the first page of the instruction manual plus all the parts specified by the page.

Inserted the differential outer joint into the pulley and added the o-ring to it.

Added 3 spacers and put the retaining pin thru the hole in the outer joint.

Added the 18 tooth bevel gear.

Inserted the differential outer joint into the differential gear housing. Added the o-ring to it.

Added 3 spacers and put the retaining pin thru its hole.

Added the 18 tooth bevel gear.

Second page of the differential and its initial parts.
[img]https ://lh6.googleusercontent.com/-rajQabvccE4/UyDHDDctLzI/AAAAAAAAAxk/L4TzrV-fYF0/w1358-h765-no/P3120333.JPG[/img]
Internal gears assembled.

First internal gears inserted into housing.

Second internal gears inserted into hoursing.

Getting all the parts in preparation to assemble the differential from the housing and pulley components.

Filled the differential housing with silicon oil.

Placed the rubber pad in the pulley.

Preparing to insert screws to securely mount the pulley to the housing.
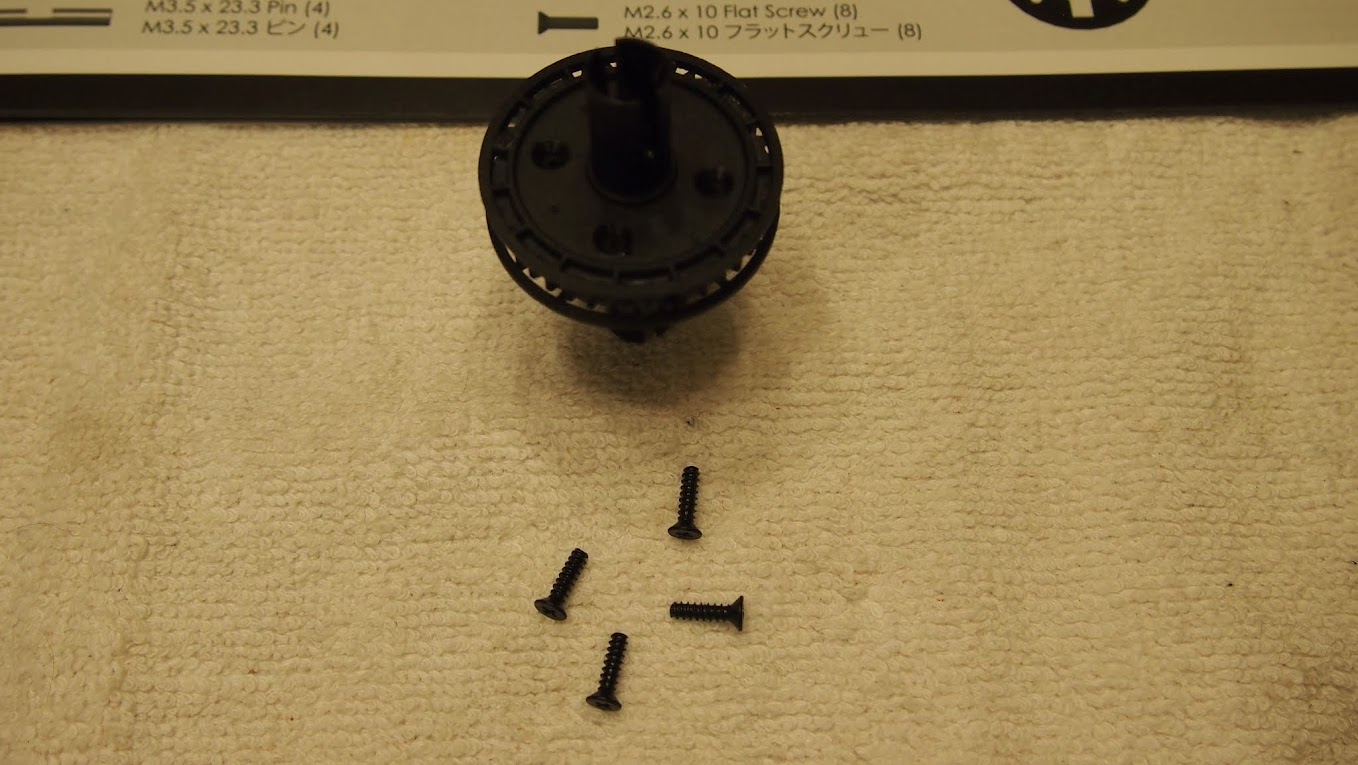
Screws inserted.

Preparing to attach bearings to the differential.

Bearings installed.

Two differentials complete.

So ends the first installment of this build.
Pic of the first page of the instruction manual plus all the parts specified by the page.
Inserted the differential outer joint into the pulley and added the o-ring to it.
Added 3 spacers and put the retaining pin thru the hole in the outer joint.
Added the 18 tooth bevel gear.
Inserted the differential outer joint into the differential gear housing. Added the o-ring to it.
Added 3 spacers and put the retaining pin thru its hole.
Added the 18 tooth bevel gear.
Second page of the differential and its initial parts.
[img]https ://lh6.googleusercontent.com/-rajQabvccE4/UyDHDDctLzI/AAAAAAAAAxk/L4TzrV-fYF0/w1358-h765-no/P3120333.JPG[/img]
Internal gears assembled.
First internal gears inserted into housing.
Second internal gears inserted into hoursing.
Getting all the parts in preparation to assemble the differential from the housing and pulley components.
Filled the differential housing with silicon oil.
Placed the rubber pad in the pulley.
Preparing to insert screws to securely mount the pulley to the housing.
Screws inserted.
Preparing to attach bearings to the differential.
Bearings installed.
Two differentials complete.
So ends the first installment of this build.
Last edited by DeltaRay; 03-15-2014 at 09:46 PM.
03-13-2014, 01:11 PM
#18
Last night I sat down to work on the car again. For some reason, on the previous night I felt I should store the differentials in a ziploc bag. I'm glad I did. The differentials had leaked most of their silicon oil. I'll have to go back, open them back up and refill. I'm a bit worried about do that as some of the screws were stripped a bit. It would probably be best to purchase some more screws. Unfortunately, my searching is not yielding any meaningful results yet, so I think I'll just purchase another set of differential parts that include the screws. Not surprisingly, HobbyKing does not have any of these parts, but the TD-10 is based on the Sakura Zero S so I looked for its parts. No one in the states seems to have any, but the over seas guys do. Anyone purchased from Integy before? Are they reputable? Do they take Paypal? I don't like buying from the chinese using a CC.
Anyway, the build will continue. There's quite a bit I can do before I need the differentials. I'll post more pics later this evening.
Anyway, the build will continue. There's quite a bit I can do before I need the differentials. I'll post more pics later this evening.
03-13-2014, 03:32 PM
#20
I'd be ordering Sakura Zero S parts, so I'm actually more concerned about the quality of the shipping, ie is it fast? Do they pack things well? Can I be assured I will get what I order?
And yes somethings was wrong. I don't think I got the screws in tight enough. I was being careful, 'cause things were getting so tight the tip of my JR phillips screw driver broke off. I switched to my Wiha set to get it as far in as I did.
And yes somethings was wrong. I don't think I got the screws in tight enough. I was being careful, 'cause things were getting so tight the tip of my JR phillips screw driver broke off. I switched to my Wiha set to get it as far in as I did.
03-13-2014, 11:19 PM
#22
So Integy has a minimum order of $40. What parts typically break on the TD-10/Sakura Zero S?
03-17-2014, 09:08 PM
#23
I've read thru some of the Sakura Zero S thread and ran into this link.
http://os.3racing.hk/articles.php?articles_key=133
Where can find M2.6x0.45 screw taps? I think I'd like a hand tool similar to what is shown in that article. My initial searches are turning up empty.
http://os.3racing.hk/articles.php?articles_key=133
Where can find M2.6x0.45 screw taps? I think I'd like a hand tool similar to what is shown in that article. My initial searches are turning up empty.
Last edited by DeltaRay; 03-17-2014 at 10:14 PM.
03-27-2014, 12:36 PM
#24
Tech Apprentice
iTrader: (19)
Delta Ray,
I just got the same car from HK two days ago. Assembled it with a spare trackstar 4000KV motor/esc combo and servo from a short cousre truck that I had. It ran great first time on the street. I still need to glue the tires though, i got too excited and almost took the tires off the rims while test driving it. Cant wait to take it on a real race track.
I just got the same car from HK two days ago. Assembled it with a spare trackstar 4000KV motor/esc combo and servo from a short cousre truck that I had. It ran great first time on the street. I still need to glue the tires though, i got too excited and almost took the tires off the rims while test driving it. Cant wait to take it on a real race track.
04-01-2014, 01:38 PM
#25
Tech Rookie
I'm sure you already got parts, but you could try tqrcracing.com for US shipped parts. I have not used them, but was going to order a 3racing car from them until I bought something else local.
04-03-2014, 08:44 PM
#26
Delta Ray,
I just got the same car from HK two days ago. Assembled it with a spare trackstar 4000KV motor/esc combo and servo from a short cousre truck that I had. It ran great first time on the street. I still need to glue the tires though, i got too excited and almost took the tires off the rims while test driving it. Cant wait to take it on a real race track.
I just got the same car from HK two days ago. Assembled it with a spare trackstar 4000KV motor/esc combo and servo from a short cousre truck that I had. It ran great first time on the street. I still need to glue the tires though, i got too excited and almost took the tires off the rims while test driving it. Cant wait to take it on a real race track.
To update you all, I've purchased some taps, ordered some replacement parts and several parts recommended in the Zero S thread. Unfortunately, I made a mistake on the original order and got the 3S-4S 10.5T motor instead of the 2S motor. I also finished the Zero S thread only to find out near the end of the thread that the Zero S has been replaced by the Xi Sport and some parts are already being phased out. The thread also introduced me to USGT and VTA. So... Needing a new motor and with new info in hand I decided to redirect this build toward 21.5 USGT car. I will also be picking up a Xi Sport in the not too distant future for a VTA build. I have a one last purchase to make, I need to decide on gearing so I can pick up a proper spur and pinion.
More pics are coming. I just haven't had time to work on it for the last few weeks.
05-21-2014, 06:57 AM
#28
Tech Addict
iTrader: (11)
try www.rcmart.com
I have been using them for quite some time and set up a mates sakura to race spec.
they are based in hong kong so don't know how postage will go for you americans, but I know they can ship to Australia in 5 working days..
Heaps of upgrades too..
I know I had to upgrade quite a few parts to get it race ready.. bits broke on the maiden race.. altho my mate was an amateur and hit the walls regulartly, but eventually we make it noob proof
Currently Active Users Viewing This Thread: 1 (0 members and 1 guests)
