Go Back  R/C Tech Forums > General Forums > Nitro Off-Road
Kyosho Inferno MP9 TKI4 1/8 Buggy Kit >

Kyosho Inferno MP9 TKI4 1/8 Buggy Kit

Like Tree321Likes

Kyosho Inferno MP9 TKI4 1/8 Buggy Kit

    Hide Wikipost
Old 11-05-2018, 09:06 AM   -   Wikipost
R/C Tech ForumsThread Wiki: Kyosho Inferno MP9 TKI4 1/8 Buggy Kit
Please read: This is a community-maintained wiki post containing the most important information from this thread. You may edit the Wiki once you have been a member for 90 days and have made 90 posts.
 
Last edit by: 30Tooth
Picked up a TKI3 and want to upgrade to TKI4 ? Here are all the updated parts:

Shocks

IF347-155 1.5X5 Pistons
IF471-01 Front Shock Body
IF470-01 Rear Shock Body
IF470-03BK Shock Adjust Dial
IFW154 Boots
IF346-05C Shock End Set

Wing

IF491BK Wing
IFW460B Wing Mount/Stay

Rear End

IFH006W Wheel
IF490 HUB
IF490-01 Hub Insert
IF492 Shock Pin
IF423HB Rear Arm
IF287 Hard Upper Rod Rear

Front End

IF489 Steering Rod Set
IF488 Knuckles
IF487H Front Arm
IFW458 Hard Lower Pin
IFW425 93MM CVD
IF286 Hard Upper Rod
IF486 Lower Susp Holder
IFW459 Servo Saver (Hard)
IF446B Ackerman Arm
IF426-64.5 Susp Shaft


Other

IF469B Filter
97035LW-13 Clutch Bell
IF453B Body Mount
IFW107GM Hexes
W300910 Washer
IF443B Center Diff Plate
IF444C Tank
IF479B Radio Box
96772 13x16x0.15mm Shim
IF481B Fuel Tank Stay
IFW336GM Wheelnut
IFB008 TKI4 Body
IFD403W TKI4 Decal

---------------------------

Another option if you want TKI4 Durability but TKI3 geometry of the front arm is :

IF493 Front Arm (Updated MP9 front arms replaces IF427B as a direct fit. Left and right.)

They use the older TKI3 captured outer hinge pin and screw. But if you just reem out the the outer hole you can use TKI hinge-pin/nut (IFW458)
---------------------------

Optional Updates / New Parts:

IFW469 IFW469 Aeration Cap Set(Threaded Big Shock/MP9)

IFW473 New Brake Pads (Sept 2017)

Optional Alu front hubs:
- IFW412 - 13 deg (like stock plastic ones)
- IFW436 - 16 deg
- IFW474 - 17.5 deg
- IFW461 - 19deg

M2C 1mm engine spacer: M2C9610

Body Options
New Bitty Force Body

Tebo's Build Videos

Video #1

Video #2

Video #3

Video #4

Video #5

Video #6

Original Kyosho MP9 TKI Thread
_____________________

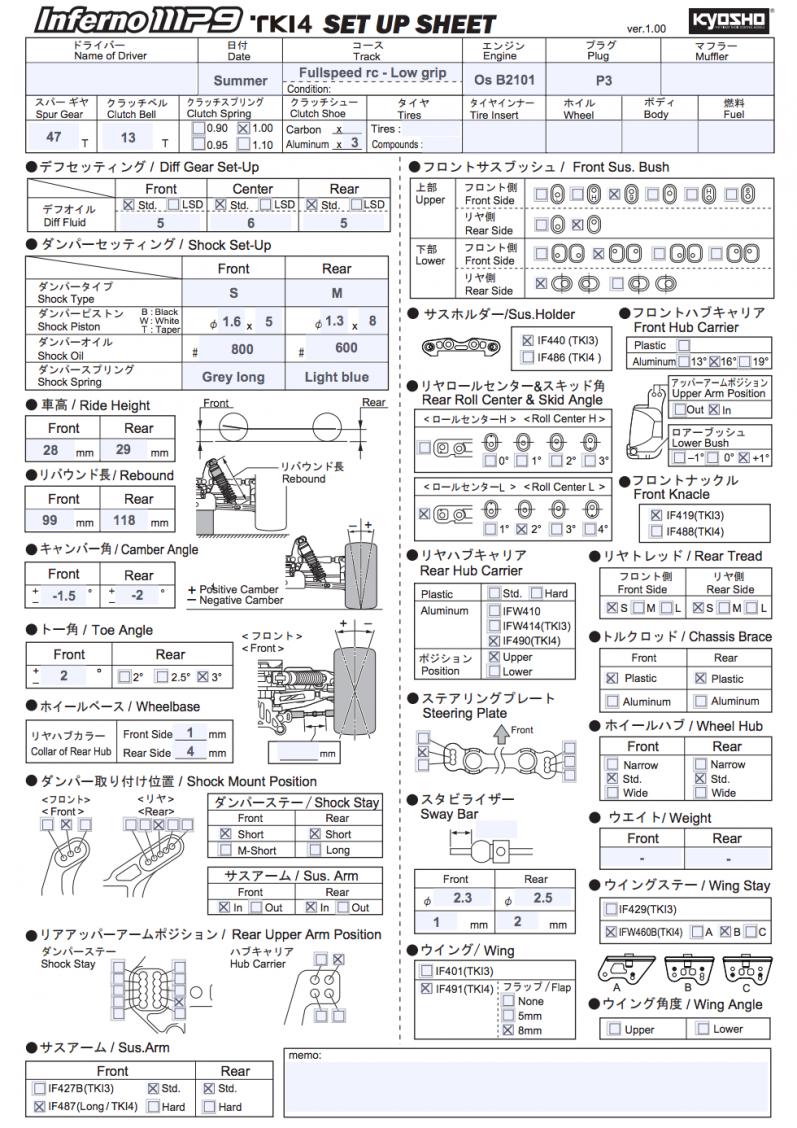
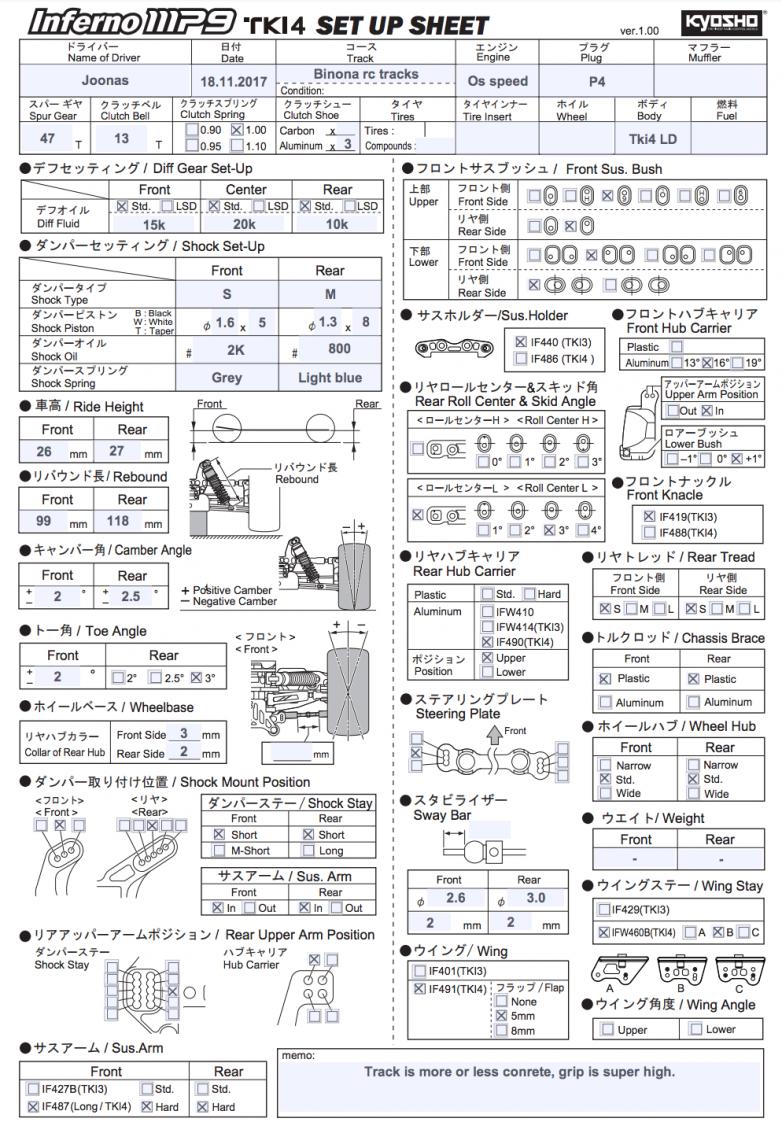
Baseline setups from Joonas.


_____________________

Shock build with vented cap and compensator.

You have to use the HC diaphragms (if346-09,stock TKI3 and if not mistaken TKI4 too, yes the thin ones no one likes), aeration caps without the bleeder screw or mod the stock caps by drilling a 1.5 or 2mm hole on the top facing up or at an angle (doesn't matter the size or angle, it just for bleeding pressure behind the diaphragm and allow the foam compensator to breathe) and a 10mm width x 3.5mm height dome shaped foam compensator made from old open cell inserts or dishwasher sponge. The foam compensator has to be soft enough not to add rebound but allow the diaphragm to regain it's shape.

Setup Sheet and Tuning

The setup sheet is getting crowded with all options but don't worry once you get acquainted with the parts will make sense.
Run the car as is, more than probably you won't need anything else. Using my setup as an example:

Diff gear has two options, normal and LSD. LSD stands for limited slip differential and is like using thick oils because you can't tune coast from locked.

Shock setup is a bit more confusing, you have two shock body sizes (S and M and truggy sized rear shocks that only the first version had so forget this one), three types of pistons (flat holes and surfaces, flat holes tapered surface and tapered holes with tapered surface): tapered have most pack, then black(simple piston) and then white because length of the holes. Then you have different length springs to account for different shock sizes, for a standard wheelbase/no weights car a good combo is Light Blue front and Orange rear, if you extend the wheelbase then I expect the included Light Blue rear springs be money instead of Orange.

Ride height is self explanatory, start always with lower arms parallel because good suspension geometry will be far easier to achieve. Rebound is used as total shock length no idea why they call it rebound, either use total shock length or maximum exposed shock shaft length. Camber self explanatory, run more camber in the front than the rear to make the car oversteer and more rear than front to make it understeer(grossly oversimplified).

Toe same deal as camber(again grossly oversimplified) but this you have to run the least amount you can. I use around 2º-2.5º on my cars, never more as I can find traction by other means with way less impact on performance.

Wheelbase is a powerful setting, changes a lot of stuff. Let's just say that it can make the car behave neutral or not in that small range. Try for yourself. I like to use the longest setting and tune from there.

Shock position self explanatory, something most don't change and I don't play around with it. I do have a method but involves much work (with the car bottomed out, see which position places the shock 90º to the lower arm and then chose spring from a couple equations and bam done, I can do it easily so anyone interested just ask.

Rear upper arm position is again an important setting, you change both camber gain and roll centre. The rear roll centre should be higher than the front, that's why I use the middle hole inner row as a starting setup.

Suspension arm, self explanatory: there are two different length arms and each has a hard and a normal flex plastic.

Front suspension bushing is for upper arm alignment, also same deal as rear upper arm position changes both camber gain and roll centre.

Suspension holder is for kick up (pro dive is the correct naming). I believe tki4 9º of kick up to be better than 9º of kick up using the tki3 parts because you can run the car lower (26mm front ride height) and use the +2mm front shock tower if there's too much camber gain or it's stiff in roll. So use +2mm lowered roll centre to keep most stuff unchanged or use the bushings with the dot up to lower the roll centre a bit more, doesn't hurt anything.

Front hub carrier, self explanatory. I am trying to use the out hole on top of the carrier as it is better during braking and accelerating. Together with the higher front roll centre on the tki4 should provide enough camber gain during cornering if not then more caster will do.

Rear roll centre and anti squat(wrongly called skid angle). Again same thinking as the front, lower the car and keep roll centre in the same height as before(that will need a change in upper arm position which my setup does). Anti squat is changed only if the pitching motion causes too much camber to be gained by the rear tires on power, nothing more.

Front knuckle, apparently there's a difference in the Ackerman arm. Can't say anything about them as I don't know enough about both.

Rear hub carrier,there is one made of plastic (which doesn't have offset apparently so it's suited to long arm setting) and three aluminium versions. One similar to the plastic one, other with offset and a new one with offset and adjustable hub height.

Rear tread can be used as arm length and outboard toe(never seen it being used but the possibility is there). Longer is better most of the time (only on really low traction).

Chassis brace, wheel hub, sway bars and weight are self explanatory. No need to use weights nor other hubs. A couple of roll bars would be a nice addition. About the aluminium braces I am torn, I guess the car doesn't need flex with this setup but won't recommend the stiffer braces but the lower engine mount is very nice to deal with flex around the clutch.

Wing and wing stay are like the d81x had regarding height and position. The wing should be as low and have free airflow as possible.

Print Wikipost

Old 05-11-2018, 09:59 PM
  #2551  
Tech Addict
 
Join Date: Mar 2018
Location: California
Posts: 735
Default

If you already own the original tki4, don't buy it and just get parts, but if you are deciding, it is a no-brainer and the 10 anniversary is a way better dead and a better car.
rcbuggy88 is offline  
Old 05-13-2018, 09:54 AM
  #2552  
R/C Tech Elite Member
iTrader: (3)
 
2fst4u67's Avatar
 
Join Date: Feb 2017
Location: UK
Posts: 101
Trader Rating: 3 (100%+)
Default

Originally Posted by Motorman007
Originally Posted by AZRC4Me
If you run 9deg kickup w/ -1 caster on the standard knuckles, you would have 9+13-1 = 21deg total caster. Here are the different caster setups you can run:

9° Kickup / 13° Knuckle / -1 / 0 / +1 Knuckle insert = 21 / 22 / 23 total caster

11° Kickup / 13° Knuckle / -1 / 0 / +1 Knuckle insert = 23 / 24 / 25 total caster

9° Kickup / 16° Knuckle / -1 / 0 / +1 Knuckle insert = 24 / 25 / 26 total caster

11° Kickup / 16° Knuckle / -1 / 0 / +1 Knuckle insert = 26 / 27 / 28 total caster

And no, the car will not handle the same if you run different kickup but still have the same total caster.
Here's a chart showing what possible caster setups you can run with the MP9 front geometry. These will all have different handling traits, meaning just because your total caster is the same doesn't necessarily mean it will handle the same. Box stock is the following:

11° Kickup / 13° Knuckle / 0 / Knuckle insert = 24 total caster
Cheers for that
2fst4u67 is offline  
Old 05-13-2018, 10:28 PM
  #2553  
Tech Regular
iTrader: (5)
 
xyzracer's Avatar
 
Join Date: May 2004
Location: bakersfield
Posts: 398
Trader Rating: 5 (100%+)
Default

Haven't raced nitro in a while since my 8ight 2.0 days and decided to try out an MP9 since the Anniversary model seemed like such a good deal. Build went excellent and i am very impressed with the car but it seems like i cannot get the gear mesh right. the kit came with a 47 tooth diff gear and a 13t clutch bell but i cant seem to get the motor close enough for a good mesh. i have cheated the motor over as much as i can in the blocks but it is still too loose. i am using the thinnest of the center diff spacers since the instruction say you use them unless running a 46 tooth gear and i am afraid if i pull the spacers out the gear will be below the chassis. anyone else experiencing this same issue?
xyzracer is offline  
Old 05-14-2018, 05:01 AM
  #2554  
Tech Master
iTrader: (2)
 
Winner's Circle's Avatar
 
Join Date: May 2005
Location: Atlanta, Georgia USA
Posts: 1,196
Trader Rating: 2 (100%+)
Default

Originally Posted by xyzracer
Haven't raced nitro in a while since my 8ight 2.0 days and decided to try out an MP9 since the Anniversary model seemed like such a good deal. Build went excellent and i am very impressed with the car but it seems like i cannot get the gear mesh right. the kit came with a 47 tooth diff gear and a 13t clutch bell but i cant seem to get the motor close enough for a good mesh. i have cheated the motor over as much as i can in the blocks but it is still too loose. i am using the thinnest of the center diff spacers since the instruction say you use them unless running a 46 tooth gear and i am afraid if i pull the spacers out the gear will be below the chassis. anyone else experiencing this same issue?
Check to see if the center rear driveshaft is hitting the engine mounting boss. I had to dremel a little material off the engine to create room to get a perfect mesh.

Lee
Winner's Circle is offline  
Old 05-14-2018, 06:40 AM
  #2555  
Tech Regular
iTrader: (5)
 
xyzracer's Avatar
 
Join Date: May 2004
Location: bakersfield
Posts: 398
Trader Rating: 5 (100%+)
Default

no, that is not hitting, i have plenty of room there. i watched the tebo build videos and clearenced that engine tab and also smoothed the inner edge of the the mounting blocks the engine mounts to so everything has plenty of room. going to pull out the diff spacers tonight after work and see how low the gear sits. if its too low might just have to dremel the plates a bit so i can slide the motor over slightly.

what gearing is everyone running?
xyzracer is offline  
Old 05-14-2018, 06:59 AM
  #2556  
Tech Elite
iTrader: (89)
 
Motorman007's Avatar
 
Join Date: Dec 2003
Posts: 3,420
Trader Rating: 89 (100%+)
Default

Originally Posted by xyzracer
no, that is not hitting, i have plenty of room there. i watched the tebo build videos and clearenced that engine tab and also smoothed the inner edge of the the mounting blocks the engine mounts to so everything has plenty of room. going to pull out the diff spacers tonight after work and see how low the gear sits. if its too low might just have to dremel the plates a bit so i can slide the motor over slightly.

what gearing is everyone running?
47/13 and it fit fine ran it Sunday. Also, make sure you have the diff mounting right.
Motorman007 is offline  
Old 05-14-2018, 08:54 AM
  #2557  
Tech Master
iTrader: (2)
 
Winner's Circle's Avatar
 
Join Date: May 2005
Location: Atlanta, Georgia USA
Posts: 1,196
Trader Rating: 2 (100%+)
Default

Originally Posted by xyzracer
no, that is not hitting, i have plenty of room there. i watched the tebo build videos and clearenced that engine tab and also smoothed the inner edge of the the mounting blocks the engine mounts to so everything has plenty of room. going to pull out the diff spacers tonight after work and see how low the gear sits. if its too low might just have to dremel the plates a bit so i can slide the motor over slightly.

what gearing is everyone running?
I started with 13:46 but lately I have been running 13:48. I don't have any mesh issues.
Winner's Circle is offline  
Old 05-14-2018, 09:21 AM
  #2558  
Tech Regular
iTrader: (5)
 
xyzracer's Avatar
 
Join Date: May 2004
Location: bakersfield
Posts: 398
Trader Rating: 5 (100%+)
Default

Motorman are you running any of the gray spacers under your center diff mounts?
xyzracer is offline  
Old 05-14-2018, 11:21 AM
  #2559  
Suspended
 
Join Date: Apr 2018
Location: from a wee town in TX
Posts: 290
Default

is the tki3 RTR knuckles the same geometry as the tki3 kit ones?
iplaygames is offline  
Old 05-14-2018, 01:01 PM
  #2560  
Tech Elite
iTrader: (89)
 
Motorman007's Avatar
 
Join Date: Dec 2003
Posts: 3,420
Trader Rating: 89 (100%+)
Default

Originally Posted by xyzracer
Motorman are you running any of the gray spacers under your center diff mounts?
Yes the middle spacer One.
Motorman007 is offline  
Old 05-14-2018, 01:17 PM
  #2561  
Tech Prophet
iTrader: (96)
 
houston's Avatar
 
Join Date: Sep 2004
Location: Sherwood,OR
Posts: 15,844
Trader Rating: 96 (100%+)
Default

Originally Posted by iplaygames
is the tki3 RTR knuckles the same geometry as the tki3 kit ones?
pretty sure the tki3rs is tki3 geometry

arent they cast though ?

part # if275?
houston is offline  
Old 05-14-2018, 02:57 PM
  #2562  
Tech Regular
iTrader: (5)
 
xyzracer's Avatar
 
Join Date: May 2004
Location: bakersfield
Posts: 398
Trader Rating: 5 (100%+)
Default

Originally Posted by Motorman007
Yes the middle spacer One.
ok, i def have something not right then. Thanks!
xyzracer is offline  
Old 05-14-2018, 03:06 PM
  #2563  
Tech Regular
 
Join Date: Dec 2017
Posts: 414
Default

For those interested in anniversary parts I noticed Dollarhobbyz is stocking them in their "kitted" form which I find cheaper than usual spares. Above talk of HD shock bodies, I got some a few months back and personally I don't find any difference. If your current ones aren't damaged or worn out then the HD ones won't offer much else.They don't appear to have the teflon type coating either which the sceptic in me says was removed to cut cost. The HD shocks are still very smooth but in a blind test you'd be hard pressed to pick the difference when filled.
For the fella looking for a good astro turf setup, wait a few days and Tebo and Boots should have their setups from the recent French Kyosho Masters race. It was awesome to watch the two different styles of Boots and Tebo on a slippery wet track.

Last edited by Matty A; 05-14-2018 at 03:52 PM.
Matty A is offline  
Old 05-14-2018, 05:00 PM
  #2564  
Tech Addict
 
Join Date: Mar 2018
Location: California
Posts: 735
Default

Not sure how reliable Dollarhobbyz is. Never heard of it.
rcbuggy88 is offline  
Old 05-14-2018, 05:14 PM
  #2565  
Tech Regular
 
Join Date: Dec 2017
Posts: 414
Default

Originally Posted by rcbuggy88
Not sure how reliable Dollarhobbyz is. Never heard of it.
I've had 4 shipments in the past 6 months and no problem and genuine.. There difference is pretty straight forward: take a kit, pull it apart and sell them as spares.
Matty A is offline  

Thread Tools
Search this Thread

Contact Us - Archive - Advertising - Cookie Policy - Privacy Statement - Terms of Service -

Copyright © 2024 MH Sub I, LLC dba Internet Brands. All rights reserved. Use of this site indicates your consent to the Terms of Use.