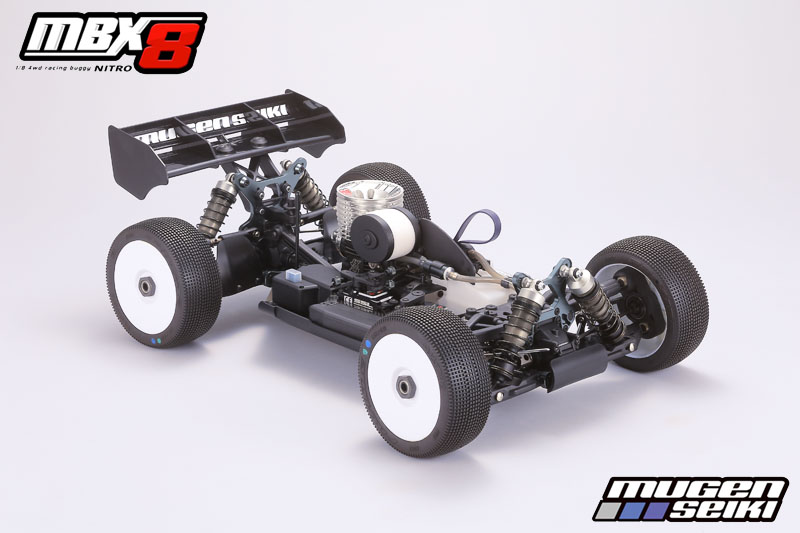
Community
Wiki Posts
Search
Like Tree346Likes

Mugen MBX8

    Hide Wikipost
Old 05-31-2019, 05:05 PM   -   Wikipost
R/C Tech ForumsThread Wiki: Mugen MBX8
Please read: This is a community-maintained wiki post containing the most important information from this thread. You may edit the Wiki once you have been a member for 90 days and have made 90 posts.
 
Last edit by: E1 Diablo
E2025 - MBX8 Worlds Edition - April, 2019

MUGE0240: Wide Offset Wheel Hubs 1mm 2pcs; The 1mm wide offset wheel hubs will increase stability and cornering.
MUGE2146: Inline Front Uprights; The E2146 inline front uprights have smoother steering compared to the stock E2147 trailing front uprights and work great in high traction conditions. E2146 uprights can be used with both CVA and universal style driveshafts.
MUGE2168: -3mm Front Upright Arm; The -3mm front upright arm improves the initial steering response and make the vehicle more stable through the middle and exit of the corner.. The new upright arms also reduce bump steer and make the vehicle more predictable in bumpy conditions.
MUGE2235: 46T Spur Gear; The 46 tooth HTD spur gear provides a great balance of acceleration and top-end speed.
MUGE2252: 12T Pinion Gear
MUGE2254: 42T Conical Gear; The optional 12T bevel gear when used with the 42T conical gear will change the final drive ratio and increase acceleration.
MUGE2260: Center Joint Cup.
MUGE2261: Center Front Dog Bone (84.5mm)
MUGE2262: Center Rear Dog Bone (115mm); The front and rear-center dogbones for the MBX8 reduce friction from the stock universal driveshafts. Less friction will give the vehicle a more efficient drivetrain, increase acceleration, and provide more traction. The dog bones are lightweight, durable, and will increase traction.
MUGE2428: Rear Wing Stay +15mm; The +15mm wing mount has more adjustment and will help increase mid corner rotation and be more stable in high speed conditions.


E2021 - MBX8 1/8 Nitro Buggy Kit

Chassis:
The MBX8 chassis features a new design that improves traction and stability in bumpy conditions and on the exit of corners. The steering post are also keyed into the MBX8 chassis for easier maintenance.

Differential & drive train:
High Traction Differentials are included in the MBX8. The Mugen Seiki HTD provides increased acceleration, longer runtime, and more consistent handling. The HTD's also increase stability, traction, and improve handling in bumpy conditions. The HTD has a new larger volume diff cup to increase consistency during long main events. This makes it easier to time rhythm sections, better in bumpy and low grip conditions, helps to increase traction, and increases fuel mileage.

The new gearbox makes allows you to remove and service the differentials without detaching the suspension arm mounts. Easy access to the front and rear differential.

New straight cut 13T bevel gear & 44T conical gear. The new straight cut bevel and conical gears increase acceleration, runtime, and efficiency. A free and efficient drive train will also increase speeds while cornering.

Light weight one-piece wing mount:
The new lightweight one-piece wing mount lower the center of gravity. The position of the wing and wing mount is optimized to improve the performance of vehicle. The height of the wing mount is adjustable. This allows you to control the down force on the rear of the vehicle by simply raising or lowering the mount on the shock tower.

Light weight high down-force wing:
The new IFMAR legal wing is lightweight and provides amazing down force and cornering. The underside of the wing uses a new design to reduced weight and creates additional down-force.

Suspension:
New suspension mounts. The FF/FR/RF/RR are new for the MBX8.
The front and rear lower arms use a new impact resistant material for increased durability. The new arms are box-shaped and include arm stiffeners to reduce flex and increase durability. Adjusting the hardness of the lower suspension arms is now possible. This allows you to fine tune the steering and traction from track to track. CFRP plates will be released as an option part.

Center differential mount & plate:
The center differential mounts use a stiffer material and has a new top plate to reduce chassis flex and increases clutch bell, spur gear, and clutch bearing life. The reduced chassis flex also provides more consistent handling in all conditions. The top plate design also makes it easier to adjust the brakes and easier maintenance.

Enclosed Battery box and updated carbon fiber radio plate:
The MBX8 still uses a flat 2S Lipo or Life battery, but the receiver battery is now enclosed in a molded battery box. The battery box allows for quick and easy access to the battery. The molded box also helps protect the battery from hard impacts. The battery box is mounted to an updated carbon fiber radio plate.

Other new parts and upgrades:
Body, Clamping Servo Saver Nut, F/R Shock Towers, Front bumper, Front center and rear center universal joint.

Mugen Seiki MBX8 Manual

Print Wikipost

Thread Tools
 
Search this Thread
 
Old 08-02-2018, 08:30 PM
  #691  
Tech Fanatic
iTrader: (15)
 
fastchvy's Avatar
 
Join Date: Feb 2012
Location: Corona, Ca
Posts: 794
Trader Rating: 15 (100%+)
Default

Originally Posted by tom1974
where did you get the springs for the brake pads
fastchvy is offline  
Old 08-02-2018, 08:35 PM
  #692  
Tech Addict
iTrader: (1)
 
Join Date: Dec 2016
Posts: 595
Trader Rating: 1 (100%+)
Default

Originally Posted by fastchvy


where did you get the springs for the brake pads
AE springs but you can use the XRAY springs as well.
Cardiak is offline  
Old 08-03-2018, 02:22 AM
  #693  
Tech Fanatic
 
tom1974's Avatar
 
Join Date: Jan 2013
Location: la maddalena italy
Posts: 970
Default

Yes..😉
tom1974 is offline  
Old 08-03-2018, 03:39 AM
  #694  
Tech Initiate
 
R4ge's Avatar
 
Join Date: Jul 2017
Location: Larisa, Greece
Posts: 22
Default

Originally Posted by fastchvy


where did you get the springs for the brake pads
tekno springs used here!
R4ge is offline  
Old 08-03-2018, 08:24 AM
  #695  
Tech Champion
iTrader: (14)
 
jmackani's Avatar
 
Join Date: May 2009
Location: Shippensburg
Posts: 5,694
Trader Rating: 14 (100%+)
Default

Originally Posted by slackinoff
They probably mean something like this. https://www.amainhobbies.com/avid-rc...-m-145/p780211

I would be hesitant on getting the avid ones. We bought a set to try and the car became unpredictable coming out of the corners with them. Like someone else mentioned it appears they are not letting the shock rotate on the post even if you loosen the nut.
slackinoff likes this.
jmackani is offline  
Old 08-05-2018, 06:37 PM
  #696  
Tech Master
iTrader: (10)
 
E1 Diablo's Avatar
 
Join Date: Jul 2011
Location: East TN
Posts: 1,557
Trader Rating: 10 (100%+)
Default

Originally Posted by mattythegreat
Can someone explaine the servo mounts for me.. I am using a protek for Steering and a Spektrum for throttle. The plastic mounts under the servos have letters on them.. Please explain the letter meaning as the Manuel does not...
Just use the ones that minimize gap between between the servos.
MugenDrew and mattythegreat like this.
E1 Diablo is offline  
Old 08-06-2018, 04:12 AM
  #697  
Tech Elite
iTrader: (36)
 
MugenDrew's Avatar
 
Join Date: Aug 2006
Location: Apollo Beach, Florida
Posts: 2,152
Trader Rating: 36 (100%+)
Default

A must be used in the position shown in the manual.
F=futaba
K=Kopropo
S=sanwa
MugenDrew is offline  
Old 08-06-2018, 09:58 AM
  #698  
Tech Regular
iTrader: (10)
 
Join Date: Mar 2008
Posts: 380
Trader Rating: 10 (100%+)
Default

Originally Posted by MugenDrew
A must be used in the position shown in the manual.
F=futaba
K=Kopropo
S=sanwa
ok so what is Spektrum and Protek?
mattythegreat is offline  
Old 08-06-2018, 10:00 AM
  #699  
Tech Adept
iTrader: (2)
 
Join Date: Mar 2012
Location: Florida
Posts: 113
Trader Rating: 2 (100%+)
Default

Originally Posted by mattythegreat


ok so what is Spektrum and Protek?
It's not about the vendor, its the spline count. I *think* Spektrum is 25 splines, as is Futaba, so you would use that one.

mattythegreat likes this.
mstrfahrenheit is offline  
Old 08-06-2018, 10:15 AM
  #700  
Tech Adept
iTrader: (2)
 
Join Date: Mar 2012
Location: Florida
Posts: 113
Trader Rating: 2 (100%+)
Default

Originally Posted by mstrfahrenheit
It's not about the vendor, its the spline count. I *think* Spektrum is 25 splines, as is Futaba, so you would use that one.
I may have confused the issue --- Just to be clear, I was talking about the inserts that sit inside the servo arms to mount on the servo.

mstrfahrenheit is offline  
Old 08-06-2018, 11:16 AM
  #701  
Tech Regular
iTrader: (10)
 
Join Date: Mar 2008
Posts: 380
Trader Rating: 10 (100%+)
Default

Originally Posted by mstrfahrenheit
I may have confused the issue --- Just to be clear, I was talking about the inserts that sit inside the servo arms to mount on the servo.
yes that’s what I am talking about.
mattythegreat is offline  
Old 08-06-2018, 11:18 AM
  #702  
Tech Adept
iTrader: (2)
 
Join Date: Mar 2012
Location: Florida
Posts: 113
Trader Rating: 2 (100%+)
Default

Originally Posted by mattythegreat


yes that’s what I am talking about.
Ok, cool. FWIW, I'd dump the plastic steering arm and pick up an aluminum one, in which case you wouldn't need the insert at all. For throttle/brake, stock is fine.

mstrfahrenheit is offline  
Old 08-06-2018, 03:00 PM
  #703  
Tech Regular
iTrader: (1)
 
slackinoff's Avatar
 
Join Date: Mar 2018
Posts: 332
Trader Rating: 1 (100%+)
Default

I have posted some of the below in the ECO version of this thread. I wanted to share with you guys.

The bind in the arms is something I think new builders should be aware of. My front and rear arms were tight, and I could easily see a new builder not knowing that they are supposed to be silky smooth. I reamed and then polished the hinge pins for extra smoothness. I say this because this was my first kit built buggy and I had never experienced a kit that the arms were tight. I had handling and setup issues (could not get ride height set consistently) my first race weekend. I just didn't know any better. Now that I have fixed the binding issues, the buggy handles completely different (much better) and is a such an easy car to maintain for my racing.
slackinoff is offline  
Old 08-07-2018, 07:53 AM
  #704  
Tech Regular
iTrader: (10)
 
Join Date: Mar 2008
Posts: 380
Trader Rating: 10 (100%+)
Default

Originally Posted by slackinoff
I have posted some of the below in the ECO version of this thread. I wanted to share with you guys.

The bind in the arms is something I think new builders should be aware of. My front and rear arms were tight, and I could easily see a new builder not knowing that they are supposed to be silky smooth. I reamed and then polished the hinge pins for extra smoothness. I say this because this was my first kit built buggy and I had never experienced a kit that the arms were tight. I had handling and setup issues (could not get ride height set consistently) my first race weekend. I just didn't know any better. Now that I have fixed the binding issues, the buggy handles completely different (much better) and is a such an easy car to maintain for my racing.
i agree that the front on my buggy has a hitch in it. When I put a little pressure to the arms it’s better.. Reaming out your arm holes is what you did to clear up the binding?
mattythegreat is offline  
Old 08-07-2018, 08:01 AM
  #705  
Tech Regular
iTrader: (1)
 
slackinoff's Avatar
 
Join Date: Mar 2018
Posts: 332
Trader Rating: 1 (100%+)
Default

Originally Posted by mattythegreat


i agree that the front on my buggy has a hitch in it. When I put a little pressure to the arms it’s better.. Reaming out your arm holes is what you did to clear up the binding?
Correct, along with other things mentioned below.
-Reamed the arms so that the pins "fall through" the arms. This gives clearance needed for dirt and debris.
-Polished the pins with polish compound, a drill, and a rag. This was very effective.
-Keep an eye on the pills, I have had flashing keep them from sitting in the holder all the way. This is similar to having the little clip spacers set too tight.
-Keep an eye on the clip spacers, I have had them too tight.
-Make sure the pillow balls are not adjusted too tight
-The steering links can become damaged and get tight

These are some things I have used to get a silky smooth suspension moment.
slackinoff is offline  


Contact Us - Archive - Advertising - Cookie Policy - Privacy Statement - Terms of Service -

Copyright © 2024 MH Sub I, LLC dba Internet Brands. All rights reserved. Use of this site indicates your consent to the Terms of Use.