Community
Wiki Posts
Search
Like Tree346Likes

Mugen MBX8

    Hide Wikipost
Old 05-31-2019, 05:05 PM   -   Wikipost
R/C Tech ForumsThread Wiki: Mugen MBX8
Please read: This is a community-maintained wiki post containing the most important information from this thread. You may edit the Wiki once you have been a member for 90 days and have made 90 posts.
 
Last edit by: E1 Diablo
E2025 - MBX8 Worlds Edition - April, 2019

MUGE0240: Wide Offset Wheel Hubs 1mm 2pcs; The 1mm wide offset wheel hubs will increase stability and cornering.
MUGE2146: Inline Front Uprights; The E2146 inline front uprights have smoother steering compared to the stock E2147 trailing front uprights and work great in high traction conditions. E2146 uprights can be used with both CVA and universal style driveshafts.
MUGE2168: -3mm Front Upright Arm; The -3mm front upright arm improves the initial steering response and make the vehicle more stable through the middle and exit of the corner.. The new upright arms also reduce bump steer and make the vehicle more predictable in bumpy conditions.
MUGE2235: 46T Spur Gear; The 46 tooth HTD spur gear provides a great balance of acceleration and top-end speed.
MUGE2252: 12T Pinion Gear
MUGE2254: 42T Conical Gear; The optional 12T bevel gear when used with the 42T conical gear will change the final drive ratio and increase acceleration.
MUGE2260: Center Joint Cup.
MUGE2261: Center Front Dog Bone (84.5mm)
MUGE2262: Center Rear Dog Bone (115mm); The front and rear-center dogbones for the MBX8 reduce friction from the stock universal driveshafts. Less friction will give the vehicle a more efficient drivetrain, increase acceleration, and provide more traction. The dog bones are lightweight, durable, and will increase traction.
MUGE2428: Rear Wing Stay +15mm; The +15mm wing mount has more adjustment and will help increase mid corner rotation and be more stable in high speed conditions.


E2021 - MBX8 1/8 Nitro Buggy Kit

Chassis:
The MBX8 chassis features a new design that improves traction and stability in bumpy conditions and on the exit of corners. The steering post are also keyed into the MBX8 chassis for easier maintenance.

Differential & drive train:
High Traction Differentials are included in the MBX8. The Mugen Seiki HTD provides increased acceleration, longer runtime, and more consistent handling. The HTD's also increase stability, traction, and improve handling in bumpy conditions. The HTD has a new larger volume diff cup to increase consistency during long main events. This makes it easier to time rhythm sections, better in bumpy and low grip conditions, helps to increase traction, and increases fuel mileage.

The new gearbox makes allows you to remove and service the differentials without detaching the suspension arm mounts. Easy access to the front and rear differential.

New straight cut 13T bevel gear & 44T conical gear. The new straight cut bevel and conical gears increase acceleration, runtime, and efficiency. A free and efficient drive train will also increase speeds while cornering.

Light weight one-piece wing mount:
The new lightweight one-piece wing mount lower the center of gravity. The position of the wing and wing mount is optimized to improve the performance of vehicle. The height of the wing mount is adjustable. This allows you to control the down force on the rear of the vehicle by simply raising or lowering the mount on the shock tower.

Light weight high down-force wing:
The new IFMAR legal wing is lightweight and provides amazing down force and cornering. The underside of the wing uses a new design to reduced weight and creates additional down-force.

Suspension:
New suspension mounts. The FF/FR/RF/RR are new for the MBX8.
The front and rear lower arms use a new impact resistant material for increased durability. The new arms are box-shaped and include arm stiffeners to reduce flex and increase durability. Adjusting the hardness of the lower suspension arms is now possible. This allows you to fine tune the steering and traction from track to track. CFRP plates will be released as an option part.

Center differential mount & plate:
The center differential mounts use a stiffer material and has a new top plate to reduce chassis flex and increases clutch bell, spur gear, and clutch bearing life. The reduced chassis flex also provides more consistent handling in all conditions. The top plate design also makes it easier to adjust the brakes and easier maintenance.

Enclosed Battery box and updated carbon fiber radio plate:
The MBX8 still uses a flat 2S Lipo or Life battery, but the receiver battery is now enclosed in a molded battery box. The battery box allows for quick and easy access to the battery. The molded box also helps protect the battery from hard impacts. The battery box is mounted to an updated carbon fiber radio plate.

Other new parts and upgrades:
Body, Clamping Servo Saver Nut, F/R Shock Towers, Front bumper, Front center and rear center universal joint.

Mugen Seiki MBX8 Manual

Print Wikipost

Thread Tools
 
Search this Thread
 
Old 10-14-2018, 09:37 PM
  #781  
Tech Fanatic
iTrader: (15)
 
fastchvy's Avatar
 
Join Date: Feb 2012
Location: Corona, Ca
Posts: 794
Trader Rating: 15 (100%+)
Default

It’s an easy fix. Run 6-4-2 and fallow Adams medium grip set up to the T and the car will be great.
fastchvy is offline  
Old 10-15-2018, 03:29 PM
  #782  
Tech Adept
 
Join Date: Jul 2014
Posts: 226
Default

Originally Posted by Kibble


loose on exit would be exactly what they were describing.
run a softer rear sway bar , run the rear hub on the closest hole to the axle and run less anti squat. Adams setup run too much anti squat , too hard of a rear sway bar and the hubs too high Makes the car a bit too tall happy.
Ricardo_d99 is offline  
Old 10-15-2018, 10:54 PM
  #783  
Tech Fanatic
 
tom1974's Avatar
 
Join Date: Jan 2013
Location: la maddalena italy
Posts: 970
Default

Originally Posted by fastchvy
I found the car is sensitive to diff oil. I’ve tried every configuration possible and found out that 6-4-2 f/c/r works very awesome and any track conditions. If you run over 3 in the rear on a medium grip track the car will want to get loose on exit
Can you give me link set up low or medium grip adam please?
tom1974 is offline  
Old 10-16-2018, 12:21 AM
  #784  
am
Tech Master
 
Join Date: Jul 2004
Location: Norway
Posts: 1,842
Default

Originally Posted by Anunnaki
hello great pilots and admirers of MUGEN SEIKI !!! first time I write in the forum (by the way interesting and of much learning); I own a MBX7, MBX7T and soon the MBX8. I have been in the hobby for a short time compared to people and professionals. I have been a pilot since 2005 and the little I know I am ALWAYS learning! My big question (that is why I ask everyone) is the great controversy that exists with the book of adjustments (set up book) especially with the book of adjustments HUDY. since the small (not because it is small) book of MUGEN SEIKI RACING (web) is contradicted in certain criteria with the other books. and asked??? In the end it is not all geometry and physics when we adjust our cars, WHY ??? they are not all these UNIVERSAL books. Is advertising ??? AND WHO HAS THE TRUTH OF THESE REPORTS TO ADJUST CARTS ??? many. thanks to all. ANUNNAKI
Hi, books are a greta tool for us, but it is also quite the oposite. When a manufactor makes a setup book, it is made to their caror filosophy. Yes, the laws of physicks is the same for all, but it depends on the geometry of the car you have the book for.

F, eks:
On MBX6 i found the car to give more steering when you raised the upper front arm. On Xray XB 132- it gave you less steering. Ackerman mve forward on the Kyosho gives you a more agressive car, but on my old (think it was crono) it gave me a car that was easier to drive.

Use a setup book as a rule of thumb, but not as a fact-it depends on your car what happends when you adjust this or that. My best advice to you is that when you are on track,practicing- change one setting at a time and write down what happend. Suddenly, you have made your own setup book for YOUR car and skill level. We have a short seasson here in Norway and theese days i get to do very little driving. I often use a car for 2-3 seassons ( not one car but one brand f. eks MP9) and when i start the second seasson i have learned the car and usually have a car that works very goog almoast all the time.

Good luck.
Anunnaki likes this.
am is offline  
Old 10-16-2018, 01:12 AM
  #785  
Tech Elite
iTrader: (1)
 
Join Date: Sep 2010
Location: My house.
Posts: 3,569
Trader Rating: 1 (100%+)
Default

Originally Posted by Ricardo_d99
run a softer rear sway bar , run the rear hub on the closest hole to the axle and run less anti squat. Adams setup run too much anti squat , too hard of a rear sway bar and the hubs too high Makes the car a bit too tall happy.
90% there, with a spindle height change (using the hole on the hub closer to the axle) it has to be compensated with a change in upper arm angle too, wither the shock tower side or the outer side depending where the car has adjustability to do so. That means a higher roll centre in order to have camber gain that was lost in the spindle height change and also because by making the rear soft it will work in a different tune than the front, like an orchestra. During a corner the rear would still be moving from the car entering when the front is already pointed to exit therefore it would seem the car is more tail happy than before when the truth is one went too far soft.

Originally Posted by am
Hi, books are a greta tool for us, but it is also quite the oposite. When a manufactor makes a setup book, it is made to their caror filosophy. Yes, the laws of physicks is the same for all, but it depends on the geometry of the car you have the book for.

F, eks:
On MBX6 i found the car to give more steering when you raised the upper front arm. On Xray XB 132- it gave you less steering. Ackerman mve forward on the Kyosho gives you a more agressive car, but on my old (think it was crono) it gave me a car that was easier to drive.

Use a setup book as a rule of thumb, but not as a fact-it depends on your car what happends when you adjust this or that. My best advice to you is that when you are on track,practicing- change one setting at a time and write down what happend. Suddenly, you have made your own setup book for YOUR car and skill level. We have a short seasson here in Norway and theese days i get to do very little driving. I often use a car for 2-3 seassons ( not one car but one brand f. eks MP9) and when i start the second seasson i have learned the car and usually have a car that works very goog almoast all the time.

Good luck.
As you said, the laws of physics are the same for all but depends on where the car set up wise. The mugen always ran higher front roll centre than xray and their dog bone plunge was very different as is the Ackerman. About the Crono cars Ackerman, they had the RS01 with lots of pro Ackerman and then switched to anti Ackerman which depending on other settings makes the car more numb to drive, the mp9 Ackerman options are really good because they are well chosen so each setting does what is supposed to do. Speaking specifically about the mugen cars, if not mistaken they have a lot of pro Ackerman built in so they will always have more ease to "drift" using steering inputs. Almost forgot. One very important change that @am made was bump steer. The xray had way less than the mugen so by messing with the upper arm one feels there's less steering, the mugen by contrary has less bump steer if the upper arm is raised, effectively showing how much grip it has hidden away from you.

There you go, one can't make one single change and expect that it won't mess with anything else.

Edit*
On the same token, the rc8b3, the hb and pretty much everyone else has less bump steer than the mugen...
Maxxingout and Anunnaki like this.

Last edited by 30Tooth; 10-16-2018 at 09:05 AM.
30Tooth is offline  
Old 10-16-2018, 06:22 AM
  #786  
Tech Addict
iTrader: (18)
 
Join Date: Apr 2010
Posts: 553
Trader Rating: 18 (100%+)
Default

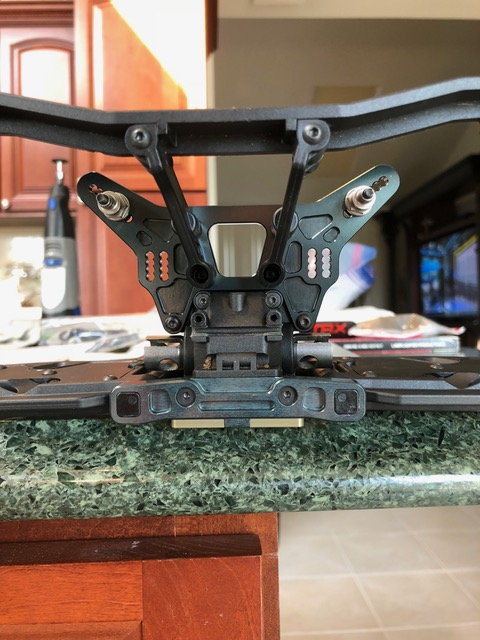
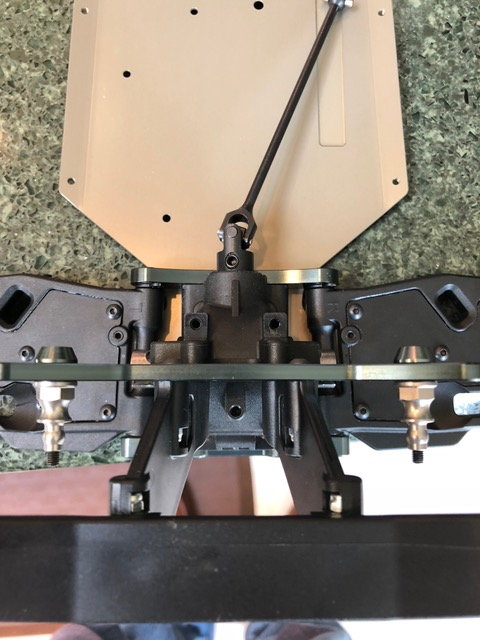
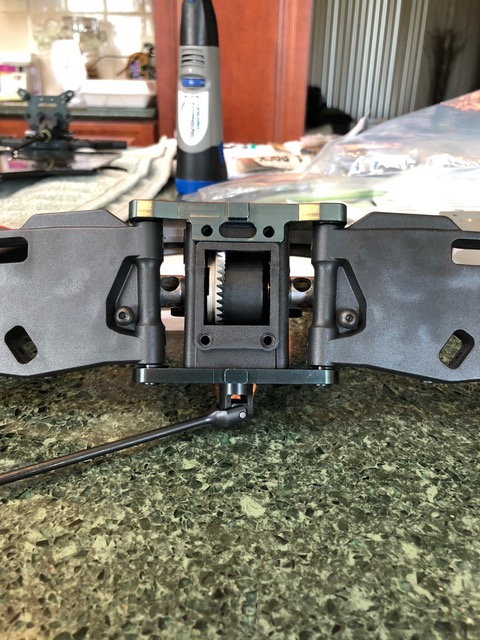
Can I get some info on the rear pills and rear toe in adjustment. Im putting together a 7 series GT and purchased the 8 series arms and 8 series suspension mounts.

The parts #s for the suspension arm MOUNTS are different from 7 and 8, does anyone know what those differences are in the mounts?

The 8 series mounts and arms are bolted up to the 7 series diff cases with no issues.

Im looking to find out what the rear toe setting are and how the pills work ?

Car is going to be used for straight speed on street, so im looking for the least amount of rear toe in.

I currently have the rear pills in so pill dots are high and dots closest to the inside. Does anyone know what that toe setting is currently at?

The manual shows them stock with dots in center, is that 2.75 degrees of rear toe?


Also noticed theres no difference between arm mounts MBX and GT, I would have thought the GT would have had more toe adjustments for high bite, that said im not sure i understand

If i can get less toe in.

I did see that M2C arm mount has more adjustments to get less rear toe. Is that the only way to get less toe is to buy there brace. Any info would

be appreciated. I can post pics of my setup if needed. TY
spectre is offline  
Old 10-16-2018, 06:44 AM
  #787  
Tech Addict
iTrader: (18)
 
Join Date: Apr 2010
Posts: 553
Trader Rating: 18 (100%+)
Default

Heres some pics

spectre is offline  
Old 10-16-2018, 07:01 AM
  #788  
Tech Champion
iTrader: (14)
 
jmackani's Avatar
 
Join Date: May 2009
Location: Shippensburg
Posts: 5,694
Trader Rating: 14 (100%+)
Default

Your photos are 0 degrees anti-squat with 2.5 degrees of rear toe
jmackani is offline  
Old 10-16-2018, 07:21 AM
  #789  
Tech Fanatic
iTrader: (15)
 
fastchvy's Avatar
 
Join Date: Feb 2012
Location: Corona, Ca
Posts: 794
Trader Rating: 15 (100%+)
Default

Originally Posted by tom1974
Can you give me link set up low or medium grip adam please?
Setup Sheets
fastchvy is offline  
Old 10-16-2018, 09:14 AM
  #790  
Tech Addict
iTrader: (18)
 
Join Date: Apr 2010
Posts: 553
Trader Rating: 18 (100%+)
Default

Originally Posted by jmackani
Your photos are 0 degrees anti-squat with 2.5 degrees of rear toe
Thank you for info. Is it possible to get to 2 degrees of toe in and less.
Also can i get recommendation for how much anti squat to run on road.
spectre is offline  
Old 10-16-2018, 05:58 PM
  #791  
Tech Champion
iTrader: (14)
 
jmackani's Avatar
 
Join Date: May 2009
Location: Shippensburg
Posts: 5,694
Trader Rating: 14 (100%+)
Default

Originally Posted by spectre
Thank you for info. Is it possible to get to 2 degrees of toe in and less.
Also can i get recommendation for how much anti squat to run on road.
On road should be high grip in which you can run the max amount of anti squat. C Block pills up all the way and the D block bills with the dot down all the way. I think 2.5 is the least amount of toe you can get with the pills.
AlbertN likes this.
jmackani is offline  
Old 10-16-2018, 06:09 PM
  #792  
Tech Addict
iTrader: (18)
 
Join Date: Apr 2010
Posts: 553
Trader Rating: 18 (100%+)
Default

Originally Posted by jmackani
On road should be high grip in which you can run the max amount of anti squat. C Block pills up all the way and the D block bills with the dot down all the way. I think 2.5 is the least amount of toe you can get with the pills.
Thank you, very much appreciated
spectre is offline  
Old 10-16-2018, 09:27 PM
  #793  
Tech Master
iTrader: (40)
 
Join Date: Sep 2009
Posts: 1,016
Trader Rating: 40 (100%+)
Default

Originally Posted by spectre
does anyone know what those differences are in the mounts?
t
Bolt holes are .5mm lower on the X8 C-Block, and it's clearanced differently for the input bearings/diff case. Using it on the X7 will cause your RF (C) pills to be .5mm higher than a stock block, which will give you more antisquat.

Just something to consider when you're tuning.
BrakeTurnAccelerate is offline  
Old 10-17-2018, 07:08 AM
  #794  
Tech Adept
iTrader: (8)
 
Join Date: Sep 2010
Location: Maryland
Posts: 176
Trader Rating: 8 (100%+)
Default

Hello everyone, I am trying to buy some replacement dogbone pins for my (non-mugen) buggy. I see that there are two parts numbers/pin lengths - 3x12.8mm and 3x13.8m - on amain it shows compatibility with almost all Mugen vehicles.Did not find antying in the manuals either although it does list both part numers. Does anyone know which ones are used for what? i.e front vs rear UJs? Would appreciate the help. Thank you.

https://www.amainhobbies.com/mugen-s...mugc0271/p4436

https://www.amainhobbies.com/mugen-s...mugc0270/p4435
littlebuddha is offline  
Old 10-17-2018, 10:54 PM
  #795  
Tech Fanatic
 
tom1974's Avatar
 
Join Date: Jan 2013
Location: la maddalena italy
Posts: 970
Default

Originally Posted by littlebuddha
Hello everyone, I am trying to buy some replacement dogbone pins for my (non-mugen) buggy. I see that there are two parts numbers/pin lengths - 3x12.8mm and 3x13.8m - on amain it shows compatibility with almost all Mugen vehicles.Did not find antying in the manuals either although it does list both part numers. Does anyone know which ones are used for what? i.e front vs rear UJs? Would appreciate the help. Thank you.

https://www.amainhobbies.com/mugen-s...mugc0271/p4436

https://www.amainhobbies.com/mugen-s...mugc0270/p4435
3x13.8 pins for wheels pins 3x12.8 for central
littlebuddha and Anunnaki like this.
tom1974 is offline  


Contact Us - Archive - Advertising - Cookie Policy - Privacy Statement - Terms of Service -

Copyright © 2024 MH Sub I, LLC dba Internet Brands. All rights reserved. Use of this site indicates your consent to the Terms of Use.