


 120Likes
Losi mini B 1/16th 2wd buggy
 01-01-2021, 11:26 PM
#136
Good news, I emailed MIP regarding the ball diff and they replied that it is going to be released next month.
Regarding parts compatibility, Tower has exploded views for both the B and the T that show part numbers, so if you don't get an answer here, Tower is available as a resource. Click on Manuals & Support to view and scroll to the bottom.
Hoping to find a charger locally today. It took me literally all day yesterday to charge one pack. Started around 1-2 in the afternoon and it didn't finish charging until sometime after 12am. I started with an older Apple AC adapter and switched to a Samsung Galaxy S5 adapter in the middle of the day.
 01-02-2021, 10:41 AM
#137
Tech Adept
Just received the rear springs for the B (LOS214017) in the mail and the gold and black springs are the same length, but the silver springs are about 1-2mm shorter. It would be nice if Losi would stop including springs that are included with the vehicle and provide another rate or omit the duplicate springs and lower the cost of the parts, they did this with version 1.0 as well.
I also received a 16t aluminum pinion the other day. My motor was running a bit too hot with the stock pinion and the mesh was a bit on the tight side. I installed the 16t and did not have to move the motor closer, the pinion fit perfectly, the gear mesh was much better, motor ran much cooler, the B came alive, and holding speed through turns became a lot easier, the B became more responsive. Losi should have included a 16t or made that the stock pinion. The nice thing about aluminum pinions is that they are significantly lighter than their steel counterparts.
Shims are due to arrive today and since I'm rebuilding the shocks, I decided to get some 2mm o-rings for the shock shafts. My plan is one ring in the front and 2 in the rear.
01-02-2021, 11:30 PM
#138
Tech Rookie
Hi all. I'm new around here and new to this hobby. I haven't driven my own RC since I had a Tamiya Frog in the late 80's, so it's been quite a while. I decided to pick up the Mini B for my son for Christmas and quickly found myself ordering a second one.  I'd like to make the switch to brushless on the second buggy, but can't tell what needs to be upgraded along with it. I'm looking at the Dynamite motor (DYNS0501) but can't tell if I need to upgrade the ESC/RX. If I need to upgrade are there any recommendations for the transmitter and receiver? I see a variety of parts mentioned above, but just need the dots more clearly connected. Thanks in advance for any help. I'm looking forward to seeing more posts here and racing our buggies.
I'd like to make the switch to brushless on the second buggy, but can't tell what needs to be upgraded along with it. I'm looking at the Dynamite motor (DYNS0501) but can't tell if I need to upgrade the ESC/RX. If I need to upgrade are there any recommendations for the transmitter and receiver? I see a variety of parts mentioned above, but just need the dots more clearly connected. Thanks in advance for any help. I'm looking forward to seeing more posts here and racing our buggies.
01-04-2021, 10:19 AM
#139
Tech Adept
I received my bearings and can confirm that 3x6x2.5mm bearings will work in the stock bellcranks.
Also received the Yokomo spacers and those worked as well. I installed them in the following locations;
x1 .13mm spacer on each side of the bellcrank arm. The spacers act as a washer and allow the kingpin to be tightened while still allowing the parts to move freely. I tightened the kingpins until the parts wouldn't move and then backed them off until I found the sweet spot.
x1 .25mm spacer in between bottom of spindle and hub.
x1 .13mm spacer in between top of spindle and hub.
x1 .13mm spacer in between rear camber block and a-arm.
This eliminated some of the slop, but not all of it. It appears that most of the slop in the front is caused by the link that connects the servo to the draglink and the rest of the slop is due to generous part tolerances and the flexibility of the plastic used.
I also received my camber gauge and all four corners now have 1.5 negative camber. My B had about .5mm negative camber stock on all four corners.
All of the changes I have made to the buggy so far have made it less twitchy and have improved handling and stability. I should have shocks rebuilt with o-rings today, which in my opinion is necessary if you are using the silver springs in the rear. I had to use a lot of preload to get the rear a-arms level with the silver springs.
All of these changes should work on a T as well, but I won't be able to confirm until I get mine later this week.
Last edited by RCTecher1337; 01-04-2021 at 10:37 AM.
01-04-2021, 06:25 PM
#140
Tech Adept
Rebuilt the shocks and they work much better, it's something I highly recommend doing, but it takes some patience. I did not follow the instructions in the manual and I did not use a box wrench to reassemble, I used my fingers and a needle nose.
The stock shocks work great when rebuilt properly. They need to be bled to get the shock shaft to rebound, while not getting sucked back in when fully extended. One of the youtube folks should do a video, it would be worthwhile and helpful to a lot of folks. The shocks are now a lot smoother, rebound faster, and are quiet, no more squishy sounds (trapped air).
The front and rear shocks have a 2 hole piston. Before the rebuild my shocks were not the same length when fully extended and the shock shafts did not rebound without the spring when pushed in.
I used 27.5 AE oil in the front and rear, rear silver springs, black in the front, x3 2x2mm o-rings in the rear, and x1 2x2mm o-ring in the front. I ditched the silver shock washer and made use of spacers when reattaching the shocks, I used x1 .25mm spacer between the shock and nut on the shock towers and used x1 .25mm spacer on each side of the lower rear shock eyelet.
The buggy is a lot more predictable now and much easier to drive. I think all of the changes will work well on an RCP track. Last thing suspension wise to play with is camber link length and front springs. Next major change is a transmission rebuild, plan to go full MIP once the ball diff is released.
01-04-2021, 07:50 PM
#141
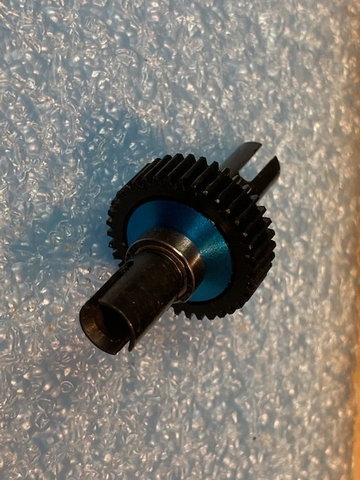
Regarding ball diffs for the mini-T and mini-B... I have spent a few days fighting one particular brand of ball diff and it has me outwitted at this time. I had a couple of old mini-t (1.0) diffs already and they worked great, but when I tried to find a "new" ball diff, the only one I could find was on eBay, and it is made by eRacingPro (Hong Kong). It looks great, and actually seemed to work for a few minutes, then slipped like crazy - I adjusted it and it worked for a minute or so, then slipped like crazy. I tore it apart and found the problem - it does NOT use a "thrust bearing" on the diff screw! it simply has a tiny bearing slid onto the screw (the screw is like an axle through the bearing) - then, in the diff, the screw puts side-force on the bearing trying to use it as a thrust bearing. This is similar to the concept used on pancars, BUT this tiny little bearing is just too small and even worse, the head of the diff screw actually jams up against the outer race of the tiny bearing, so you actually lock up the diff before you get it to adjust properly...
Any ideas on how to "fix" this thing? (OH - I'm an idiot because I had already ordered two more before I tested this on, so I REALLY need to find a fix... LOL!)
Any ideas on how to "fix" this thing? (OH - I'm an idiot because I had already ordered two more before I tested this on, so I REALLY need to find a fix... LOL!)
01-04-2021, 09:32 PM
#142
Tech Master
iTrader: (13)
Regarding ball diffs for the mini-T and mini-B... I have spent a few days fighting one particular brand of ball diff and it has me outwitted at this time. I had a couple of old mini-t (1.0) diffs already and they worked great, but when I tried to find a "new" ball diff, the only one I could find was on eBay, and it is made by eRacingPro (Hong Kong). It looks great, and actually seemed to work for a few minutes, then slipped like crazy - I adjusted it and it worked for a minute or so, then slipped like crazy. I tore it apart and found the problem - it does NOT use a "thrust bearing" on the diff screw! it simply has a tiny bearing slid onto the screw (the screw is like an axle through the bearing) - then, in the diff, the screw puts side-force on the bearing trying to use it as a thrust bearing. This is similar to the concept used on pancars, BUT this tiny little bearing is just too small and even worse, the head of the diff screw actually jams up against the outer race of the tiny bearing, so you actually lock up the diff before you get it to adjust properly...
Any ideas on how to "fix" this thing? (OH - I'm an idiot because I had already ordered two more before I tested this on, so I REALLY need to find a fix... LOL!)
Any ideas on how to "fix" this thing? (OH - I'm an idiot because I had already ordered two more before I tested this on, so I REALLY need to find a fix... LOL!)
01-05-2021, 08:44 AM
#144
Tech Adept
If I were you I would throw what you bought in the trash and wait for MIP to release their ball diff this month. It's proven and a top notch product.
01-05-2021, 05:46 PM
#146
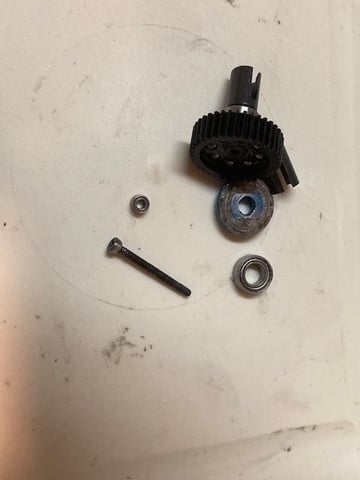
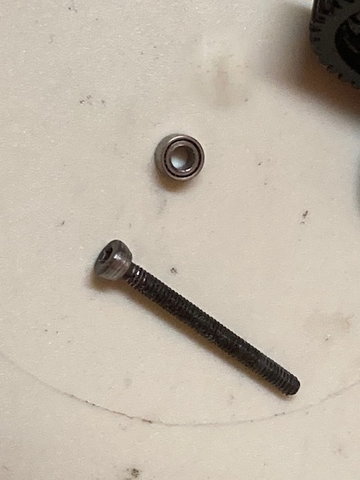
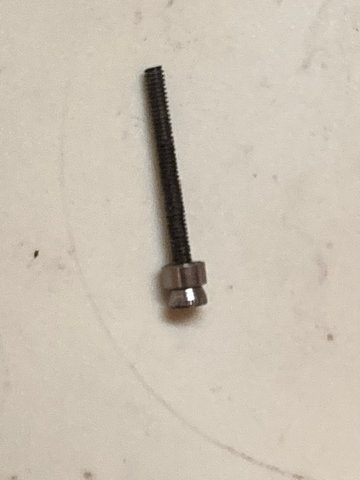
These are the pics I promised. As I hope you can see, the diff looks fine as it comes, all assembled, but the problem is that instead of a true thrust washer, it has that small silver bearing, placed on the diff screw such that the screw should put side force on the bearing, trying to use it as the thrust washer. If you look closely at the pics, you might notice my latest effort to "fix" this - I have ground the back side of the diff screw to taper it, so that it only contacts the inner race of the bearing. (As received, the back side of the screw bottoms out on both races of the bearing, preventing it for working as intended.)
01-05-2021, 06:08 PM
#147
Tech Addict
iTrader: (19)
I have only used gear diffs, never ball diffs.
What are the advantages of a ball diff for this vehicle?
Given that the stock gear diff is open (ie no diff cup, no way to add any fluid) one potential advantage for the ball diff would be the ability to add a little resistance (simulating perhaps 5k diff fluid).
Would the ball diff enable that?
What are the advantages of a ball diff for this vehicle?
Given that the stock gear diff is open (ie no diff cup, no way to add any fluid) one potential advantage for the ball diff would be the ability to add a little resistance (simulating perhaps 5k diff fluid).
Would the ball diff enable that?
01-06-2021, 01:13 AM
#148
Tech Adept
I would like to adjust my camber link angles and need longer ball studs, does anyone know if the ball studs on the Mini T/B are the same as the ones on the Mini 8ight?
01-06-2021, 02:52 PM
#149
So just got me a mini at our local carpet racing joint.
and cant find any info on the brushed motor... 12 turn? 15 turn?
and cant find any info on the brushed motor... 12 turn? 15 turn?
01-06-2021, 05:25 PM
#150
Tech Adept