


 60Likes
VBC D10
 11-05-2017, 02:59 AM
#46
Got my first ever VBC, I'm on stage 18 of the build, and I've already encountered a few problems.
1) The Kawada Spur they provide does not fit. The center pulley has a 3 prong setup for holding the spurs in place and the spurs are designed to go on a 4 prong setup. I tried this numerous times to make sure I wasn't making a mistake, and no... the provided spur does not fit. (Minor issue for me as I use 48 Pitch but I needed to buy a new spur and wanted one on in the interim)
2) The front aluminum spool shaft and spool outdrives don't seemed to be machined accurately. To insert the cups I had to add some oil and gradually tighten and loosen the screw to get them to fit in. They are so tight that if I want to replace any component I will need to just buy a new one. Compared to my Yokomo where they slipped in with ease, these are just way too tight. (Also, they are on a 30 degree offset to each other which seems weird but should be fine)
3) The last one, the warning for those who are up to stage 18, bag marked step 8. CHECK THE HOLE DEPTH FOR THE SWAYBAR BALL-JOINT!!! The ball-joint they provide and inform you to use is a 6mm long thread. The hole depth is only 4mm and the instructions do not mention anything about a shim for that stage. I tried screwing in a tapping screw and ended up stripping the plastic out. Since the front and back arms are the same I do have another that I can swap it for, but the information and parts provided are clearly wrong. They do provide a 2mm shim in the packet right next to the ball joints, so I assume that is for this section.
Edit: Actually scrap that last bit... I may need a new arm since the front uses the same hole. Awesome... =__= Might try locktight cause it's only a swaybar.
Note: Stage 19 says Bag Marked 18-20. That's an error.
==========
4) The shims for the rear arm (2mm, 1mm, arm, 1mm) are too much and force the rear block to kick back a bit. I had to remove the front 1mm shim and replace it with a 0.5mm. The arm is still a little sticky so may eventually replace the rear shim with a 0.5 as well and maybe a 0.2mm. Yes, I checked the cups to ensure they were in correctly.
5) Turnbuckles in stage 20 are not 32mm as mentioned in the book, they are 28mm in the box. The measurement provided for the setup of 17mm gives the wheels something like a 5 degree inverted camber, so adjust these to 12mm instead as that looks closer to the correct setup.
Just to be clear as well, the build is quite nice, so I'm not a disgruntled customer. These are just first impressions.
Last edited by NuttsnBolts; 11-05-2017 at 04:27 PM.
 11-05-2017, 05:03 PM
#47
Got my first ever VBC, I'm on stage 18 of the build, and I've already encountered a few problems.
1) The Kawada Spur they provide does not fit. The center pulley has a 3 prong setup for holding the spurs in place and the spurs are designed to go on a 4 prong setup. I tried this numerous times to make sure I wasn't making a mistake, and no... the provided spur does not fit. (Minor issue for me as I use 48 Pitch but I needed to buy a new spur and wanted one on in the interim)
2) The front aluminum spool shaft and spool outdrives don't seemed to be machined accurately. To insert the cups I had to add some oil and gradually tighten and loosen the screw to get them to fit in. They are so tight that if I want to replace any component I will need to just buy a new one. Compared to my Yokomo where they slipped in with ease, these are just way too tight. (Also, they are on a 30 degree offset to each other which seems weird but should be fine)
3) The last one, the warning for those who are up to stage 18, bag marked step 8. CHECK THE HOLE DEPTH FOR THE SWAYBAR BALL-JOINT!!! The ball-joint they provide and inform you to use is a 6mm long thread. The hole depth is only 4mm and the instructions do not mention anything about a shim for that stage. I tried screwing in a tapping screw and ended up stripping the plastic out. Since the front and back arms are the same I do have another that I can swap it for, but the information and parts provided are clearly wrong. They do provide a 2mm shim in the packet right next to the ball joints, so I assume that is for this section.
Edit: Actually scrap that last bit... I may need a new arm since the front uses the same hole. Awesome... =__= Might try locktight cause it's only a swaybar.
Note: Stage 19 says Bag Marked 18-20. That's an error.
==========
4) The shims for the rear arm (2mm, 1mm, arm, 1mm) are too much and force the rear block to kick back a bit. I had to remove the front 1mm shim and replace it with a 0.5mm. The arm is still a little sticky so may eventually replace the rear shim with a 0.5 as well and maybe a 0.2mm. Yes, I checked the cups to ensure they were in correctly.
5) Turnbuckles in stage 20 are not 32mm as mentioned in the book, they are 28mm in the box. The measurement provided for the setup of 17mm gives the wheels something like a 5 degree inverted camber, so adjust these to 12mm instead as that looks closer to the correct setup.
Just to be clear as well, the build is quite nice, so I'm not a disgruntled customer. These are just first impressions.
1) The Kawada Spur they provide does not fit. The center pulley has a 3 prong setup for holding the spurs in place and the spurs are designed to go on a 4 prong setup. I tried this numerous times to make sure I wasn't making a mistake, and no... the provided spur does not fit. (Minor issue for me as I use 48 Pitch but I needed to buy a new spur and wanted one on in the interim)
2) The front aluminum spool shaft and spool outdrives don't seemed to be machined accurately. To insert the cups I had to add some oil and gradually tighten and loosen the screw to get them to fit in. They are so tight that if I want to replace any component I will need to just buy a new one. Compared to my Yokomo where they slipped in with ease, these are just way too tight. (Also, they are on a 30 degree offset to each other which seems weird but should be fine)
3) The last one, the warning for those who are up to stage 18, bag marked step 8. CHECK THE HOLE DEPTH FOR THE SWAYBAR BALL-JOINT!!! The ball-joint they provide and inform you to use is a 6mm long thread. The hole depth is only 4mm and the instructions do not mention anything about a shim for that stage. I tried screwing in a tapping screw and ended up stripping the plastic out. Since the front and back arms are the same I do have another that I can swap it for, but the information and parts provided are clearly wrong. They do provide a 2mm shim in the packet right next to the ball joints, so I assume that is for this section.
Edit: Actually scrap that last bit... I may need a new arm since the front uses the same hole. Awesome... =__= Might try locktight cause it's only a swaybar.
Note: Stage 19 says Bag Marked 18-20. That's an error.
==========
4) The shims for the rear arm (2mm, 1mm, arm, 1mm) are too much and force the rear block to kick back a bit. I had to remove the front 1mm shim and replace it with a 0.5mm. The arm is still a little sticky so may eventually replace the rear shim with a 0.5 as well and maybe a 0.2mm. Yes, I checked the cups to ensure they were in correctly.
5) Turnbuckles in stage 20 are not 32mm as mentioned in the book, they are 28mm in the box. The measurement provided for the setup of 17mm gives the wheels something like a 5 degree inverted camber, so adjust these to 12mm instead as that looks closer to the correct setup.
Just to be clear as well, the build is quite nice, so I'm not a disgruntled customer. These are just first impressions.
I don't have the car, but thinking about getting one eventually. This seems really odd that the holes are only 4mm long, since they even sell a D10 stabiliser kit that has the 6mm ball connectors.
https://www.tqrcracing.com/shop/prod...asp?p_id=13089
11-05-2017, 05:18 PM
#48
I don't have the car, but thinking about getting one eventually. This seems really odd that the holes are only 4mm long, since they even sell a D10 stabiliser kit that has the 6mm ball connectors.
https://www.tqrcracing.com/shop/prod...asp?p_id=13089
https://www.tqrcracing.com/shop/prod...asp?p_id=13089
Also on the front, same issue with the suspension pin. I think the pin itself is a fraction too long as I had to take off the two blocks and press them down hard on the table to ensure the cups were in as far as possible. Even after doing that it feels like there is some pressure on the tip of the pin. Took out the 1mm and put in a 0.5mm in the FR section as well so now the arms are loose enough for me to be happy. Will do the same again on the rear as that now feels stiffer when comparing the two.
Edit: nah. Was too sloppy on the rear. Left it at 2mm, 0.5, arm, 1mm.
Last edited by NuttsnBolts; 11-05-2017 at 05:40 PM.
11-05-2017, 07:12 PM
#49
Tech Apprentice
Thanks for those valuable suggestions, we are working around the clock to fix the issues.
Wen
Wen
11-06-2017, 08:38 AM
#50
Got my first ever VBC, I'm on stage 18 of the build, and I've already encountered a few problems.
1) The Kawada Spur they provide does not fit. The center pulley has a 3 prong setup for holding the spurs in place and the spurs are designed to go on a 4 prong setup. I tried this numerous times to make sure I wasn't making a mistake, and no... the provided spur does not fit. (Minor issue for me as I use 48 Pitch but I needed to buy a new spur and wanted one on in the interim)
2) The front aluminum spool shaft and spool outdrives don't seemed to be machined accurately. To insert the cups I had to add some oil and gradually tighten and loosen the screw to get them to fit in. They are so tight that if I want to replace any component I will need to just buy a new one. Compared to my Yokomo where they slipped in with ease, these are just way too tight. (Also, they are on a 30 degree offset to each other which seems weird but should be fine)
3) The last one, the warning for those who are up to stage 18, bag marked step 8. CHECK THE HOLE DEPTH FOR THE SWAYBAR BALL-JOINT!!! The ball-joint they provide and inform you to use is a 6mm long thread. The hole depth is only 4mm and the instructions do not mention anything about a shim for that stage. I tried screwing in a tapping screw and ended up stripping the plastic out. Since the front and back arms are the same I do have another that I can swap it for, but the information and parts provided are clearly wrong. They do provide a 2mm shim in the packet right next to the ball joints, so I assume that is for this section.
Edit: Actually scrap that last bit... I may need a new arm since the front uses the same hole. Awesome... =__= Might try locktight cause it's only a swaybar.
Note: Stage 19 says Bag Marked 18-20. That's an error.
==========
4) The shims for the rear arm (2mm, 1mm, arm, 1mm) are too much and force the rear block to kick back a bit. I had to remove the front 1mm shim and replace it with a 0.5mm. The arm is still a little sticky so may eventually replace the rear shim with a 0.5 as well and maybe a 0.2mm. Yes, I checked the cups to ensure they were in correctly.
5) Turnbuckles in stage 20 are not 32mm as mentioned in the book, they are 28mm in the box. The measurement provided for the setup of 17mm gives the wheels something like a 5 degree inverted camber, so adjust these to 12mm instead as that looks closer to the correct setup.
Just to be clear as well, the build is quite nice, so I'm not a disgruntled customer. These are just first impressions.
1) The Kawada Spur they provide does not fit. The center pulley has a 3 prong setup for holding the spurs in place and the spurs are designed to go on a 4 prong setup. I tried this numerous times to make sure I wasn't making a mistake, and no... the provided spur does not fit. (Minor issue for me as I use 48 Pitch but I needed to buy a new spur and wanted one on in the interim)
2) The front aluminum spool shaft and spool outdrives don't seemed to be machined accurately. To insert the cups I had to add some oil and gradually tighten and loosen the screw to get them to fit in. They are so tight that if I want to replace any component I will need to just buy a new one. Compared to my Yokomo where they slipped in with ease, these are just way too tight. (Also, they are on a 30 degree offset to each other which seems weird but should be fine)
3) The last one, the warning for those who are up to stage 18, bag marked step 8. CHECK THE HOLE DEPTH FOR THE SWAYBAR BALL-JOINT!!! The ball-joint they provide and inform you to use is a 6mm long thread. The hole depth is only 4mm and the instructions do not mention anything about a shim for that stage. I tried screwing in a tapping screw and ended up stripping the plastic out. Since the front and back arms are the same I do have another that I can swap it for, but the information and parts provided are clearly wrong. They do provide a 2mm shim in the packet right next to the ball joints, so I assume that is for this section.
Edit: Actually scrap that last bit... I may need a new arm since the front uses the same hole. Awesome... =__= Might try locktight cause it's only a swaybar.
Note: Stage 19 says Bag Marked 18-20. That's an error.
==========
4) The shims for the rear arm (2mm, 1mm, arm, 1mm) are too much and force the rear block to kick back a bit. I had to remove the front 1mm shim and replace it with a 0.5mm. The arm is still a little sticky so may eventually replace the rear shim with a 0.5 as well and maybe a 0.2mm. Yes, I checked the cups to ensure they were in correctly.
5) Turnbuckles in stage 20 are not 32mm as mentioned in the book, they are 28mm in the box. The measurement provided for the setup of 17mm gives the wheels something like a 5 degree inverted camber, so adjust these to 12mm instead as that looks closer to the correct setup.
Just to be clear as well, the build is quite nice, so I'm not a disgruntled customer. These are just first impressions.
The Kawada gear is meant for a pan car diff. Replaced it with a Axon gear.
The aluminum front outdrives don't appear to be matched with the spool. I machined the bearing diameter so the bearings fit and the spool spins free. This was never a problem with the steel outdrives in the D-08 and D-09.
I shimmed the arm spacing as NuttsnBolts stated.
For the arms and the 6mm ball, you can drill the hole a bit further and the 6mm ball will fully screw into the arm.
One last problem I had was with the rear uprights. The bearings are much too tight causing them not to spin free. The two bearings must be drawn in parallel for the axel to have a chance of sliding through both bearings. I used the axel and a flat washer on the outside bearing. Then used a nut to pull the bearings into the upright. That method provided the best way to install the bearings in the upright so the axel slides through the bearings without binding.
The rest of the build went well, but I do wish VBC would provide better directions for the entire kit. There was no real direction for the battery mount hardware, just a incomplete drawing. A bit of explanation and some insight would go a long way, especially for items like the motor mount. There are many configurations, but no explanation from the designer's point of view of how the different adjustments affect the chassis. We'll all be doing a great deal of testing for motor mount configuration.
My D-10 with the aluminum chassis weigh 1304 grams. That is with all of the steel screws and a lite weight sedan body. Looking forward to the first test at TQ raceway on Thursday.
11-06-2017, 07:01 PM
#51
Tech Initiate
I am thinking about getting some color screws for the kit, does anyone got the full list of screw for this kit? thanks in advance.
11-06-2017, 07:36 PM
#52

I had exactly the same issues with my D-10 build as NuttsnBolts.
The Kawada gear is meant for a pan car diff. Replaced it with a Axon gear.
The aluminum front outdrives don't appear to be matched with the spool. I machined the bearing diameter so the bearings fit and the spool spins free. This was never a problem with the steel outdrives in the D-08 and D-09.
I shimmed the arm spacing as NuttsnBolts stated.
For the arms and the 6mm ball, you can drill the hole a bit further and the 6mm ball will fully screw into the arm.
One last problem I had was with the rear uprights. The bearings are much too tight causing them not to spin free. The two bearings must be drawn in parallel for the axel to have a chance of sliding through both bearings. I used the axel and a flat washer on the outside bearing. Then used a nut to pull the bearings into the upright. That method provided the best way to install the bearings in the upright so the axel slides through the bearings without binding.
The rest of the build went well, but I do wish VBC would provide better directions for the entire kit. There was no real direction for the battery mount hardware, just a incomplete drawing. A bit of explanation and some insight would go a long way, especially for items like the motor mount. There are many configurations, but no explanation from the designer's point of view of how the different adjustments affect the chassis. We'll all be doing a great deal of testing for motor mount configuration.
My D-10 with the aluminum chassis weigh 1304 grams. That is with all of the steel screws and a lite weight sedan body. Looking forward to the first test at TQ raceway on Thursday.
I can say that I had issues with my D09 spool outdrives for fitment as well, but I ended up rotating it until it had the best fit, but still needed some machining for the bearing fitment, only happened on one kit though so I thought it was just a fluke issue.
Tyree, please let us know how your testing goes as well, Thanks.
11-07-2017, 06:47 AM
#53
Tech Fanatic
Thanks for reporting the weight, Tyree. My past vbc's have all been slightly heavy. Good to hear that the D10 is light. What electronics are you running?
I had exactly the same issues with my D-10 build as NuttsnBolts.
The Kawada gear is meant for a pan car diff. Replaced it with a Axon gear.
The aluminum front outdrives don't appear to be matched with the spool. I machined the bearing diameter so the bearings fit and the spool spins free. This was never a problem with the steel outdrives in the D-08 and D-09.
I shimmed the arm spacing as NuttsnBolts stated.
For the arms and the 6mm ball, you can drill the hole a bit further and the 6mm ball will fully screw into the arm.
One last problem I had was with the rear uprights. The bearings are much too tight causing them not to spin free. The two bearings must be drawn in parallel for the axel to have a chance of sliding through both bearings. I used the axel and a flat washer on the outside bearing. Then used a nut to pull the bearings into the upright. That method provided the best way to install the bearings in the upright so the axel slides through the bearings without binding.
The rest of the build went well, but I do wish VBC would provide better directions for the entire kit. There was no real direction for the battery mount hardware, just a incomplete drawing. A bit of explanation and some insight would go a long way, especially for items like the motor mount. There are many configurations, but no explanation from the designer's point of view of how the different adjustments affect the chassis. We'll all be doing a great deal of testing for motor mount configuration.
My D-10 with the aluminum chassis weigh 1304 grams. That is with all of the steel screws and a lite weight sedan body. Looking forward to the first test at TQ raceway on Thursday.
The Kawada gear is meant for a pan car diff. Replaced it with a Axon gear.
The aluminum front outdrives don't appear to be matched with the spool. I machined the bearing diameter so the bearings fit and the spool spins free. This was never a problem with the steel outdrives in the D-08 and D-09.
I shimmed the arm spacing as NuttsnBolts stated.
For the arms and the 6mm ball, you can drill the hole a bit further and the 6mm ball will fully screw into the arm.
One last problem I had was with the rear uprights. The bearings are much too tight causing them not to spin free. The two bearings must be drawn in parallel for the axel to have a chance of sliding through both bearings. I used the axel and a flat washer on the outside bearing. Then used a nut to pull the bearings into the upright. That method provided the best way to install the bearings in the upright so the axel slides through the bearings without binding.
The rest of the build went well, but I do wish VBC would provide better directions for the entire kit. There was no real direction for the battery mount hardware, just a incomplete drawing. A bit of explanation and some insight would go a long way, especially for items like the motor mount. There are many configurations, but no explanation from the designer's point of view of how the different adjustments affect the chassis. We'll all be doing a great deal of testing for motor mount configuration.
My D-10 with the aluminum chassis weigh 1304 grams. That is with all of the steel screws and a lite weight sedan body. Looking forward to the first test at TQ raceway on Thursday.
11-07-2017, 01:24 PM
#55
Got this from Victor this morning, hopefully its all been rectified.
Thank you for your comments. We will look into these problems right away. We do discover that within the first batch there were some kits which were mixed with the pan car Kawada gears and some spool shafts were misaligned. Problems on these problems have been rectified and we are replacing these parts to our distributors or any customers encountered these problem, they can contact their distributors or contact us directly for replacements. We did find out that this is from one lot of the initial batch and these problems has been fixed.
Some misinformation on the manual will rectify in the next manual revision and will be posted online.
We will check on the rear upright as well. Thanks.
best regards,
Victor
www.vbcracing.com
11-07-2017, 04:49 PM
#56
Really glad to hear that any concerns are being addressed and rectified for future releases. 
Currently on stage 23 (slow build... work has me tied up) and noticed a few things.
The screws mentioned are 6mm, but they're actually 10mm to allow for the nuts to screw on. Not too sure about the nuts as they were tricky to attach so I'll keep an eye out in case they loosen, but the screw is screwed into the plastic so it wont affect your drive.
The next part is the 5mm ball joint for the steering. It's too short in my opinion and this is based on if the nut loosens the steering will go all haywire and come off. I'm going to put on a set of nylock nuts but I'll be ordering a set of longer ball joints. Probably the 8mm 31518 item.
=====
I also have an important question for one of the VBC representative. In stage 24 with the king pin and the red spacer, the one that goes into the steering block, the spacer in the book says it's part #T2-7075 (B-02-P30890). The spacers I have seen elsewhere are that same number and work fine (mostly found in the suspension arms), however this spacer on the king pin is not that part number.
It's the same outside diameter which is about 6mm, but the internal is 4mm, not 3mm. So my question is what would be the part number for this item?
Last edited by NuttsnBolts; 11-07-2017 at 05:26 PM.
11-07-2017, 08:34 PM
#57
Tech Initiate
I am a newbie on this site and also the hobby.. i want to know does D10 has got the standard setup sheet that i can follow with? as i try to search on the web but no luck. Just wondering if vbc website will upload one soon or i have to seek or wait for Petit rc ..
appreciate, thank you
appreciate, thank you
11-08-2017, 02:41 PM
#58
Really glad to hear that any concerns are being addressed and rectified for future releases.
Currently on stage 23 (slow build... work has me tied up) and noticed a few things.
The screws mentioned are 6mm, but they're actually 10mm to allow for the nuts to screw on. Not too sure about the nuts as they were tricky to attach so I'll keep an eye out in case they loosen, but the screw is screwed into the plastic so it wont affect your drive.
The next part is the 5mm ball joint for the steering. It's too short in my opinion and this is based on if the nut loosens the steering will go all haywire and come off. I'm going to put on a set of nylock nuts but I'll be ordering a set of longer ball joints. Probably the 8mm 31518 item.
=====
I also have an important question for one of the VBC representative. In stage 24 with the king pin and the red spacer, the one that goes into the steering block, the spacer in the book says it's part #T2-7075 (B-02-P30890). The spacers I have seen elsewhere are that same number and work fine (mostly found in the suspension arms), however this spacer on the king pin is not that part number.
It's the same outside diameter which is about 6mm, but the internal is 4mm, not 3mm. So my question is what would be the part number for this item?
I am a newbie on this site and also the hobby.. i want to know does D10 has got the standard setup sheet that i can follow with? as i try to search on the web but no luck. Just wondering if vbc website will upload one soon or i have to seek or wait for Petit rc ..
appreciate, thank you
appreciate, thank you
11-08-2017, 04:31 PM
#59
Thats the wrong spacer your trying to use there and they aren't actually used in that stage (probably a instruction issue thats being worked on), the ones you should use are in a individual package, these are 1mm thick and there are also some 2mm ones included in the kit. this is if you decide to flip the lower caster blocks and adjust the height setting.
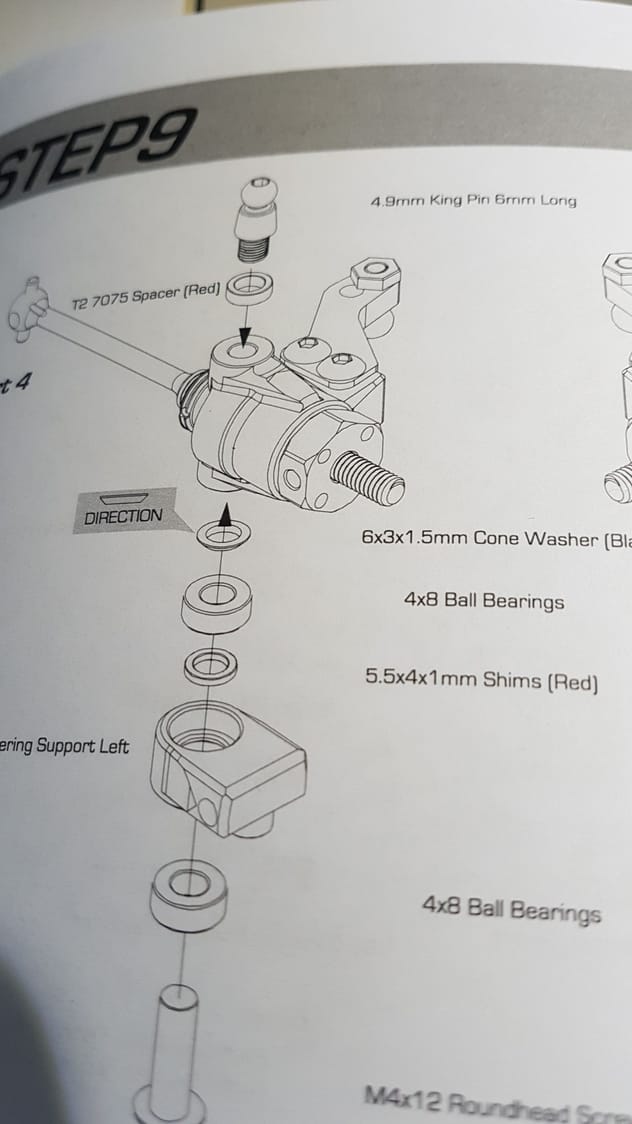
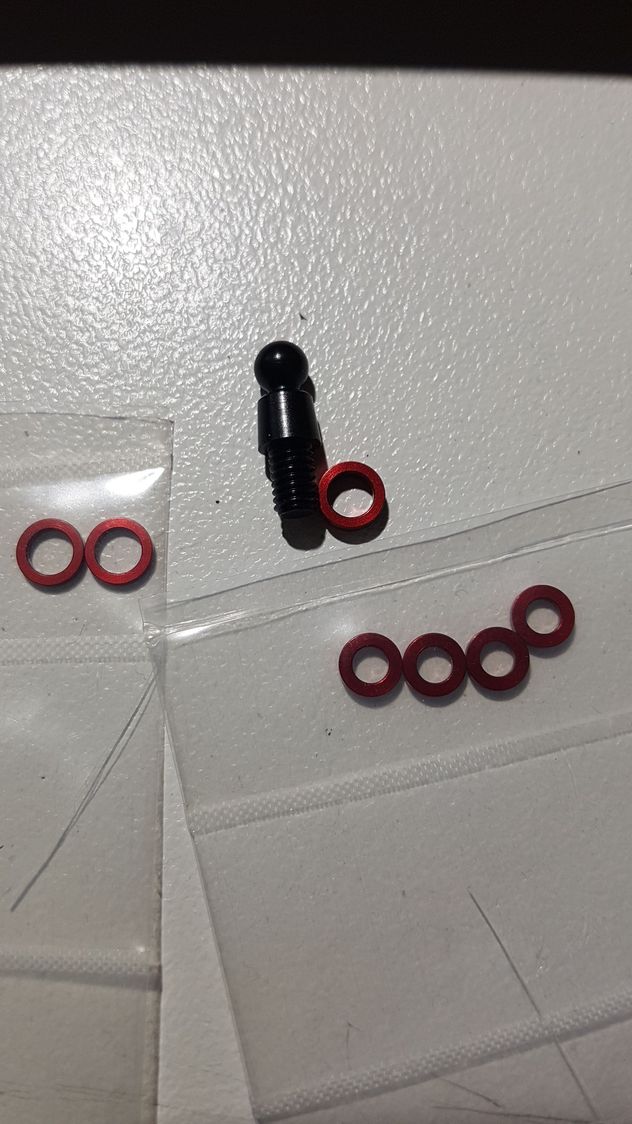
Spacer on the left is a 1mm thick, 4mm internal
Middle is 2mm thick, 4mm internal
Bottom right are some 1mm thick, 3mm internal.
Measuring the screw it's a 4mm diameter for the thread, so I assume the 4mm ones as the 3mm won't fit. The book is saying the T2 7075, so I'm just confused.
The 5.5x4x1mm are already in the car.
11-09-2017, 12:21 PM
#60
I just noticed the D10 has pill inserts in the arms too (not just the suspension holders) - interesting.