


 1Likes
New XRAY X12 All new 2014

 09-25-2013, 04:36 AM
#3

They will be releasing full information this week on the kit. Mario is working on the presentation now. I built mine last friday and ran it the first time Fri-Sunday. Its all new and works great out of the box. The changes made were definitely the right ones.
EA
EA
09-25-2013, 03:05 PM
#4
..... darn, i'd jus' got a team tamale rear pod, too. Anyways, i'm still probably gonna build it.
 .....(patiently waitin' for more info.)
darn, i'd jus' got a team tamale rear pod, too. Anyways, i'm still probably gonna build it......(patiently waitin' for more info.)
09-26-2013, 02:57 AM
#5
X12 2014 Specs onsale now !
09-26-2013, 03:38 AM
#6
http://www.teamxray.com/x12/
All the details are on. Worry it will not be durable as 2011. Especially the the antenna mount. But I want one.
All the details are on. Worry it will not be durable as 2011. Especially the the antenna mount. But I want one.
09-27-2013, 11:53 AM
#8
X12'14 Spare & Option parts onsale
10-09-2013, 09:41 AM
#13
Old one is 35mm between the screewholes
New one is 37,5mm between the screewholes
Since they are shorter they dont fit .... if you need pics of it lmk and ill post it
 10-12-2013, 07:53 AM
#15
my X12 2014 arrived few day ago, LHS said this is the only one that was shipped to them, the box was damaged but since it is the only one, I have to take it


the parts are separated based on components instead of steps make it not so newbie friendly and easily lost of careless.

I started off with rounding the edge of chassis and rear bottom plate, CA'ed of course. I also add few layers of CA to other carbon parts to dull the edge

The instruction manual are excellent as usual but the oil and grease are horrible, a silicon oil with 2 different weight label is crazy, the so called ball diff grease is by far the worst I seen.


Instead of doing the steering system, I started with chassis because I open the bag for carbon gluing, the part fit nicely together no extra process needed

The front mount of the center shock are supported with only one Alu. pole on each side. As expert in car crushing, I worry the pole or chassis will broke during major impact. therefore I add a weak spot (alu top screw) to protect the rest of the structure.

after the main chassis, I now move on the assemble the steering system. the following part are side specific, make sure you dont get the wrong one for spare

This is the steel ball of the steering system, out of 4 steel balls(2 from car and another 2 as spare) only one fit into the kingpin, I have to measure the remaining 3 for internal diameter, choose the biggest one and polish the inside of the bal to make it big enough to let kingpin pass, good job Xray, this is what you call quality ?

the front end is done, I love my CRC ball poper, it make pushing the balls into the arms so easy without deforming it. a 3mm shim will fix the diameter issue with its 1/8inch shaft

This is the ride height shim, I was so stupid at first thinking why Xray give me that many spanner

I moved on to assemble the diff, unlike most AE/CRC base diff, Xray design their diff with thrust bearing into the structure to protect their bearing. For most other car, I have to say thank you to Slapmaster2000 for making such wonderful thrust bearing kit to keep our diff running.

Instruction manual suggested that a small gap is needed for the rear axial for move freely, this is how I do it: I use the plastic bag (usually 0.15mm) as spacer for the gap, I pull it off after tighten the wheel hub and the gap is always right this way.

This is really confusing (700 or 3000), gladly I always use my own oil

Almost done, just need body post and electronics

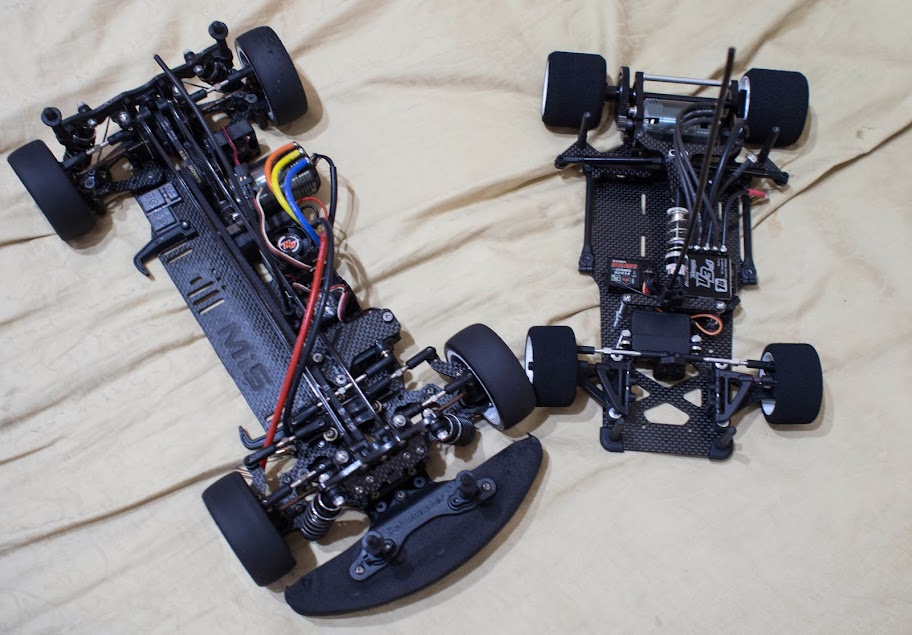
finally, It is done, I love black and silver theme, this applied to electronics too, here is my X12 2014 and Mi5. hopefully I can test it out ASAP, weather in Taipei is rather unstable yet all we have is outdoor track. please God, let me win a big lottory so I can built an RC arena for everyone to enjoy it
the parts are separated based on components instead of steps make it not so newbie friendly and easily lost of careless.
I started off with rounding the edge of chassis and rear bottom plate, CA'ed of course. I also add few layers of CA to other carbon parts to dull the edge
The instruction manual are excellent as usual but the oil and grease are horrible, a silicon oil with 2 different weight label is crazy, the so called ball diff grease is by far the worst I seen.
Instead of doing the steering system, I started with chassis because I open the bag for carbon gluing, the part fit nicely together no extra process needed
The front mount of the center shock are supported with only one Alu. pole on each side. As expert in car crushing, I worry the pole or chassis will broke during major impact. therefore I add a weak spot (alu top screw) to protect the rest of the structure.
after the main chassis, I now move on the assemble the steering system. the following part are side specific, make sure you dont get the wrong one for spare
This is the steel ball of the steering system, out of 4 steel balls(2 from car and another 2 as spare) only one fit into the kingpin, I have to measure the remaining 3 for internal diameter, choose the biggest one and polish the inside of the bal to make it big enough to let kingpin pass, good job Xray, this is what you call quality ?
the front end is done, I love my CRC ball poper, it make pushing the balls into the arms so easy without deforming it. a 3mm shim will fix the diameter issue with its 1/8inch shaft
This is the ride height shim, I was so stupid at first thinking why Xray give me that many spanner
I moved on to assemble the diff, unlike most AE/CRC base diff, Xray design their diff with thrust bearing into the structure to protect their bearing. For most other car, I have to say thank you to Slapmaster2000 for making such wonderful thrust bearing kit to keep our diff running.
Instruction manual suggested that a small gap is needed for the rear axial for move freely, this is how I do it: I use the plastic bag (usually 0.15mm) as spacer for the gap, I pull it off after tighten the wheel hub and the gap is always right this way.
This is really confusing (700 or 3000), gladly I always use my own oil
Almost done, just need body post and electronics
finally, It is done, I love black and silver theme, this applied to electronics too, here is my X12 2014 and Mi5. hopefully I can test it out ASAP, weather in Taipei is rather unstable yet all we have is outdoor track. please God, let me win a big lottory so I can built an RC arena for everyone to enjoy it