


 20Likes
Team Associated TC6 Thread


")
 01-05-2011, 09:16 PM
#1353
 All parts were there
 01-05-2011, 10:30 PM
#1357
mine went together with almost no issues. the ball cups were a little tight. there a cup that if you pinch them with a plires will loosen up. mine didnt as much as i wanted. so i took a old ball stud made a small groove in it. and put it in the dremel at real low rpm. worked great.
01-05-2011, 10:53 PM
#1358
Ok, I am going to atempt to help any one who is having troubles with your
TC6 ball cups.
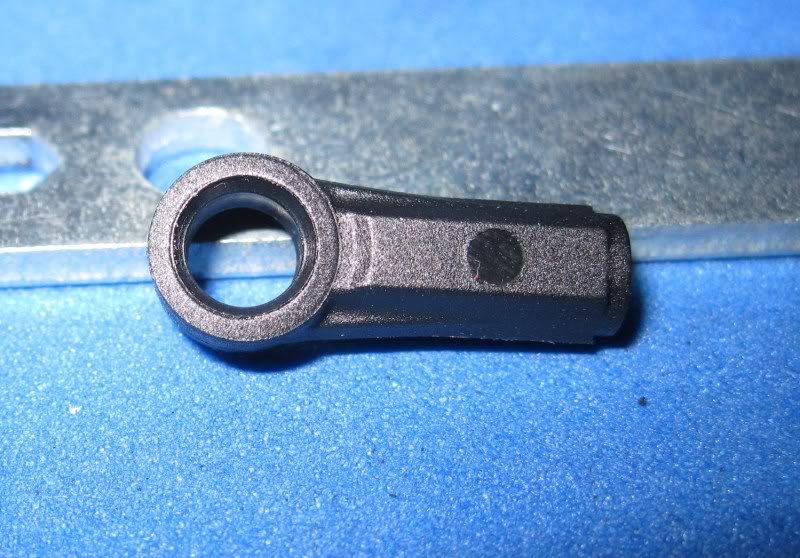
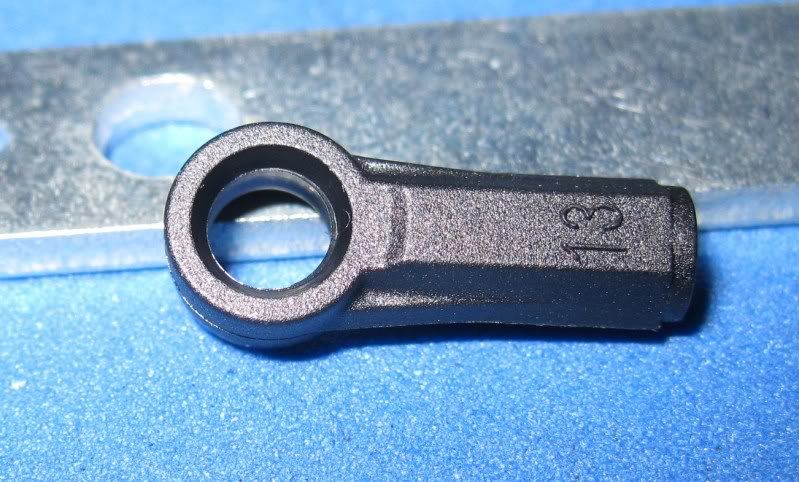
I was taught a long time ago when I got into Helis is there is a right way to install ball cups of this type. There is one side that is different from the other. The side with the numbers on them is molded differently than the other side. The side with the numbers has a larger opening and needs to be placed so the numbers face the ball you are snappiong them on to.
In these pictures you can see the difference in the two sides.
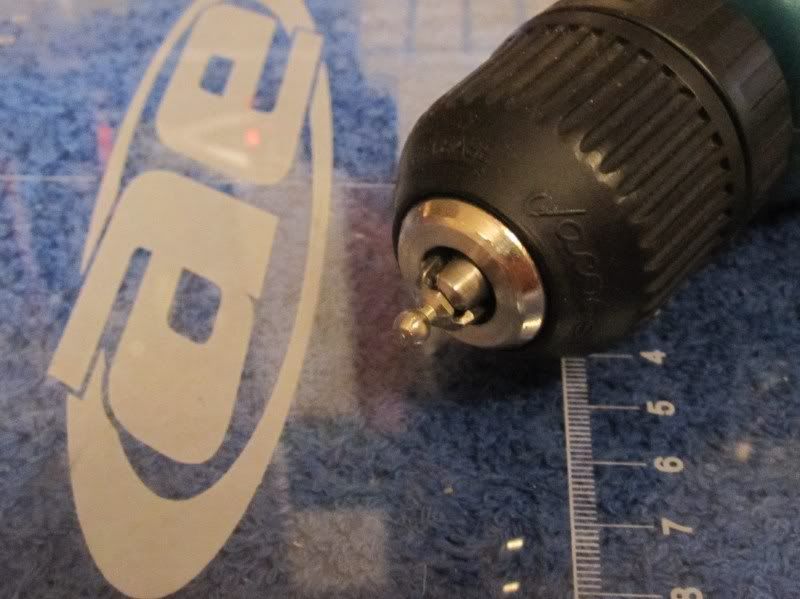
Another thing I learned when I got into helis is a neat way to perfectly size a tight ball cup. Squeezing a ball cup works in a pinch but alot of times isn't a permanent fix. What I am going to show you is not only easy but will make the cups fit perfectly.
1st take a spare ball of the proper size. Not all balls are the same. LOL Take a side cutter grab and squeeze the ball stud two different times 90* apart.
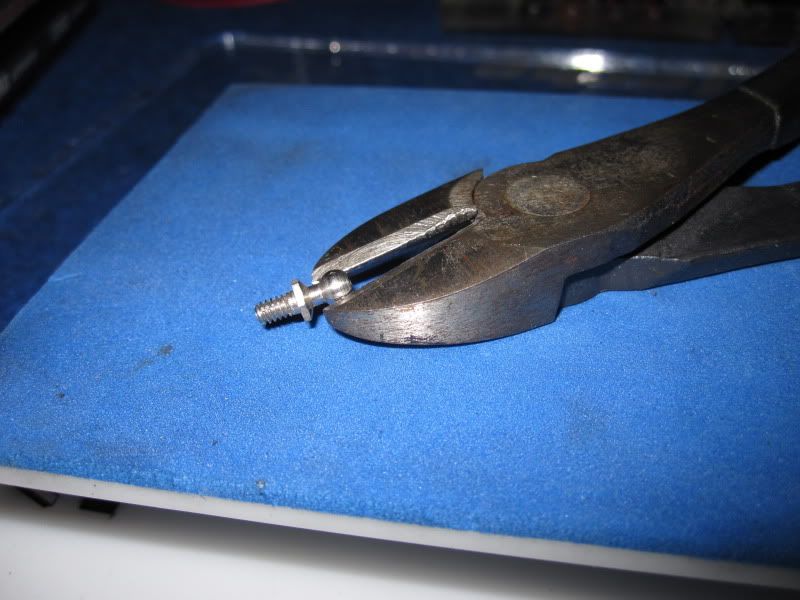
Squezze pretty hard as you ar trying to cut into the ballstud. You should now have 4 cuts 90* apart.
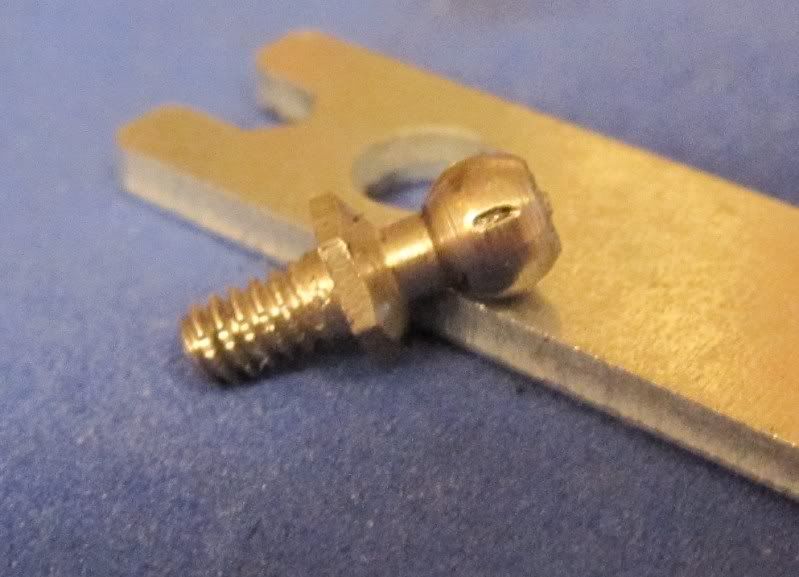
Once you have done this, click the ballstud into your favorite drill.
Pop a ball cup onto the ballstud and spin the drill for a few seconds.
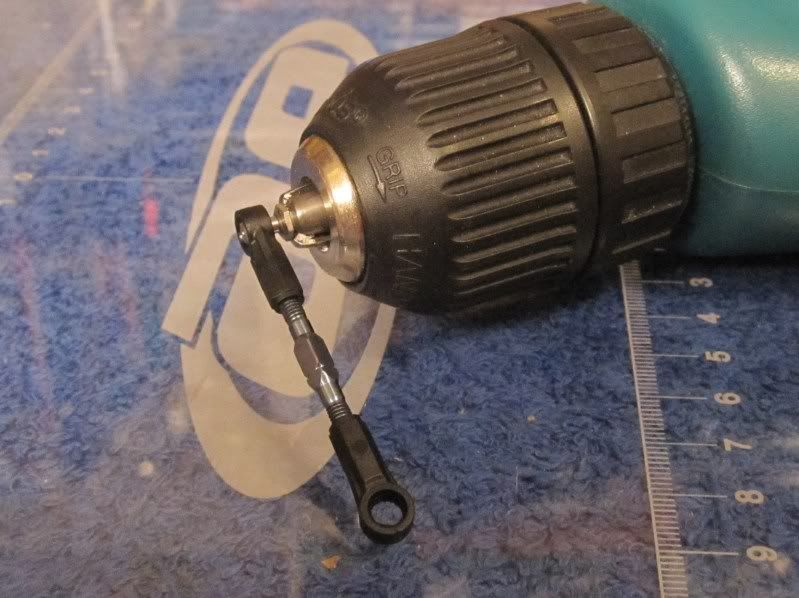
Different drills spin at different speeds so it will take a couple of times to figure how much you will need. Also some cups will be tighter than others. So take your time. After you spin it for a few seconds check it on the car. If it is still tight do it again until it is perfect. I usually get all my tierods setup first then size them as needed. It also makes it easier to hold. Once you get a feel for how long to spin the drill it will go really fast.
I hope this will help those of you having trouble with the fit of your ball cups. Also those of you who think yours are pretty good, give it a shot. I think every one will soon see that AE didn't make a mistake with their molds. They made very good cups that with a little TLC fit absolutely perfect.
TC6 ball cups.
I was taught a long time ago when I got into Helis is there is a right way to install ball cups of this type. There is one side that is different from the other. The side with the numbers on them is molded differently than the other side. The side with the numbers has a larger opening and needs to be placed so the numbers face the ball you are snappiong them on to.
In these pictures you can see the difference in the two sides.
Another thing I learned when I got into helis is a neat way to perfectly size a tight ball cup. Squeezing a ball cup works in a pinch but alot of times isn't a permanent fix. What I am going to show you is not only easy but will make the cups fit perfectly.
1st take a spare ball of the proper size. Not all balls are the same. LOL
Take a side cutter grab and squeeze the ball stud two different times 90* apart.Squezze pretty hard as you ar trying to cut into the ballstud. You should now have 4 cuts 90* apart.
Once you have done this, click the ballstud into your favorite drill.
Pop a ball cup onto the ballstud and spin the drill for a few seconds.
Different drills spin at different speeds so it will take a couple of times to figure how much you will need. Also some cups will be tighter than others. So take your time. After you spin it for a few seconds check it on the car. If it is still tight do it again until it is perfect. I usually get all my tierods setup first then size them as needed. It also makes it easier to hold. Once you get a feel for how long to spin the drill it will go really fast.
I hope this will help those of you having trouble with the fit of your ball cups. Also those of you who think yours are pretty good, give it a shot. I think every one will soon see that AE didn't make a mistake with their molds. They made very good cups that with a little TLC fit absolutely perfect.
Last edited by tqcookie; 01-05-2011 at 11:05 PM.
01-06-2011, 04:24 AM
#1361
TQCooky u the man!!!!! Thanks.
01-06-2011, 04:27 AM
#1362
Tech Adept
mine was issue free, too / first batch
but one thing to notice:
what shells are u us guys useing on your tc�s.
in europe we are mostly useing the
Protoform Mazda Speed6 or LTC-R
HB Mazda MPS
and for this shells, the front Body Stand is way to short
(have to put about 4mm unter it)
I love this car
greetings
but one thing to notice:
what shells are u us guys useing on your tc�s.
in europe we are mostly useing the
Protoform Mazda Speed6 or LTC-R
HB Mazda MPS
and for this shells, the front Body Stand is way to short
(have to put about 4mm unter it)
I love this car
greetings
01-06-2011, 05:00 AM
#1363
Ok after many sets of tires and quite a few different tries.. I have a base setup.. very drivable has great feel and is close to how the tc5 was feelig though this car is entirely a different animal then the 5.
From here I start working tire combos.. this is really good with Jaco Douple pink/orange double pink.. works well with crc magenta magenta also heavy ca front edge.. or double pink, double pink heavy ca front edge..
Tires start 56mm.. RD ht 4.3
Also note we have spec/r gear diffs around the car with 1000 wt in them.
Track high bite carpet
front
shock oil 50- wt, piston #3 tower #4, arm B
spring purple.
Anti dive front mt 0B- 1.5mm spacer... rear mt 1B 1.5mm
Arm mounted to rear bifg shim in front small in rear
Camber link #4
Steering A 1mm bump steer spacer on arm
Servo saver #7B
Front diff mounted high
droop 5
Rear
Shock oil 30- wt, piston #3 tower 5, arm b
Spring blue
pro Squat front mount 1B 1mm spacer rear mt 2B 2, & 1mm spacer
.5deg rear hub
ball on hub 1mm spacer inner hole(A)
Camber link "5
Arm mounted to rear, large spacer in front
Diff mounted high
Droop 4
Just a start I am sure I will refine more.
01-06-2011, 11:25 AM
#1364
Quality post above for the ball cup treatment! Thanks!
I've just got a Spec R diff for the Yoke, I remember someone saying what needed trimming on it but cant find the post. Anyone remember?
I've just got a Spec R diff for the Yoke, I remember someone saying what needed trimming on it but cant find the post. Anyone remember?