


 6Likes
Schumacher Mi4
 06-04-2009, 09:03 AM
#226
Tech Initiate
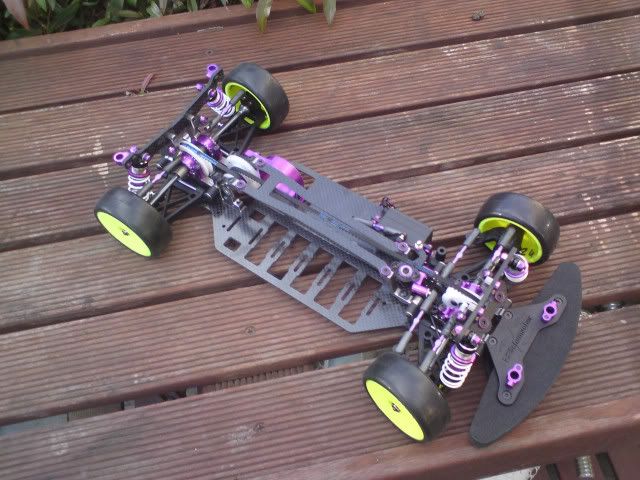
Yesterday I've mounted everything except the rear sway bar and the shocks (still missing the electronic...).
What I liked:
1- Great step by step labels on each bag linking the manual step to the bags.
2- Love the motor mount. Just wonderful.
3- The sway bars mounting is a lot better now. Now I can mount then with almost no gap or undesired movement.
4- Awesome top deck and bulkheads. The small carbon links between rear bulkheads seems a great idea.
5- Very good camber link ball connectors support, made of thick carbon.
6- The stock ball cups are now great! No need to go for RPM ones. Really good fit with no binding with the balls.
7- The hex wheels are thicker which allows a better contact with the wheel mount and doesn't required the use of washers anymore.
8- One more hole in the shock towers for a better adjustment.
9- A lot better diff pulley, which I believe will make the diffs to last much longer.
What could be improved:
1- The holes in the suspension wishbones are a little too tighter for the bars that support them. I needed to use a dremel a lot to find a perfect fit.
2- Wasted a lot of time with the dremel to enlarge the screw holes at the bottom of the chassis. Otherwise they would make the chassis not flat.
And for now it's about it
 I'll keep you posted.
 06-04-2009, 12:19 PM
#227
I would think you could just upsize the drilled holes a bit with larger drill, faster then dremeling...no?
06-04-2009, 12:59 PM
#228

Guess we shall ask someone with a car?
Did the sway bars come with the kit? Or were they separate?
And pics!!

eheheheh I wish... I wish...
Yesterday I've mounted everything except the rear sway bar and the shocks (still missing the electronic...).
What I liked:
1- Great step by step labels on each bag linking the manual step to the bags.
2- Love the motor mount. Just wonderful.
3- The sway bars mounting is a lot better now. Now I can mount then with almost no gap or undesired movement.
4- Awesome top deck and bulkheads. The small carbon links between rear bulkheads seems a great idea.
5- Very good camber link ball connectors support, made of thick carbon.
6- The stock ball cups are now great! No need to go for RPM ones. Really good fit with no binding with the balls.
7- The hex wheels are thicker which allows a better contact with the wheel mount and doesn't required the use of washers anymore.
8- One more hole in the shock towers for a better adjustment.
9- A lot better diff pulley, which I believe will make the diffs to last much longer.
What could be improved:
1- The holes in the suspension wishbones are a little too tighter for the bars that support them. I needed to use a dremel a lot to find a perfect fit.
2- Wasted a lot of time with the dremel to enlarge the screw holes at the bottom of the chassis. Otherwise they would make the chassis not flat.
And for now it's about it I'll keep you posted.
Yesterday I've mounted everything except the rear sway bar and the shocks (still missing the electronic...).
What I liked:
1- Great step by step labels on each bag linking the manual step to the bags.
2- Love the motor mount. Just wonderful.
3- The sway bars mounting is a lot better now. Now I can mount then with almost no gap or undesired movement.
4- Awesome top deck and bulkheads. The small carbon links between rear bulkheads seems a great idea.
5- Very good camber link ball connectors support, made of thick carbon.
6- The stock ball cups are now great! No need to go for RPM ones. Really good fit with no binding with the balls.
7- The hex wheels are thicker which allows a better contact with the wheel mount and doesn't required the use of washers anymore.
8- One more hole in the shock towers for a better adjustment.
9- A lot better diff pulley, which I believe will make the diffs to last much longer.
What could be improved:
1- The holes in the suspension wishbones are a little too tighter for the bars that support them. I needed to use a dremel a lot to find a perfect fit.
2- Wasted a lot of time with the dremel to enlarge the screw holes at the bottom of the chassis. Otherwise they would make the chassis not flat.
And for now it's about it
I'll keep you posted.Did the sway bars come with the kit? Or were they separate?
And pics!!
06-04-2009, 02:39 PM
#229
Tech Initiate
06-04-2009, 03:14 PM
#230
Tech Initiate
The holes are fine. The issue is the fit of the screw head in the chassis hole underneath. If with don't enlarge the screw head socket in the chassis the screw head won't fit correctly. This normally happens with most of the cars, I think.
06-04-2009, 03:16 PM
#231
Tech Initiate
 No time until then...
06-04-2009, 04:43 PM
No time until then...
06-04-2009, 04:43 PM
#232
sounds like he is saying the counter sunk part of the screw hole is what he enlarged so the screw would go deeper in the chassis plate
06-04-2009, 05:29 PM
#234
Tech Initiate
This Saturday I'll fit the electronics and setup the car. Pics by then
 06-05-2009, 06:29 AM
#236
06-05-2009, 07:52 AM
#237
Interesting find. Generally a flathead is 82 degs. (at least in SAE), and the M3 stainless RC screws I just checked since this had me wondering measure pretty close to that. One easy way to check if your opening the counterbores is...use a felt pen and mark the screw head where it seats, insert into hole you opened up and using the ball driver push and turn to rub off the felt pen, remove screw and look for full contact.
This could seem a bit anal to some but imagine the screw head only contacting near head, then what an impact may do to shift and hold tweak.
http://www.mcfeelys.com/tech/dimensions.htm
This could seem a bit anal to some but imagine the screw head only contacting near head, then what an impact may do to shift and hold tweak.
http://www.mcfeelys.com/tech/dimensions.htm
06-05-2009, 08:24 AM
#238
sae is 82*, but sedans using sae fasteners are pretty much extinct.
 i think 90* is the standard countersink angle for metric fasteners under something like m20. i am not 100% certain, but i've not found any information to contradict this.
 while, on the surface it sounds a bit meticulous, all it takes is for one guy to redo his chassis at 82* to cause a bunch of bad press.
(not to mention the troubles he might have fixing the issue).the better solution might be to find some shallower screws, just for the lower chassis. the stuff that ships with the kit is a bit bulky. for what it's worth, the take-off steel screws that schumacher imports are simply stout. they are really low, and might even be a class 12.9. the socket fits well too. (two packets of TS-953 should get it done).
06-05-2009, 02:37 PM
#239
I had used an 82 on mine and havnt had a problem. Yes i thin m3 is really 90, but i make stuff uber tight so it wont shift either way...
06-06-2009, 02:10 AM
#240
Tech Master
You have to be very careful countersinking the chassis. All of the holes are in the region that is pocket milled on the other side. So this means that you only have 2mm to play with - and 2mm is the "official" depth that you need to countersink to for an M3 head. What i'm trying to say is if you countersink to the "correct" depth, you could end up with a hole that is bigger than 3mm, and risk a screw pulling through.
Also, make sure you have a very sharp bit, because if not i think you could break the carbon layers up, as you are effectively pushing on air - as the pocketed side isn't in contact with anything.
Oh, and yeah, I would use a bit with the correct angle on it.
Also, make sure you have a very sharp bit, because if not i think you could break the carbon layers up, as you are effectively pushing on air - as the pocketed side isn't in contact with anything.
Oh, and yeah, I would use a bit with the correct angle on it.

