


 288Likes
Tamiya mini cooper
 01-07-2009, 01:38 PM
#8086
Tech Elite

iTrader: (7)
Join Date: Jun 2002
Location: Melbourne, Australia. Home of rc-mini.net
Posts: 3,549
Trader Rating: 7 (100%+)
Define 'HPI'?
RS4 Mini? If so, then the answer is yes....
RS4 Mini? If so, then the answer is yes....
 01-07-2009, 02:29 PM
#8087
tony another question what is a good shock spring combo for an hpi mini and nitro mini any info would help thanks
01-07-2009, 02:55 PM
#8088
Placed an order for an A210 1/12-scale 4WD car at the hobby shop last night. The track and wheelbase look about right for a Mini body. Don't worry, it's for drifting only.
01-07-2009, 08:52 PM
#8089
Tony, just visited your web site cause it looked like you had added a lot of new stuff. There doesn't seem to be a scroll bar, so I can't scroll down the page. I was wondering if I was the only one that is having this problem.
My computer skills are minimal, so if anyone could assist, it would be appreciated.
My computer skills are minimal, so if anyone could assist, it would be appreciated.
01-07-2009, 10:01 PM
#8090
Tech Elite
iTrader: (7)
Join Date: Jun 2002
Location: Melbourne, Australia. Home of rc-mini.net
Posts: 3,549
Trader Rating: 7 (100%+)
Scroll bar is there on the r/hand side just like normal.
But..it is damn hard to see on some browsers. IE7 seems to white it out a bit. But it IS there...
In IE it looks like this - really light, you can barely see it.

In Firefox it's more normal

But..it is damn hard to see on some browsers. IE7 seems to white it out a bit. But it IS there...
In IE it looks like this - really light, you can barely see it.
In Firefox it's more normal
01-07-2009, 11:14 PM
#8091
Ohhhh, now I get it. Makes sense.
Now, should I tell you guys about the "incident" last night when I was gluing tires? I'll go so far as to say that there was a "spray" of glue that went 360 degrees, and I had to act quickly because my mouth was glued shut for a second there. (Did I mention that I had a tire stuck to my hand, too?)
If only there was a camera running.
Jim
 .....kinda embarasing trip to the hospital to explain that
 !!!! lol.......
We'll see Sunday how the whole "gluing" thing works out!!! I know it's been kicked around here a few times......I just hope you get it right....and the car has some traction left....(don't coat the whole tire Jim
 !!!).....I'm still not convinced
 !!!
!!!R
01-08-2009, 02:51 AM
#8093
ive tried a lot of different things that have been suggested in this thread and i can say after having some terrible traction roll problems on our asphalt court track, gluing the side walls on my front tyre's has solved a great deal of those problems. Now if I could only stop the rear end lifting when braking extremely hard off our main straight into the hairpin. Wish i could video it as some of the stacks are a laugh.
With racing starting again next weekend( it sucks here in SA with both clubs closed for 5 weeks ) i think it might be time to break out the lead and put some more in the back somewhere. I'm sitting at around 1440 grams atm so i figure another 40 or 50 in the back end somewhere would help. And maybe give the front suspension a tweak too. I had Blue springs in the front with 35wt oil but like what Calvin was saying a page or so back, I might try heavier weight oil like 50wt and white super stiff springs in the front.
Thoughts?
With racing starting again next weekend( it sucks here in SA with both clubs closed for 5 weeks
) i think it might be time to break out the lead and put some more in the back somewhere. I'm sitting at around 1440 grams atm so i figure another 40 or 50 in the back end somewhere would help. And maybe give the front suspension a tweak too. I had Blue springs in the front with 35wt oil but like what Calvin was saying a page or so back, I might try heavier weight oil like 50wt and white super stiff springs in the front. Thoughts?
01-08-2009, 08:44 AM
#8094
Hi guys, Ill post this in Spanish, but Im translating it to English too, it's just im kinda busy right now.....
Hope you understand while the translation is ready ....
Hola, esto es lo que sucede cuando las vacaciones dejan un buen tiempo libre... Es una mejora a mi anterior tecnica de bloquear diferenciales de engranajes en los Minis....
1. Lo que sucedia antes era que para evitar que uno de los vasos quedara descentrado.... se ponia el empaque en el lado por donde se cierra con la tapa plastica.... Pero esto doblaba la tapa en el centro, quedando por encima del vaso... con lo cual generaba mucha friccion con el interior del chassis.
La otra opcion era...
2. Se ponia el empaque de caucho o junta torica no encima del planetario que queda cerca a la tapa del diff.... sino en el fondo... para evitar que la tapa se doblara, pero lo malo de esto es que se movia todo el conjunto de engranajes hacia arriba y con esto los vasos no quedaban centrados, con lo cual todo el diferencial quedaba movido hacia un lado... rozando con el chassis .........
Entonces que hacemos :?: :?: :?:
Pues es algo muy simple....
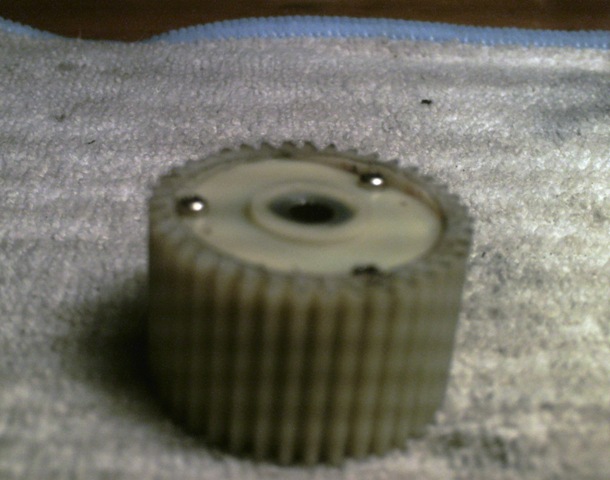
Asi es nuestro diferencial.. sin hacerle naa
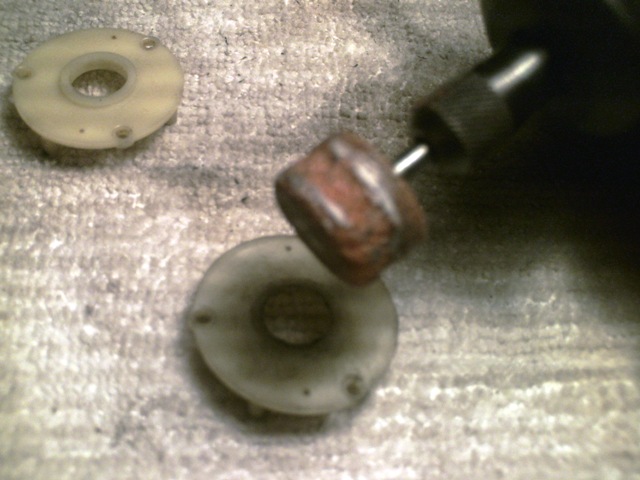
Ahora quitamos la tapa.... y con la dremel o una lima de la parienta jajaja quitamos la parte que sobresale en la tapa, parte superior...
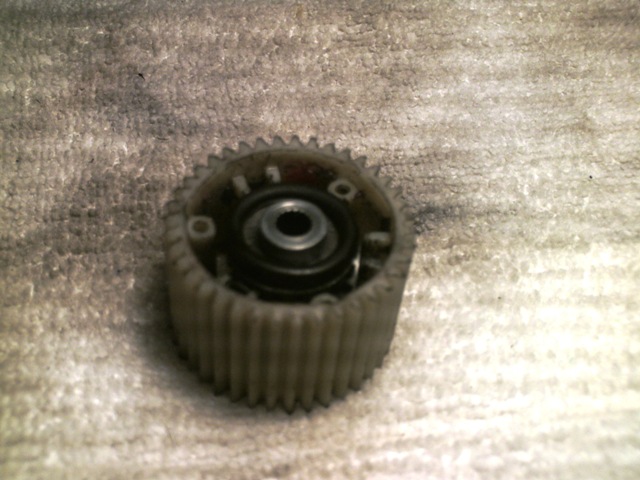
Despues de limado queda algo asi... comparen........ a la derecha ya esta limada, la izq esta sin tocar...
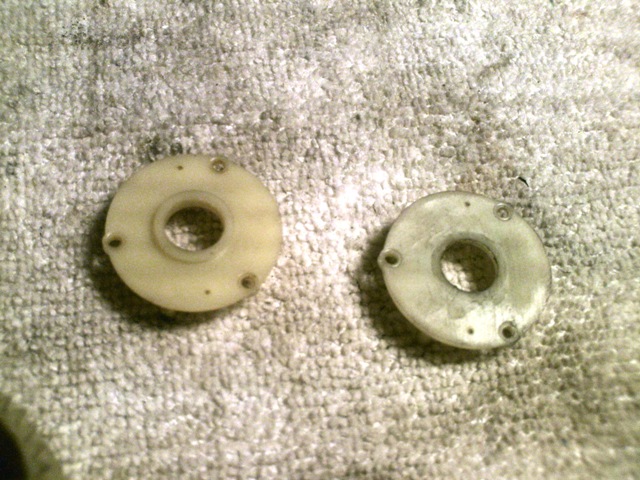
Ven la diferencia???
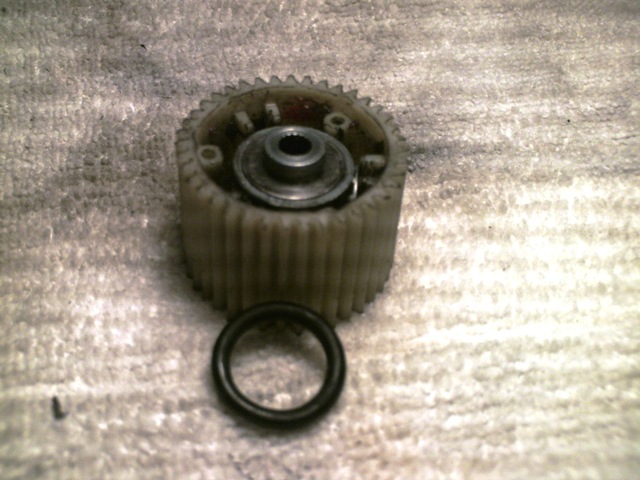
Se coloca el empaque, sobre el planetario, con eso endureceremos la accion diferencial en cierto grado, dependiendo del grosor de esta..... ESTE EMPAQUE O JUNTA TORICA ES LO QUE PERMITE QUE EL DIFERENCIAL QUEDE BIEN APRETADO, ----- NO ES UN EJE RIGIDO ----.... ESTE PASO ES EL ALMA DEL PROCESO HEHE... PERO AL IGUAL QUE COLOCAR LA TORICA, LIMAR LA SALIDA DEL VASO TAMBIEN ES MUY IMPORTANTE YA QUE SI NO LO HACEMOS, COMENZAREMOS A TENER FRICCION DEL DIFERENCIAL CON EL CHASSIS... COSA Q NO QUEREMOS...
---------------------------------------------------------
El lijar la tapa evitara que la tapa roze con el chassis y tb sirve si lo desbloquas... El carro perdera direccion en la entrada de curva pero saldra muuuy bn... puedes experimentar con diferentes grosores de las juntas toricas o empaques....
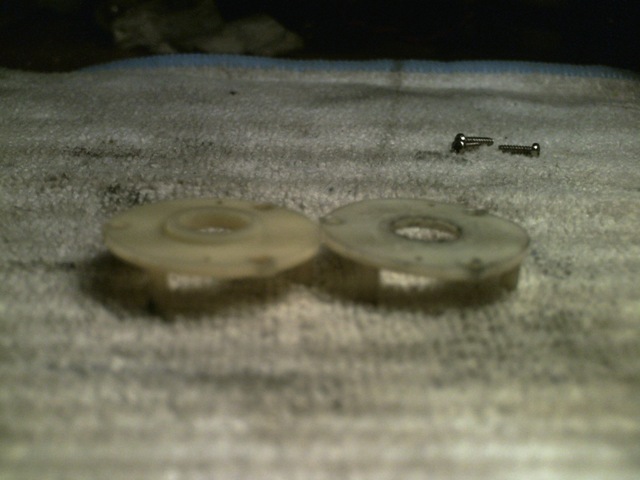
Ya terminado se ensambla normalmente
Espero les sirva como a mi.... la falta de direccion cuando suelte el acelerador se puede ayudar a equilibrar con algo de setup....
Saludos!!!!
---------------------------------------------------------------------------------------
INFO ADICIONAL:
Bueno, al ser los M03 de traccion delantera, la mayor parte de la fuerza al acelerar (sobre todo en curva, cuando el auto esta apoyado en un lado mas q otro) se pierde por la accion del diferencial, que deja que todo el par del motor se desvie facilmente por la rueda que este menos cargada (la misma que tiene menos agarre) o sea la rueda que cruza el radio interno en una curva..... Esta rueda comienza a girar pero como no apoya muy bn en el suelo la fuerza no se transmite en velocidad... no es muy eficiente...
Pero con un diff apretaito como el ejemplo o un eje rigido, la fuerza no se pierde en la rueda interna.... y se transmite igual o parcialmente, hacia las dos ruedas (esto lo define la dureza del diferencial...) Logrando que las dos ruedas transmitan eficientemente la fuerza hacia el suelo....
Por lo tanto logramos una salida de curva muuucho mejor, mas rapida y con mas direccion....
Como contraparte perdemos direccion cuando soltamos gas (generalmente a la entrada de curva).... Pero esto lo he logrado compensar con algo de setup.... muelles medios alante.... los hidraulicos no los toque.... tampoco el droop, y 40 grs, distribuidos ... 15 en cada lado de los soportes de baterias.... y 10 en el bumper delantero.... con eso tenemos mas peso yendo hacia adelante, con lo que ganamos direccion y el tren trasero todavia se mantiene estable....
Esto es un poco del setup que hize, obivamente no a todos les gusta el comportamiento del carro al principio y recomiendo lo prueben sin plomos al principio para que sientan como va cambiando...
Hope you understand while the translation is ready ....
Hola, esto es lo que sucede cuando las vacaciones dejan un buen tiempo libre... Es una mejora a mi anterior tecnica de bloquear diferenciales de engranajes en los Minis....
1. Lo que sucedia antes era que para evitar que uno de los vasos quedara descentrado.... se ponia el empaque en el lado por donde se cierra con la tapa plastica.... Pero esto doblaba la tapa en el centro, quedando por encima del vaso... con lo cual generaba mucha friccion con el interior del chassis.
La otra opcion era...
2. Se ponia el empaque de caucho o junta torica no encima del planetario que queda cerca a la tapa del diff.... sino en el fondo... para evitar que la tapa se doblara, pero lo malo de esto es que se movia todo el conjunto de engranajes hacia arriba y con esto los vasos no quedaban centrados, con lo cual todo el diferencial quedaba movido hacia un lado... rozando con el chassis .........
Entonces que hacemos :?: :?: :?:
Pues es algo muy simple....
Asi es nuestro diferencial.. sin hacerle naa
Ahora quitamos la tapa.... y con la dremel o una lima de la parienta jajaja quitamos la parte que sobresale en la tapa, parte superior...
Despues de limado queda algo asi... comparen........ a la derecha ya esta limada, la izq esta sin tocar...
Ven la diferencia???
Se coloca el empaque, sobre el planetario, con eso endureceremos la accion diferencial en cierto grado, dependiendo del grosor de esta..... ESTE EMPAQUE O JUNTA TORICA ES LO QUE PERMITE QUE EL DIFERENCIAL QUEDE BIEN APRETADO, ----- NO ES UN EJE RIGIDO ----.... ESTE PASO ES EL ALMA DEL PROCESO HEHE... PERO AL IGUAL QUE COLOCAR LA TORICA, LIMAR LA SALIDA DEL VASO TAMBIEN ES MUY IMPORTANTE YA QUE SI NO LO HACEMOS, COMENZAREMOS A TENER FRICCION DEL DIFERENCIAL CON EL CHASSIS... COSA Q NO QUEREMOS...
---------------------------------------------------------
El lijar la tapa evitara que la tapa roze con el chassis y tb sirve si lo desbloquas... El carro perdera direccion en la entrada de curva pero saldra muuuy bn... puedes experimentar con diferentes grosores de las juntas toricas o empaques....
Ya terminado se ensambla normalmente
Espero les sirva como a mi.... la falta de direccion cuando suelte el acelerador se puede ayudar a equilibrar con algo de setup....
Saludos!!!!
---------------------------------------------------------------------------------------
INFO ADICIONAL:
Bueno, al ser los M03 de traccion delantera, la mayor parte de la fuerza al acelerar (sobre todo en curva, cuando el auto esta apoyado en un lado mas q otro) se pierde por la accion del diferencial, que deja que todo el par del motor se desvie facilmente por la rueda que este menos cargada (la misma que tiene menos agarre) o sea la rueda que cruza el radio interno en una curva..... Esta rueda comienza a girar pero como no apoya muy bn en el suelo la fuerza no se transmite en velocidad... no es muy eficiente...
Pero con un diff apretaito como el ejemplo o un eje rigido, la fuerza no se pierde en la rueda interna.... y se transmite igual o parcialmente, hacia las dos ruedas (esto lo define la dureza del diferencial...) Logrando que las dos ruedas transmitan eficientemente la fuerza hacia el suelo....
Por lo tanto logramos una salida de curva muuucho mejor, mas rapida y con mas direccion....
Como contraparte perdemos direccion cuando soltamos gas (generalmente a la entrada de curva).... Pero esto lo he logrado compensar con algo de setup.... muelles medios alante.... los hidraulicos no los toque.... tampoco el droop, y 40 grs, distribuidos ... 15 en cada lado de los soportes de baterias.... y 10 en el bumper delantero.... con eso tenemos mas peso yendo hacia adelante, con lo que ganamos direccion y el tren trasero todavia se mantiene estable....
Esto es un poco del setup que hize, obivamente no a todos les gusta el comportamiento del carro al principio y recomiendo lo prueben sin plomos al principio para que sientan como va cambiando...
01-08-2009, 08:45 AM
#8095
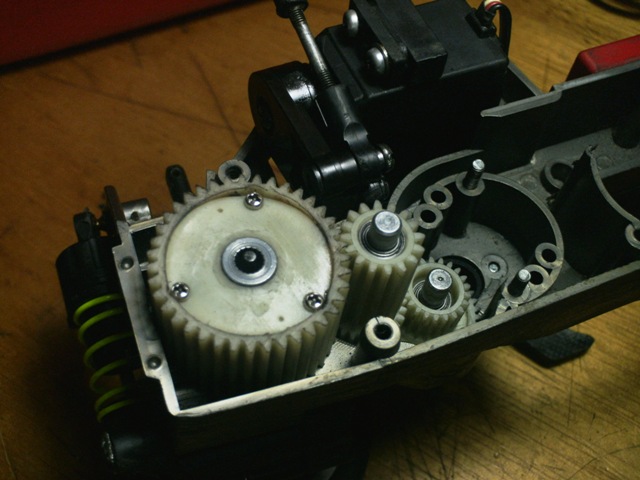
Como muchos sabemos el sujetador este no es muy bueno jejeje pq el tornillo se afloja cada rato....Y las baterias un poco mas grandes no caben bien...
La idea es simple, sustituir los tornillos y poner unos separadores que nos dejen graduar el espacio para la bateria....
El tornillo de la parte giratoria es el que mas problema da [smilie=yellowcolorz4_pdt_03.gif] entonces lo cambiamos por uno mas grueso (no seais bestias) y un poco mas largo con eso tenemos una buena sujeccion al chassis... y le ponemos una arandelita gruesa para que quede paralelo al chassis (yo utilize uno de los bujes metalicos que trae el Mini cuando no tienes rodamientos) y el otro tornillo lo dejas y asi queda...

Lo doradito es el buje metalico....

Y listo... ahora para cuadrar el espacio para la bateria le ponemos al otro lado unos tornillos mas largos y si un poco mas gruesos para poder darle espacio a la separacion.... y �c�mo separamos la placa del chassis? Con resortes!!!
Asi queda con el tama�o que queramos y lo modificamos dandole vueltitas a lso tornillos ...
Asi..

y asi quedan los tornillos....

Es simple pero queda bien sujetada la bateria y tambien te da espacio para meter una LiPo mas larguita jajaja......Lo unicio que faltaria para un buena LiPo seria dejar el espacio de la bateria, rectangular...... y hay si nos cabe de lujo jajaja
La idea es simple, sustituir los tornillos y poner unos separadores que nos dejen graduar el espacio para la bateria....
El tornillo de la parte giratoria es el que mas problema da [smilie=yellowcolorz4_pdt_03.gif] entonces lo cambiamos por uno mas grueso (no seais bestias) y un poco mas largo con eso tenemos una buena sujeccion al chassis... y le ponemos una arandelita gruesa para que quede paralelo al chassis (yo utilize uno de los bujes metalicos que trae el Mini cuando no tienes rodamientos) y el otro tornillo lo dejas y asi queda...
Lo doradito es el buje metalico....
Y listo... ahora para cuadrar el espacio para la bateria le ponemos al otro lado unos tornillos mas largos y si un poco mas gruesos para poder darle espacio a la separacion.... y �c�mo separamos la placa del chassis? Con resortes!!!
Asi queda con el tama�o que queramos y lo modificamos dandole vueltitas a lso tornillos ...
Asi..
y asi quedan los tornillos....
Es simple pero queda bien sujetada la bateria y tambien te da espacio para meter una LiPo mas larguita jajaja......Lo unicio que faltaria para un buena LiPo seria dejar el espacio de la bateria, rectangular...... y hay si nos cabe de lujo jajaja
01-08-2009, 05:57 PM
#8096
Find attached my three Mini's. One of each chassis length and all setup differently.
For those that want to know, the short wheel base Swift shell is by Active.
Regards,
Calvin.
For those that want to know, the short wheel base Swift shell is by Active.
Regards,
Calvin.
Last edited by caltek1; 01-08-2009 at 05:59 PM. Reason: typo
01-09-2009, 12:58 AM
#8097
Tech Elite
iTrader: (7)
Join Date: Jun 2002
Location: Melbourne, Australia. Home of rc-mini.net
Posts: 3,549
Trader Rating: 7 (100%+)
What are YOU lookin at?......

Yep, if you're looking at something different in the way of bodyshells for the new racing season, this might be one that could stand out in the crowd.
Check it out here at rc-mini.
Yep, if you're looking at something different in the way of bodyshells for the new racing season, this might be one that could stand out in the crowd.
Check it out here at rc-mini.
01-09-2009, 02:55 AM
#8098
The production version of the HPI Mini prototype will now be called "Switch." The chassis and suspension arms are made from transluscent white nylon, allowing you to somewhat see the drivetrain and diff. The motor and drive gear is still in-line. The Japanese magazine article touts is as a low-price, fun car. The sad part is that the choice of bodies will be limited to the Fiat Abarth 500 and Alfa Romeo. That's right, no Mini.
01-09-2009, 12:01 PM
#8099
Tech Elite
iTrader: (7)
Join Date: Jun 2002
Location: Melbourne, Australia. Home of rc-mini.net
Posts: 3,549
Trader Rating: 7 (100%+)
But....at least it sounds like the car is 'entry-level' and therefore it might actually be on a similar level of performance to the M03, instead of miles ahead as we feared it might be....
01-09-2009, 03:25 PM
#8100
It definitely is entry level, and in this department HPI has more sense than Tamiya by making ball bearings standard. Price is supposed to be about 1000 yen less than the M03.