


 321Likes
Yokomo BD9


 05-12-2019, 08:14 PM
#379
05-13-2019, 01:57 PM
#381
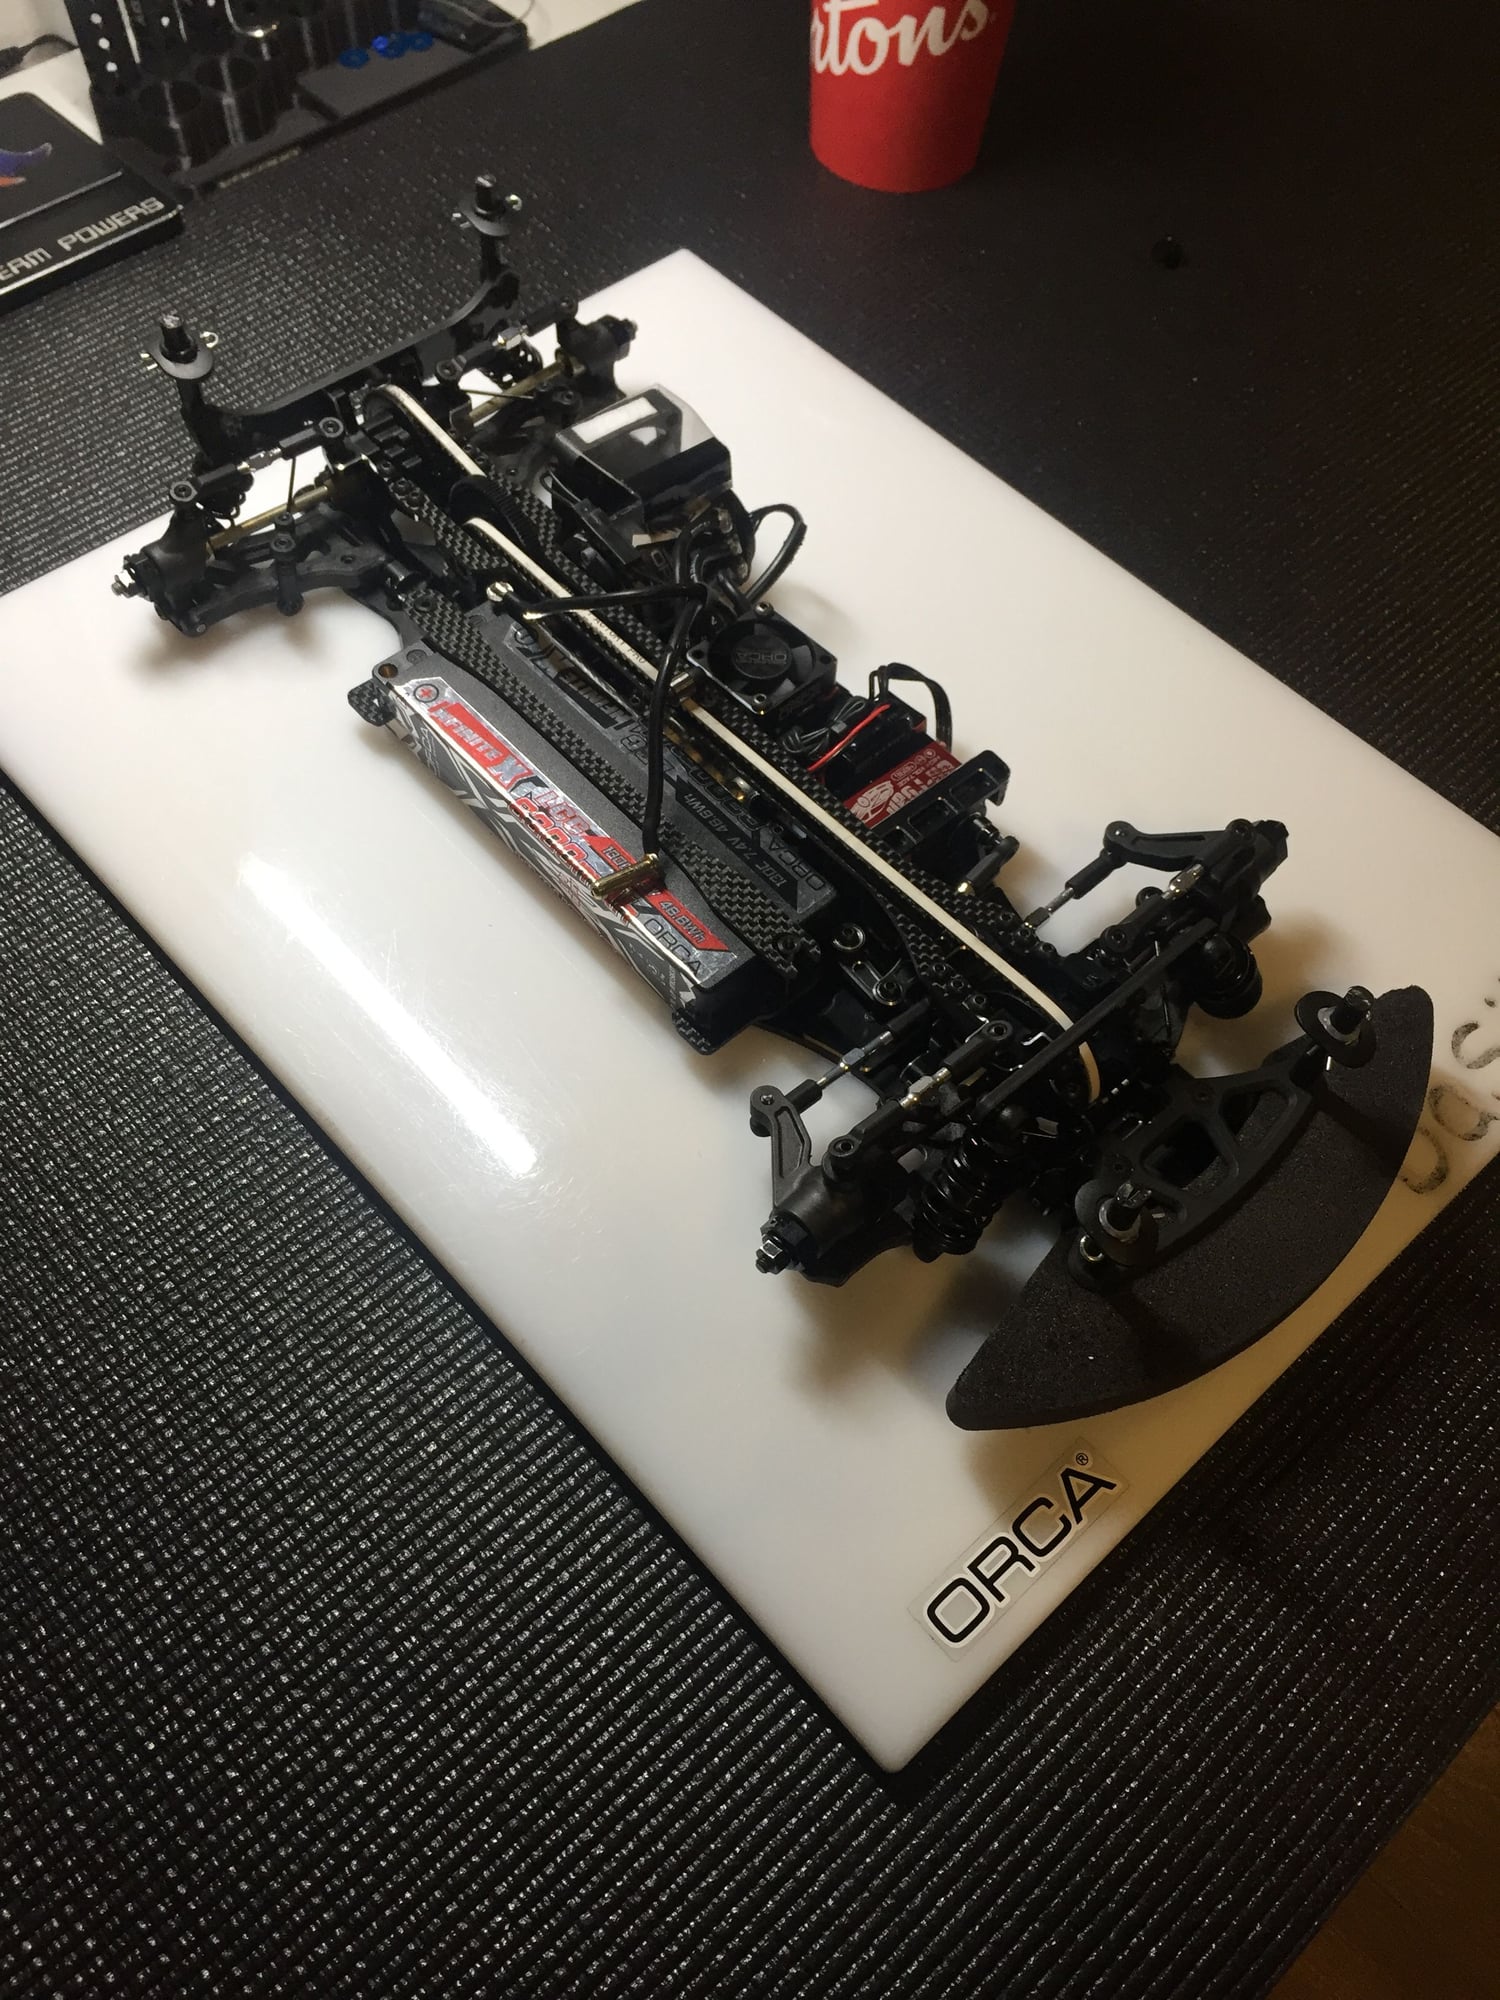
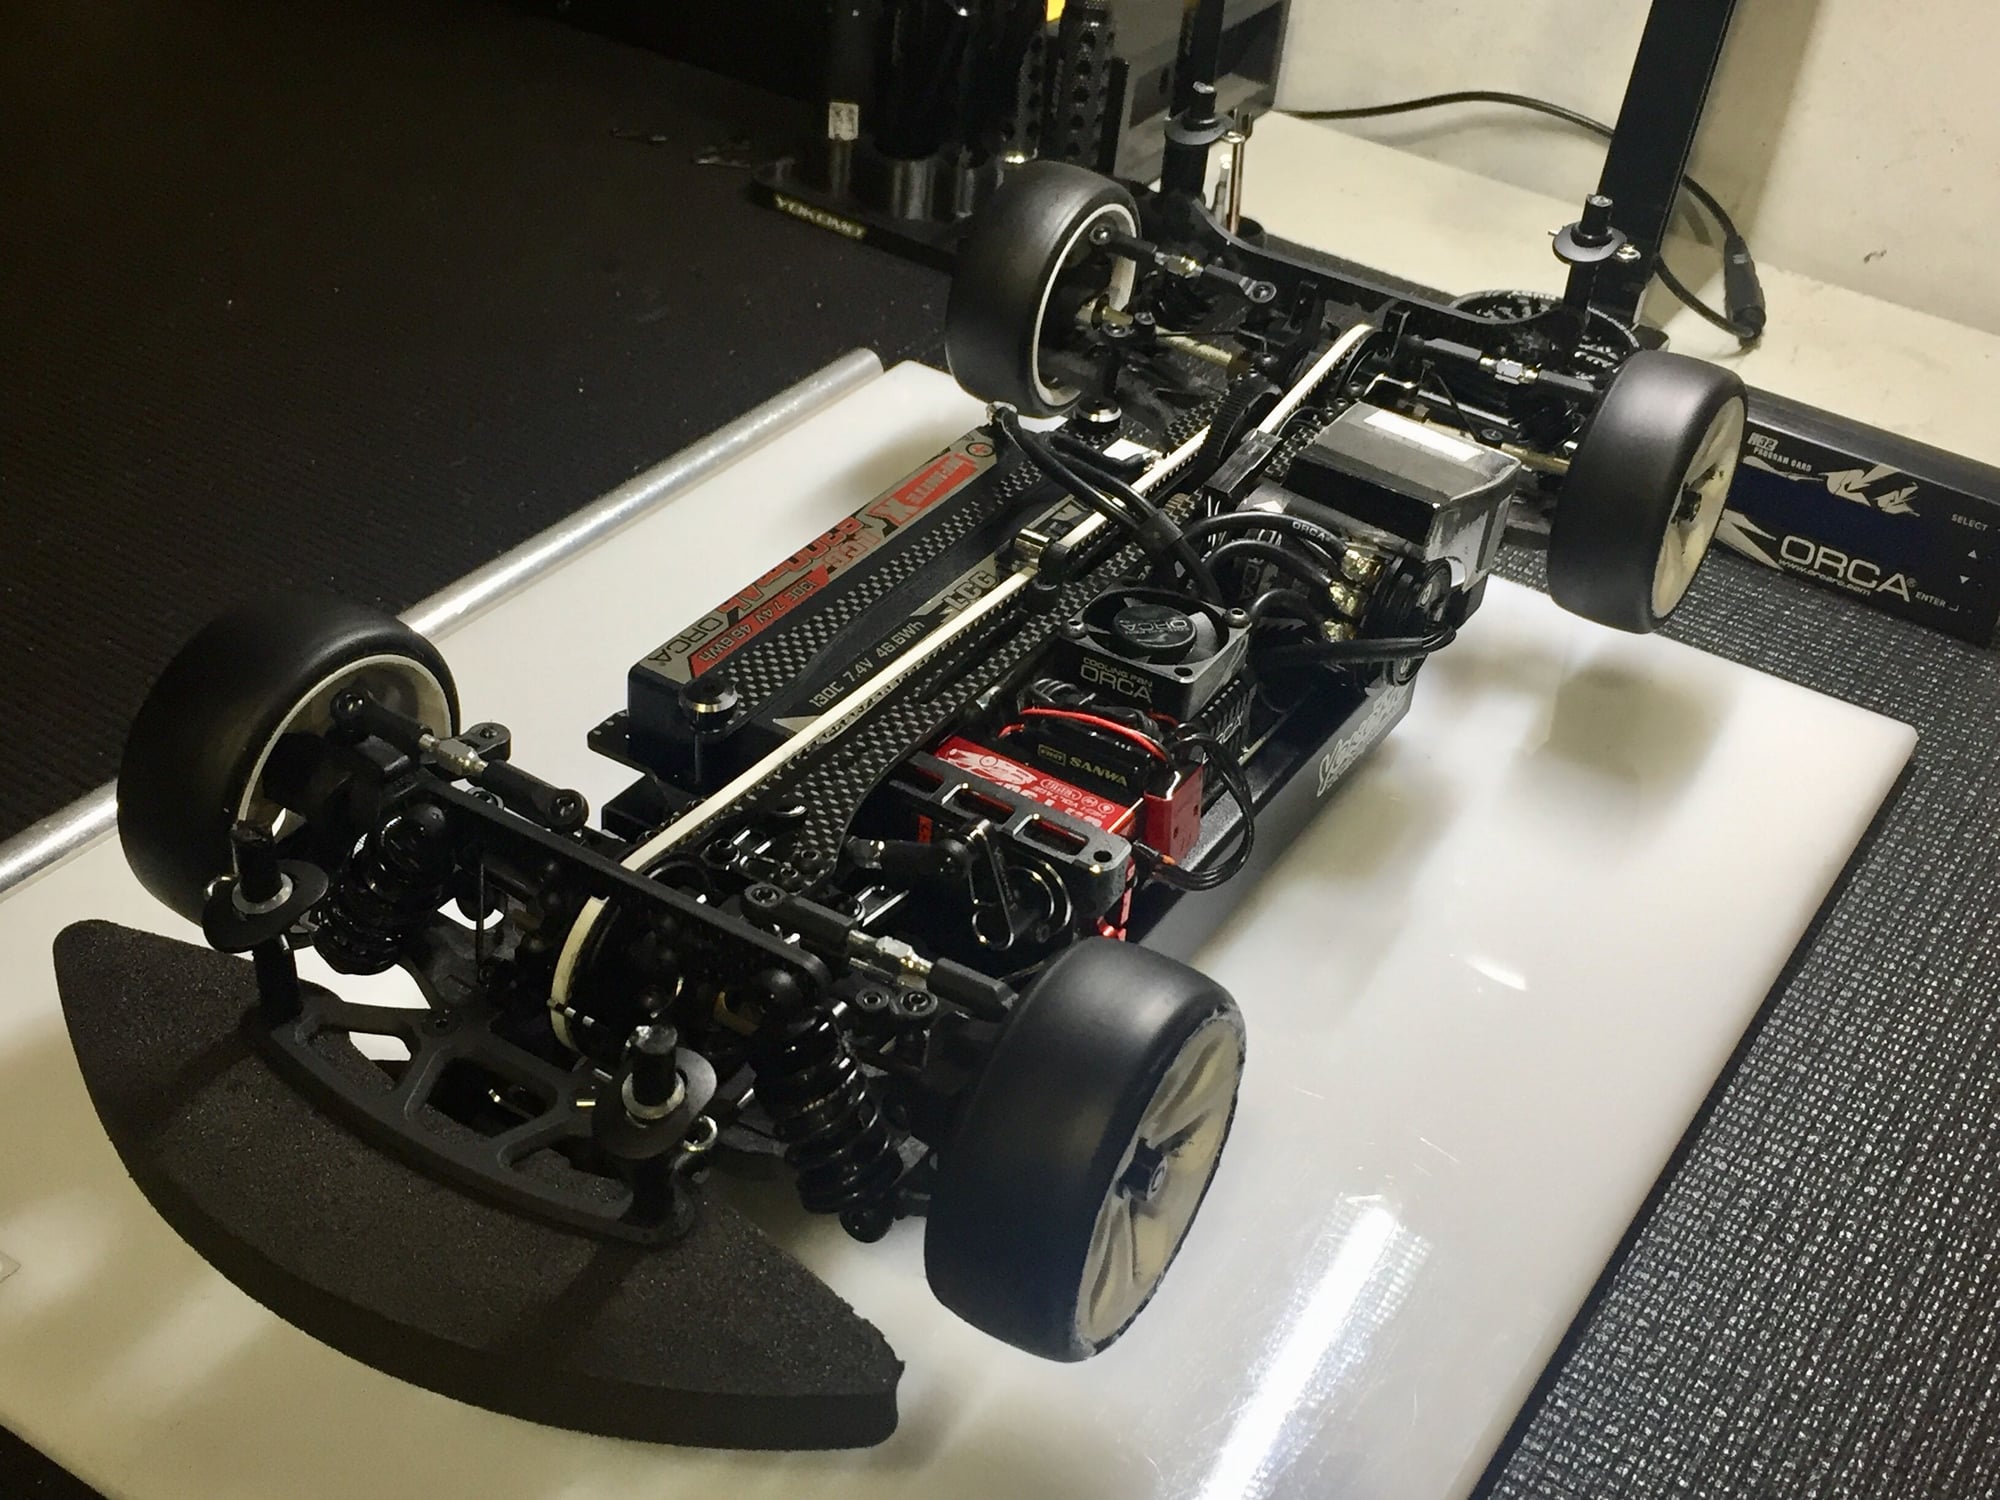
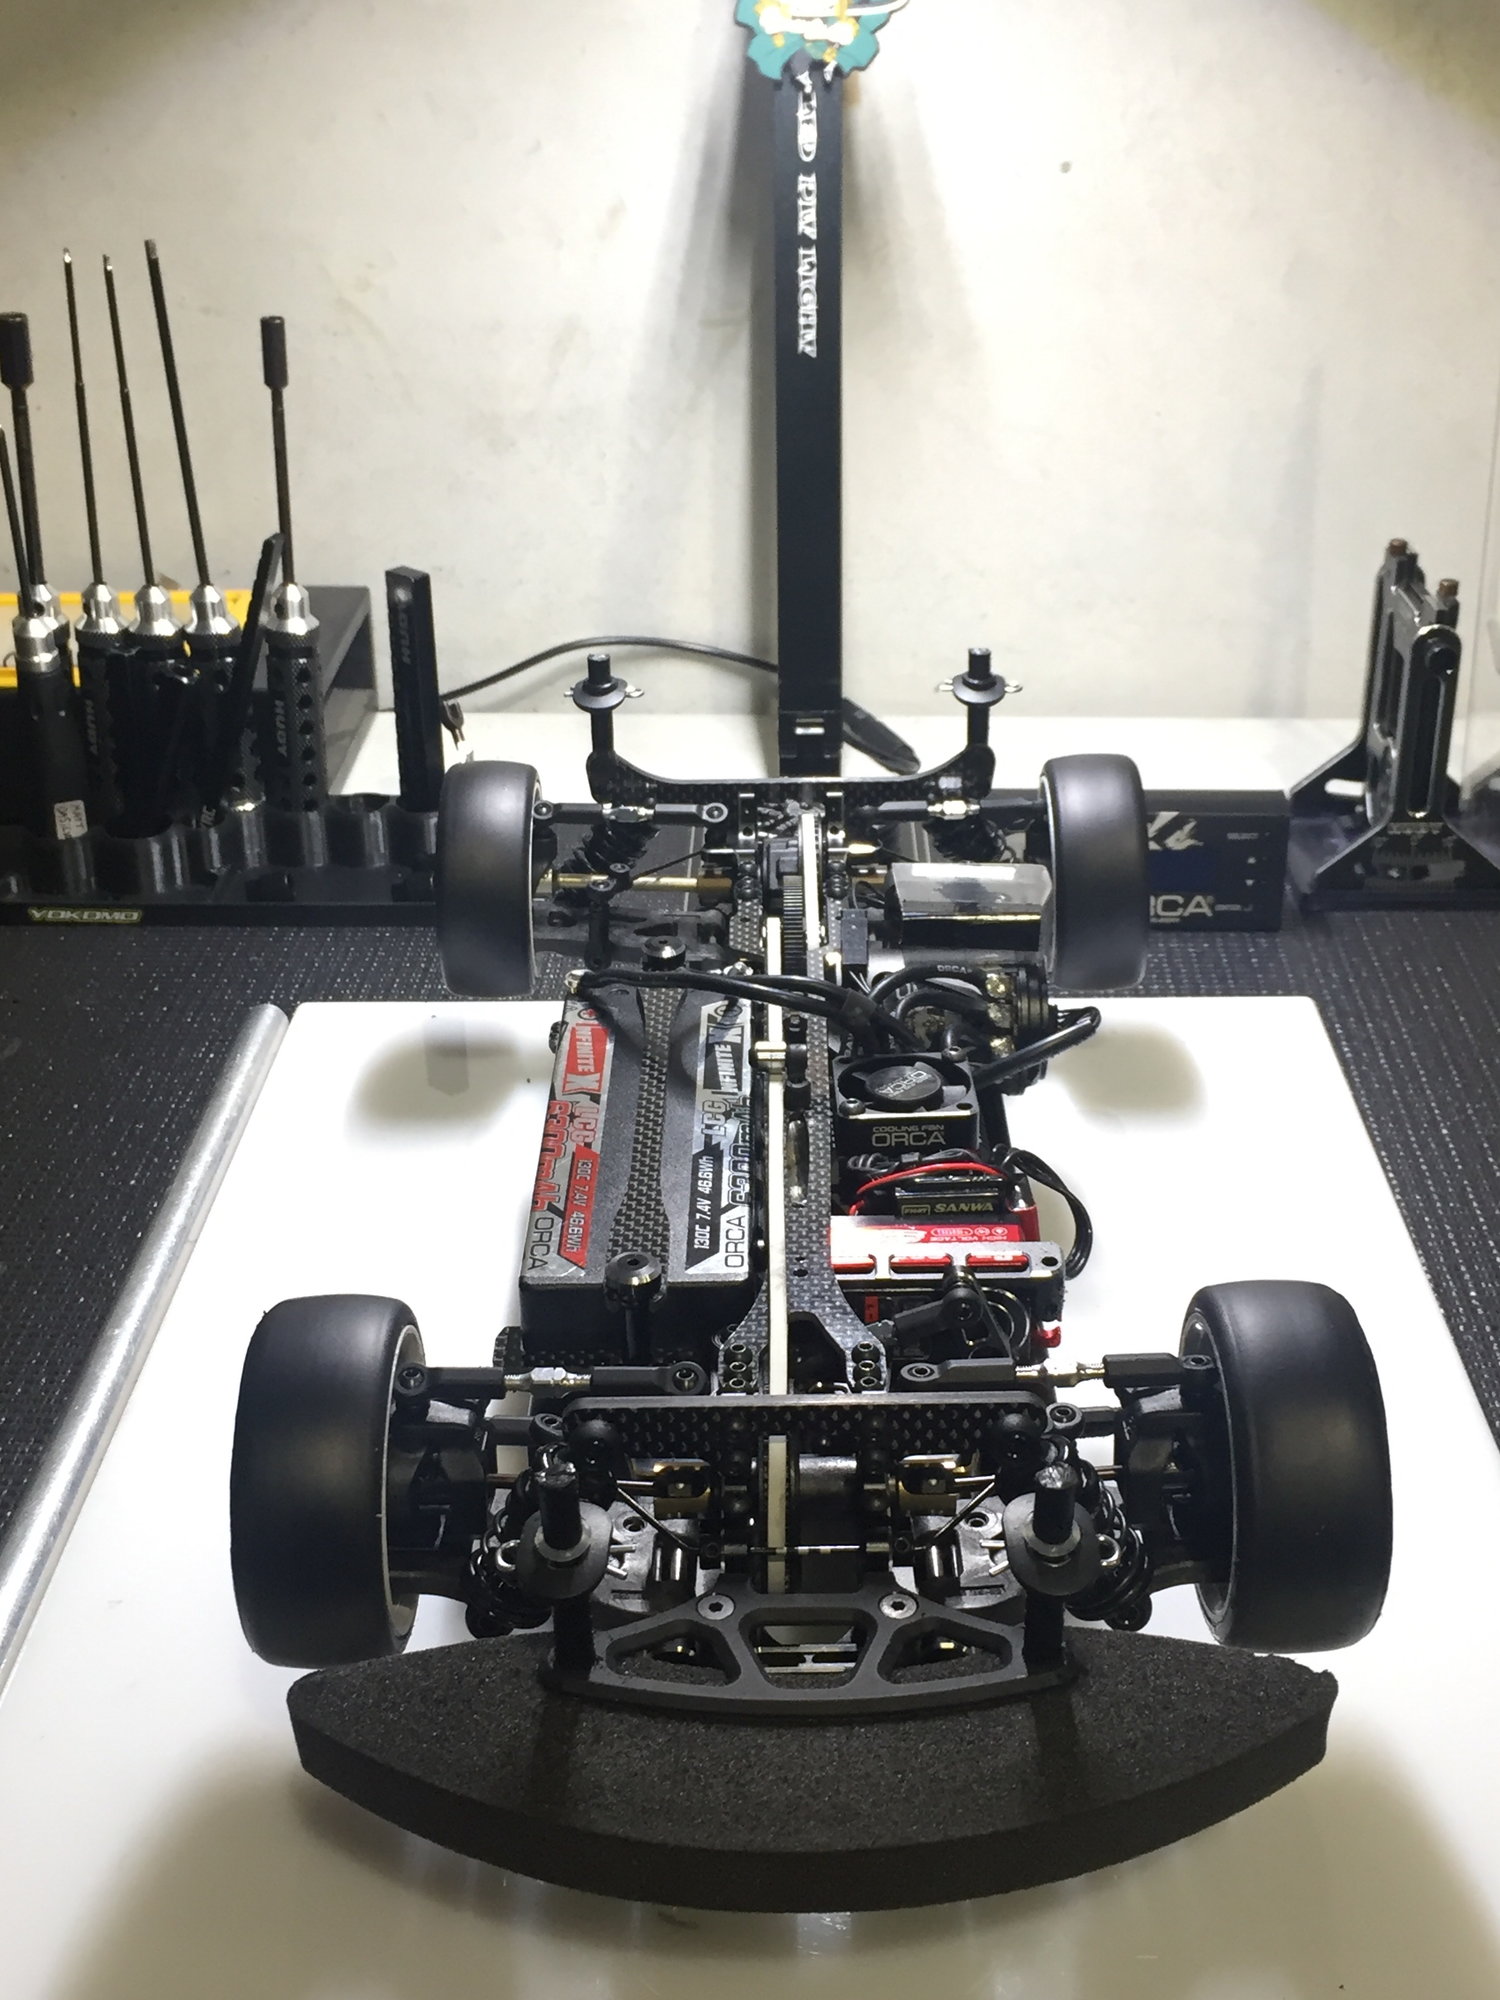
Coming from the BD8 with great success I moved my 17.5 set up over to the BD9 . It has been awesome and everything I felt like I was missing before I have now (Ball bearings on the sways, lower IR, shorter towers , shorter shocks, more flex changes etc)  I feel the car gives you a bigger window and will result in you pushing harder, while being easier to drive then the previous car. Mind you I also loved the BD8 18 Chassis and if it was the same designer with the latest updates into that design I also feel like it would of been a step up / really good kit. I race 17.5 as my premier class and this BD9 really holds it down with anything out there.
  It's been a pleasure to race but I will continue to push the tuning and set up for more reward.
Tips & Tricks (My .02)
-Be sure to cut / shave the correct Shock ball end's down 1mm as per instructions
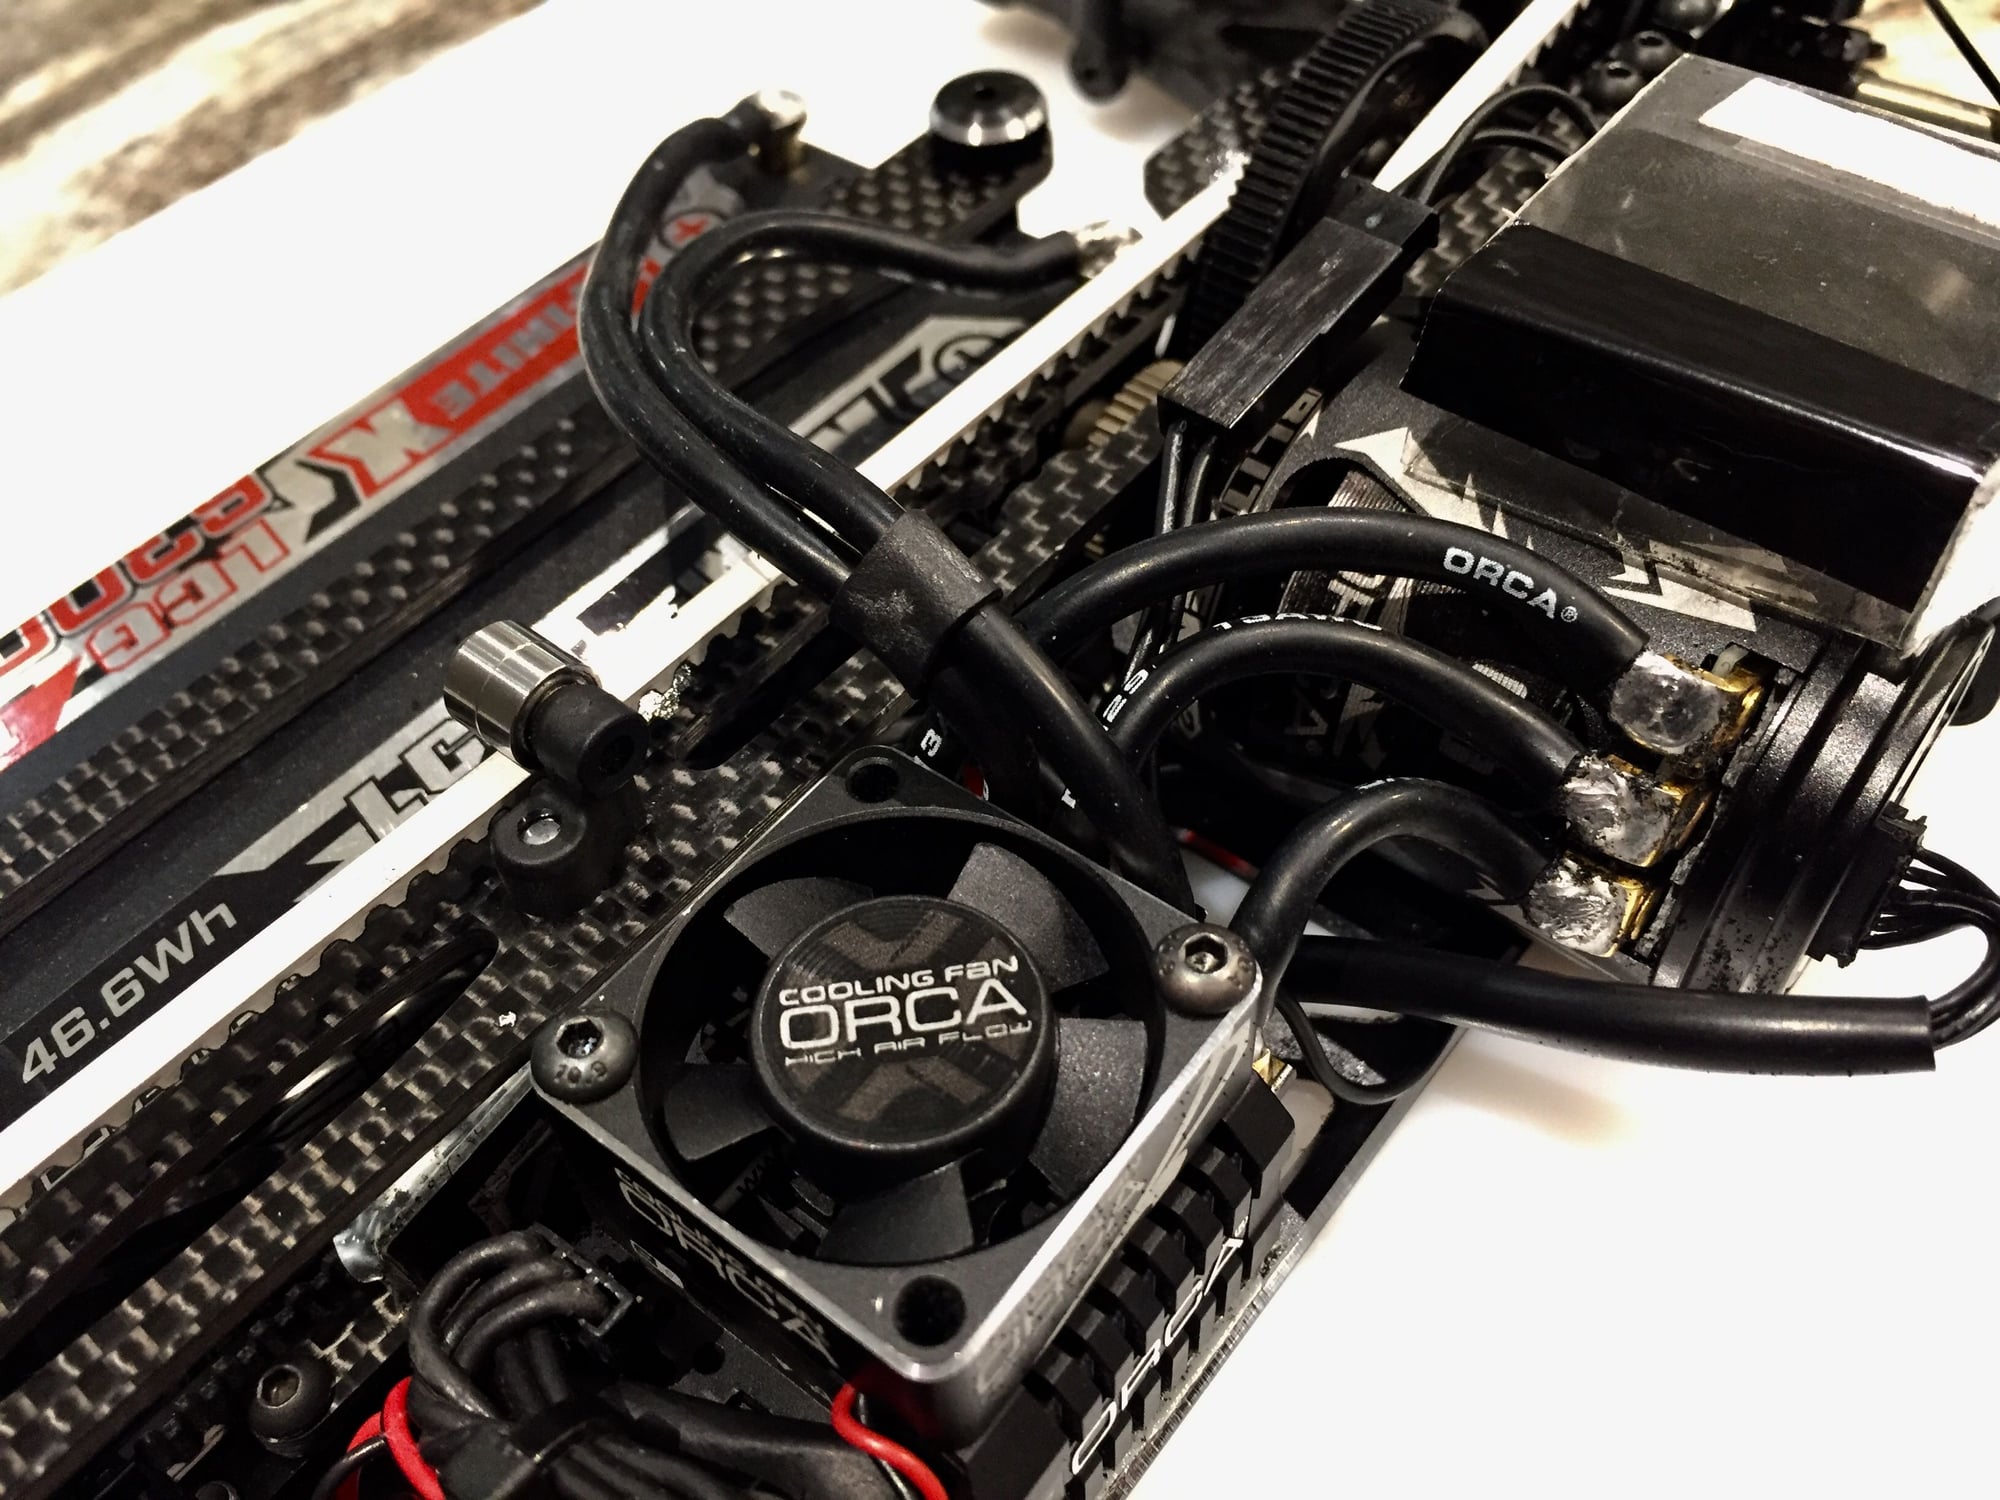
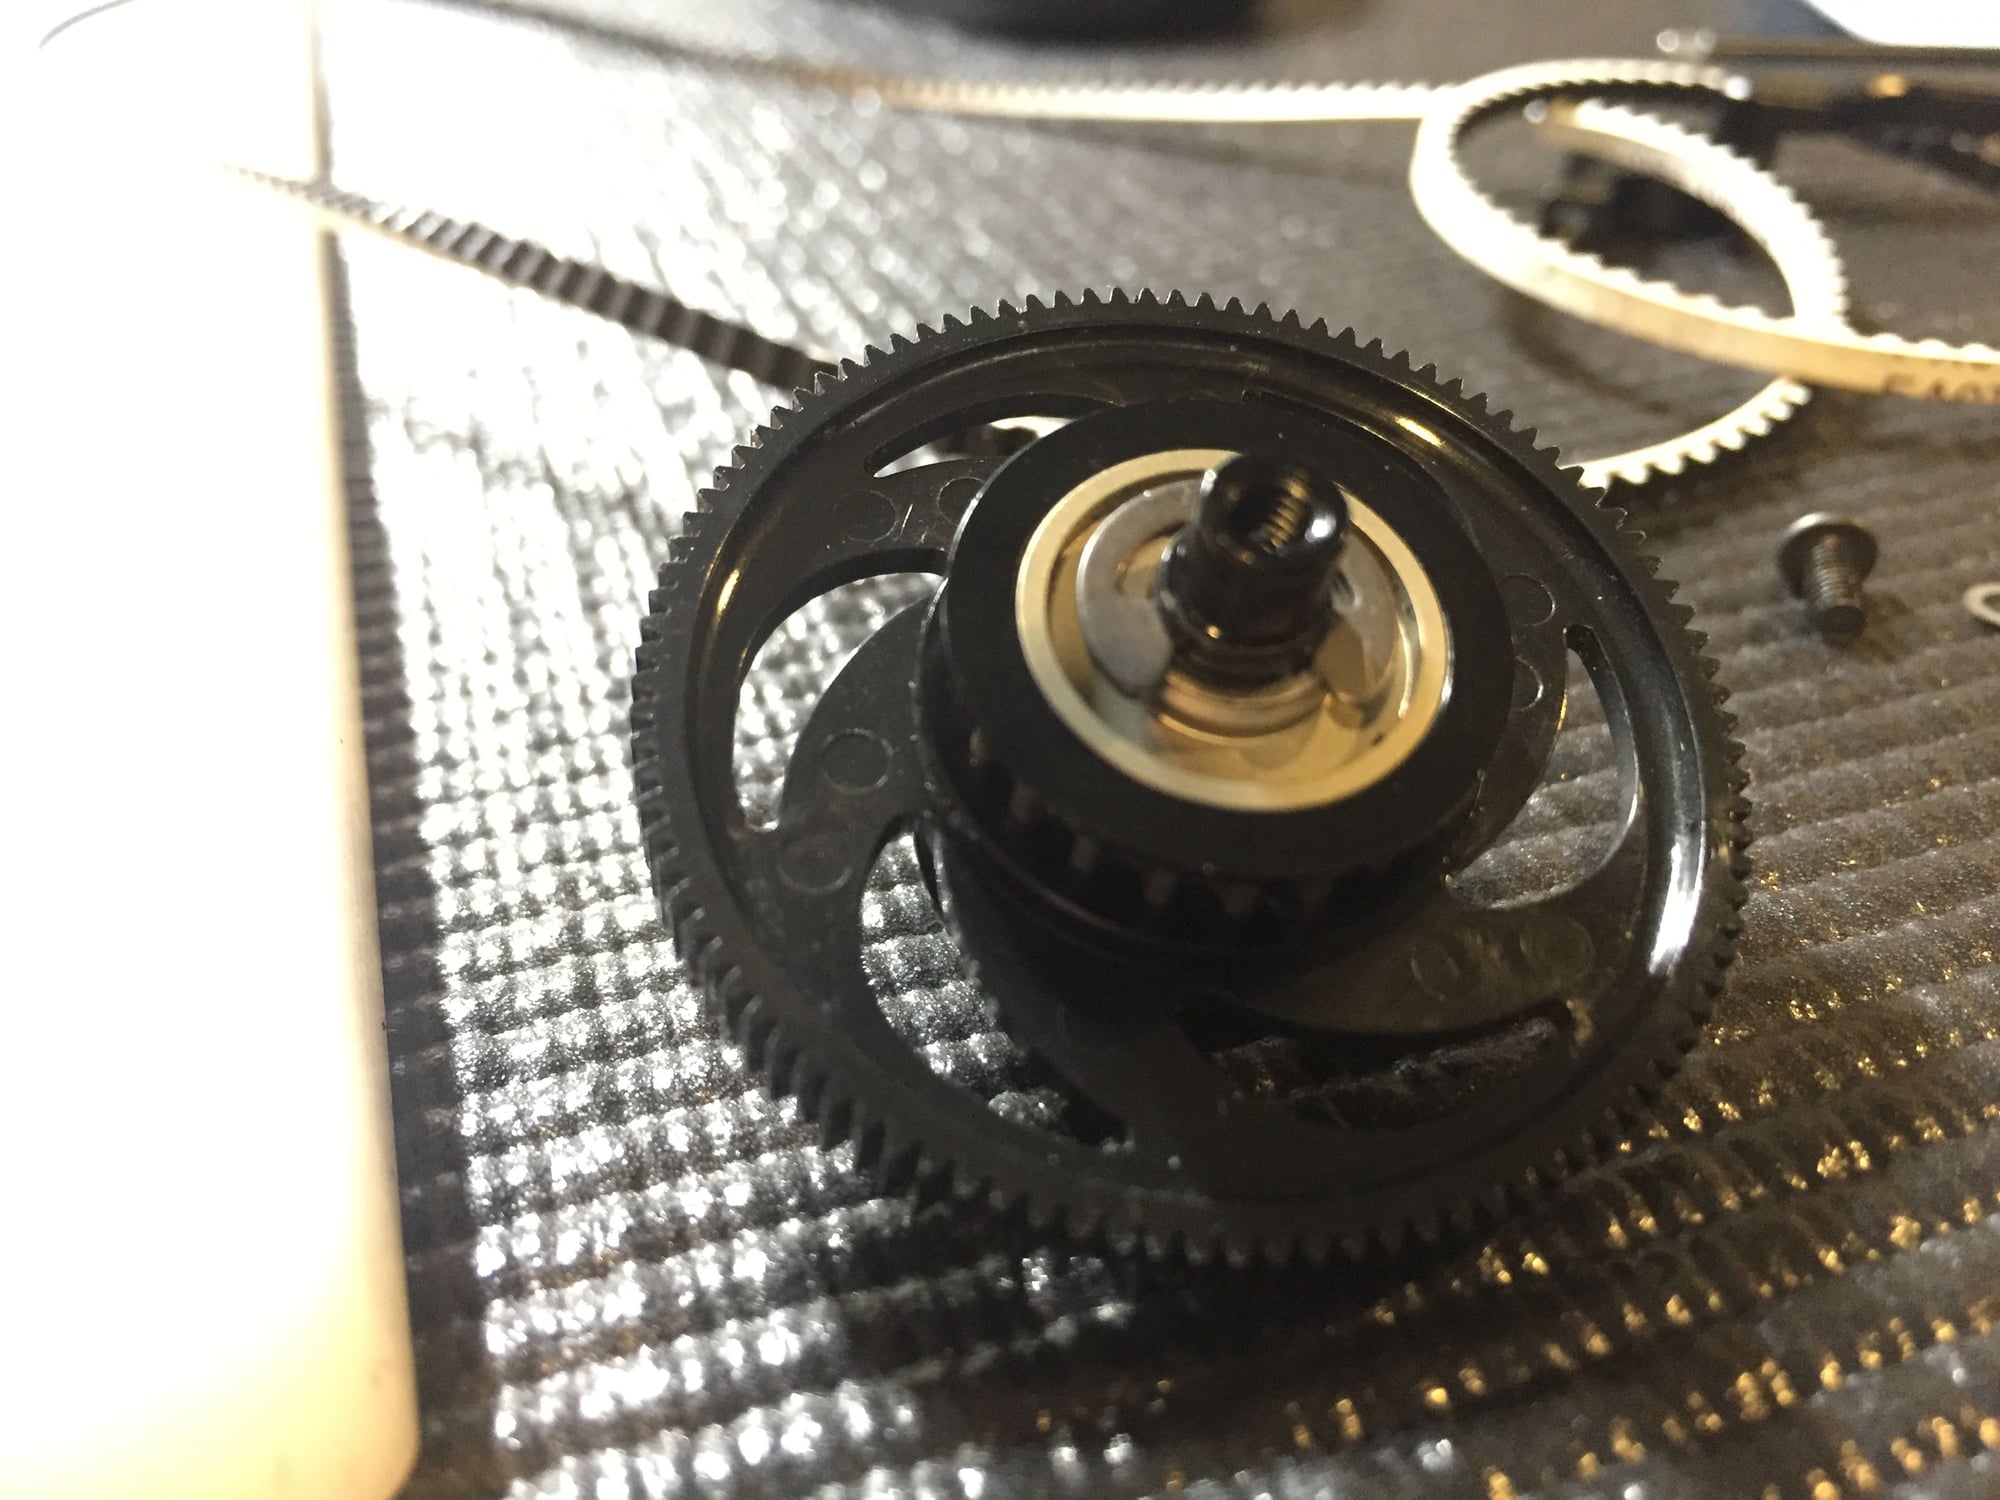
-Use a 6x.01 Shim on each side of the spur gear pulleys before adding the c-clip's. From factory there is a good amount of play side to side, under load it can be ok but to be 100% I would add the shims for sure. The reason for the 6mm inner Diameter is so it can clear over on the ridges on the shaft. A 5mm inner dia will not. If you buy the Carbon Fiber T works Spur gear plate it's a bit thicker then the factory alum piece.. so you will only need one shim on one side. This also knocks off a bit of weight at 1.3 grams (You can hardly see it but I attached a photo at the bottom of it)
-The T plate that attaches to both sides of the motor mounts can be tricky. From factory if you tighten them (properly even) the tolerance is slightly incorrect so it pulls down on the mount and causes a tweak in the base chassis plate. I add a .1 shim on top of the T plate on the passenger side. So it's sandwiched between the T plate and the motor mount piece. I have these snug but not to tight so they don't cause a chassis Tweak. You will have to play with this a bit to get it right with different size shims in some cases. I check these throughout the Race day to make sure it doesn't shift or hold tension after a 6 min session.
-Droop.. So on my previous car I didn't have any issue with a standard set of droop blocks / gauge. Being that the BD9 has extra material on the rear arm the measurement won't be accurate just sliding a droop gauge under and checking like you normally would. So to get this sorted and have a good reference, I set up my BD8 like I would with my standard droop settings. Then I measured the Axle pin height with a set of calipers to get Values in mm. For the BD9 I use a droop gauge under the front arms (not where the extra cylinder material is) But right where the pin is.. for the Rear I use Calipers and measure it in mm to get say a 5.4 or 5.6 droop setting and this is how I set droop each round. I recently just ordered a Yokomo pan car ride height gauge (Goes down to 1mm I believe and has good increments) which I will use to slide under the bride part under the rear arm and it should be around 3.2-3.4.
-The Factory Diff O-rings provided are too small for the Diff housings and will leak every time. I had tried a few different O-rings and the ones that have not leaked at all are the bigger Yok #BD-500GO. These fill the housings well, retaining smooth diff action. Use your typical method of building the diff with some good grease / patience and the diff leaking issue will be resolved. It can be very annoying during a race day to have oil coming out of the outdrives.
-Zero Rebound in the shocks.. This takes a little different approach coming from the longer SLF II shocks before compared to the new Axon units. The piston when pushed all the way up will be almost flush with the top of the cylinder. Fill the cylinder full full until the shock fluid is just out past the top but not spilling out (like a full bubble look). Bleed the shocks as you would leaving the shock pistons all the way up on the final wait out of bleeding time. Adding the bladders slowly on a angle on top of the full fluid will over spill but that's ok.. pushing the bladder down is at the same time pushing the shock piston down a little, while maintaining no air getting in. Using a 2 or 3mm hex driver slowly press the bladder down until it's seated nice and no more oil is being forced out. (Do not push too hard and mess with the bladder) Put the caps on slowly tightening them in your hand and wipe clean for a nice shock build. Of course make sure you measure all your ball cup ends before doing any of this.
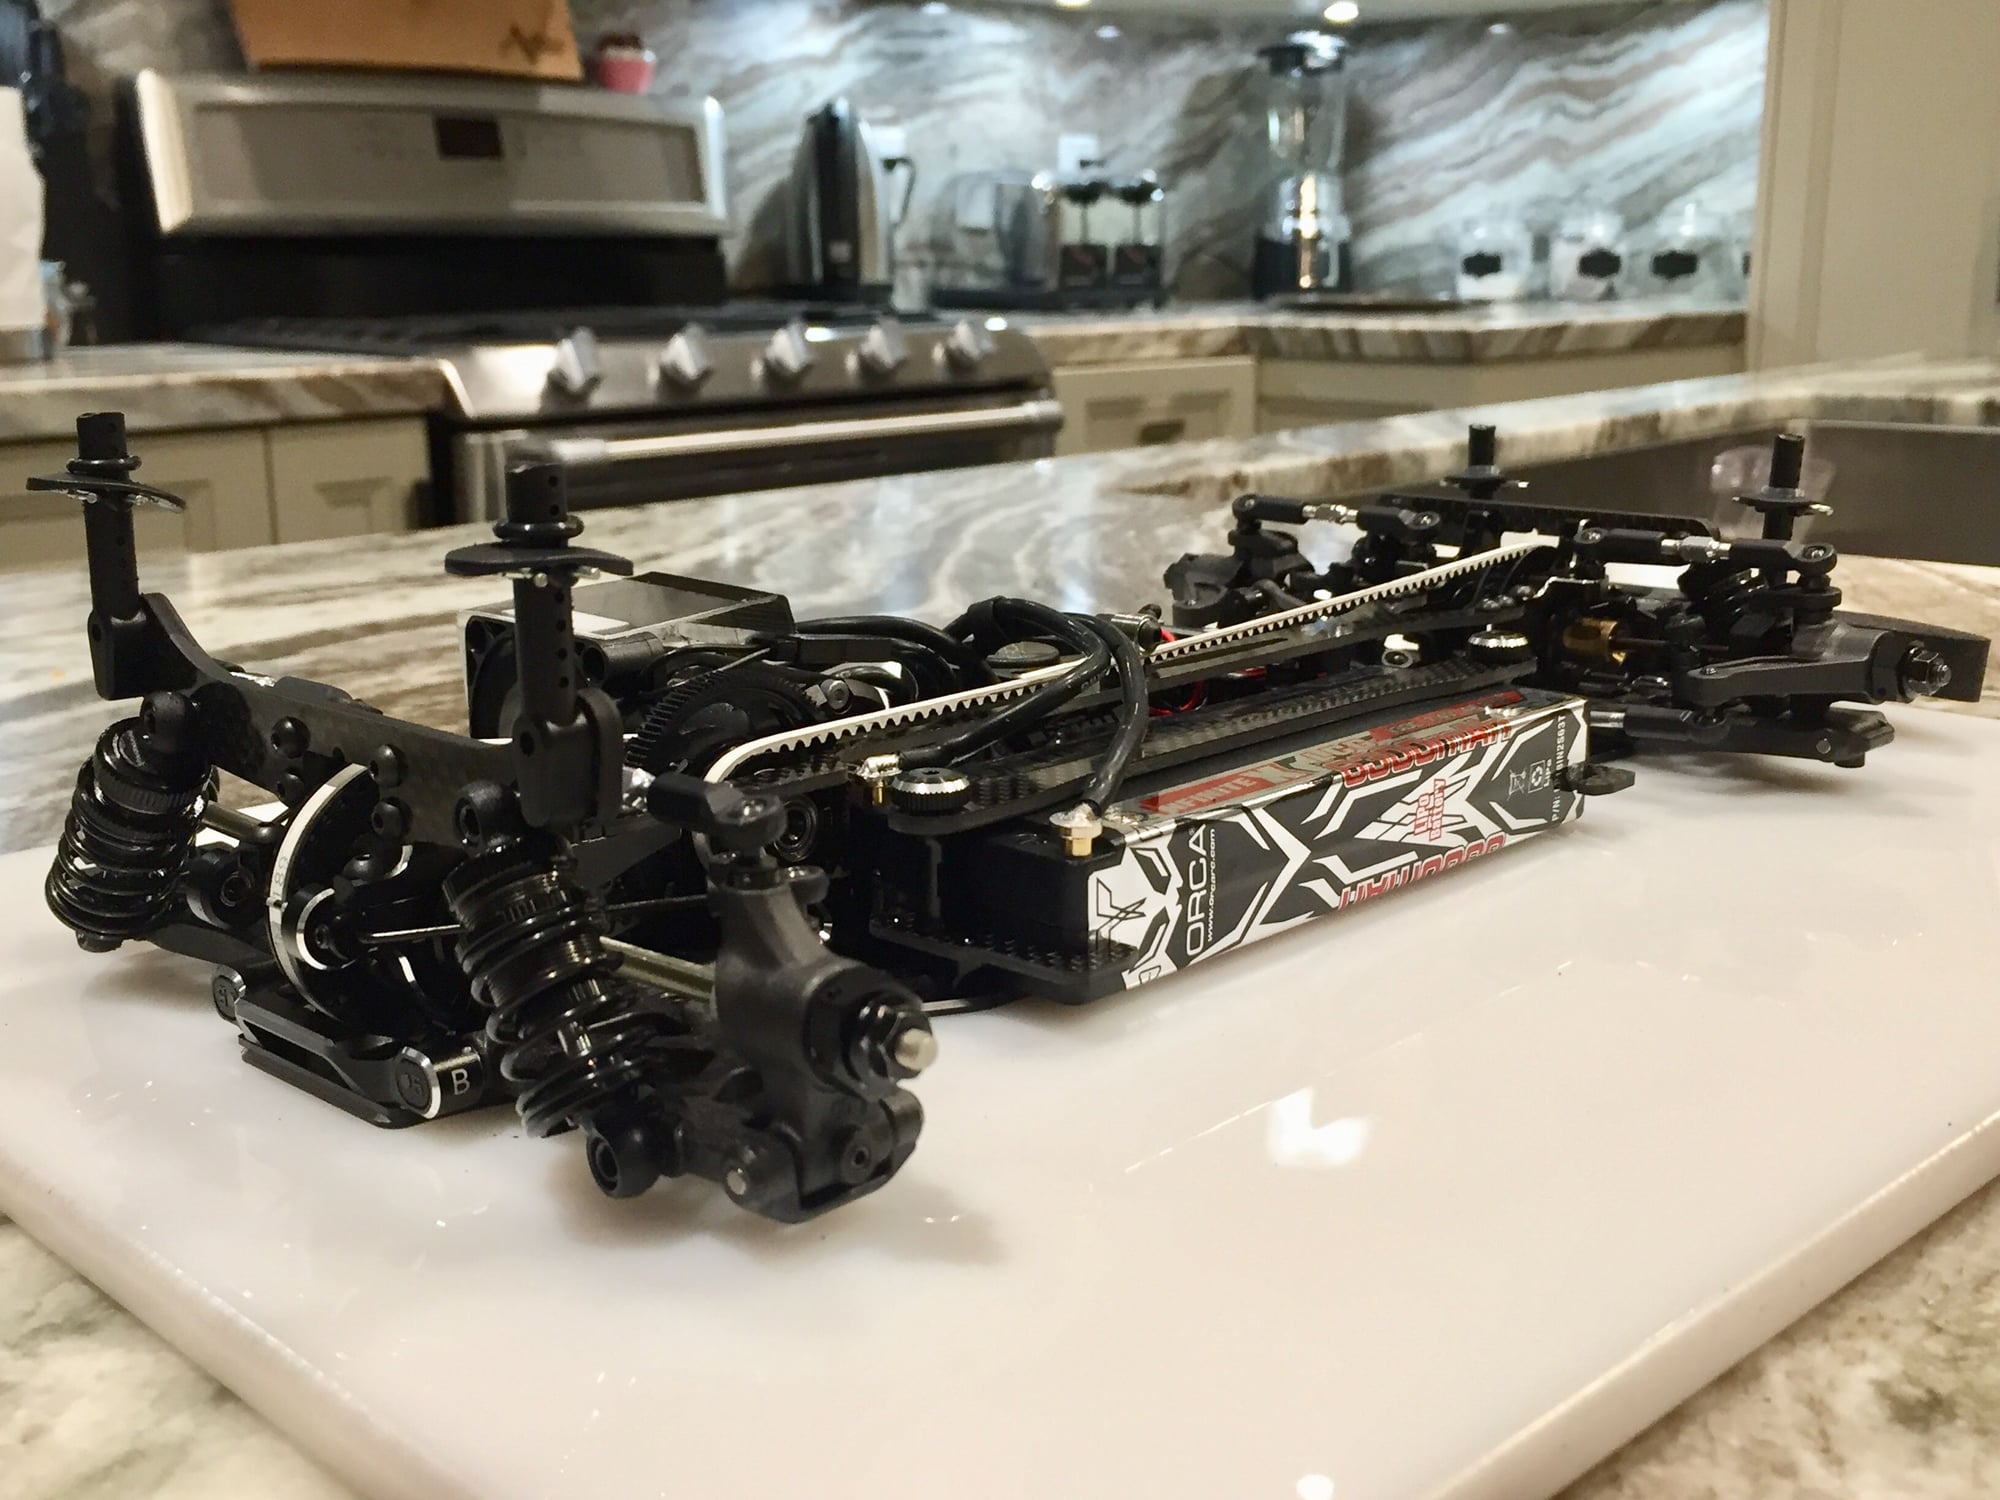
That's most of it for now, I will continue to post back more as I do race the car almost ever weekend. Set up sheets to follow shortly here's a photo bomb for the Yok squad Sorry for the phone quality, my RC funds eat up the camera I should buy lol
I feel the car gives you a bigger window and will result in you pushing harder, while being easier to drive then the previous car. Mind you I also loved the BD8 18 Chassis and if it was the same designer with the latest updates into that design I also feel like it would of been a step up / really good kit. I race 17.5 as my premier class and this BD9 really holds it down with anything out there. It's been a pleasure to race but I will continue to push the tuning and set up for more reward.Tips & Tricks (My .02)
-Be sure to cut / shave the correct Shock ball end's down 1mm as per instructions
-Use a 6x.01 Shim on each side of the spur gear pulleys before adding the c-clip's. From factory there is a good amount of play side to side, under load it can be ok but to be 100% I would add the shims for sure. The reason for the 6mm inner Diameter is so it can clear over on the ridges on the shaft. A 5mm inner dia will not. If you buy the Carbon Fiber T works Spur gear plate it's a bit thicker then the factory alum piece.. so you will only need one shim on one side. This also knocks off a bit of weight at 1.3 grams (You can hardly see it but I attached a photo at the bottom of it)
-The T plate that attaches to both sides of the motor mounts can be tricky. From factory if you tighten them (properly even) the tolerance is slightly incorrect so it pulls down on the mount and causes a tweak in the base chassis plate. I add a .1 shim on top of the T plate on the passenger side. So it's sandwiched between the T plate and the motor mount piece. I have these snug but not to tight so they don't cause a chassis Tweak. You will have to play with this a bit to get it right with different size shims in some cases. I check these throughout the Race day to make sure it doesn't shift or hold tension after a 6 min session.
-Droop.. So on my previous car I didn't have any issue with a standard set of droop blocks / gauge. Being that the BD9 has extra material on the rear arm the measurement won't be accurate just sliding a droop gauge under and checking like you normally would. So to get this sorted and have a good reference, I set up my BD8 like I would with my standard droop settings. Then I measured the Axle pin height with a set of calipers to get Values in mm. For the BD9 I use a droop gauge under the front arms (not where the extra cylinder material is) But right where the pin is.. for the Rear I use Calipers and measure it in mm to get say a 5.4 or 5.6 droop setting and this is how I set droop each round. I recently just ordered a Yokomo pan car ride height gauge (Goes down to 1mm I believe and has good increments) which I will use to slide under the bride part under the rear arm and it should be around 3.2-3.4.
-The Factory Diff O-rings provided are too small for the Diff housings and will leak every time. I had tried a few different O-rings and the ones that have not leaked at all are the bigger Yok #BD-500GO. These fill the housings well, retaining smooth diff action. Use your typical method of building the diff with some good grease / patience and the diff leaking issue will be resolved. It can be very annoying during a race day to have oil coming out of the outdrives.
-Zero Rebound in the shocks.. This takes a little different approach coming from the longer SLF II shocks before compared to the new Axon units. The piston when pushed all the way up will be almost flush with the top of the cylinder. Fill the cylinder full full until the shock fluid is just out past the top but not spilling out (like a full bubble look). Bleed the shocks as you would leaving the shock pistons all the way up on the final wait out of bleeding time. Adding the bladders slowly on a angle on top of the full fluid will over spill but that's ok.. pushing the bladder down is at the same time pushing the shock piston down a little, while maintaining no air getting in. Using a 2 or 3mm hex driver slowly press the bladder down until it's seated nice and no more oil is being forced out. (Do not push too hard and mess with the bladder) Put the caps on slowly tightening them in your hand and wipe clean for a nice shock build. Of course make sure you measure all your ball cup ends before doing any of this.
That's most of it for now, I will continue to post back more as I do race the car almost ever weekend. Set up sheets to follow shortly here's a photo bomb for the Yok squad
Sorry for the phone quality, my RC funds eat up the camera I should buy lol
05-13-2019, 07:27 PM
#382
Good info DaSilva3525. I will add one thing about the T plate issue you had. In the early runs this was an issue, but the shims are not needed on many of the newer released units. Still a very good idea to check when building car, as I have still seen a couple newer kits still need shims.
05-13-2019, 07:33 PM
#383
05-14-2019, 09:32 PM
#384
Coming from the BD8 with great success I moved my 17.5 set up over to the BD9 . It has been awesome and everything I felt like I was missing before I have now (Ball bearings on the sways, lower IR, shorter towers , shorter shocks, more flex changes etc) I feel the car gives you a bigger window and will result in you pushing harder, while being easier to drive then the previous car. Mind you I also loved the BD8 18 Chassis and if it was the same designer with the latest updates into that design I also feel like it would of been a step up / really good kit. I race 17.5 as my premier class and this BD9 really holds it down with anything out there. It's been a pleasure to race but I will continue to push the tuning and set up for more reward.
Tips & Tricks (My .02)
-Be sure to cut / shave the correct Shock ball end's down 1mm as per instructions
-Use a 6x.01 Shim on each side of the spur gear pulleys before adding the c-clip's. From factory there is a good amount of play side to side, under load it can be ok but to be 100% I would add the shims for sure. The reason for the 6mm inner Diameter is so it can clear over on the ridges on the shaft. A 5mm inner dia will not. If you buy the Carbon Fiber T works Spur gear plate it's a bit thicker then the factory alum piece.. so you will only need one shim on one side. This also knocks off a bit of weight at 1.3 grams (You can hardly see it but I attached a photo at the bottom of it)
-The T plate that attaches to both sides of the motor mounts can be tricky. From factory if you tighten them (properly even) the tolerance is slightly incorrect so it pulls down on the mount and causes a tweak in the base chassis plate. I add a .1 shim on top of the T plate on the passenger side. So it's sandwiched between the T plate and the motor mount piece. I have these snug but not to tight so they don't cause a chassis Tweak. You will have to play with this a bit to get it right with different size shims in some cases. I check these throughout the Race day to make sure it doesn't shift or hold tension after a 6 min session.
-Droop.. So on my previous car I didn't have any issue with a standard set of droop blocks / gauge. Being that the BD9 has extra material on the rear arm the measurement won't be accurate just sliding a droop gauge under and checking like you normally would. So to get this sorted and have a good reference, I set up my BD8 like I would with my standard droop settings. Then I measured the Axle pin height with a set of calipers to get Values in mm. For the BD9 I use a droop gauge under the front arms (not where the extra cylinder material is) But right where the pin is.. for the Rear I use Calipers and measure it in mm to get say a 5.4 or 5.6 droop setting and this is how I set droop each round. I recently just ordered a Yokomo pan car ride height gauge (Goes down to 1mm I believe and has good increments) which I will use to slide under the bride part under the rear arm and it should be around 3.2-3.4.
-The Factory Diff O-rings provided are too small for the Diff housings and will leak every time. I had tried a few different O-rings and the ones that have not leaked at all are the bigger Yok #BD-500GO. These fill the housings well, retaining smooth diff action. Use your typical method of building the diff with some good grease / patience and the diff leaking issue will be resolved. It can be very annoying during a race day to have oil coming out of the outdrives.
-Zero Rebound in the shocks.. This takes a little different approach coming from the longer SLF II shocks before compared to the new Axon units. The piston when pushed all the way up will be almost flush with the top of the cylinder. Fill the cylinder full full until the shock fluid is just out past the top but not spilling out (like a full bubble look). Bleed the shocks as you would leaving the shock pistons all the way up on the final wait out of bleeding time. Adding the bladders slowly on a angle on top of the full fluid will over spill but that's ok.. pushing the bladder down is at the same time pushing the shock piston down a little, while maintaining no air getting in. Using a 2 or 3mm hex driver slowly press the bladder down until it's seated nice and no more oil is being forced out. (Do not push too hard and mess with the bladder) Put the caps on slowly tightening them in your hand and wipe clean for a nice shock build. Of course make sure you measure all your ball cup ends before doing any of this.
That's most of it for now, I will continue to post back more as I do race the car almost ever weekend. Set up sheets to follow shortly here's a photo bomb for the Yok squad Sorry for the phone quality, my RC funds eat up the camera I should buy lol
I feel the car gives you a bigger window and will result in you pushing harder, while being easier to drive then the previous car. Mind you I also loved the BD8 18 Chassis and if it was the same designer with the latest updates into that design I also feel like it would of been a step up / really good kit. I race 17.5 as my premier class and this BD9 really holds it down with anything out there. It's been a pleasure to race but I will continue to push the tuning and set up for more reward.Tips & Tricks (My .02)
-Be sure to cut / shave the correct Shock ball end's down 1mm as per instructions
-Use a 6x.01 Shim on each side of the spur gear pulleys before adding the c-clip's. From factory there is a good amount of play side to side, under load it can be ok but to be 100% I would add the shims for sure. The reason for the 6mm inner Diameter is so it can clear over on the ridges on the shaft. A 5mm inner dia will not. If you buy the Carbon Fiber T works Spur gear plate it's a bit thicker then the factory alum piece.. so you will only need one shim on one side. This also knocks off a bit of weight at 1.3 grams (You can hardly see it but I attached a photo at the bottom of it)
-The T plate that attaches to both sides of the motor mounts can be tricky. From factory if you tighten them (properly even) the tolerance is slightly incorrect so it pulls down on the mount and causes a tweak in the base chassis plate. I add a .1 shim on top of the T plate on the passenger side. So it's sandwiched between the T plate and the motor mount piece. I have these snug but not to tight so they don't cause a chassis Tweak. You will have to play with this a bit to get it right with different size shims in some cases. I check these throughout the Race day to make sure it doesn't shift or hold tension after a 6 min session.
-Droop.. So on my previous car I didn't have any issue with a standard set of droop blocks / gauge. Being that the BD9 has extra material on the rear arm the measurement won't be accurate just sliding a droop gauge under and checking like you normally would. So to get this sorted and have a good reference, I set up my BD8 like I would with my standard droop settings. Then I measured the Axle pin height with a set of calipers to get Values in mm. For the BD9 I use a droop gauge under the front arms (not where the extra cylinder material is) But right where the pin is.. for the Rear I use Calipers and measure it in mm to get say a 5.4 or 5.6 droop setting and this is how I set droop each round. I recently just ordered a Yokomo pan car ride height gauge (Goes down to 1mm I believe and has good increments) which I will use to slide under the bride part under the rear arm and it should be around 3.2-3.4.
-The Factory Diff O-rings provided are too small for the Diff housings and will leak every time. I had tried a few different O-rings and the ones that have not leaked at all are the bigger Yok #BD-500GO. These fill the housings well, retaining smooth diff action. Use your typical method of building the diff with some good grease / patience and the diff leaking issue will be resolved. It can be very annoying during a race day to have oil coming out of the outdrives.
-Zero Rebound in the shocks.. This takes a little different approach coming from the longer SLF II shocks before compared to the new Axon units. The piston when pushed all the way up will be almost flush with the top of the cylinder. Fill the cylinder full full until the shock fluid is just out past the top but not spilling out (like a full bubble look). Bleed the shocks as you would leaving the shock pistons all the way up on the final wait out of bleeding time. Adding the bladders slowly on a angle on top of the full fluid will over spill but that's ok.. pushing the bladder down is at the same time pushing the shock piston down a little, while maintaining no air getting in. Using a 2 or 3mm hex driver slowly press the bladder down until it's seated nice and no more oil is being forced out. (Do not push too hard and mess with the bladder) Put the caps on slowly tightening them in your hand and wipe clean for a nice shock build. Of course make sure you measure all your ball cup ends before doing any of this.
That's most of it for now, I will continue to post back more as I do race the car almost ever weekend. Set up sheets to follow shortly here's a photo bomb for the Yok squad
Sorry for the phone quality, my RC funds eat up the camera I should buy lol
05-17-2019, 06:12 AM
#385
These are low friction Belts. These are the Factory pro one's, Yokomo has some too I believe in black
05-20-2019, 10:24 PM
#388
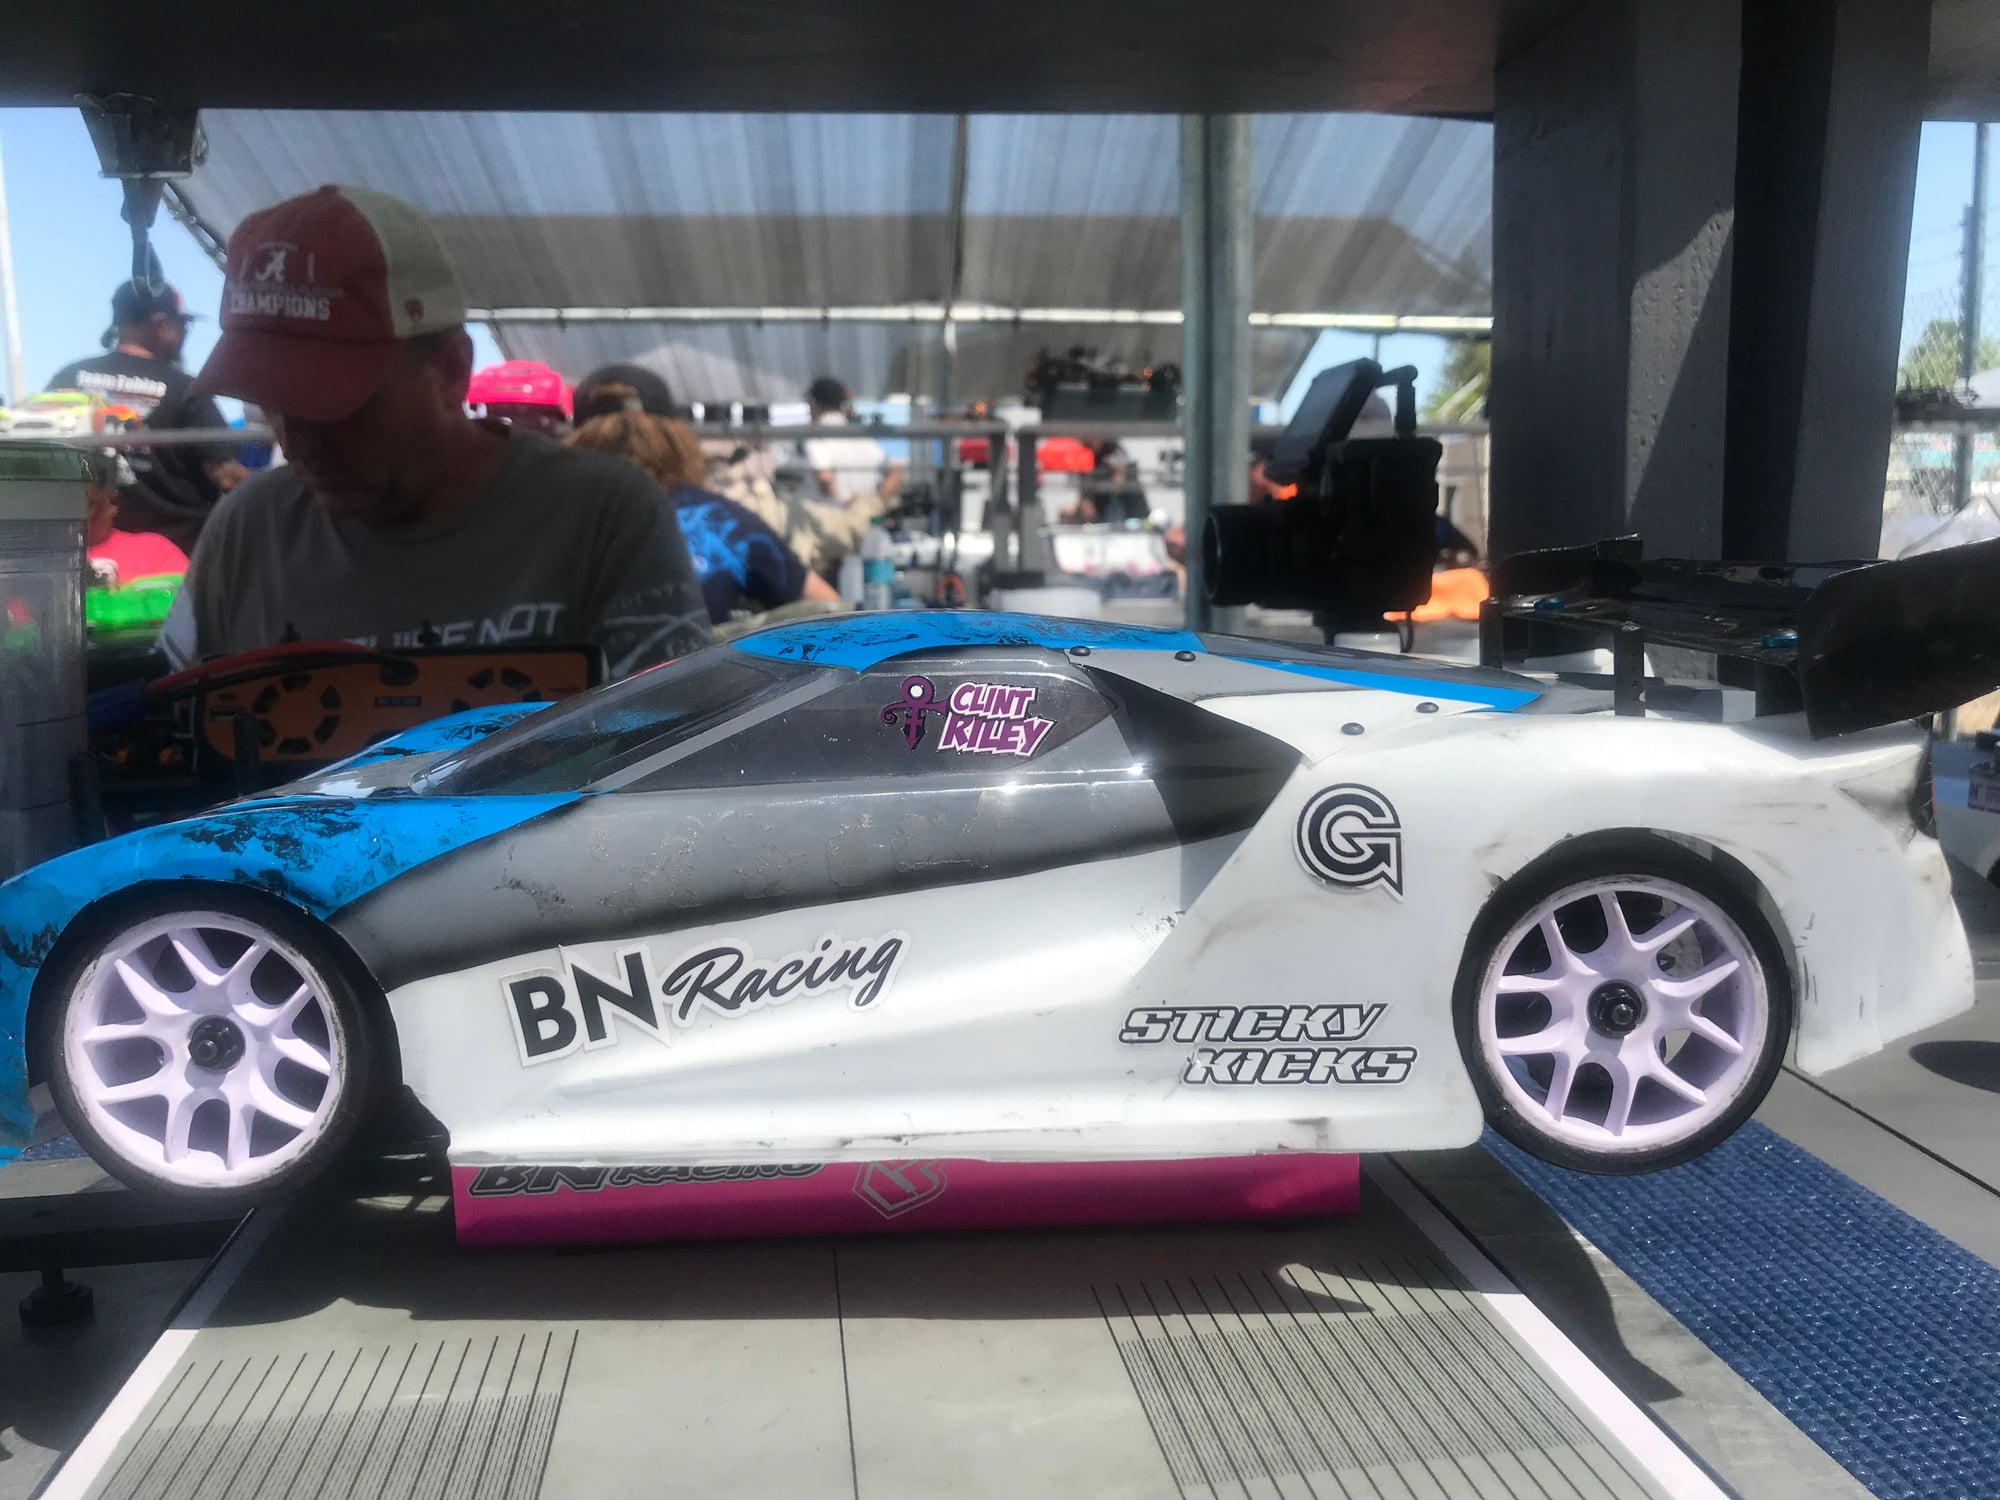
This is the current setup that I have run in 21.5TC with the Type S and in USGT with the Ford GT. Ran the exact same setup to prove it works in both classes. All I did was add weight to the electronics side for USGT.
This is at the track where the nationals will be held at.
This is at the track where the nationals will be held at.
05-22-2019, 07:23 AM
#389
Tech Rookie
[QUOTE = Dane; 15452428] Ha guidato questa macchina su asfalto a bassa percentuale nella classe di serie. Solo le modifiche dalla configurazione della scatola erano di 2.6 molle nella parte anteriore e rimosso il braccio oscillante. Eventuali altre variazioni popolari la gente sta facendo per queste condizioni? [/ QUOTE]
the changes that worked best for me for very low grip are upperdeck 1.65, 0mm spacer sus-blocks, cam low and 1 screw in T plate
the changes that worked best for me for very low grip are upperdeck 1.65, 0mm spacer sus-blocks, cam low and 1 screw in T plate
05-23-2019, 10:16 PM
#390
Does anyone know if they corrected the bd9 shocks on the newer kits so the shock ends don�t have to be cut any shorter to reach ride height? Any suggestions on any upgrades to buy when building the car? Thank you!