Go Back  R/C Tech Forums > General Forums > Electric Off-Road
Tekno RC EB410 Thread >

Tekno RC EB410 Thread

Community
Wiki Posts
Search
Like Tree2421Likes

Tekno RC EB410 Thread

    Hide Wikipost
Old 05-13-2019, 06:33 AM   -   Wikipost
R/C Tech ForumsThread Wiki: Tekno RC EB410 Thread
Please read: This is a community-maintained wiki post containing the most important information from this thread. You may edit the Wiki once you have been a member for 90 days and have made 90 posts.
 
Last edit by: tobamiester
Welcome to the EB410 Wiki page.

Basic Stats/Features:
  • Shaft drive (tapered AL for light weight and straightness)
  • Gear differentials (all 3)
  • Low Angle CVAs (with captured pins so no ejecting them!)
  • Durable stub axles with 12mm hexes and optional offset adjustments
  • Reverse bellcrank steering system
  • Quick access bulkheads (for easy diff maintenance and tuning)
  • Spllt center diff holder (for easy diff maintenance and tuning)
  • 8th scale style motor mount (for easy mesh adjustment)
  • 13mm big bore shocks
  • 3.5mm shock shafts
  • Droop screws

Videos
Servo Horns
Tekno included a plastic servo horn but also offers an aluminum one. This is highly recommended. Here's a list of servo horns that have been found to work:
Gearing:
Works out of the box for mod or 13.5.
  • Preference for Associated factory team pinions
  • Start mod gearing around 21t pinion
  • Start 13.5 gearing around 29t pinion with the stock spur (81tooth). If using a Tekin Spec R 13.5, start with a 24t pinion for medium sized indoor tracks.
  • Internal Gear Ratio: 2.5:1
  • For comparison:
  • B64 is 2.47:1
  • 22-4 is 2.4:1
  • YZ4 is 2.6:1

Wheels
  • B6/22/rb6 wheels direct fit
  • 22-4/XB4 front wheels direct fit
  • B64 front wheels will fit, but you need the +1 hexes (can use #TKR1654X, which is a +1mm hex)
  • 22 2wd front wheels will also fit, possibly a good option for carpet.

Setup Sheets and other documentation
Setup sheets for all Tekno RC vehicles can be found here. Please be sure to try our recommended setup. It works very well on most tracks.
Piston Drills:
Some of our setups recommend using pistons that are enlarged. For instance 4x1.9 or 3x2.0. To drill the pistons we recommend the following:
Aftermarket Upgrades:
Warranty Policy:
Tekno RC is the only company in the industry that will give 50% off of parts if returned to them using the General Warranty return policy found on their website. The parts can be lightly used or completely abused, as long as the part is still being produced it's covered!


Build Tips:
  • When fastening the steering posts with a 5.5mm socket wrench, you can back space the socket with some nuts to help drive the post into the bulk head

  • Place an alcohol swab over metal threads and drive screws through the swab to clean both sides of threads before applying thread lock

  • Use a metallic marker to indicate what fluids you have filled in your diffs for easy identification

  • Apply thin layer of grease on crown gears to help hold gaskets in place for easy hole alignment

  • Bags F and H have 2 different size set screws, be sure to use the smaller 3x3mm screws for the hexes or you may run into problems installing wheels over the hex if you use the longer 3x4mm screws
  • To make is easier to slip the o-rings on the shock cap bleeder screws, apply a drop of shock oil and slip them over a 1.5mm hex bit, then line up the bit with the screw and transfer the o-ring over using fingernails or needle nose pliers
  • pinch+rotate shock caps in 17mm hex wrench to improve roundness
    More shock build tips here
  • Use a 3.05mm drill bit or 3.05mm Kyosho arm reamer, 1/8" drill bits are not recommended because they are 3.17mm in diameter and tend to introduce too much slop, the pins are roughly 2.97mm in diameter
  • Replace the stock 3x14mm screws (TKR1405) with 3x20mm screws (TKR1409) in step H-10 in the manual in order to increase durability to the bulkhead.

  • When installing the front and rear differentials into the bulkheads be careful when tightening the 3x8mm screws of the cover that holds the diff in place. Bottom out the screws first (use a hand driver and make it hand tight) then check the diff to make sure it rotates smooth. If it binds up, start by backing out each screw 1/8-1/4 of a turn until the both front and rear diffs move freely. The plastic threads will keep the screws in place so don't worry if you think the screws are not secure.
  • When installing the steering hub kingpins (TKR6596), drive each one in hand tight only. Then check the movement of the steering hub. If it binds up, back out the kingpin screws by 1/8-1/4 of a turn until it moves freely. Then install the set screws (TKR1601) to hold it in place. Only drive the set screw in until you make contact with the kingpin. Do not force it.
  • If using the low profile servo mount, be sure to use smaller OD (outter diameter) washers to avoid rubbing on the center drive shaft. Protek ball stud washers are a good example of the acceptable diameter. You can chose to not run washers though it is recommended to use them as it makes for a more secure mount.

  • Ball Cup Alternative from AE: ASC91453. These are used as a harder composite option if you are not happy with the softer stock plastics. Note that these are approximately 2-3mm shorter and require compensation when building your kit to the manual specs to achieve proper camber/toe settings


  • Wheel Nut Alternative: Yokomo 4mm Thin Aluminum Serrated Flanged Nut

    https://www.amainhobbies.com/yokomo-...-n4flt/p541494


  • Moving Rear Shocks to the Front of the A-arm

    This is the break down of what's required by one of the Eb410 FB users.

    Joey A.

    So since there has been some people wondering about running the shocks in the front of the arm I though I would try explaining everything that I did to get them to work and why. My goal was to run as much stock stuff as possible with the least amount of modifications.

    -Arms- need to be flipped and 1mm shaved off the back (spacing the arm farther back) running it this way the car is still a mm shorter then stock but more material could be removed for more adjustability but I have found no need to make the car longer.

    -Inner ball stud- there are 2 ways of mounting, the first can be used with the stock plastic tower. All you need to do is use a 10mm ball stud instead of the lower shock mount screw and a little clearance from the shock tower and diff case. Using this method will work but the ball stud is moved lower and farther in then the stock locations which requires different pivot locations to try and correct roll centers. The other way (preferred) using the option carbon tower drill a hole higher and farther out if done properly you will be able to get the ball stud location in the correct hight(0mm) and between the two stock locations.

    -Shocks- only 2 changes from stock you will need to space the top shock mount 2mm out. You will also need to run around 1.5-2mm less droop depending on your setup.

    -Sway bar- this is the hardest part of the swap. This can be done a million ways I chose to print a mount in the stock ball stud location which allowed me to use the stock swaybars and arm mounting position. You can also bend your own bar and use the stock mounts on the back. You will have to drill your arms on the other side and closer to the pivot for this to work (remember you will need a thinner bar the closer you mount the lower pickup on the arm to get the same feeling as stock).

    -Other- you will need to remove the drop screws on the rear arm. Depending on rear rims,hubs,ballcups and setup you might need to clearance the outer ball cup so it doesn’t rub on the wheel.

    -Why- the benefits of running the shocks in the front are the ability to run a softer rear shock package without giving up corner speed and pack. The car will land without chassis slapping or packing out as easy allowing you to drive the car harder and it corners flatter and rotates faster without losing rear grip.

    Sorry for the shity grammar,
    TJR

    Sway bar mount for forward mounted shocks: https://www.ebay.com/itm/Tekno-EB410...4AAOSwYNxahFkq

Print Wikipost

Thread Tools
 
Search this Thread
 
Old 09-07-2018, 11:55 PM
  #4621  
Tech Elite
iTrader: (39)
 
EbbTide's Avatar
 
Join Date: Nov 2012
Location: Bay Area, Ca
Posts: 4,264
Trader Rating: 39 (100%+)
Default

Originally Posted by shadaloo
Feel dumb for asking this but with titanium screw kits they say ["Never use in areas where Loctite is to be used. Never use in high stress areas, such as shock mounts or chassis braces."]

So I understand not doing the motor mount, or anything that takes loctite.. but what else? Do you swap most of the screws on the bottom of the chassis? Such as the 4 that hold on the front/rear ends? And up stop, what is considered high stress? I have a full screw kit and am trying to figure out what to avoid... I feel like 90% of the car is high stress, loctite, or a brace... ><
The only places I avoid using them now is the center diff mounts/motor mount. Everything else I've been okay with using titanium.
EbbTide is offline  
Old 09-09-2018, 11:11 AM
  #4622  
Tech Regular
iTrader: (2)
 
shadaloo's Avatar
 
Join Date: Oct 2016
Location: fla
Posts: 268
Trader Rating: 2 (100%+)
Questions??

So you use them for the 4 that mount the front/rear? And still avoid anything with loctite?

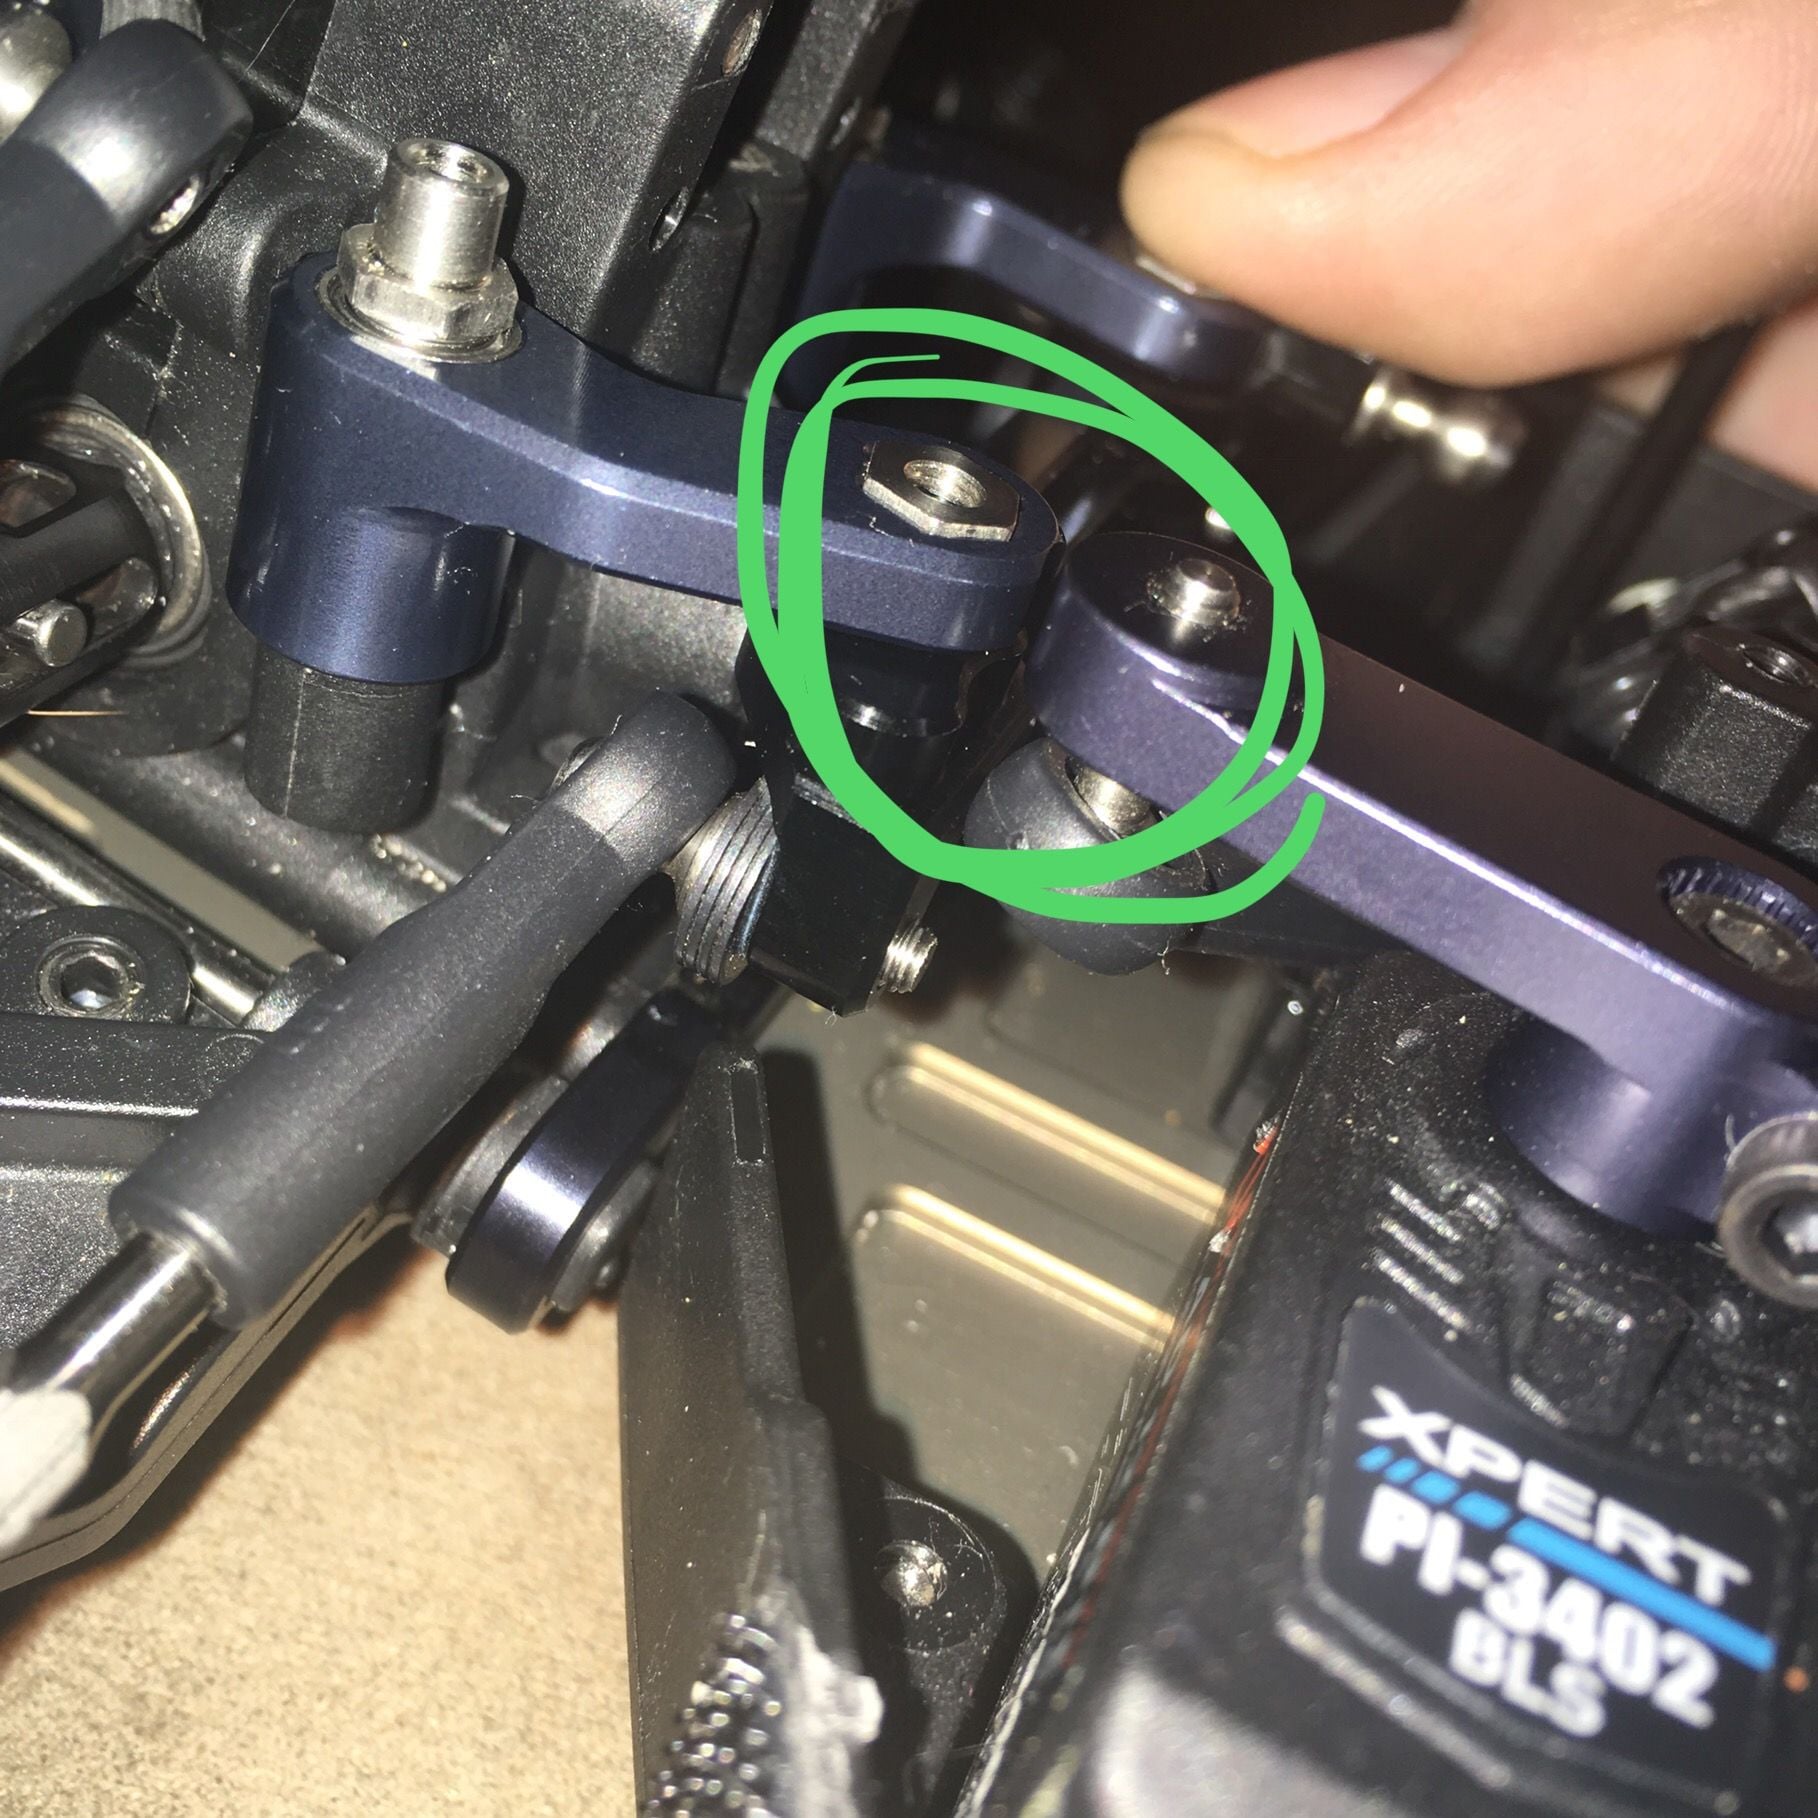
I installed the exotek aluminum bell cranks after the stock ones stripped out on me, and the tekno aluminum ackerman plate... now my tekno aluminum steering horn and steering links both hit? My plastic bell cranks are destroyed so I can't compare length... but are the exotek bell cranks longer or is the ackerman different? I have a steering horn from my 1/8 tekno's that has 2 holes and the shorter hole might work, but wasn't sure how that would go...


shadaloo is offline  
Old 09-09-2018, 11:39 AM
  #4623  
Tech Champion
iTrader: (33)
 
Join Date: Mar 2011
Location: Austin,TX
Posts: 6,192
Trader Rating: 33 (97%+)
Default

I don't see the top plate in yet, confirming that the angle of the steering post is correct?

If still not proper clearance after top plate is installed, then I'd file the edge of the servo horn to get the clearance needed
billdelong is offline  
Old 09-09-2018, 11:46 AM
  #4624  
Tech Regular
iTrader: (2)
 
shadaloo's Avatar
 
Join Date: Oct 2016
Location: fla
Posts: 268
Trader Rating: 2 (100%+)
Default


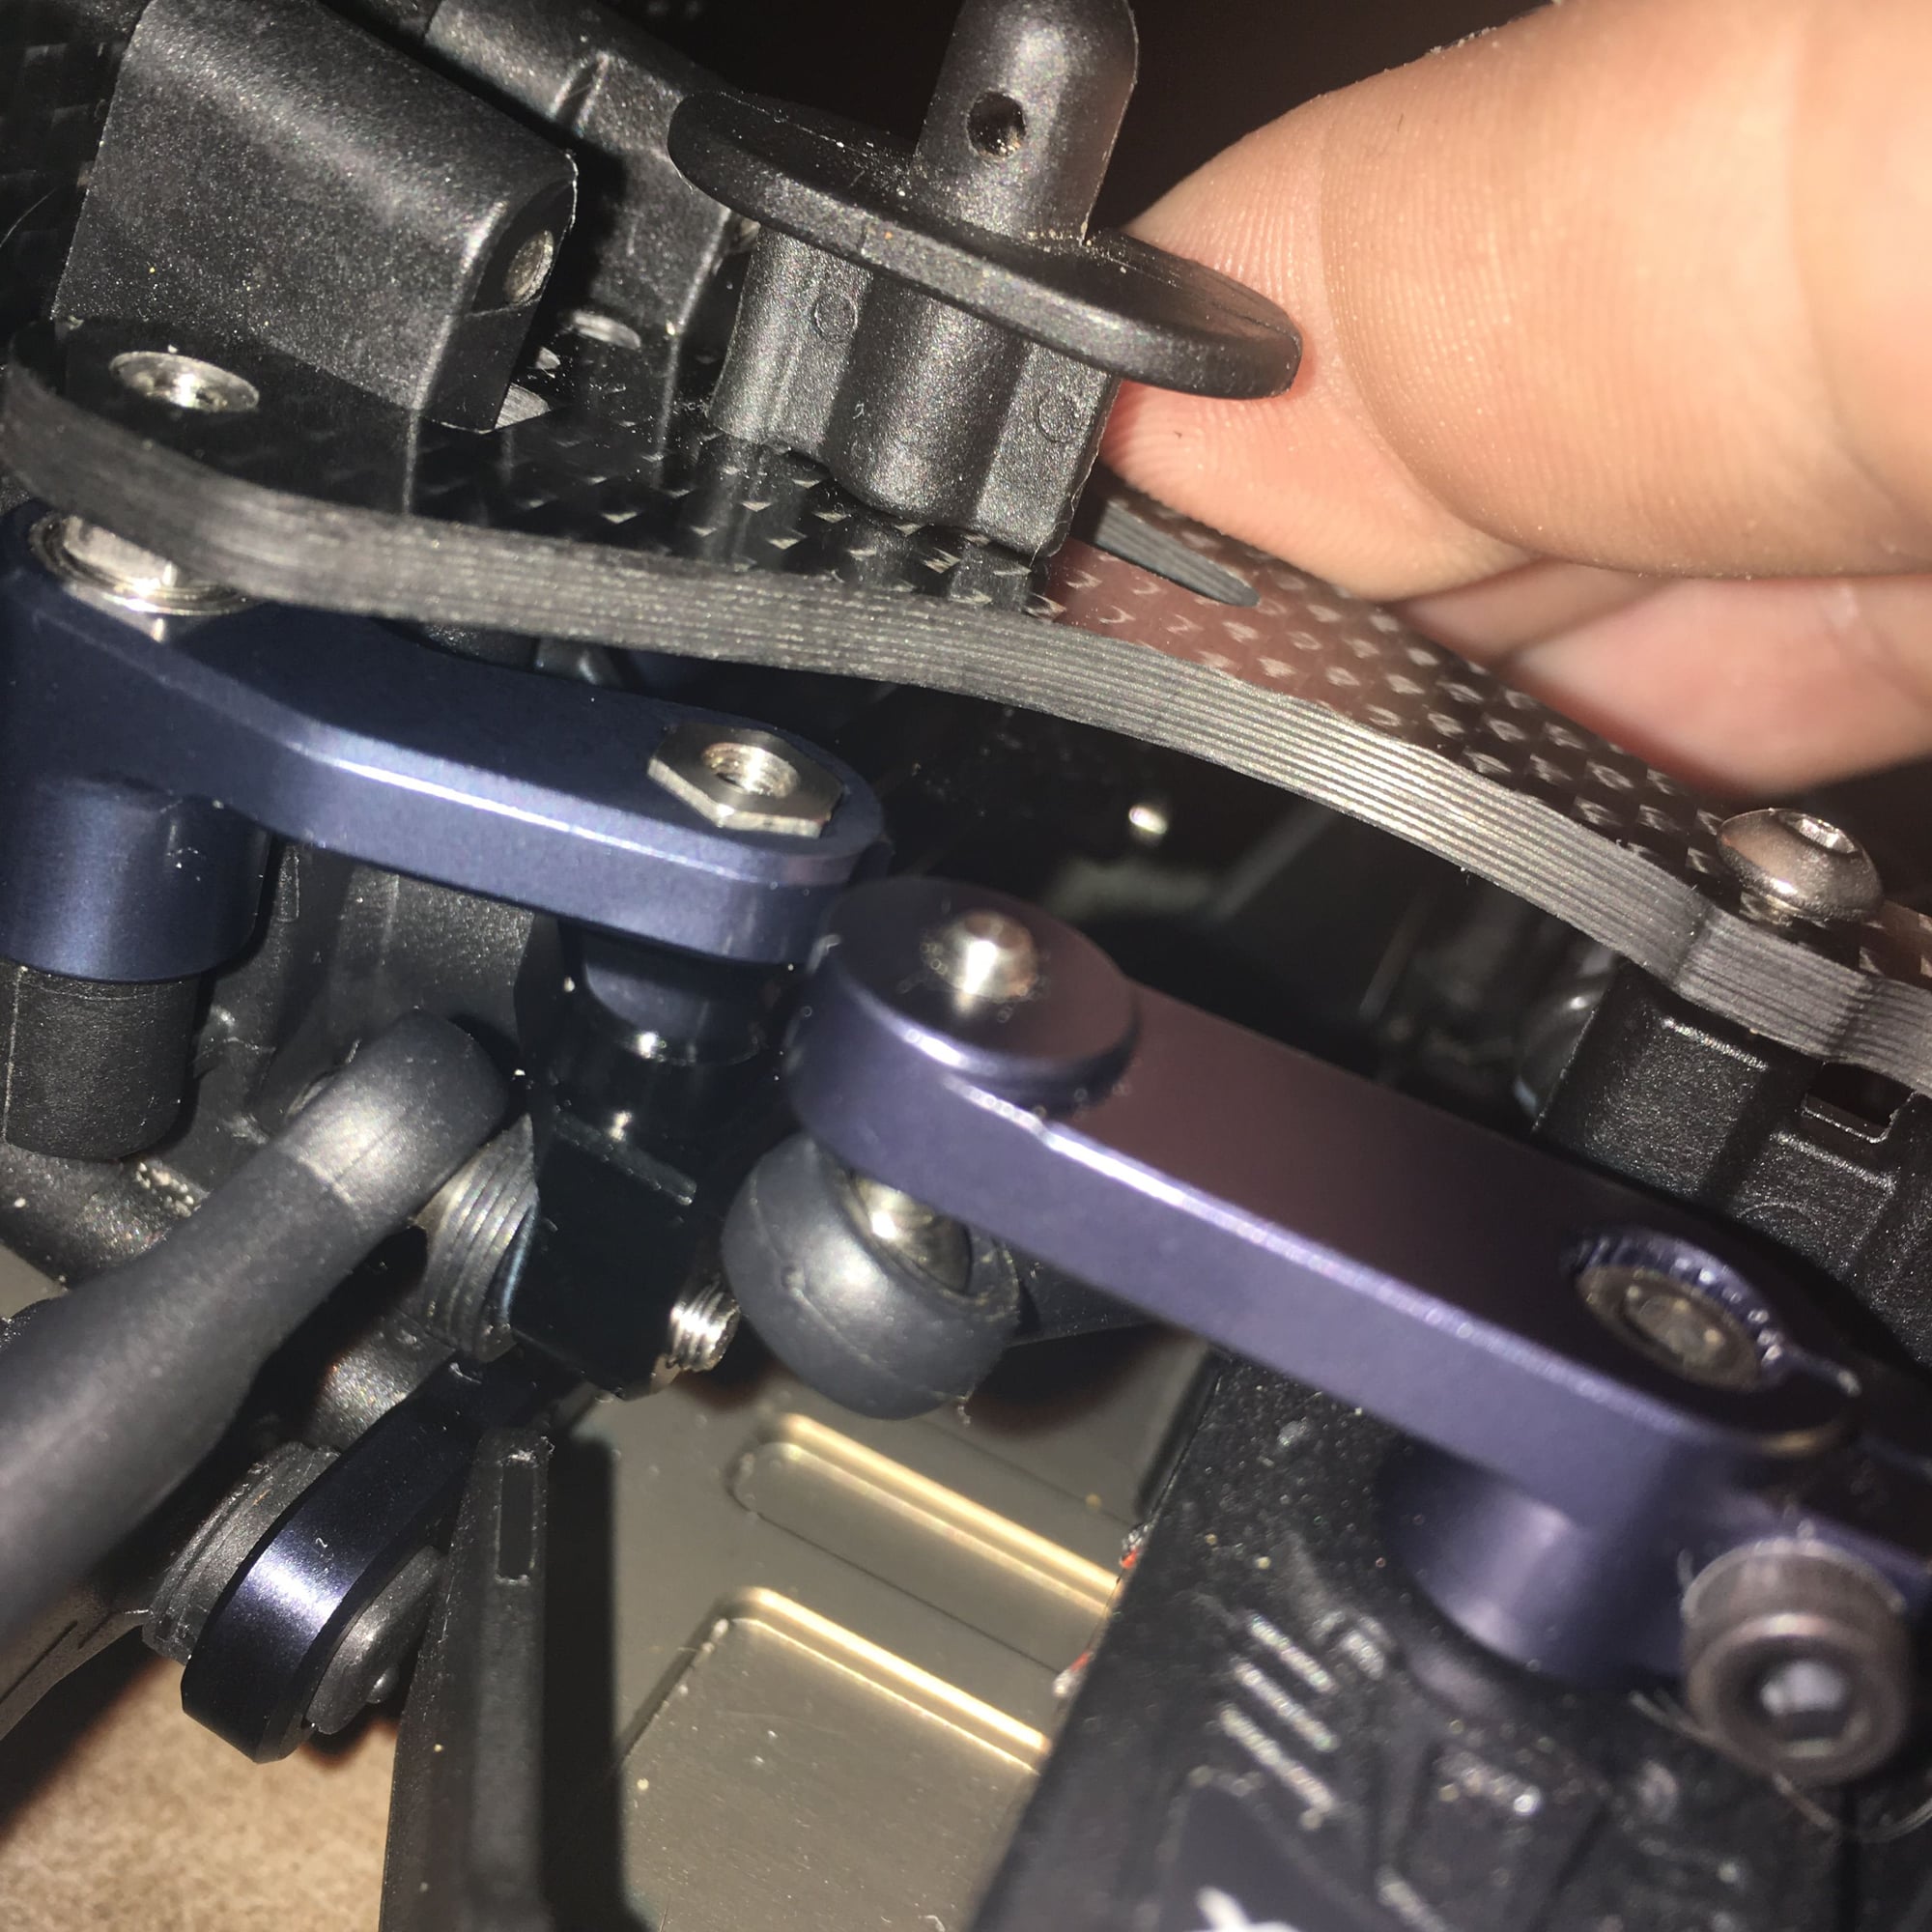
Still hits after top plate is on.. :/
shadaloo is offline  
Old 09-09-2018, 11:49 AM
  #4625  
Tech Champion
iTrader: (33)
 
Join Date: Mar 2011
Location: Austin,TX
Posts: 6,192
Trader Rating: 33 (97%+)
Default

Maybe grind away the splines on the servo mount to allow the servo to be mounted farther away from the linkage?

Definitely won't have this issue with a standard servo, or simply mount the low profile servo on the standard mount?
billdelong is offline  
Old 09-09-2018, 11:56 AM
  #4626  
Tech Regular
iTrader: (2)
 
shadaloo's Avatar
 
Join Date: Oct 2016
Location: fla
Posts: 268
Trader Rating: 2 (100%+)
Default


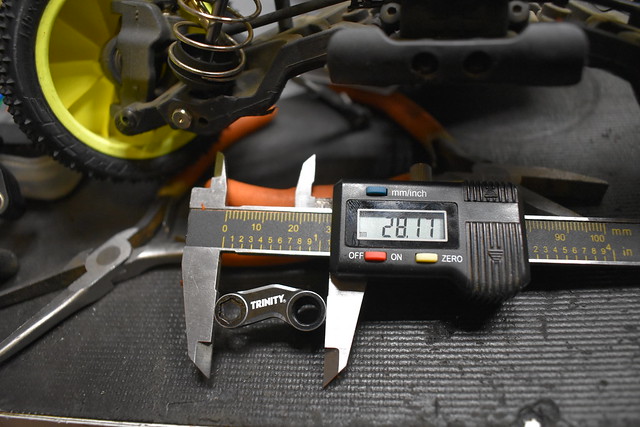
How long are the stock bell cranks? These are 27mm.
shadaloo is offline  
Old 09-09-2018, 01:08 PM
  #4627  
Tech Legend
iTrader: (294)
 
Cain's Avatar
 
Join Date: May 2002
Location: West Fargo, North Dakota
Posts: 34,378
Trader Rating: 294 (100%+)
Default

can see some oddball things happening if you got any chassis flex there on an impact.
Cain is offline  
Old 09-09-2018, 01:40 PM
  #4628  
Tech Regular
iTrader: (2)
 
shadaloo's Avatar
 
Join Date: Oct 2016
Location: fla
Posts: 268
Trader Rating: 2 (100%+)
Default

I figure the exotek bell cranks are longer or the aluminum ackerman is shaped different? I don't have the originals to compare... there isn't any chassis flex or anything..
shadaloo is offline  
Old 09-09-2018, 06:11 PM
  #4629  
Tech Champion
iTrader: (33)
 
Join Date: Mar 2011
Location: Austin,TX
Posts: 6,192
Trader Rating: 33 (97%+)
Default

I don't feel like taking apart my car, but I did place my caliper above to get an "eyeball" measure and it's pretty darn close to 27mm... can't you loosen the screws and slide the servo away from the rack to get proper clearance?
billdelong is offline  
Old 09-09-2018, 09:15 PM
  #4630  
Tech Champion
iTrader: (33)
 
Join Date: Mar 2011
Location: Austin,TX
Posts: 6,192
Trader Rating: 33 (97%+)
Default

Turns out that my wife forgot to tell me about a package that just came in the mail for me yesterday, and as luck will have it, I got my set of aluminum bell cranks from Trinity

Anyway, both the stock and Trinity cranks measure the same at 28mm


EbbTide and shadaloo like this.
billdelong is offline  
Old 09-09-2018, 09:27 PM
  #4631  
Tech Regular
iTrader: (2)
 
shadaloo's Avatar
 
Join Date: Oct 2016
Location: fla
Posts: 268
Trader Rating: 2 (100%+)
Default

I got it to work by using the shim for the lp servo... I appreciate you measuring yours! No idea why it was necessary though, i swapped out the bell cranks and ackerman at the same time so not sure what the issue was... but with the shim in place, everything is working great. [:
billdelong and EbbTide like this.
shadaloo is offline  
Old 09-11-2018, 06:19 PM
  #4632  
Tech Regular
iTrader: (3)
 
Join Date: Jul 2012
Posts: 399
Trader Rating: 3 (100%+)
Default

I'm going to be replacing the chassis on my EB410, I was thinking either the MC2 chassis or the revised Tekno chassis, what do you think is better?
AJrollin is offline  
Old 09-11-2018, 06:43 PM
  #4633  
Tech Elite
iTrader: (39)
 
EbbTide's Avatar
 
Join Date: Nov 2012
Location: Bay Area, Ca
Posts: 4,264
Trader Rating: 39 (100%+)
Default

Originally Posted by AJrollin
I'm going to be replacing the chassis on my EB410, I was thinking either the MC2 chassis or the revised Tekno chassis, what do you think is better?
well if you get the m2c chassis from amain it will be quite a bit cheaper because with the updated tekno chassis you'll also need the new A and B blocks. But the updated chassis should be a few grams lighter even with the new blocks. So my 2 cents. I would get the updated chassis if you've been having bulkhead failures. If not save money and go m2c.
EbbTide is offline  
Old 09-11-2018, 06:54 PM
  #4634  
Tech Regular
iTrader: (3)
 
Join Date: Jul 2012
Posts: 399
Trader Rating: 3 (100%+)
Default

Originally Posted by EbbTide
well if you get the m2c chassis from amain it will be quite a bit cheaper because with the updated tekno chassis you'll also need the new A and B blocks. But the updated chassis should be a few grams lighter even with the new blocks. So my 2 cents. I would get the updated chassis if you've been having bulkhead failures. If not save money and go m2c.
Ok good info... I'm running the steel D block so will probably go back to aluminum and that should counter a couple grams. Not having any bulkhead failures, car is solid
EbbTide likes this.
AJrollin is offline  
Old 09-12-2018, 10:07 AM
  #4635  
Tech Addict
 
sea1swk's Avatar
 
Join Date: Jan 2018
Location: Tacoma Area
Posts: 501
Default

Anyone running the MIP chassis in Mod? How are the Pucks in the center holding up? Anyone figured out what non-Pucks center drivelines can be used?
sea1swk is offline  


Contact Us - Archive - Advertising - Cookie Policy - Privacy Statement - Terms of Service -

Copyright © 2024 MH Sub I, LLC dba Internet Brands. All rights reserved. Use of this site indicates your consent to the Terms of Use.