


Tekin RS soldering question
 02-10-2011, 01:51 AM
#1
(sorry I don't have a pic yet, I will post one in about 4 hours when I get home, until then lets see if you can understand my ramble  )
)
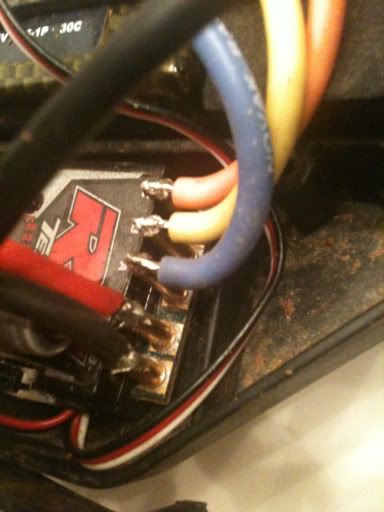
I just got a Tekin Rs the other day and was soldering on the wires yesterday. It seems practically impossible to get the 10ga wires it comes with, down into the posts without trimming some of the strands away. I ended up basically soldering the wires to the side of the posts, the side opposite the leds to clarify. It was easy once I got myself 63/37 solder, and there is solder flowed all around the edges of the connection, and fully through the slot on the post.
What I am asking is, is this sufficient? Or should I unsolder it, clean up the solder that's left on them and try again? (I have a solder sucker, and unsoldering braid) I was also wondering if I could maybe get away with using 12ga wire. I'm pretty sure it would seat in the post slots much easier, but unsure about its ability to flow enough current to the motor. It's a Viper 13.5 motor by the way. Otherwise the only way I can see to get the 10ga into the tiny slots is to... not tin anything, seat the wire into the slot, and then flux/solder it in one shot. I would really prefer that to be honest, as I'm not a fan of having the wires standing up. It's in a XXX buggy and they do rub the body a little, and knowing my luck I will get hit there and break the esc.
Thoughts? Advice?
Thanks.
)I just got a Tekin Rs the other day and was soldering on the wires yesterday. It seems practically impossible to get the 10ga wires it comes with, down into the posts without trimming some of the strands away. I ended up basically soldering the wires to the side of the posts, the side opposite the leds to clarify. It was easy once I got myself 63/37 solder, and there is solder flowed all around the edges of the connection, and fully through the slot on the post.
What I am asking is, is this sufficient? Or should I unsolder it, clean up the solder that's left on them and try again? (I have a solder sucker, and unsoldering braid) I was also wondering if I could maybe get away with using 12ga wire. I'm pretty sure it would seat in the post slots much easier, but unsure about its ability to flow enough current to the motor. It's a Viper 13.5 motor by the way. Otherwise the only way I can see to get the 10ga into the tiny slots is to... not tin anything, seat the wire into the slot, and then flux/solder it in one shot. I would really prefer that to be honest, as I'm not a fan of having the wires standing up. It's in a XXX buggy and they do rub the body a little, and knowing my luck I will get hit there and break the esc.
Thoughts? Advice?
Thanks.
 02-10-2011, 02:16 AM
#2
I know when I first looked at my rs to solder it I was a little weary. It actually turned out easier than I expected.
I didn't use the supplied wire though. I used a Novak wire kit labeled for the Havok 3S. It came with bullet plugs preinstalled and it matched what I was using on all my motors. All my stuff is using 14ga wire so it wasn't as bad as trying to get 10-12ga on there.
Still though I had to shape my wires tinned end a little. Basically I flattened them out with some smooth needlenose I have until they were thin enough to fit in the slot. I trimmed them up some so they would fit in without so much hanging off the posts.
Let me see if I can get a pic up from my phone lol.
Edit: pics, and sorry truck is still a little dirty...

Re-edited, sorry posted from phone and didnt realize the pics were so huge!
I didn't use the supplied wire though. I used a Novak wire kit labeled for the Havok 3S. It came with bullet plugs preinstalled and it matched what I was using on all my motors. All my stuff is using 14ga wire so it wasn't as bad as trying to get 10-12ga on there.
Still though I had to shape my wires tinned end a little. Basically I flattened them out with some smooth needlenose I have until they were thin enough to fit in the slot. I trimmed them up some so they would fit in without so much hanging off the posts.
Let me see if I can get a pic up from my phone lol.
Edit: pics, and sorry truck is still a little dirty...
Re-edited, sorry posted from phone and didnt realize the pics were so huge!
Last edited by GizmoJunkie; 02-11-2011 at 12:16 AM. Reason: Edited to post pics.
02-10-2011, 03:05 AM
#4

I used the Tekin wire supplied with the ESC for my fresh install.
The secret is not to pre-tin the wires too much with solder that it risks dripping down the solder post when you solder to it, or flatten the soldered wire too much - or you could risk them not having enough space between each other.
Pre tin the post, then the wire, then apply enough force on the top of the wire, but without flattening it.
I use an 80w antex iron with a biggish tip for ESC installs, and a 30w draper iron for smaller work, coupled with draper expert solder:
http://washford.scene7.com/is/image/.../704049?$prod$
hope that helps
02-10-2011, 03:13 AM
#5
I think my soldering gun/iron what ever you wanna call it, is holding me back a bit. It's a butane 'gun' shaped one. It works great don't get me wrong, the solder liquefies in like 2 sec of touching it, but it has a 1/4" chisel tip on it. A bit big for this stuff. I have a Hakko 936 in the mail, should have it next Wed.
02-10-2011, 03:26 AM
#7
http://www.fusionhobbies.com/kb_results.asp?ID=17
hopefully that link works for you
02-10-2011, 03:49 AM
#9
EDIT: My battery wires go at a 45deg angle to clear the cap, but that was the neatest way of hooking it up.
What also helps, is placing the ESC, battery and motor in the car, then eyeballing what the best route is for the wiring, place the wires by hand where they would go, mark the wire at that point, cut the wires to size, allowing maybe a max of 1cm more for the ends that you are cutting the insulation off of.
Then finish off with zip ties should you need to use them.
Hopefully that makes sence, I was very lucky how mine all slotted in to my sedan neatly...
 02-10-2011, 04:01 AM
#10
It is all installed into the car, being it's a 2wd buggy, the motor wires have to go through the rear shock tower to be protected. So it was a bit tricky to get layed out right, but I should be able to re-do it with the wires on their sides. My battery wires are basically the same as yours.
I'll be leaving work shortly, when I get home I will post up a pic of how it currently is.
I'll be leaving work shortly, when I get home I will post up a pic of how it currently is.
02-10-2011, 04:04 AM
#11
No worries, if you need any other help, PM me and i'll do what I can to help
02-10-2011, 04:53 AM
#12
+1, pre tin the posts and fill the gaps with solder. Pre tin the wire ends and solder directly to top of posts. Works very well, clean and easy to change motors if needed.

 02-10-2011, 06:49 AM
#14
Ok, for one, I'm retarted and didn't realize it is 12ga already
And I gave it another try just now. I cleaned out almost all the solder from the posts, then heated and flattened the wires. I then soldered them to the top of the post, and I could deff feel the wire go into the slot. Looks much better, clears the body well too. They got a little fuzz on them from my rag if you are wondering what that is.


And I gave it another try just now. I cleaned out almost all the solder from the posts, then heated and flattened the wires. I then soldered them to the top of the post, and I could deff feel the wire go into the slot. Looks much better, clears the body well too. They got a little fuzz on them from my rag if you are wondering what that is.
02-10-2011, 07:43 AM
#15