


Project: Brushless Carbon Jato
 09-12-2007, 07:19 AM
#1
OK RC'ers and wanna bees. I have been hip deep preparing for the iHobby show but I could not resist getting out this sneak preview on a car I am building.
What I have here is something rather new from Vantage Racing (http://www.vantageracing.com/site/). First these guys make radical 3D carbon fiber components for a wide verity of RC cars. Everything from tuned pipes (nitro) to fluff things like fuel tank protectors and what may be the sexiest chassis out. I really like these guys because they are doing carbon the way it should be done, 3D. Not flat plates that have been water knifed out. These are formed in a 2 part or greater pressure die molding process using prepreg carbon fiber that after the process is dipped to get the final rather clean finish.
(Side - Bar here: Since working with carbon fiber and carbon ceramic is my real job I know this process very well. Even thought they will not reveal their process I am 90% certin what they are doing. Even though I love their process there are issues I will get into later in this post.)
Well here is the project. Since I made the first brushless Jato around 2 years ago there have been many that have gone and built their own and I congratulate them. The brushless Jato was one of the most fun cars I have ever converted. But now I have had to raise the bar on all those out there. Here is the new brushless Jato. I am calling this new ride the Jato E3.6. I will see if anyone can figure out the meaning of the name.
This project required a newer approach to the car then any other one I have done. This is because of the carbon chassis. One thing you dont want to do (trust me on this) is make new holes in carbon or mount anything that may damage the resin or fibers. Both of these will greatly compromise the integrity if the chassis.
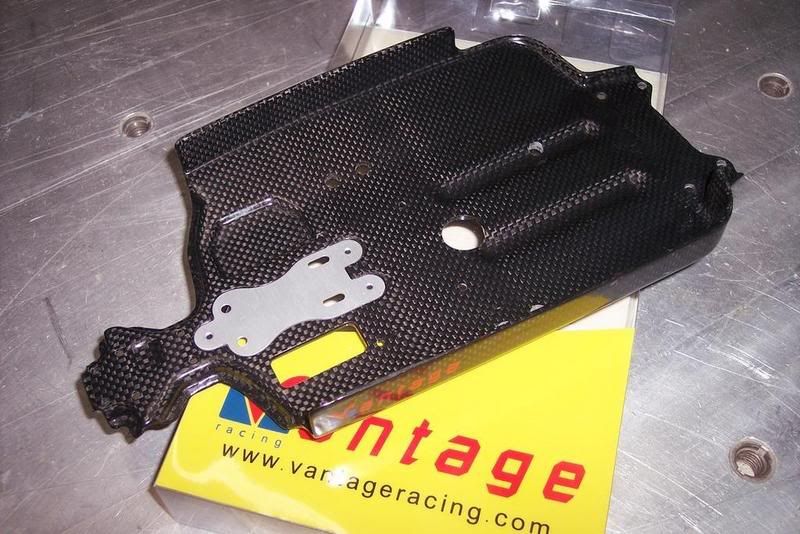
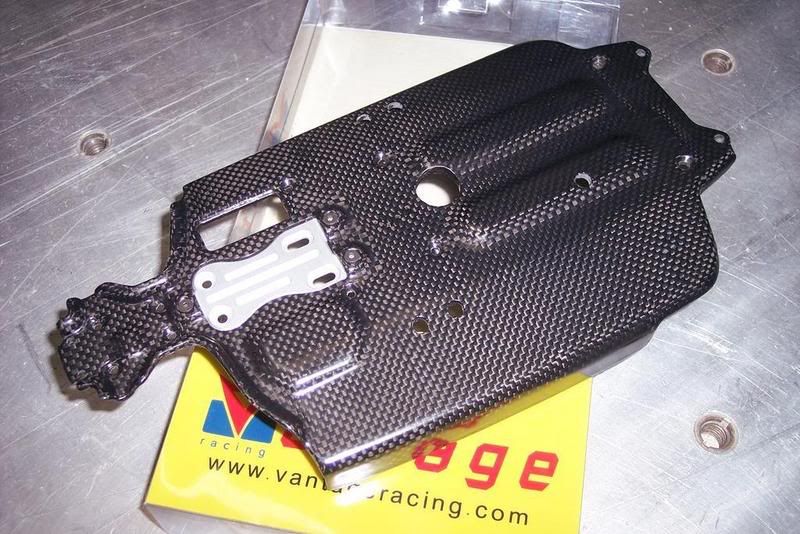
Here is how the chassis comes from Vantage Racing (http://www.vantageracing.com/site/). The package is nice and clean. It has a great presence even while just sitting in the package. The clear packaging is great to show off exactly what in in the package. It makes you want to buy it. The chassis comes with a small CNC machined aluminum part that mounts into the middle rear of the chassis. This is where you would mount the 3.3 Traxxas motor for you nitro guys. The fit and finish of the insert is simply of the best quality. Not a sharp edge anywhere. This is what you want with both carbon and aluminum.
There is a special made area for the insert to go into and the kit comes with the screws to mount the insert into the chassis. Just a drop of BLUE lock tight and mount this in the chassis. Now if you are doing what I did dont use the lock tight yet, you will be taking this on and off many times to get proper alignment of the rest of the stuff. But if you are going 'O'nitro then just move all your stuff across. I took all my parts and washed in 'Kaboom'(tm) and water to wash all the parts off of the donor used Jato I got for this project. Please wear gloves the stuff will dry out your hands.
Here is the good stuff: Since I have done several brushless Jatos doing the front modification for the servo and to remove things that will not be needed in the electric conversion is a no brainier here. I take away everything that is not needed to hold the servo in to place firmly. Since the donor Jato came completely stripped I have put in one of my favorite servos in, a Blue Bird BMS-610MG-HS with 132 in-oz of torque. This is a great servo that I use all over the place. Yes it is over kill for steering the Jato but I have around 10 of these in my hobby box and if you just set the end points up right there is no problem. To trim all the excess plastic off the mount plate I just use a small Dremel vertical band saw. It cuts clean and quickly. I am very careful to leave the factory antenna mount.

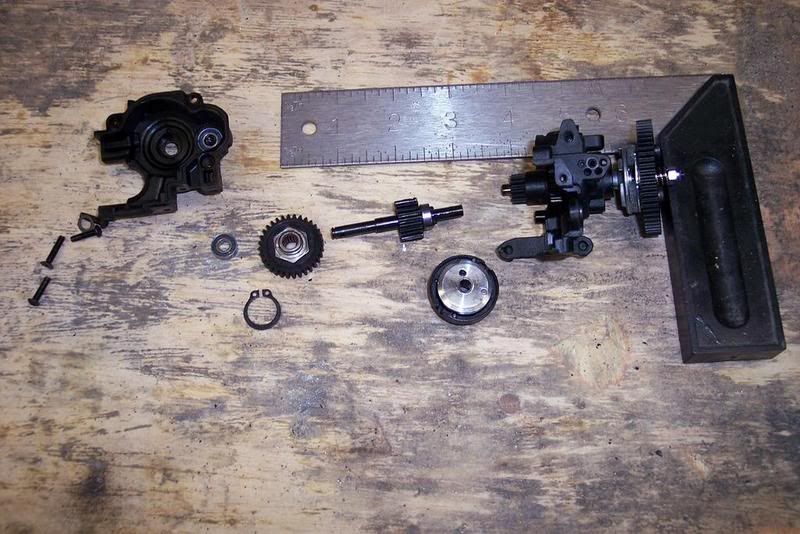
Now I have to get the rear end done. First I am going to use the motor for braking (not to mention I want to have reverse) so I have to modify the rear end. Inside the transmission of the Jato you will find a 2 speed transmission that is run with a centrifical clutch. Here we need to split the transmission and remove the secondary drive shaft. This shaft holds the first gear and second gear with the clutch. Since the electric motor has more torque and power than the nitro there is no need for first gear. Besides in my first E-Jato The transmission shifted in about 10 feet so it is truly useless. Also the brushless motor will turn at 60,000 rpm plus so speed is not a problem either.
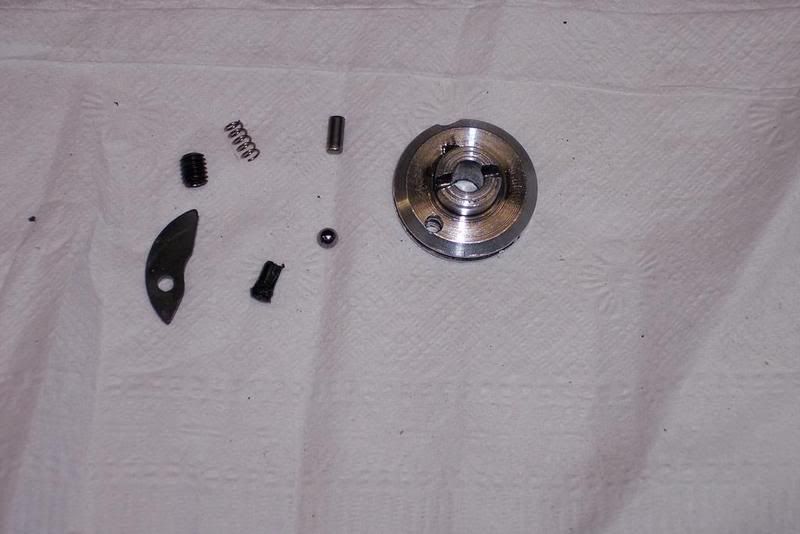
To lock the clutch I like the pin method. However there are several other ways. You can score the inside of the plastic gear and run some sand paper on the facing clutch area and use some good 2 part epoxy and glue it or what ever. Just make sure that you do it good. In the following photos you will see the pin method I did. I first disassembled the clutch. This is done by driving out the pins that are in the clutch. You will get a set screw and a spring and a ball bearing and the clevit (this is the part that engages second gear).
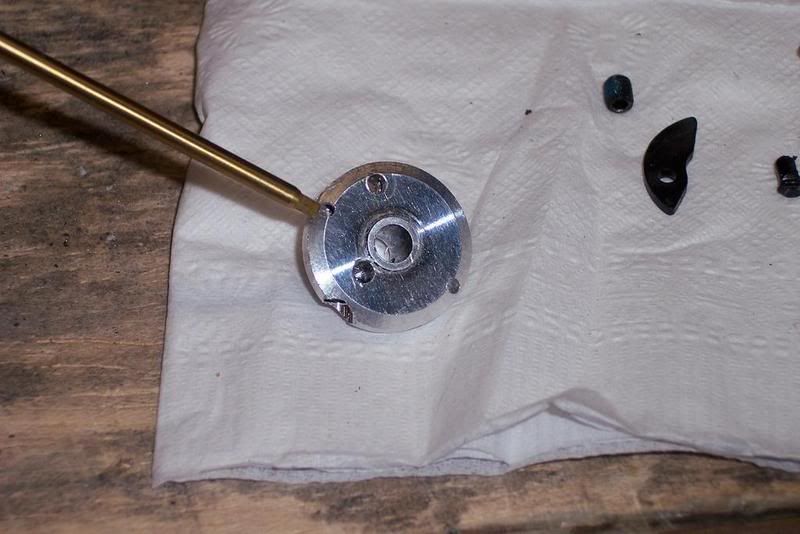
You must drill the holes for the pins at the point where the aluminum starts to taper. This is vary difficult to do unless you use a center punch to help guide the drill through the first little bit of the aluminum. The hole must be this far out because you need the pin to go through the thickest part of the plastic gear for strength. Drill the aluminum first. I use for pins wheel drive pins. These are hardened steel and will not sheer. In others I have used 2mm roll pins and these have proven to be good also. In either case you need to drill the hole just slightly smaller than the pin. You will have a little more grace with the roll pin. With the wheel drive pin you will have to be exact with a very straight and nice hole or it will not go in or it will be too loose. Once you drill the holes in the aluminum use it as a guide for the plastic gear. Do not drill all the way through. There is a high possibility that you will drill through part of the gear face and thus have to buy another gear. If you go into the plastic gear 3 to 4 mm this will work well. I use 2 pins at opposing sides and I recommend the same to you.
Once you get the drilling done you will have to press in the pins. Press them into the aluminum first alone. Get them fully seated and see how much is sticking through and check the holes in the plastic gear to make sure they are deep enough. Once this is done put the bearing back on and then press the aluminum and the gear together. I have a bench press for this that puts straight force in 2 surfaces that are perfectly flat to each other. If you do not have a press a bench vice with clean SMOOTH jaws will also work well for this. Now you have the drive gear done.
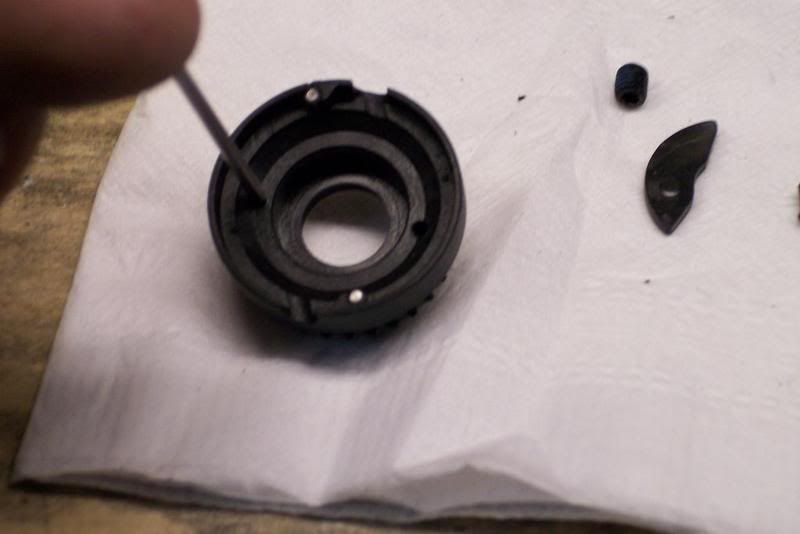
Now you need to reassemble the shaft and put the transmission together. Dont for get to remove the first gear gear from the one way bearing. Put the bearing back on the shaft and reassemble. Now you have a single speed transmission that will also allow you to use the motor for braking. You will also have the option of reverse.

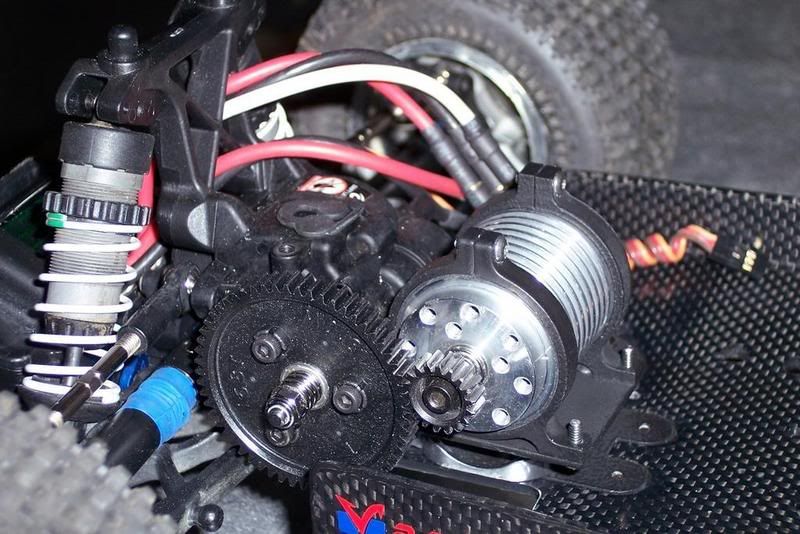
What the hell are we going to do with the motor? Well as discussed previously we do not want to drill or chaff the carbon fiber. After looking at the chassis and the pile of parts for about 15 minutes I had the fix. I am going to use the factory nitro motor mount. The chassis is made for this to mount to, and it will raise the motor off the chassis and more align it to the center horizontal line of the spur gear.
OK having built these before I know I have to remove the plastic housing around the slipper so I can get the motor close enough to the spur gear. I get the housing off and reassemble. Now I cut a piece of 2 mm aluminum sheet metal in to a 55mm x 60mm square. I mount the factory motor mount to the aluminum plate on the Vantage Racing chassis with the factory machine screws. I now trim the aluminum plate I made to fit cleanly. The motor mount I am using for this is a clamp style. It has not adjustment fore and aft. However this is not needed. Since I am using the factory motor mount the fore and aft movement will be done just as the factory set up, by loosening the screws in the bottom and sliding the entire assembly back and forth. The clamps are wider then the motor mount so the plate needed to be wider. It was here that i just started drilling and matching to get a perfect fit. As you can see the mount came out great (if I do say so my self).
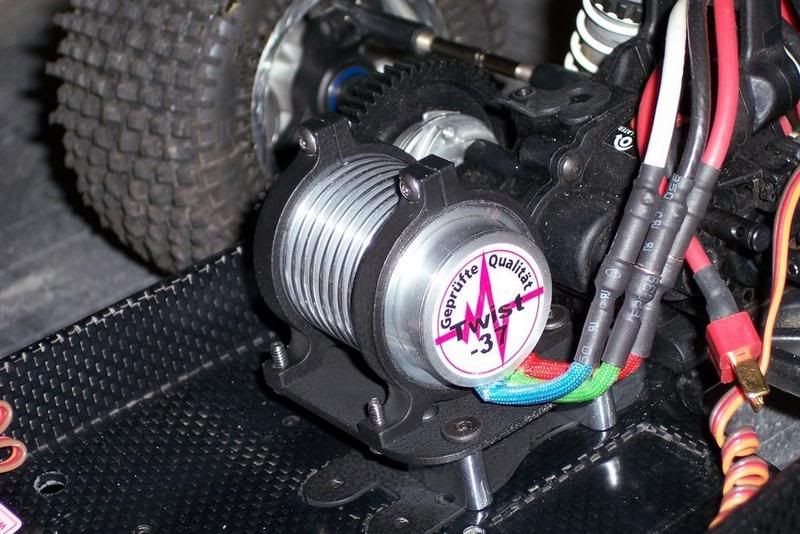

The motor I am using is a Kontronik Twist 37. It is a 3700 rpm/v motor. Very few people on the car side of this hobby have heard of Kontronik but let me assure you that they are one of the great ones. Plus it is just a great looking motor. Polished aluminum with machined cooling fins. This is where I decided that everything needed to go black except the factory motor mount and the motor. I finished trimming and cleaning then sent all the aluminum (including the Vantage Racing aluminum chassis part) out to get a coat of black satin with a light wrinkle finish.
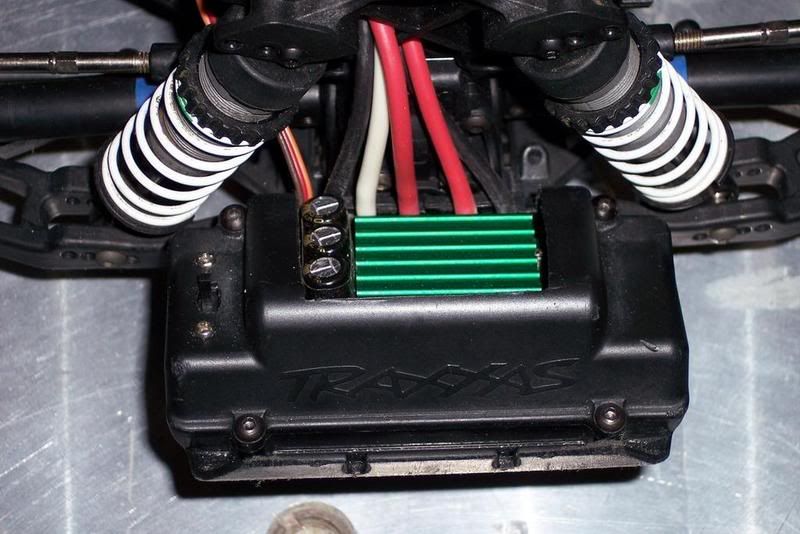
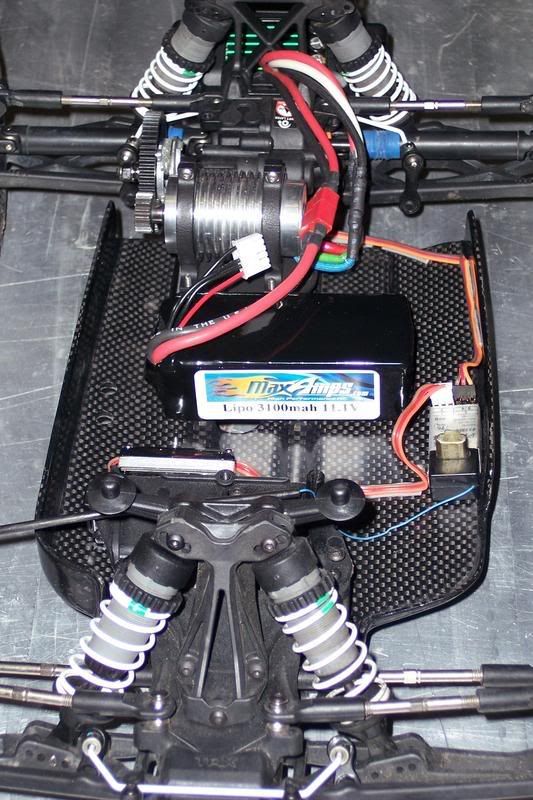
Now as you can see by the photos I decided to mount the Castle Creations Mamba Max esc in the rear battery tray. I did this because of wanting to keep the attention on the motor in the chassis. The esc would fit with out the cut out, barely the caps would hit fairly hard. But cut out needed to be made to allow the esc to cool. It would not run long sealed up in the box. I also used Velcro to hold it and this raised it up slightly so the heat sink just sticks out the hole. The Velcro also allows the esc to be removed to allow easy access to the programming port on the side of the Mamba Max.
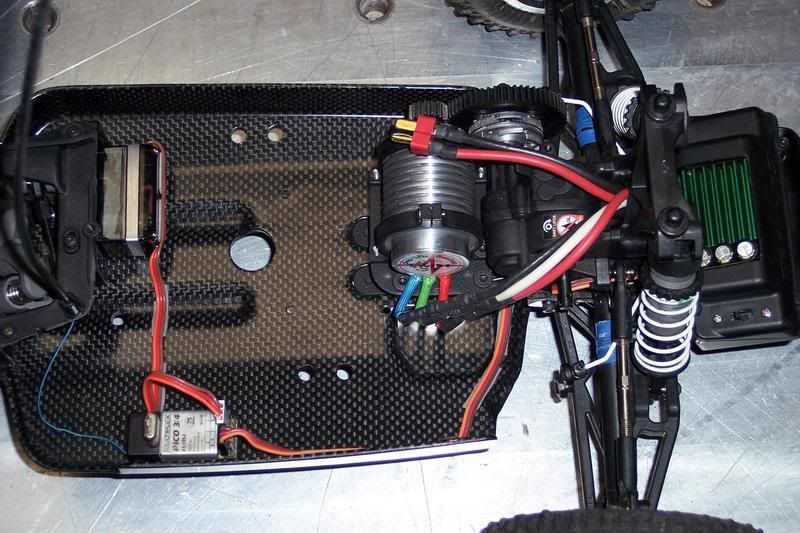
The rest of the system consists of a Multiplex 4 ch receiver. There is also a Cell Pro 4S-DPM/BEC in there. This is a Discharge Protection Module for lipo batteries with a UBEC built in. I will be reviewing this further later. So far I like it. The batteries are from the fine folks at MaxAmps.com. They are 3100 mah 7.4 and 11.1 packs. I went with these because I generally ran my other EJatos on a 2100 Thunder Power 2 or 3 cell lipo. The MaxAmps packs are the same size with 1000 more mah of capacity and a higher 'C' rating. These packs will run 20C all day. The Krontronik motor has a max current draw at 65 amps so this will run well. You can easily fit a standard size lipo car pack in here so you dont have to do what I have done. All machine screws are Traxxas screws for a Jato except for the 5 bolts on the motor clamp. Those are 4-40 stainless.
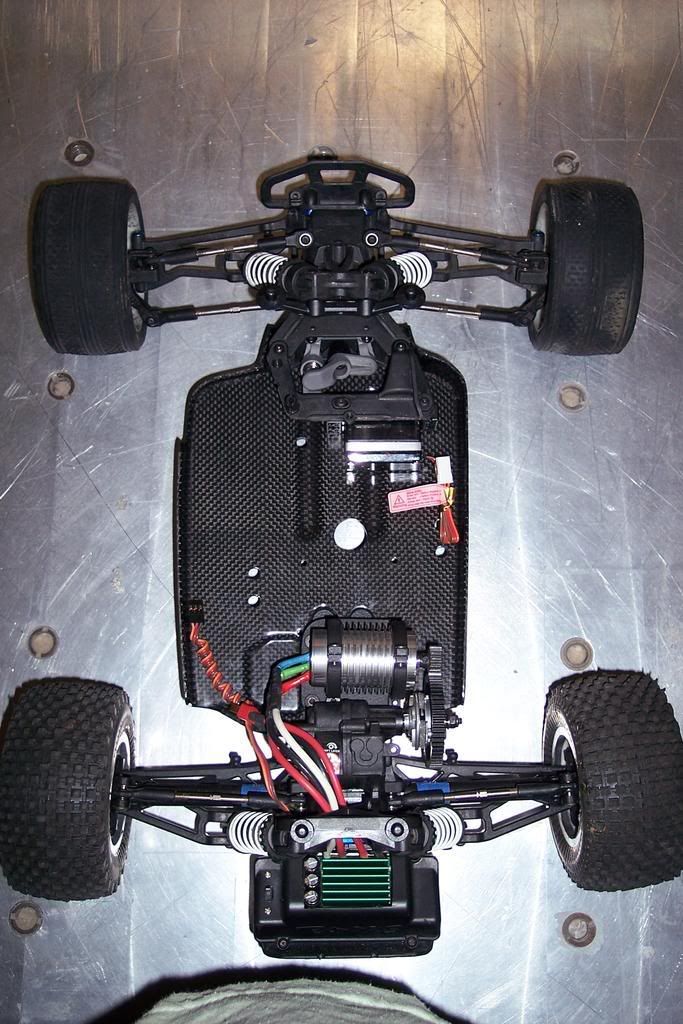
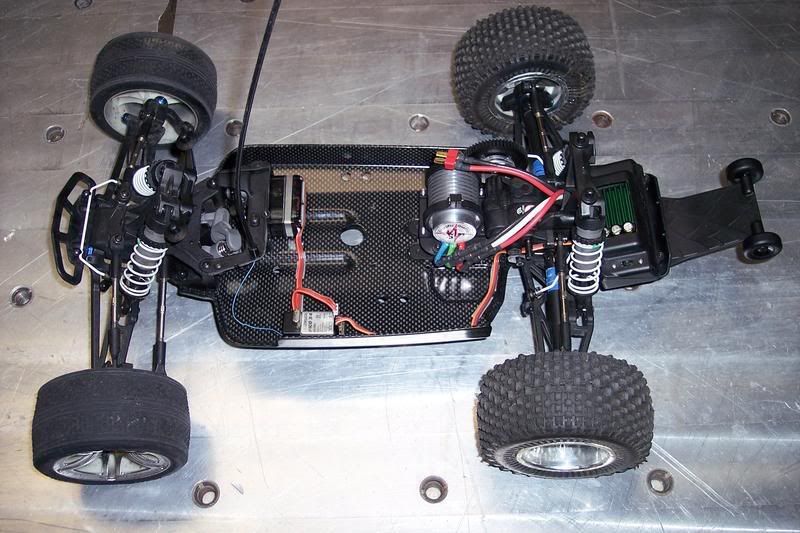
This is the whole thing.
I am now waiting for the ProLine Crowd Pleazer 2.0 body for the Jato to arrive so I can send it out for painting. I have found this guy in California that paints very sick bodies. I am also waiting for my battery retainers to get here. I also have new tires and wheels coming. So when all the parts arrive I will make some videos and put them up.
One more time here is my parts list:
1 Jato donor car. I got mine used and stripped for $40.
2 Carbon fiber chassis from Vantage Racing. http://www.vantageracing.com
3 Steering servo Blue Bird BMS-610MG-HS with 132 in-oz of torque. http://www.blue-bird-model.com/USA/index2.htm
4 Krontronik Twist 37 motor. 3700 rpm/volt. http://www.kontronikusa.com/index.html (The German site is better but in German)
5 Castle Creations Mamba Max esc. http://www.castlecreations.com/index.html
6 Max Amps battery packs 3100 mah one 2 cell 7.4v and one 3 cell 11.1v. (There is plenty of room for a 4 cell if you want.) http://www.maxamps.com/
7 3mm Schulze gold connectors on the motor and Deans on the battery.
8 Multiplex 4ch Pico receiver. http://www.multiplexusa.com/product_fs.htm
9 Velcro battery straps are made for me by Bay Area Gear Repair here in Florida. They make and repair firemen clothing.
10 Motor mount made and designed by me.
Right now I can tell you that this truck is very light. My first Jato was around a pound lighter then a factory Jato and this one is lighter yet. I need to get a new scale but this is going to be close to a RTR T4.
What I have here is something rather new from Vantage Racing (http://www.vantageracing.com/site/). First these guys make radical 3D carbon fiber components for a wide verity of RC cars. Everything from tuned pipes (nitro) to fluff things like fuel tank protectors and what may be the sexiest chassis out. I really like these guys because they are doing carbon the way it should be done, 3D. Not flat plates that have been water knifed out. These are formed in a 2 part or greater pressure die molding process using prepreg carbon fiber that after the process is dipped to get the final rather clean finish.
(Side - Bar here: Since working with carbon fiber and carbon ceramic is my real job I know this process very well. Even thought they will not reveal their process I am 90% certin what they are doing. Even though I love their process there are issues I will get into later in this post.)
Well here is the project. Since I made the first brushless Jato around 2 years ago there have been many that have gone and built their own and I congratulate them. The brushless Jato was one of the most fun cars I have ever converted. But now I have had to raise the bar on all those out there. Here is the new brushless Jato. I am calling this new ride the Jato E3.6. I will see if anyone can figure out the meaning of the name.
This project required a newer approach to the car then any other one I have done. This is because of the carbon chassis. One thing you dont want to do (trust me on this) is make new holes in carbon or mount anything that may damage the resin or fibers. Both of these will greatly compromise the integrity if the chassis.
Here is how the chassis comes from Vantage Racing (http://www.vantageracing.com/site/). The package is nice and clean. It has a great presence even while just sitting in the package. The clear packaging is great to show off exactly what in in the package. It makes you want to buy it. The chassis comes with a small CNC machined aluminum part that mounts into the middle rear of the chassis. This is where you would mount the 3.3 Traxxas motor for you nitro guys. The fit and finish of the insert is simply of the best quality. Not a sharp edge anywhere. This is what you want with both carbon and aluminum.
There is a special made area for the insert to go into and the kit comes with the screws to mount the insert into the chassis. Just a drop of BLUE lock tight and mount this in the chassis. Now if you are doing what I did dont use the lock tight yet, you will be taking this on and off many times to get proper alignment of the rest of the stuff. But if you are going 'O'nitro then just move all your stuff across. I took all my parts and washed in 'Kaboom'(tm) and water to wash all the parts off of the donor used Jato I got for this project. Please wear gloves the stuff will dry out your hands.
Here is the good stuff: Since I have done several brushless Jatos doing the front modification for the servo and to remove things that will not be needed in the electric conversion is a no brainier here. I take away everything that is not needed to hold the servo in to place firmly. Since the donor Jato came completely stripped I have put in one of my favorite servos in, a Blue Bird BMS-610MG-HS with 132 in-oz of torque. This is a great servo that I use all over the place. Yes it is over kill for steering the Jato but I have around 10 of these in my hobby box and if you just set the end points up right there is no problem. To trim all the excess plastic off the mount plate I just use a small Dremel vertical band saw. It cuts clean and quickly. I am very careful to leave the factory antenna mount.
Now I have to get the rear end done. First I am going to use the motor for braking (not to mention I want to have reverse) so I have to modify the rear end. Inside the transmission of the Jato you will find a 2 speed transmission that is run with a centrifical clutch. Here we need to split the transmission and remove the secondary drive shaft. This shaft holds the first gear and second gear with the clutch. Since the electric motor has more torque and power than the nitro there is no need for first gear. Besides in my first E-Jato The transmission shifted in about 10 feet so it is truly useless. Also the brushless motor will turn at 60,000 rpm plus so speed is not a problem either.
To lock the clutch I like the pin method. However there are several other ways. You can score the inside of the plastic gear and run some sand paper on the facing clutch area and use some good 2 part epoxy and glue it or what ever. Just make sure that you do it good. In the following photos you will see the pin method I did. I first disassembled the clutch. This is done by driving out the pins that are in the clutch. You will get a set screw and a spring and a ball bearing and the clevit (this is the part that engages second gear).
You must drill the holes for the pins at the point where the aluminum starts to taper. This is vary difficult to do unless you use a center punch to help guide the drill through the first little bit of the aluminum. The hole must be this far out because you need the pin to go through the thickest part of the plastic gear for strength. Drill the aluminum first. I use for pins wheel drive pins. These are hardened steel and will not sheer. In others I have used 2mm roll pins and these have proven to be good also. In either case you need to drill the hole just slightly smaller than the pin. You will have a little more grace with the roll pin. With the wheel drive pin you will have to be exact with a very straight and nice hole or it will not go in or it will be too loose. Once you drill the holes in the aluminum use it as a guide for the plastic gear. Do not drill all the way through. There is a high possibility that you will drill through part of the gear face and thus have to buy another gear. If you go into the plastic gear 3 to 4 mm this will work well. I use 2 pins at opposing sides and I recommend the same to you.
Once you get the drilling done you will have to press in the pins. Press them into the aluminum first alone. Get them fully seated and see how much is sticking through and check the holes in the plastic gear to make sure they are deep enough. Once this is done put the bearing back on and then press the aluminum and the gear together. I have a bench press for this that puts straight force in 2 surfaces that are perfectly flat to each other. If you do not have a press a bench vice with clean SMOOTH jaws will also work well for this. Now you have the drive gear done.
Now you need to reassemble the shaft and put the transmission together. Dont for get to remove the first gear gear from the one way bearing. Put the bearing back on the shaft and reassemble. Now you have a single speed transmission that will also allow you to use the motor for braking. You will also have the option of reverse.
What the hell are we going to do with the motor? Well as discussed previously we do not want to drill or chaff the carbon fiber. After looking at the chassis and the pile of parts for about 15 minutes I had the fix. I am going to use the factory nitro motor mount. The chassis is made for this to mount to, and it will raise the motor off the chassis and more align it to the center horizontal line of the spur gear.
OK having built these before I know I have to remove the plastic housing around the slipper so I can get the motor close enough to the spur gear. I get the housing off and reassemble. Now I cut a piece of 2 mm aluminum sheet metal in to a 55mm x 60mm square. I mount the factory motor mount to the aluminum plate on the Vantage Racing chassis with the factory machine screws. I now trim the aluminum plate I made to fit cleanly. The motor mount I am using for this is a clamp style. It has not adjustment fore and aft. However this is not needed. Since I am using the factory motor mount the fore and aft movement will be done just as the factory set up, by loosening the screws in the bottom and sliding the entire assembly back and forth. The clamps are wider then the motor mount so the plate needed to be wider. It was here that i just started drilling and matching to get a perfect fit. As you can see the mount came out great (if I do say so my self).
The motor I am using is a Kontronik Twist 37. It is a 3700 rpm/v motor. Very few people on the car side of this hobby have heard of Kontronik but let me assure you that they are one of the great ones. Plus it is just a great looking motor. Polished aluminum with machined cooling fins. This is where I decided that everything needed to go black except the factory motor mount and the motor. I finished trimming and cleaning then sent all the aluminum (including the Vantage Racing aluminum chassis part) out to get a coat of black satin with a light wrinkle finish.
Now as you can see by the photos I decided to mount the Castle Creations Mamba Max esc in the rear battery tray. I did this because of wanting to keep the attention on the motor in the chassis. The esc would fit with out the cut out, barely the caps would hit fairly hard. But cut out needed to be made to allow the esc to cool. It would not run long sealed up in the box. I also used Velcro to hold it and this raised it up slightly so the heat sink just sticks out the hole. The Velcro also allows the esc to be removed to allow easy access to the programming port on the side of the Mamba Max.
The rest of the system consists of a Multiplex 4 ch receiver. There is also a Cell Pro 4S-DPM/BEC in there. This is a Discharge Protection Module for lipo batteries with a UBEC built in. I will be reviewing this further later. So far I like it. The batteries are from the fine folks at MaxAmps.com. They are 3100 mah 7.4 and 11.1 packs. I went with these because I generally ran my other EJatos on a 2100 Thunder Power 2 or 3 cell lipo. The MaxAmps packs are the same size with 1000 more mah of capacity and a higher 'C' rating. These packs will run 20C all day. The Krontronik motor has a max current draw at 65 amps so this will run well. You can easily fit a standard size lipo car pack in here so you dont have to do what I have done. All machine screws are Traxxas screws for a Jato except for the 5 bolts on the motor clamp. Those are 4-40 stainless.
This is the whole thing.
I am now waiting for the ProLine Crowd Pleazer 2.0 body for the Jato to arrive so I can send it out for painting. I have found this guy in California that paints very sick bodies. I am also waiting for my battery retainers to get here. I also have new tires and wheels coming. So when all the parts arrive I will make some videos and put them up.
One more time here is my parts list:
1 Jato donor car. I got mine used and stripped for $40.
2 Carbon fiber chassis from Vantage Racing. http://www.vantageracing.com
3 Steering servo Blue Bird BMS-610MG-HS with 132 in-oz of torque. http://www.blue-bird-model.com/USA/index2.htm
4 Krontronik Twist 37 motor. 3700 rpm/volt. http://www.kontronikusa.com/index.html (The German site is better but in German)
5 Castle Creations Mamba Max esc. http://www.castlecreations.com/index.html
6 Max Amps battery packs 3100 mah one 2 cell 7.4v and one 3 cell 11.1v. (There is plenty of room for a 4 cell if you want.) http://www.maxamps.com/
7 3mm Schulze gold connectors on the motor and Deans on the battery.
8 Multiplex 4ch Pico receiver. http://www.multiplexusa.com/product_fs.htm
9 Velcro battery straps are made for me by Bay Area Gear Repair here in Florida. They make and repair firemen clothing.
10 Motor mount made and designed by me.
Right now I can tell you that this truck is very light. My first Jato was around a pound lighter then a factory Jato and this one is lighter yet. I need to get a new scale but this is going to be close to a RTR T4.
 09-12-2007, 07:55 AM
#2

Hey man... very nice work! That's gonna be a really sweet ride.
I'm a car guy and I know about Kontronik but I know what you mean...
I like the motor/speedo locations... it's like a "what's wrong with this picture?" thing, LOL
You need some new rubber and a fan on the MM for some cool factor....
I'm a car guy and I know about Kontronik
but I know what you mean...I like the motor/speedo locations... it's like a "what's wrong with this picture?" thing, LOL
You need some new rubber
and a fan on the MM for some cool factor....
09-12-2007, 09:00 AM
#3
Hey man... very nice work! That's gonna be a really sweet ride.
I'm a car guy and I know about Kontronik but I know what you mean...
I like the motor/speedo locations... it's like a "what's wrong with this picture?" thing, LOL
You need some new rubber and a fan on the MM for some cool factor....
I'm a car guy and I know about Kontronik
but I know what you mean...I like the motor/speedo locations... it's like a "what's wrong with this picture?" thing, LOL
You need some new rubber
and a fan on the MM for some cool factor....
09-12-2007, 09:27 PM
#4
NEW PHOTOS
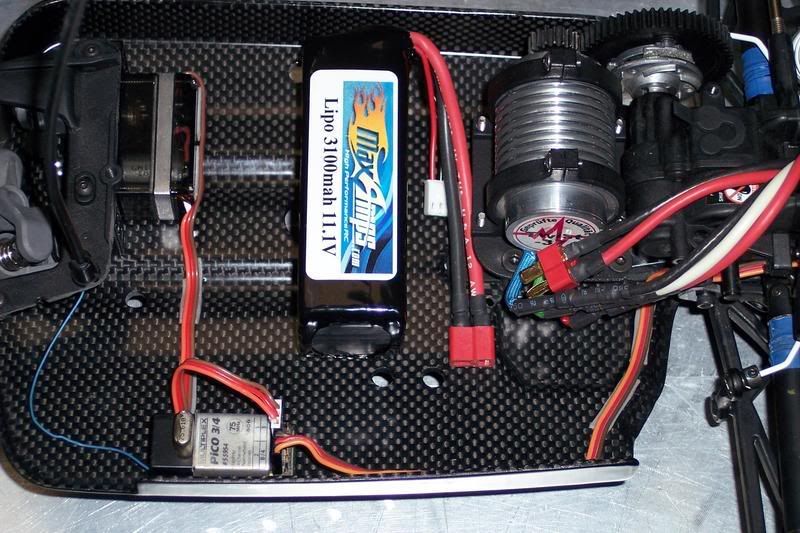
OK here are photos from today. Here you will see the receiver and the battery installed. Also note the wire routing for the esc control. I am getting a couple of small strain reliefs for the motor and power wires. Also look at the factory wheelie bar. I think it sucks. I dont have the Cell Pro lipo protector installed because it is rather wireree ( I know it is not a word). I am looking for a vary small receiver box that I can stick it all in to clean it up. Any ideas.
Finally no one has even tried to figure out what the name means. There is hidden meanings in the name. Come on guys get to it. I am calling it the Jato E3.6.


Thanks for looking.
OK here are photos from today. Here you will see the receiver and the battery installed. Also note the wire routing for the esc control. I am getting a couple of small strain reliefs for the motor and power wires. Also look at the factory wheelie bar. I think it sucks. I dont have the Cell Pro lipo protector installed because it is rather wireree ( I know it is not a word). I am looking for a vary small receiver box that I can stick it all in to clean it up. Any ideas.
Finally no one has even tried to figure out what the name means. There is hidden meanings in the name. Come on guys get to it. I am calling it the Jato E3.6.
Thanks for looking.
09-12-2007, 09:31 PM
#5
i must say, that is damn sexy. im a sucker for a carbon tub chasis, hopefully in college and later on in my career ill be doing that on a bit larger scale
09-12-2007, 09:51 PM
#6
I missed the tires comment... but I was sure you weren't going to keep those old things on there. As for the fan... that's just for a cool factor. I know you really don't need one although it does keep temps lower. I have a bunch on MM in several cars and setups. It's a potent little thing.
I'd like to see what this thing weighs when you get her all done. Should be one of the lightest Jato conversions, and well balanced too. I know one guy who has one that weighs almost a full pound more than a T4.
09-12-2007, 10:30 PM
#8
Well a jato is a rocket used for assisting jets during takeoff. Dunno the significance of the E6.3 though.
09-13-2007, 01:49 AM
#9
Tech Adept
What do i win, a trip to Florida and the first test drive. The E(electric) 3.(third jato conversion)6.(guessing 60000 rpm or maybe 6lbs). Very nice work what-ever it means. I'd like to throw my Mamba Max 5700 into one of my old rc10gt's, so i can plug and play. Later.
The E(electric) 3.(third jato conversion)6.(guessing 60000 rpm or maybe 6lbs). Very nice work what-ever it means. I'd like to throw my Mamba Max 5700 into one of my old rc10gt's, so i can plug and play. Later.
09-13-2007, 05:58 AM
#10
oops
09-13-2007, 06:04 AM
#11
I missed the tires comment... but I was sure you weren't going to keep those old things on there. As for the fan... that's just for a cool factor. I know you really don't need one although it does keep temps lower. I have a bunch on MM in several cars and setups. It's a potent little thing.
I'd like to see what this thing weighs when you get her all done. Should be one of the lightest Jato conversions, and well balanced too. I know one guy who has one that weighs almost a full pound more than a T4.
09-13-2007, 06:07 AM
#12
I thought it was referring to the motor when I first saw it but that would be E3.7 so I dunno.. and it's also a 3.7v/cell battery 
09-13-2007, 06:17 AM
#13
1 it is quiter
2 it is cleaner
3 it is less finikey
4 I dont have to tune it when a cloud goes over head
5 it is faster
6 it is less toxic
7 it dose not smell in the house when I am working on it
8 it is quicker
9 it is easier to maintain
10 it dose not use $25 a gallion fuel (I know that batteries are not cheap but you buy them once not every weekend)
11 no need to worry about getting burned on hot exhaust or head
12 it drives bette.
13 I can easily get 1 hour drive times
14 it is what I do
15 did I mention it is faster.
I did the first Jato conversion (I do mean the first one) about 2 years ago. It was a vast improvement over the nitro. I had many people that love their Jato's drive mine and say nothing but how much better than the nitro it was. With one exception, they like the sound of the nitro engine. They said it handled better and was quicker. It took the jumps better and was was more adjustable because of the lighter weight and useing any one of 25 pinion gears to get the right ratio for the track.
I hope this explaines the ins and outs of why.
09-13-2007, 06:21 AM
#14
What do i win, a trip to Florida and the first test drive. The E(electric) 3.(third jato conversion)6.(guessing 60000 rpm or maybe 6lbs). Very nice work what-ever it means. I'd like to throw my Mamba Max 5700 into one of my old rc10gt's, so i can plug and play. Later.
The E(electric) 3.(third jato conversion)6.(guessing 60000 rpm or maybe 6lbs). Very nice work what-ever it means. I'd like to throw my Mamba Max 5700 into one of my old rc10gt's, so i can plug and play. Later.I think I may make this a contest. I might give away one of the Jato motor mount kits to the person that gets it right.
I will have to think on this.
09-13-2007, 06:21 AM
#15