


 1089Likes
Team Associated B6.1 & B6.1D thread

 03-24-2020, 06:21 PM - Wikipost
|
|||
|
|||


 04-17-2018, 12:12 PM
#783
 04-17-2018, 12:35 PM
#784
 04-17-2018, 12:39 PM
#785
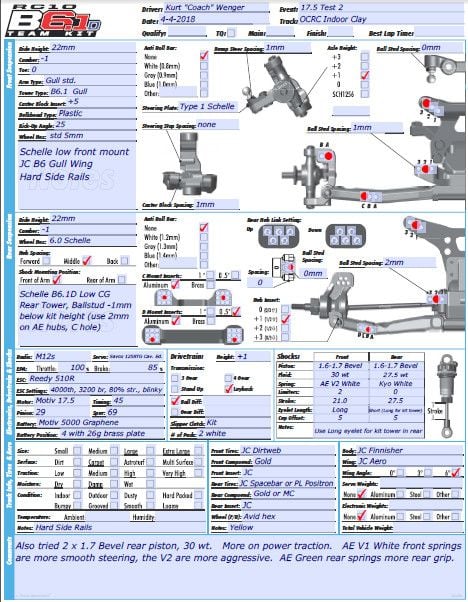
B6.1D Indoor Clay Setup OCRC
Here's what I've run at OCRC after a few test sessions. I added some notes on the bottom for some other options to run. The Layback gearbox needs a little different rear end setup on the hubs /axle height as it's got a bit more weight in the back. I also added my own design rear tower that lowers the CG and has more droop. For kit towers just go to long eyelets and it's a similar effect but higher CG.
04-17-2018, 04:58 PM
#786
B6.1D Indoor Clay Setup OCRC
Here's what I've run at OCRC after a few test sessions. I added some notes on the bottom for some other options to run. The Layback gearbox needs a little different rear end setup on the hubs /axle height as it's got a bit more weight in the back. I also added my own design rear tower that lowers the CG and has more droop. For kit towers just go to long eyelets and it's a similar effect but higher CG.
04-17-2018, 07:43 PM
#790
They switched from China to Taiwan, which is where most of the other manufacturers make their stuff. Not sure if the plastics will hold up, but I think QC seems better at the new factory and at least the initial tolerances are better IMO.
04-18-2018, 06:36 AM
#792
Tech Master
Is anyone having an issue with getting the transmission to run smoothly? I seem to have some interference with the top plate that goes on the diff. With the diff sitting in the case without the to on it spins smooth. When I screw the top on I am getting a rub/catch somewhere when I spin the gears and can't seem to locate the issue. I haven't built a B6 before so maybe there is some break in trick I am not aware of.
What I did with success, along with many others in the UK I've advised, is the following procedure;
Assemble the gearbox case halves as per the instructions but only gently nip up the 2 screws that go in from the side
Fit the camber link bracket into place and gently nip down the single centre screw
Back off the 2 side screws
Gently twist, wriggle or tap the gearbox case assembly so it can find the perfect alignment, you will notice the rear camber link bracket engage a little further
Tighten the 2 side screws down fully (but not too tight)
Nip the central screw on the camber link bracket down
You will find that the gearbox runs perfectly smooth now.
Additional tip .... the bearings are REALLY hard to get on to the new diff case, you really have to make sure they are fully seated as there is no free play side-side of the diff in the new case. If the bearings aren't on fully it will distort the height adjuster inserts very slightly which can also cause a bind.
Hope that helps.
For those running on Astroturf I now have my starting setups on Petit RC, I'm convinced there is more to come from both B6.1 & B6.1D but I am really happy with the cars as per those setups. Regional championship race on Sunday so I guess I'll find out then.
04-18-2018, 06:51 AM
#793
Tech Rookie
I've spoken with a few people who have had this issue, you have to make sure that the alloy camber link bracket is correctly located on the ridge it sits on in the gearbox casing, this effectively aligns the rear of the gearbox case and thus the diff mounting area.
What I did with success, along with many others in the UK I've advised, is the following procedure;
Assemble the gearbox case halves as per the instructions but only gently nip up the 2 screws that go in from the side
Fit the camber link bracket into place and gently nip down the single centre screw
Back off the 2 side screws
Gently twist, wriggle or tap the gearbox case assembly so it can find the perfect alignment, you will notice the rear camber link bracket engage a little further
Tighten the 2 side screws down fully (but not too tight)
Nip the central screw on the camber link bracket down
You will find that the gearbox runs perfectly smooth now.
Additional tip .... the bearings are REALLY hard to get on to the new diff case, you really have to make sure they are fully seated as there is no free play side-side of the diff in the new case. If the bearings aren't on fully it will distort the height adjuster inserts very slightly which can also cause a bind.
Hope that helps.
For those running on Astroturf I now have my starting setups on Petit RC, I'm convinced there is more to come from both B6.1 & B6.1D but I am really happy with the cars as per those setups. Regional championship race on Sunday so I guess I'll find out then.
04-18-2018, 07:21 AM
#794
Good to know, Roger! Allow me to translate for our American brothers and sisters who might have a hard time with the Queen's English: Don't gorilla wrench the diff case!
04-18-2018, 07:29 AM
#795
With a lot of others getting building and running their buggies already, I am glad that I paid Amain extra for shipping on mine to get it faster only for it to actually take longer to get, than a order with free shipping that was shipped a day later and getting it in 3 days vs a week for the buggy. But at least this way I can see all these good tips and such people have been posting.