


 219Likes
HB Racing D418 - 1/10 4WD Buggy
 09-02-2018, 04:53 AM
#121
Tech Adept
For sure - I can't wait to drive this thing... just finished the assembly minus shocks. It's pretty amazing how smooth the arms and no play anywhere. Hoping to get it out on the track this coming up weekend!
 09-02-2018, 11:55 AM
#122
Tech Regular
He did win the European championship with it though, but that was on a very low grip dirt track.
09-02-2018, 07:35 PM
#123
Tech Adept
Ah - thanks for the clarification on that John M. To be honest, I haven't paid too much attention to the goings on in the EOS until recently, so still learning the who's who and what's what of that. 
09-02-2018, 07:51 PM
#124
Tech Adept
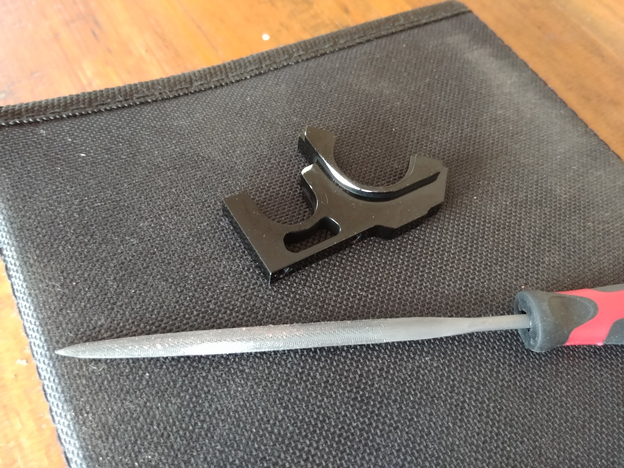
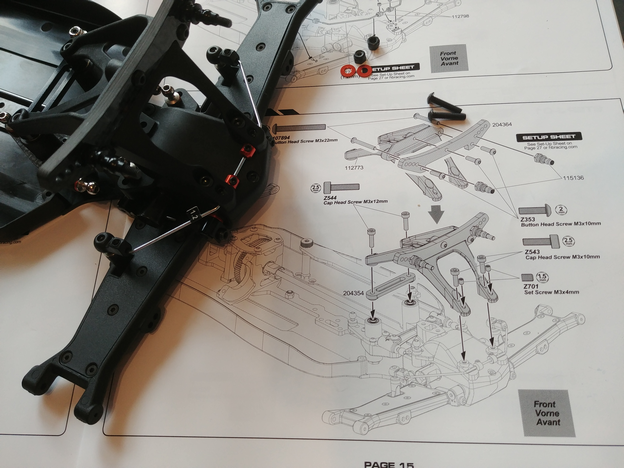
Just thought I'd share some more photos of my build, and some good and not so good stuff. First off, my main concern was the motor mount issue as I don't have a Dremel. However, I did have a set of small files, and that worked fine. With the soft aluminum, it actually didn't take much to get the material filed down until the center diff stopped rubbing against the mount. Here's what mine looked like afterwards, along with the weapon of choice:
Continuing on with the build, the fit is just awesome. So many cool little carbon fiber bits too. Like this spacer here in between the diff case and the aluminum plate for mounting rear ball studs. It's a carbon fiber spacer - no ones ever going to see it and they still include it... really cool!
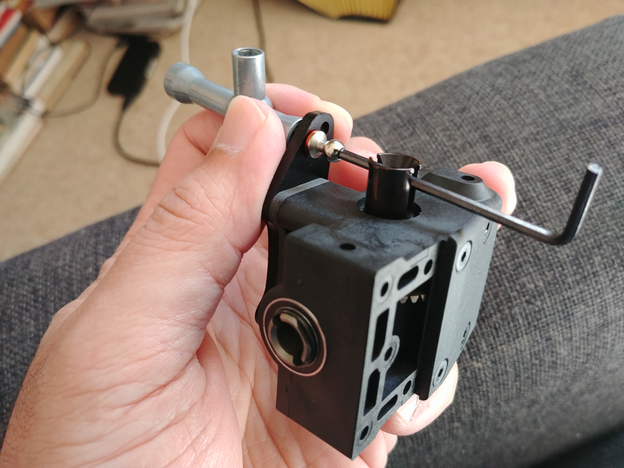
Ran into my first hiccup/gripe. When installing the rear ballstud, the outdrive gets in the way. If you have a fat shaft on your hex driver, there's no way to get to the ball stud. So what'd I do? I pulled out my trusty cheapo allen key that came in my B5. Here's a photo of what I'm talking about. Which on a side note, anyone who's coming from Associated (or older Associated kits anyway) kits should note that there are no tools that come in the kit. So the idea is that you have all you need. There are a couple of flat wrenches that were included, but I basically only used the smaller wrench for adjusting the turnbuckles.
Did I mention how awesome the orange aluminium looks with all the silver and black (Go Giants! ha ha)?

Here's some more learnings for a HB noob. Those monocoque arms have removable covers on them. So you can interchange between standard plastic, optional carbon fiber, or no covers to adjust stiffness in the arms.
Some more learning curve stuff... I've never ran (anti) sway bars before! There's not really any info in the manual to explain if you're doing it right. I just put the pieces together and tried to make it look like the diagram. However, there are 5 grub screws and it looks like a bunch of bits to adjust the sway bar. I'm going to have to go find some additional details on what the basic setup should be.
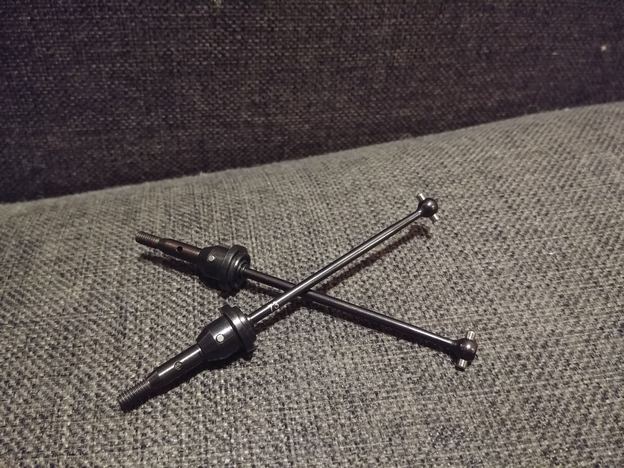
I thought this was nice too - rubber boots for protecting the rear CV joint. Seems like it adds a bit of resistance to the joints. So what's the go - most people run with boots on, or off?
This part baffled me, and then I found a post on the D413 post. Those little pins to secure the rear hexes kept sliding out. I eventually put some thin strips of clear tape (can't cover up that bling orange) to trap the pins, but then read how you can use some grease to get some "stickiness" on them. Will do that before I mount wheels.

Another cool find. Aluminum servo arm out of the box! Am I just behind the times and getting excited over standard fare these days? Bummer if you have a non-25 spline servo though. There aren't any optional servo horns in the box, so you'll be out of pocket for a separate one.

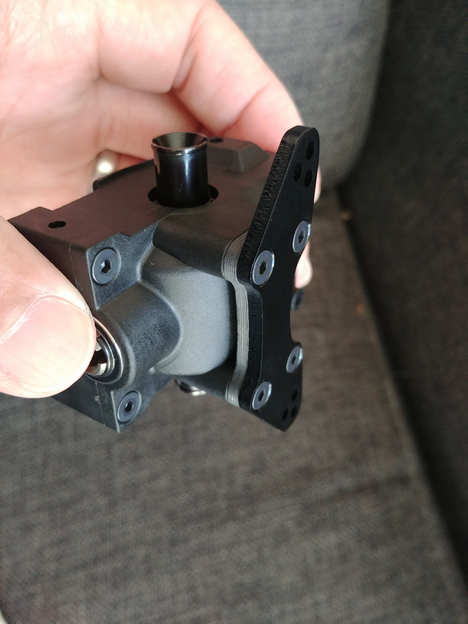
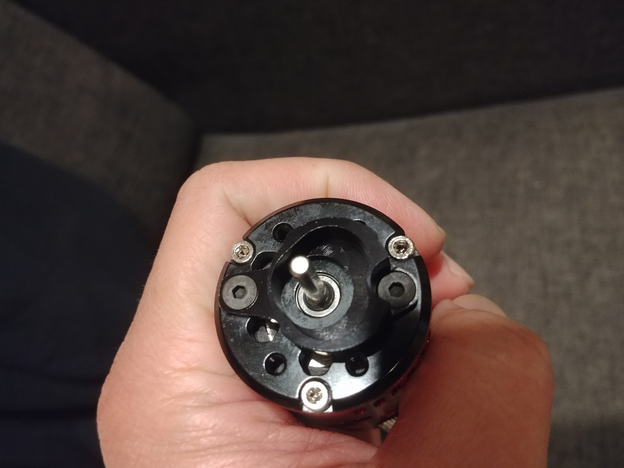
OK, last pic for the day. Here's a closeup of the motormount. Coming from a rear-motor 2WD, where you just slide the motor forward-back to adjust gear mesh, this has an eccentric ring to mount on the motor which then goes into the motor plate mounted on the chassis. Seems like it may make for more precise gear mesh setting but will still need to wait until I can put it into action.
All in all, I'm pretty much done with the build. Just need to build up the shocks (got my XTR oils today - woooo!), set the electronics and paint the body. Then it's over to driving this sucker!
No doubt I'll probably be hitting up some of you guys for some setup advice too!
Cheers.
Continuing on with the build, the fit is just awesome. So many cool little carbon fiber bits too. Like this spacer here in between the diff case and the aluminum plate for mounting rear ball studs. It's a carbon fiber spacer - no ones ever going to see it and they still include it... really cool!
Ran into my first hiccup/gripe. When installing the rear ballstud, the outdrive gets in the way. If you have a fat shaft on your hex driver, there's no way to get to the ball stud. So what'd I do? I pulled out my trusty cheapo allen key that came in my B5. Here's a photo of what I'm talking about. Which on a side note, anyone who's coming from Associated (or older Associated kits anyway) kits should note that there are no tools that come in the kit. So the idea is that you have all you need. There are a couple of flat wrenches that were included, but I basically only used the smaller wrench for adjusting the turnbuckles.
Did I mention how awesome the orange aluminium looks with all the silver and black (Go Giants! ha ha)?
Here's some more learnings for a HB noob. Those monocoque arms have removable covers on them. So you can interchange between standard plastic, optional carbon fiber, or no covers to adjust stiffness in the arms.
Some more learning curve stuff... I've never ran (anti) sway bars before! There's not really any info in the manual to explain if you're doing it right. I just put the pieces together and tried to make it look like the diagram. However, there are 5 grub screws and it looks like a bunch of bits to adjust the sway bar. I'm going to have to go find some additional details on what the basic setup should be.
I thought this was nice too - rubber boots for protecting the rear CV joint. Seems like it adds a bit of resistance to the joints. So what's the go - most people run with boots on, or off?
This part baffled me, and then I found a post on the D413 post. Those little pins to secure the rear hexes kept sliding out. I eventually put some thin strips of clear tape (can't cover up that bling orange) to trap the pins, but then read how you can use some grease to get some "stickiness" on them. Will do that before I mount wheels.
Another cool find. Aluminum servo arm out of the box! Am I just behind the times and getting excited over standard fare these days? Bummer if you have a non-25 spline servo though. There aren't any optional servo horns in the box, so you'll be out of pocket for a separate one.
OK, last pic for the day. Here's a closeup of the motormount. Coming from a rear-motor 2WD, where you just slide the motor forward-back to adjust gear mesh, this has an eccentric ring to mount on the motor which then goes into the motor plate mounted on the chassis. Seems like it may make for more precise gear mesh setting but will still need to wait until I can put it into action.
All in all, I'm pretty much done with the build. Just need to build up the shocks (got my XTR oils today - woooo!), set the electronics and paint the body. Then it's over to driving this sucker!
No doubt I'll probably be hitting up some of you guys for some setup advice too!
Cheers.
09-03-2018, 12:21 AM
#125
In order to not lose the hexes pin, use some red screw cement on pins before inserting in holes.
You also have the exotek option or the avid one (the one I use).
You also have the exotek option or the avid one (the one I use).
09-03-2018, 12:52 AM
#126
Tech Adept
Is red screw cement the same as red loctite? How hard is it to remove the pins for when removing the axles?
Will prob look at aftermarket hexes at some point. Trying to not shell out additional dough on aftermarket goodies just yet.
Will prob look at aftermarket hexes at some point. Trying to not shell out additional dough on aftermarket goodies just yet.
09-03-2018, 02:14 AM
#127
Yes red loctite, you just push with a 1mm allen screwdriver tip to remove, Durango did so on dex 410.
09-03-2018, 07:08 AM
#128
Tech Adept
Thanks for the tips Mustrum. Mind if I ask what your setup is and what kinda track you run on? I run on an outdoor dirt/clay track that is goes from low-grip (in winter), to medium/medium-high in summer when it warms up and dries out a bit. It's a good mix of high-speed sweepers flanking a straight, and a tighter middle section with some elevation changes that you need good drive out of rather than always high corner speed. I'm going with the starting gearing mentioned for the D413 - 34 pinion on a 13.5 motor, and I'm going 60wt up front and 40 in the back using XTR shock oil. Will see how that goes.
09-03-2018, 08:38 AM
#129
Just thought I'd share some more photos of my build, and some good and not so good stuff. First off, my main concern was the motor mount issue as I don't have a Dremel. However, I did have a set of small files, and that worked fine. With the soft aluminum, it actually didn't take much to get the material filed down until the center diff stopped rubbing against the mount. Here's what mine looked like afterwards, along with the weapon of choice:
Continuing on with the build, the fit is just awesome. So many cool little carbon fiber bits too. Like this spacer here in between the diff case and the aluminum plate for mounting rear ball studs. It's a carbon fiber spacer - no ones ever going to see it and they still include it... really cool!
Ran into my first hiccup/gripe. When installing the rear ballstud, the outdrive gets in the way. If you have a fat shaft on your hex driver, there's no way to get to the ball stud. So what'd I do? I pulled out my trusty cheapo allen key that came in my B5. Here's a photo of what I'm talking about. Which on a side note, anyone who's coming from Associated (or older Associated kits anyway) kits should note that there are no tools that come in the kit. So the idea is that you have all you need. There are a couple of flat wrenches that were included, but I basically only used the smaller wrench for adjusting the turnbuckles.
Did I mention how awesome the orange aluminium looks with all the silver and black (Go Giants! ha ha)?
Here's some more learnings for a HB noob. Those monocoque arms have removable covers on them. So you can interchange between standard plastic, optional carbon fiber, or no covers to adjust stiffness in the arms.
Some more learning curve stuff... I've never ran (anti) sway bars before! There's not really any info in the manual to explain if you're doing it right. I just put the pieces together and tried to make it look like the diagram. However, there are 5 grub screws and it looks like a bunch of bits to adjust the sway bar. I'm going to have to go find some additional details on what the basic setup should be.
I thought this was nice too - rubber boots for protecting the rear CV joint. Seems like it adds a bit of resistance to the joints. So what's the go - most people run with boots on, or off?
This part baffled me, and then I found a post on the D413 post. Those little pins to secure the rear hexes kept sliding out. I eventually put some thin strips of clear tape (can't cover up that bling orange) to trap the pins, but then read how you can use some grease to get some "stickiness" on them. Will do that before I mount wheels.
Another cool find. Aluminum servo arm out of the box! Am I just behind the times and getting excited over standard fare these days? Bummer if you have a non-25 spline servo though. There aren't any optional servo horns in the box, so you'll be out of pocket for a separate one.
OK, last pic for the day. Here's a closeup of the motormount. Coming from a rear-motor 2WD, where you just slide the motor forward-back to adjust gear mesh, this has an eccentric ring to mount on the motor which then goes into the motor plate mounted on the chassis. Seems like it may make for more precise gear mesh setting but will still need to wait until I can put it into action.
All in all, I'm pretty much done with the build. Just need to build up the shocks (got my XTR oils today - woooo!), set the electronics and paint the body. Then it's over to driving this sucker!
No doubt I'll probably be hitting up some of you guys for some setup advice too!
Cheers.
09-03-2018, 09:16 AM
#130

Thanks for the tips Mustrum. Mind if I ask what your setup is and what kinda track you run on? I run on an outdoor dirt/clay track that is goes from low-grip (in winter), to medium/medium-high in summer when it warms up and dries out a bit. It's a good mix of high-speed sweepers flanking a straight, and a tighter middle section with some elevation changes that you need good drive out of rather than always high corner speed. I'm going with the starting gearing mentioned for the D413 - 34 pinion on a 13.5 motor, and I'm going 60wt up front and 40 in the back using XTR shock oil. Will see how that goes.

Last edited by Mustrum; 09-03-2018 at 10:51 PM.
09-03-2018, 03:37 PM
#131
Tech Adept
No worries iamnotalobster - glad it was helpful to someone! I think this is a great buggy. Saw some local guys with it, and then wound up with one. Still need to get some wheel time on it though. In any case, I figure the more people in the know about what the D418 (and trickle up from the D413) is all about, the better for all of us. Just trying to do my part to help with the D418 community.
Cheers!
I think this is a great buggy. Saw some local guys with it, and then wound up with one. Still need to get some wheel time on it though. In any case, I figure the more people in the know about what the D418 (and trickle up from the D413) is all about, the better for all of us. Just trying to do my part to help with the D418 community. Cheers!
09-03-2018, 06:02 PM
#132
Tech Adept
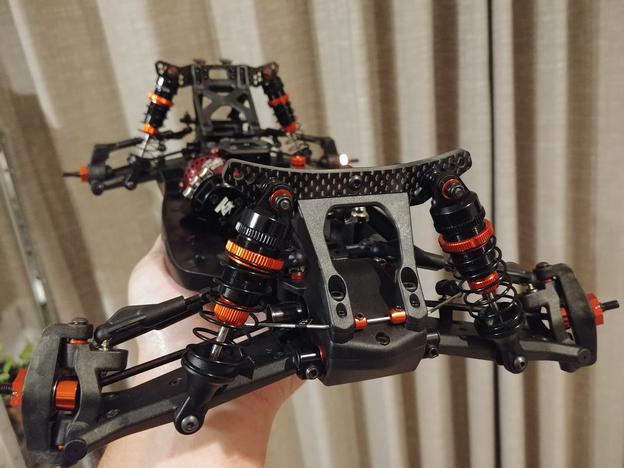
There she is - roller all done. Just need to wire-up, paint the body and put on some tires. This thing looks racy just sitting there! I love outdoor dirt racing, but this is probably the last time this thing will be this clean... ha ha!
09-05-2018, 02:40 AM
#133
Tech Adept
Anyone have suggestions on where's a good spot to mount a motor fan? I was originally thinking behind the motor, but now thinking maybe right to the side of it. Where you guys mounting yours?
09-05-2018, 06:52 AM
#134
OK, building my kit last night and the retainer clip for the rear input gear flew off my table and couldn't find it. Do they have spare of those? According to the manual Part# 112963 is the correct part number but the item picture on amain shows just the shims not the clips. Is that the correct parts number?
09-05-2018, 11:10 AM
#135
OK, building my kit last night and the retainer clip for the rear input gear flew off my table and couldn't find it. Do they have spare of those? According to the manual Part# 112963 is the correct part number but the item picture on amain shows just the shims not the clips. Is that the correct parts number?