


 2Likes
3 Racing Sakura D3 CS Drift
 12-18-2012, 11:14 AM
#931
I think your saying that you ordered some more bulkheads and they are on their way and your hoping you get 1 of each lol if I was you I'd hope I got 2 of the other side
 12-19-2012, 10:13 AM
#932
Tech Rookie
First off, many thanks to the regulars for sharing all the info. My previous car was a Marui Ninja ... it's been a while :-)
I got those, but was surprised to find metal bearings already included with the D3 kit (eg bag 2, 5, 7). Are these no good? (aren't they ball-bearings?)
I got those, but was surprised to find metal bearings already included with the D3 kit (eg bag 2, 5, 7). Are these no good? (aren't they ball-bearings?)
12-19-2012, 02:55 PM
#933
First off, many thanks to the regulars for sharing all the info. My previous car was a Marui Ninja ... it's been a while :-)
I got those, but was surprised to find metal bearings already included with the D3 kit (eg bag 2, 5, 7). Are these no good? (aren't they ball-bearings?)
I got those, but was surprised to find metal bearings already included with the D3 kit (eg bag 2, 5, 7). Are these no good? (aren't they ball-bearings?)
Last edited by pickled; 12-19-2012 at 03:12 PM.
12-19-2012, 08:03 PM
#934
Ok do you have the little silver screws in the bearing holders at the bottom of the bulkhead adjustment? If you turn the bearing holder back towards the top as it turns toward the top it tensions the front belt if this doesn't help try turning towards the bottom as you may have the bearing holders in the wrong sides? I noticed this when building my carbon chassis as on the plastic one I could have it at the bottom with good tension. I have good tension now at the second from top on my carbon chassis! I haven't destroyed a single front belt only a centre belt
Hmm.. Im getting a bit confused here,I guess its just me dont know how to play it.. Im pretty sure the bearing cups are in the right way as the other way would only make the belt run less tension as you pushing it down. I dont know if Im actually over tensioning the belt and putting too much stress on it,but I'll try run a bit less tension on it for now and see how I go.
Thanks for the reply
 12-19-2012, 08:08 PM
#935
Tech Apprentice
 because they said it worked ... every two months for a while ... lol.
12-19-2012, 08:23 PM
because they said it worked ... every two months for a while ... lol.
12-19-2012, 08:23 PM
#936
Tech Apprentice
hey people i was practicing in my parking, i have o make a video and the car seems to be very good, i need i litle more grip in front and change gearing because afer 10 min run the motor doesn,t warmer up and i fell that the car need 1 or 2more tooth. i need to play with front roll center and a litle more. any good setup or problems with it??? i try to help to solve them.
maybe i try 800 cst in a few days.. to control swichbacks.. it seems like it have more control with 600 cst.. 300 is too soft and the damping very little and the speed of rebound is too hight... i think that you dont need to mod the shocks to make the rebound very slow and the compression with more speed simply choose the correct combination of spring and oil, that would be differenf due to driving style or surface of use..I've marked that roll... lol
i need i litle more grip in front and change gearing because afer 10 min run the motor doesn,t warmer up and i fell that the car need 1 or 2more tooth. i need to play with front roll center and a litle more. any good setup or problems with it??? i try to help to solve them.maybe i try 800 cst in a few days.. to control swichbacks.. it seems like it have more control with 600 cst.. 300 is too soft and the damping very little and the speed of rebound is too hight... i think that you dont need to mod the shocks to make the rebound very slow and the compression with more speed simply choose the correct combination of spring and oil, that would be differenf due to driving style or surface of use..I've marked that roll... lol
12-19-2012, 08:27 PM
#937
Tech Apprentice
and with one rear wheel with 4 of the 9 spokes broke... lol
12-19-2012, 09:22 PM
#938
Hmm.. Im getting a bit confused here,I guess its just me dont know how to play it.. Im pretty sure the bearing cups are in the right way as the other way would only make the belt run less tension as you pushing it down. I dont know if Im actually over tensioning the belt and putting too much stress on it,but I'll try run a bit less tension on it for now and see how I go.
Thanks for the reply
Thanks for the reply
12-19-2012, 09:28 PM
#939
hey people i was practicing in my parking, i have o make a video and the car seems to be very good, i need i litle more grip in front and change gearing because afer 10 min run the motor doesn,t warmer up and i fell that the car need 1 or 2more tooth. i need to play with front roll center and a litle more. any good setup or problems with it??? i try to help to solve them.
maybe i try 800 cst in a few days.. to control swichbacks.. it seems like it have more control with 600 cst.. 300 is too soft and the damping very little and the speed of rebound is too hight... i think that you dont need to mod the shocks to make the rebound very slow and the compression with more speed simply choose the correct combination of spring and oil, that would be differenf due to driving style or surface of use..I've marked that roll... lol
i need i litle more grip in front and change gearing because afer 10 min run the motor doesn,t warmer up and i fell that the car need 1 or 2more tooth. i need to play with front roll center and a litle more. any good setup or problems with it??? i try to help to solve them.maybe i try 800 cst in a few days.. to control swichbacks.. it seems like it have more control with 600 cst.. 300 is too soft and the damping very little and the speed of rebound is too hight... i think that you dont need to mod the shocks to make the rebound very slow and the compression with more speed simply choose the correct combination of spring and oil, that would be differenf due to driving style or surface of use..I've marked that roll... lol
12-19-2012, 10:36 PM
#940
Hi all,
I have been busy building and modding my D3 during the past 14 days or so. Im going all aluminium hop-ups on this chassis, but I have decided not to upgrade to the carbon parts. Waiting on the front bearing cover thingy to be released, then I will also order the rear bulkhead, and the steering arms. Im planning on switching to aluminium pulleys aswell.
Well my main issue is the center belt slop, I bought 2 of the sakura belt tensioners, but I felt there was still to much play. I didn't want to add spacers, and I did not like the look of the pulley in the middle of everything (sorry pickled, I do love the concept though ). So I decided to mill my own spacer, and place the sakura tensioner on top of that, rising the whole assembly 15mm, and the tension is perfekt now. I just finished it 2 hours ago, and I don't have pictures of it yet. But Im a bit mental (lol), because im still not satisfied with the look of it, so i have created a new plan of attack
Im going to mill my own top deck instead. Making it about 1mm - 2mm thicker (will give me the spacer effekt) and then make some holes for the 2 belt tensioners at either end. Im hoping that will give me a nice and tight belt, and also a more clean look to the car. Maybe... I will make it later today. I will post some pics of it when im done
I have bought the Tetsujin intercooler, and what a nice piece of craftsmanship. Its really detailed, and i love it. The problem was that since the D3 is front moter based, the intercooler would stick out to far from my s14 body. That did not look pleasent to the eye, so I have modified the bumper. I cut out the foam in the middle, and only kept the sides. then i milled a piece to sit between the 2 middle post, wich i could attach the intercooler to. I then had to mill the "horns" of the bumper plate, in order to get the intercooler positioned as far back as i needed. The result is perfekt, it know sits exactly where I want it. He are some pictures of that.
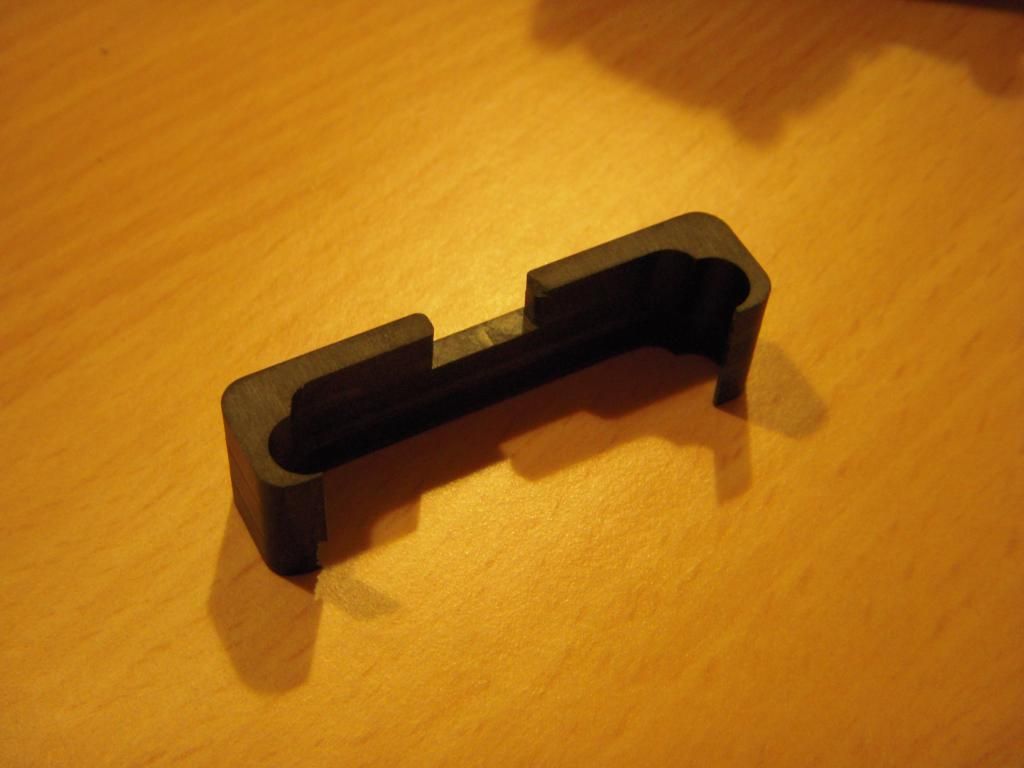
Machined part. The material is a composit fiber, glued together under high pressure and heat.
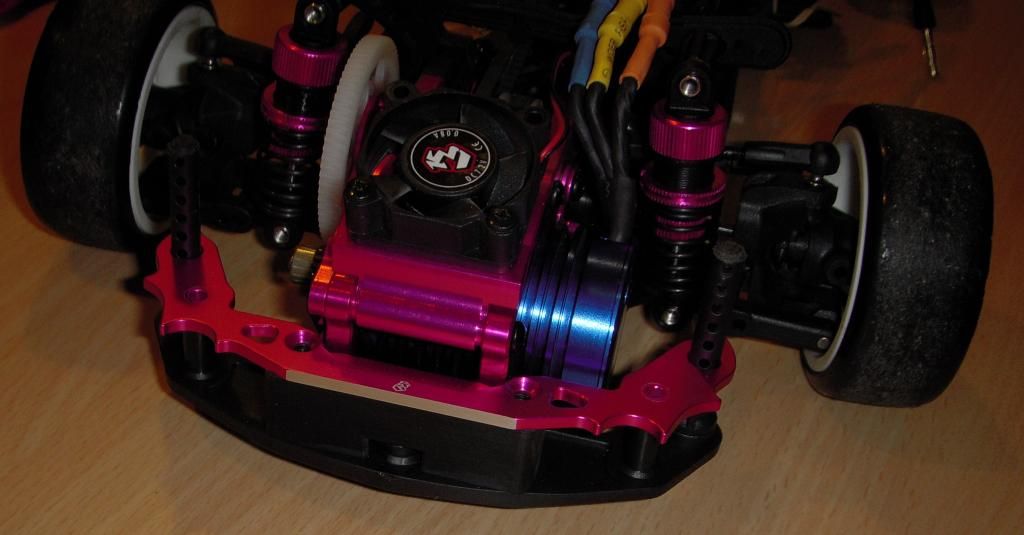
Gone are the "horns"

Finished look
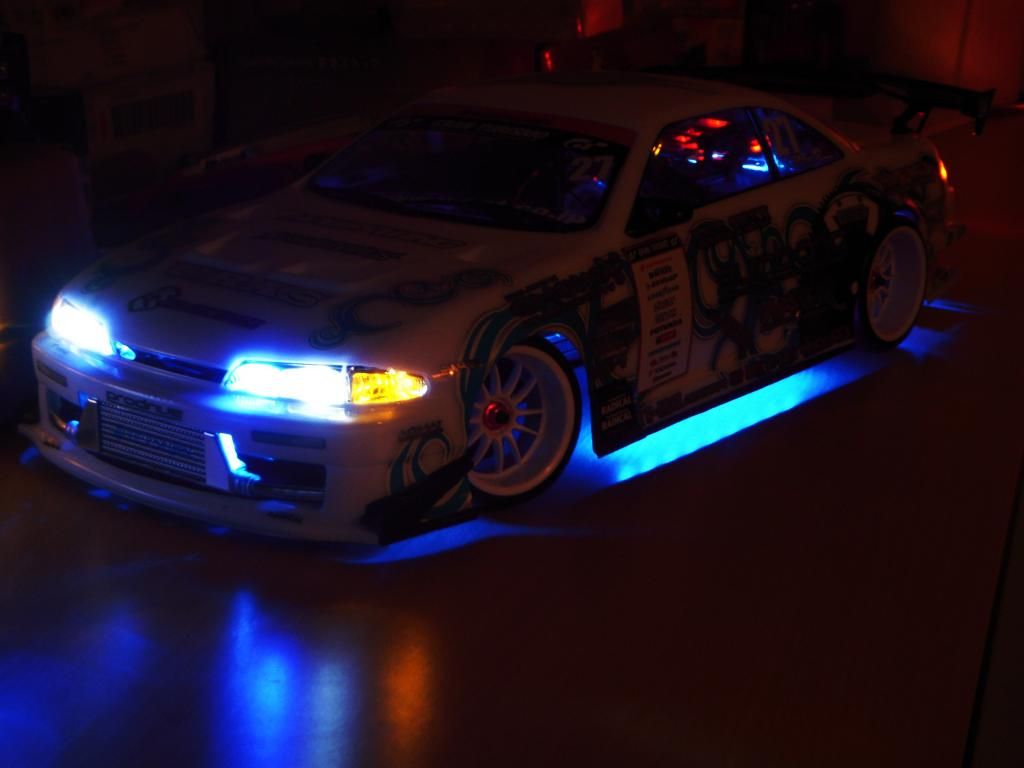
I went a little nuts with the LED's
I will post more pictures, when I get some more mods ready
I have been busy building and modding my D3 during the past 14 days or so. Im going all aluminium hop-ups on this chassis, but I have decided not to upgrade to the carbon parts. Waiting on the front bearing cover thingy to be released, then I will also order the rear bulkhead, and the steering arms. Im planning on switching to aluminium pulleys aswell.
Well my main issue is the center belt slop, I bought 2 of the sakura belt tensioners, but I felt there was still to much play. I didn't want to add spacers, and I did not like the look of the pulley in the middle of everything (sorry pickled, I do love the concept though
). So I decided to mill my own spacer, and place the sakura tensioner on top of that, rising the whole assembly 15mm, and the tension is perfekt now. I just finished it 2 hours ago, and I don't have pictures of it yet. But Im a bit mental (lol), because im still not satisfied with the look of it, so i have created a new plan of attack Im going to mill my own top deck instead. Making it about 1mm - 2mm thicker (will give me the spacer effekt) and then make some holes for the 2 belt tensioners at either end. Im hoping that will give me a nice and tight belt, and also a more clean look to the car. Maybe... I will make it later today. I will post some pics of it when im done
I have bought the Tetsujin intercooler, and what a nice piece of craftsmanship. Its really detailed, and i love it. The problem was that since the D3 is front moter based, the intercooler would stick out to far from my s14 body. That did not look pleasent to the eye, so I have modified the bumper. I cut out the foam in the middle, and only kept the sides. then i milled a piece to sit between the 2 middle post, wich i could attach the intercooler to. I then had to mill the "horns" of the bumper plate, in order to get the intercooler positioned as far back as i needed. The result is perfekt, it know sits exactly where I want it. He are some pictures of that.
Machined part. The material is a composit fiber, glued together under high pressure and heat.
Gone are the "horns"
Finished look
I went a little nuts with the LED's
I will post more pictures, when I get some more mods ready
Last edited by sgp-chris; 12-20-2012 at 08:03 AM.
12-20-2012, 12:49 AM
#941
Hi all,
I have been busy building and modding my D3 during the past 14 days or so. Im going all aluminium hop-ups on this chassis, but I have decided not to upgrade to the carbon parts. Waiting on the front bearing cover thingy to be released, then I will also order the rear bulkhead, and the steering arms. Im planning on switching to aluminium pulleys aswell.
Well my main issue is the center belt slop, I bought 2 of the sakura belt tensioners, but I felt there was still to much play. I didn't want to add spacers, and I did not like the look of the pulley in the middle of everything (sorry pickled, I do love the concept though). So I decided to mill my own spacer, and place the sakura tensioner on top of that, rising the whole assembly 15mm, and the tension is perfekt now. I just finished it 2 hours ago, and I don't have pictures of it yet. But Im a bit mental (lol), because im still not satisfied with the look of it, so i have created a new plan of attack
Im going to mill my own top deck instead. Making it about 1mm - 2mm thicker (will give me the spacer effekt) and then make some holes for the 2 belt tensioners at either end. Im hoping that will give me a nice and tight belt, and also a more clean look to the car. Maybe... I will make it later today. I will post some pics of it when im done
I have bought the Tetsujin intercooler, and what a nice piece of craftsmanship. Its really detailed, and i love it. The problem was that since the D3 is front moter based, the intercooler would stick out to far from my s14 body. That did not look pleasent to the eye, so I have modified the bumper. I cut out the foam in the middle, and only kept the sides. then i milled a piece to sit between the 2 middle post, wich i could attach the intercooler to. I then had to mill the "horns" of the bumper plate, in order to get the intercooler positioned as far back as i needed. The result is perfekt, it know sits exactly where I want it. He are some pictures of that.
http://i140.photobucket.com/albums/r...ps1d88bb83.jpg
Machined part. The material is a composit fiber, glued together under high pressure and heat.
http://i140.photobucket.com/albums/r...ps78e38045.jpg
Gone are the "horns"
http://i140.photobucket.com/albums/r...psb5bff0bb.jpg
Finished look
http://i140.photobucket.com/albums/r...ps31faa2aa.jpg
I went a little nuts with the LED's
I will post more pictures, when I get some more mods ready
I have been busy building and modding my D3 during the past 14 days or so. Im going all aluminium hop-ups on this chassis, but I have decided not to upgrade to the carbon parts. Waiting on the front bearing cover thingy to be released, then I will also order the rear bulkhead, and the steering arms. Im planning on switching to aluminium pulleys aswell.
Well my main issue is the center belt slop, I bought 2 of the sakura belt tensioners, but I felt there was still to much play. I didn't want to add spacers, and I did not like the look of the pulley in the middle of everything (sorry pickled, I do love the concept though
). So I decided to mill my own spacer, and place the sakura tensioner on top of that, rising the whole assembly 15mm, and the tension is perfekt now. I just finished it 2 hours ago, and I don't have pictures of it yet. But Im a bit mental (lol), because im still not satisfied with the look of it, so i have created a new plan of attack Im going to mill my own top deck instead. Making it about 1mm - 2mm thicker (will give me the spacer effekt) and then make some holes for the 2 belt tensioners at either end. Im hoping that will give me a nice and tight belt, and also a more clean look to the car. Maybe... I will make it later today. I will post some pics of it when im done
I have bought the Tetsujin intercooler, and what a nice piece of craftsmanship. Its really detailed, and i love it. The problem was that since the D3 is front moter based, the intercooler would stick out to far from my s14 body. That did not look pleasent to the eye, so I have modified the bumper. I cut out the foam in the middle, and only kept the sides. then i milled a piece to sit between the 2 middle post, wich i could attach the intercooler to. I then had to mill the "horns" of the bumper plate, in order to get the intercooler positioned as far back as i needed. The result is perfekt, it know sits exactly where I want it. He are some pictures of that.
http://i140.photobucket.com/albums/r...ps1d88bb83.jpg
Machined part. The material is a composit fiber, glued together under high pressure and heat.
http://i140.photobucket.com/albums/r...ps78e38045.jpg
Gone are the "horns"
http://i140.photobucket.com/albums/r...psb5bff0bb.jpg
Finished look
http://i140.photobucket.com/albums/r...ps31faa2aa.jpg
I went a little nuts with the LED's
I will post more pictures, when I get some more mods ready
12-20-2012, 05:54 AM
#942
12-20-2012, 05:29 PM
#943
Tech Apprentice
12-20-2012, 08:49 PM
#944
Tech Apprentice
Hmm.. Im getting a bit confused here,I guess its just me dont know how to play it.. Im pretty sure the bearing cups are in the right way as the other way would only make the belt run less tension as you pushing it down. I dont know if Im actually over tensioning the belt and putting too much stress on it,but I'll try run a bit less tension on it for now and see how I go.
Thanks for the reply
Thanks for the reply
12-21-2012, 01:27 AM
#945
Hi all,
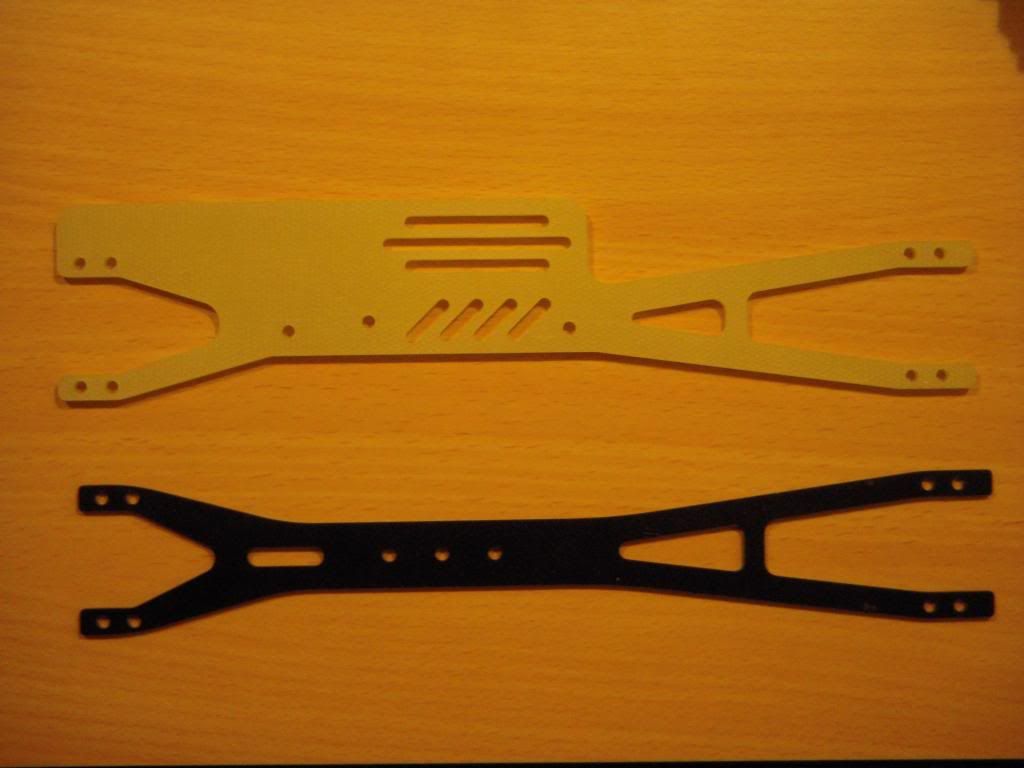
Here are some pics of my modded top plate. I made 2 versions. One that is the same strength and flex (approx) as the standard plate, and one that is alot stiffer. They are both 1mm thicker than the standard plate, because I wanted to achieve the same effekt as those who use spacers in the back.
I also made it cover up the servo abit. It suits no purpose, other than I had a little fun making it, and there was room for some stickers. I might make a new one, that is 100% symetrical on both sides. It all depends on wether I end up liking this one better or the standard look. Time will tell...
I made holes for 2 3Racing belt tensioners, and offset them 2mm from center, to make the belt run on the middle, instead of grinding against the aluminium post.
Tell me what you think guys, maybe I should switch back to the symetrical layout or???
Pics:
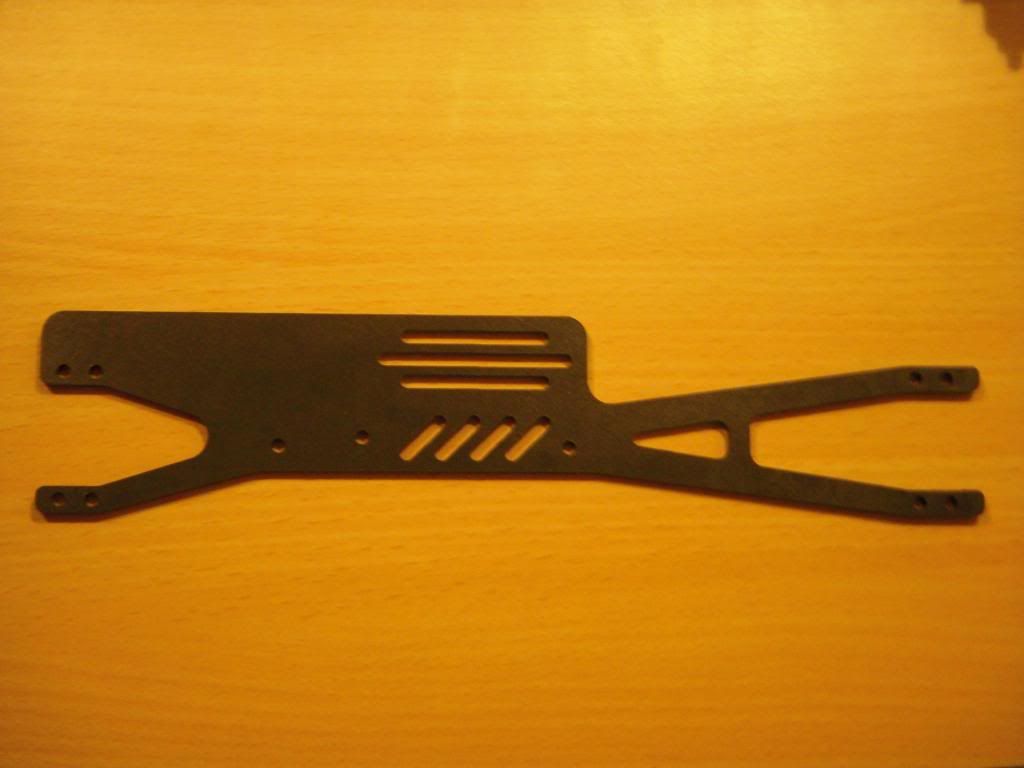
Standard flex, with cover.
Standard plate, and the upgraded stiff version, with cover.
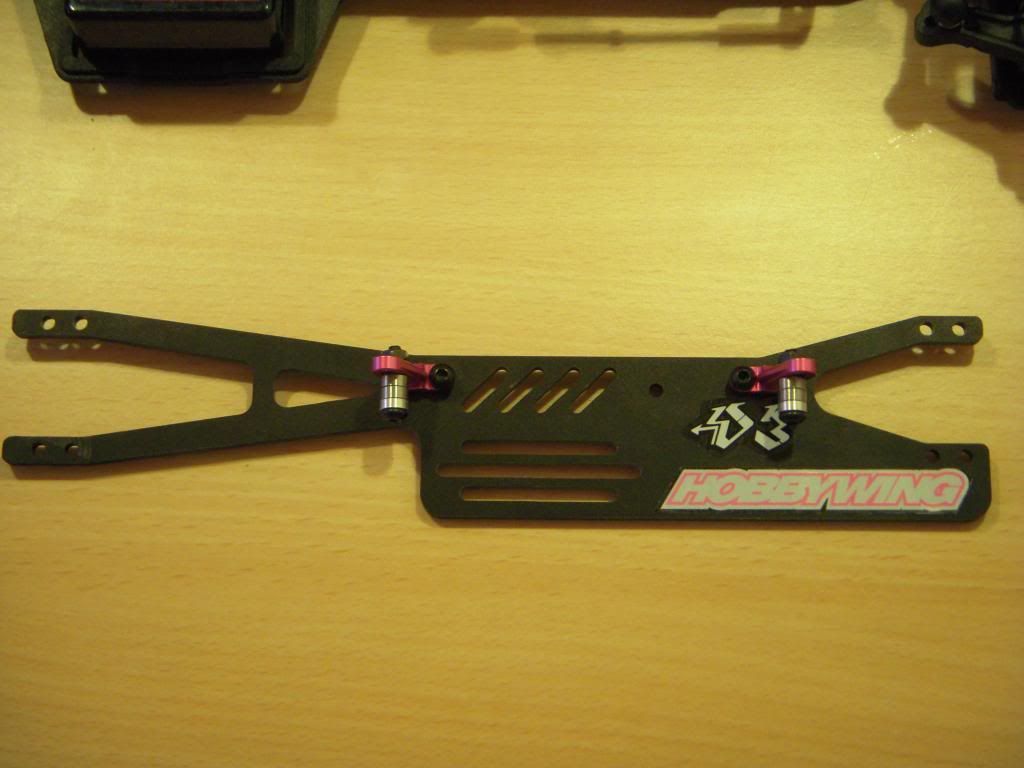
Fitted with 3Racing tensioners, and some stickers.
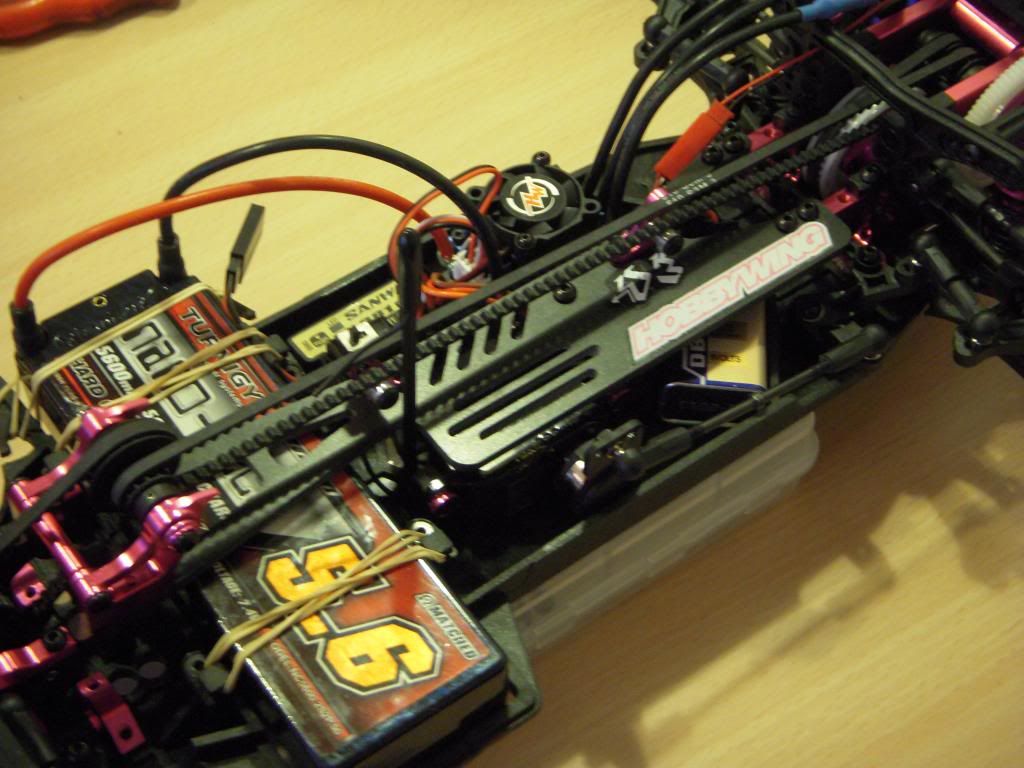
Mounted on the car, no more belt slop!
I hope you alle have a Merry Christmas
Here are some pics of my modded top plate. I made 2 versions. One that is the same strength and flex (approx) as the standard plate, and one that is alot stiffer. They are both 1mm thicker than the standard plate, because I wanted to achieve the same effekt as those who use spacers in the back.
I also made it cover up the servo abit. It suits no purpose, other than I had a little fun making it, and there was room for some stickers. I might make a new one, that is 100% symetrical on both sides. It all depends on wether I end up liking this one better or the standard look. Time will tell...
I made holes for 2 3Racing belt tensioners, and offset them 2mm from center, to make the belt run on the middle, instead of grinding against the aluminium post.
Tell me what you think guys, maybe I should switch back to the symetrical layout or???
Pics:
Standard flex, with cover.
Standard plate, and the upgraded stiff version, with cover.
Fitted with 3Racing tensioners, and some stickers.
Mounted on the car, no more belt slop!
I hope you alle have a Merry Christmas