


 142Likes
VBC Lightning FX
 09-14-2015, 10:05 AM
#1
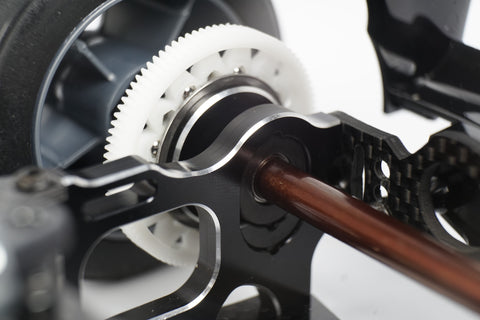
The NEW VBC Lightning FX is officially released, coming to or at a store near you


 09-15-2015, 07:40 PM
#2
Tech Initiate
Great Car!
 09-17-2015, 07:19 AM
#4
F60 front wing, Fthirteen protoform body, 3 racing rear wing very durable, pits 571,572 tires, tcs 1031,1032 tires or the new Crc rubber.
And maybe just go with kit setup to start as there is enough new parts that a lightning f setup won't transfer over directly
09-17-2015, 10:51 AM
#5
Hi everyone,
we had a little discussion on the new Lightning FX over in the old Lightning F thread. To avoid further confusion I proposed there to continue our discussion regarding the FX here, where it belongs.
The interesting bits from the other thread up to now:
Yokolun posted a first picture and a video link:
I asked for a base setup and he answered:
After building my car I had more questions  ...
...
In reply AlexPate recommended:
So far so good,
Christian
we had a little discussion on the new Lightning FX over in the old Lightning F thread. To avoid further confusion I proposed there to continue our discussion regarding the FX here, where it belongs.
The interesting bits from the other thread up to now:
Yokolun posted a first picture and a video link:


car quite good for ETS because it is easy to drive,
i just change the wheel base to 264mm
Side Spring i try the Associated 3.75lb to 5.00lb
Low Traction i will choose 3.75lb
Normal or High i will try 5.00lb or 6.25lb
Otherwise, Yokomo Side Spring also work for Lightning F/ Lightning FX
Front Spring i use Ride Soft, Front wing i use the Serpent with High Downforce Setup
Rear Wing i use TRG one, High Traction maybe i will try Serpent rear wing
you may collect more rear wing and front wing and Shell for Testing
...Thanks a lot for your advice, I will try as soon as I can get on track.
BTW, I just built my car today and found everything fitting very nicely. My only concern is with the front attachment of the shock. The eylet is a little too wide for the ball cup, so there's some play (more, than I like). Can you confirm that, and did you find a workaround?
Another question: the kit setup states a overall shock length of 64.6 mm. If I measure that between the centers of the shock eyelets (which is the usual way IMHO), then the shock would get much too long. If I measure it from end to end (including the eylets plus their rim), then I get a reasonable shock length allowing for just a little droop. How do you measure shock length, and what's you're actual setting?
Greets, Christian
Christian
09-18-2015, 01:45 AM
#6
09-18-2015, 04:08 AM
#7
Tech Master
iTrader: (1)
I had the original Flash F1 car from them. Plastics were to soft and stripped out (front upper arms) and so was the aluminum. I did a lot of work to fix the problems brought about by poor materials design. I hope this car is better but I will stick with my CRC WTF1.
09-18-2015, 10:14 AM
#8
The Lightning f has been virtually indestructible. The only time I ever broke mine was when it really deserved it.
09-18-2015, 10:15 AM
#9
09-21-2015, 02:51 PM
#11
Kits should be arriving stateside in 1-2 weeks.
09-25-2015, 12:38 AM
#12
Used parts:
1 aluminum spacer 3 x 5.5 x 3 mm
2 plastic washers 3 x 6 x 1 mm
I pushed the aluminum spacer into the shock eylet, where it sits just right. Then I attached the shock to the mount and slid one of the plastic washers onto the screw on either side of the shock eyelet.
This way the shock sits centered, without slop. Take care not to overtighten the screw, otherwise the shock will bind.
EDIT: I DON'T RECOMMENDED THIS ANYMORE AS IT ONLY ALLOWS FOR VERTICAL ACTION OF THE SHOCK, BUT LATERAL ACTION IS ALSO NEEDED WHEN THE POD TILTS.
Christian
Last edited by skyball; 09-25-2015 at 01:19 AM. Reason: not recommended anymore
09-25-2015, 08:26 AM
#14
09-27-2015, 12:28 AM
#15
So here is my solution for the moment.
Used parts:
1 aluminum spacer 3 x 5.5 x 3 mm
2 plastic washers 3 x 6 x 1 mm
I pushed the aluminum spacer into the shock eylet, where it sits just right. Then I attached the shock to the mount and slid one of the plastic washers onto the screw on either side of the shock eyelet.
This way the shock sits centered, without slop. Take care not to overtighten the screw, otherwise the shock will bind.
EDIT: I DON'T RECOMMENDED THIS ANYMORE AS IT ONLY ALLOWS FOR VERTICAL ACTION OF THE SHOCK, BUT LATERAL ACTION IS ALSO NEEDED WHEN THE POD TILTS.
Christian
Part number is
B-02-Vbc-5068
They also sell shim sets I think.