Go Back  R/C Tech Forums > General Forums > Electric On-Road
Tamiya TT02 Thread >

Tamiya TT02 Thread

Community
Wiki Posts
Search
Like Tree1121Likes

Tamiya TT02 Thread

    Hide Wikipost
Old 01-14-2021, 03:44 PM   -   Wikipost
R/C Tech ForumsThread Wiki: Tamiya TT02 Thread
Please read: This is a community-maintained wiki post containing the most important information from this thread. You may edit the Wiki once you have been a member for 90 days and have made 90 posts.
 
Last edit by: pparrett
TT02 Wiki - Post your setups, upgrades and home grown ideas here for us to read...

TT02 vs the TT-01
http://www.thercracer.com/2013/01/ta...irst-pics.html
New flat chassis layout - Easier to run LiPOs vs the cutouts in the TT-01s
Revised suspension geometry
Support for std spur gears

MODELS ----------------------------------------------------

Changes that follow are in comparison to the basic kit.
TT02 - Base Kit. Friction Dampers.
TT02D - Drift: Drift Tires, Hardened A-Parts, Oil Shocks
TT02R - Race: Rear Alu 3* Toe In Hubs, Alu Propshaft + Cups, CVA oil Dampers
TT02RR - Race+: TT02R + Adjustable Upper Arms, Oil Filled Diffs, Hardened Blue Chassis
TT02S - Type S: TRF416 arms, FRP shock towers, bearings,
TT02SR - TypeS Race: TT02S + Double cardan front drive shafts, rear lightweight universals, Rear sealed oil differential, front spool
TT02B - Buggy. Offroad: CVA Shocks, Double Wishbone long suspension

HOP UPS ----------------------------------------------------

Bearings:
#54476 Ball Bearing Set TT02: 8x 1050, 4x 1280, 4x 1150

Propshaft:
#54501 Alum Propeller Shaft TT02
#54502 Alum Propeller Joint TT02
Tip:
Put a 3mm piece of well greased silicone hose between the dog bone and the shaft of each wheel to reduce slop.

Motor Mount and Gearing:
#54558 TT02 Aluminum Motor Mount
#54500 High Speed Gear Set
#54875 Oil Gear Differential

Steering:
#54550 Low Friction Step Screws
- Full Upgrade Kit -
#54752 Steering Upgrade Kit, Includes all below.
- Individual Parts -
#54574 Aluminum Steering Set
#54575 Aluminum Steering Bridge
#54799 Hi-Torque Servo Saver or #51000 Servo Saver Black
#54248 Aluminum Turnbuckles 3x23
#50797 5mm Short Adjustable Turnbuckle End


Dog Bones to Universal Joints:
- Standard Steel -
#53792 Universal Shaft Assembly (steel), NOTE: Must also use item 54477 on the TT-02
#54477 Gearbox Joint for Universal Shaft (steel) (2pieces)
- Lightweight -
#53506 Blue Aluminum 39mm Swing Shaft
#53499 Wheel axle for assembly universal
#53681 Titanium wheel axle for assemblu universal (but this is very expensive)
#53500 cross joints for universal
#54477 Gearbox Joint for Universal Shaft (2pieces)
Tip: Run steel in the front, Alu is okay for the rear but the front takes a lot of wear and impact from crashes

Shock Options:
#54753 Super-mini CVA Oil Shocks, comes with med black springs
#42102 TRF 55mm Shocks

Chassis:
#54639 Carbon Damper Stay Front
#54640 Carbon Damper Stay Rear
#47339 Hard Lower Deck Blue
#47340 Hard Lower Deck White
#54926 Hard Lower Deck Black
#54733 Aluminum Rear Uprights, Gives 3* rear toe in for extra stability
#54549 Aluminum Rear Uprights, 2.5* Rear Toe In
#58584 Hardened A-Parts, Uprights, Hub Carriers, Diff Covers, etc

SUGGESTED BASE SETUPS ----------------------------------

Bashing:
Build to the kit instructions and have fun!

Asphalt Parking Lot Racing:
Front Diff: 300k-500k (or Tamiya #42247 Gear differential putty)
Rear Diff: 3K oil in the rear diff for low / medium grip, 5k oil in the rear for medium / high grip

Carpet Indoor Racing:
Front Diff: 300k-500k (or Tamiya #42247 Gear differential putty)
Rear Diff: 7k -10k in the rear diff for very high grip carpet.


ADDITIONAL RESOURCES -------------------------------------

TT02 Build and Review here
http://www.thercracer.com/2013/05/ta...nd-review.html

TT02 Tuning and Mods Guide
http://www.thercracer.com/2014/08/ta...-and-tips.html
https://www.rcdriver.com/take-the-versatile-tamiya-tt-02-chassis-to-the-next-level/


Gearing for 17.5t Blinky
http://www.thercracer.com/2013/07/ho...inky-with.html


Print Wikipost

Thread Tools
 
Search this Thread
 
Old 06-30-2016, 12:21 PM
  #1036  
Tech Elite
iTrader: (2)
 
eR1c's Avatar
 
Join Date: Oct 2010
Posts: 2,479
Trader Rating: 2 (100%+)
Default

oh, that is a bummer ...

Do you know if something like this would work:
http://www.rcmart.com/yeah-racing-tt...h=595_744_1585

worst case I just take the dremel to the current plastic part that hangs off the back ...yet was looking for a cleaner solution.
eR1c is offline  
Old 06-30-2016, 12:56 PM
  #1037  
Tech Initiate
 
Join Date: Dec 2015
Location: New England
Posts: 34
Default


Eric - thanks for the links to these wheels and tires. Love the look of the 6mm offset under this body!
steve_pss is offline  
Old 06-30-2016, 01:01 PM
  #1038  
Tech Elite
iTrader: (2)
 
eR1c's Avatar
 
Join Date: Oct 2010
Posts: 2,479
Trader Rating: 2 (100%+)
Default

Eric - thanks for the links to these wheels and tires. Love the look of the 6mm offset under this body!
Sure thing,
-I was hesitant at first ...but they seem to be as good quality as name brand wheels i've purchased. I actually went ahead and bought more in other styles. For the rubber I am sticking w/ some brands that I am familiar w/ and are true and tested (hpi and assosciated treaded ones).

Your body looks fantastic!
I may have to pick one of those Tamiya kit bodies up.
Still working on my TT02 build and body ...soooooon. (also prepping for my next race on the weekend). -hence why i haven't had much time on this build as I'd like.
eR1c is offline  
Old 06-30-2016, 01:14 PM
  #1039  
Tech Elite
iTrader: (2)
 
eR1c's Avatar
 
Join Date: Oct 2010
Posts: 2,479
Trader Rating: 2 (100%+)
Default

Steve_pss, ...did you paint that body? If so I like how you did the red and black.
eR1c is offline  
Old 06-30-2016, 01:28 PM
  #1040  
Tech Initiate
 
Join Date: Dec 2015
Location: New England
Posts: 34
Default

Originally Posted by eR1c
Steve_pss, ...did you paint that body? If so I like how you did the red and black.
After spending many (many) hours putting all the decals on (the hood itself is like 20 decals) I wish I had painted it. The black is actually a dark grey metallic (shows up nice in the sun). Splitter and other parts are straight black. The rest is all a hair dryer, windex and a sh*t ton of decals supplied with the kit.
steve_pss is offline  
Old 06-30-2016, 01:40 PM
  #1041  
Tech Elite
iTrader: (2)
 
eR1c's Avatar
 
Join Date: Oct 2010
Posts: 2,479
Trader Rating: 2 (100%+)
Default

The rest is all a hair dryer, windex and a sh*t ton of decals supplied with the kit.
what? Is there a decal technique I am unaware of...? Do tell!

---
the decals look really nice, good work.
eR1c is offline  
Old 06-30-2016, 01:47 PM
  #1042  
Tech Initiate
 
Join Date: Dec 2015
Location: New England
Posts: 34
Default

Originally Posted by eR1c
what? Is there a decal technique I am unaware of...? Do tell!

---
the decals look really nice, good work.
The windex just helps you have a little lee-way when you position, the hair dryer REALLY helps. It softens the decal and allows it to make pretty good bends.
steve_pss is offline  
Old 06-30-2016, 04:21 PM
  #1043  
Tech Elite
iTrader: (2)
 
eR1c's Avatar
 
Join Date: Oct 2010
Posts: 2,479
Trader Rating: 2 (100%+)
Default

Originally Posted by eR1c View Post
Nope, my kit didn't come w/ the hardened parts (lighter grey color).
I ordered the TT-02D type S kit. ...it came w/ a lot of goodies, but not the hardened parts.

So, I am going to order that part, ...going to hunt it down. (I hate the large bumper piece sticking off the back).
It will not fit on the type-S as you have a different arm mount holding the suspension pins.
I thought all the TT02 kits used the same basic chassis parts, -Specifically are the suspension mounts different? I looked online at both the TT02s and TT02D type s manuals, both appear the same?
eR1c is offline  
Old 06-30-2016, 06:05 PM
  #1044  
Tech Rookie
 
warwick's Avatar
 
Join Date: May 2016
Location: south auckland
Posts: 11
Default

manlito; this is the best i can find at the moment the photo is without the stadium truck body. It was held on with valcro.

Tamiya TT02 Thread-img15729_02042008132638_1_350_.jpg

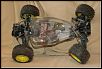
you may be able to modify the scrocher body to work the same way
warwick is offline  
Old 07-01-2016, 09:19 AM
  #1045  
Tech Elite
iTrader: (2)
 
eR1c's Avatar
 
Join Date: Oct 2010
Posts: 2,479
Trader Rating: 2 (100%+)
Default

Your looking some kind of protection for the chassis area?
what about using a pair of black nylons ...just cut both ends and wrap around the chassis.
eR1c is offline  
Old 07-04-2016, 02:49 AM
  #1046  
Tech Initiate
 
Manlito's Avatar
 
Join Date: Jun 2016
Location: Italy
Posts: 42
Default

Originally Posted by eR1c
Your looking some kind of protection for the chassis area?
what about using a pair of black nylons ...just cut both ends and wrap around the chassis.
Well, I was thinking about something rigid like a plastic cover because my esc has a fan and I'm afraid a fabric could damage it or get sucked in.

Since the weather will be hotter (here in Southern Italy temperature is 30-35°C), I'm thinking about installing a motor heatsink. I check motor temperature every 5 mins with an IR thermometer and I read about 40-50°C. Do you think I'll need an heatsink? Is it normal that it is hotter near the pinion?
Manlito is offline  
Old 07-04-2016, 03:34 AM
  #1047  
Tech Addict
iTrader: (4)
 
Djchow85's Avatar
 
Join Date: Dec 2013
Location: Sydney
Posts: 606
Trader Rating: 4 (100%+)
Default

if you are driving it in the street your ESC fan shouldn't need extra protection

In my tt02 I ran a 9t motor geared around with a 22 pinion. If you're concerned put on a heatsink + fan for it. You can get many from Rcmart. When I took my TT02 for rally on an off road track from memory it stayed around 60c with air temp in the low 20s within a 10 minute run.

I've never had issues with the ESC fan get caught with debris etc. Only had a fan die on me probably from shock when I ran indoor 4wd mod buggy... (the buggy hit the wall many times)
Djchow85 is offline  
Old 07-08-2016, 01:27 PM
  #1048  
Tech Elite
iTrader: (2)
 
eR1c's Avatar
 
Join Date: Oct 2010
Posts: 2,479
Trader Rating: 2 (100%+)
Default

okay, so this isn't complete, ...yet wanted to get a few photos up of my work in progress TT02.

I plan to put side mirrors on, an exhaust and a driver figure.

stay tuned.
Attached Thumbnails Tamiya TT02 Thread-imgp3815.jpg   Tamiya TT02 Thread-imgp3811.jpg   Tamiya TT02 Thread-imgp3812.jpg   Tamiya TT02 Thread-imgp3813.jpg  
eR1c is offline  
Old 07-09-2016, 11:43 AM
  #1049  
Tech Adept
 
Join Date: Sep 2009
Location: UK
Posts: 163
Default

Originally Posted by eR1c
I thought all the TT02 kits used the same basic chassis parts, -Specifically are the suspension mounts different? I looked online at both the TT02s and TT02D type s manuals, both appear the same?
The TT02D Type S and TT02 Type S have identical suspensions, look at the regular TT02 and TT02D manuals and you'll see they're much simpler than the Type S variants.
Mini35 is offline  
Old 07-11-2016, 07:03 PM
  #1050  
Tech Elite
iTrader: (2)
 
eR1c's Avatar
 
Join Date: Oct 2010
Posts: 2,479
Trader Rating: 2 (100%+)
Default

The TT02D Type S and TT02 Type S have identical suspensions, look at the regular TT02 and TT02D manuals and you'll see they're much simpler than the Type S variants
Ah, I will have to check out the manual for the stock TT02 and TT02D to understand the difference, -thanks for pointing that out.
eR1c is offline  


Contact Us - Archive - Advertising - Cookie Policy - Privacy Statement - Terms of Service -

Copyright © 2024 MH Sub I, LLC dba Internet Brands. All rights reserved. Use of this site indicates your consent to the Terms of Use.