


 2Likes
3 Racing Sakura D3 CS Drift
 12-05-2013, 08:02 PM
#2191
Curious to hear what motor setups you guys are running. Im running a Speed Passion 6.5t Drift Spec.
 12-07-2013, 10:19 AM
#2193
Tech Adept
im running a hacker 13.5. Older nephew will be running a Tekin 13.5 and younger will be using an Orion 13.5.
all left over motors i had layin around.
the hacker i have is the black can with purple ring on it. only a few shades darker then the Sakura pink.
all left over motors i had layin around.
the hacker i have is the black can with purple ring on it. only a few shades darker then the Sakura pink.
Last edited by Cooperd82; 12-07-2013 at 10:19 AM. Reason: meh
12-14-2013, 12:45 PM
#2194
I`m back!
May I chime in the discussion again?
I`m running a Hobbywing EZRun 13T BL (the 380 in disguise) with the EZRun 60Amp ESC.
Plenty of torque and no cogging. Am using it with a 21t 48p pinion on a 80Tspur.
@jlavador: what stealth mounts are you using there? never seen pink ones before Oo.
I want �em!
Just got my Yeah Racing Shocks. Kinda ok..ish. Mine leaked at the top, but i guess I just overdid it with the shock oil. They are now bone dry and work fine. However, what did they try to achieve with those springs? They are WAAAYYY too short! I am now using the stock orange ones on the front and the whites on the rear again...
While I was at it I noticed that my chassis tilts differently from left to right. After about 2 hours trying to figure out what`s wrong I noticed that my lower deck has kinda warped out of shape.
Now i have to place yet another order to get the graphite Deck Conversion kit. -,-
Don`t know how I managed to bend the chassis tub this badly.
Last edited by Erasus; 12-14-2013 at 02:57 PM.
12-15-2013, 07:54 AM
#2195
Welcome back Erasus . What setup are you running on the yeah racing suspension ? Slow rebound ? Oil ?
12-15-2013, 12:19 PM
#2196
Thx,man!
I was a little bit featherbrained when assembling the shocks, so I ended up having 3 hole dual rate pistons (aka slow rebound) on all 4.
I can clearly see, or better, feel, why a lot of people wanna have slow rebound in the back.
The rear now is very smooth and floaty, a bit like a hovercraft. Very sexy and predictable, too!
But now the front also floats around like a boat and this clearly is not my cup of tea, so what I will end up doing is swapping the front pistons with NON dual rate 2 hole pistons in the front for a bit more "bite".
I use the Yeah Racing 300CPS shock oil which comes with the shocks on all 4 ends and it seems to do the job just fine. Again, I must see how the front shocks work with the 2 hole pistons.
And of course the springs which come with the YR shocks are an effing joke. That`s why im using the stock 3Racing orange springs (almost too soft) on the front and the white ones( incredibru softu) on the rear.
Placed now another order at RCmart, ordered the YR SetUp station, the GF Conversion kit and another truck load full of hop ups and random bits and pieces for my D3. This is everything but a budget project anymore!
BITE ME! I just realized that that GF Conversion kit does not include the transverse battery mounting kit *head->table*
Last edited by Erasus; 12-15-2013 at 02:49 PM. Reason: spelling like a bozz
12-25-2013, 01:34 AM
#2197
Tech Rookie
Can someone give me some advise on the best way to reduce the steering slop? I have the high angle CV's, and Alu Steering Rack. I have the end points set on the TX too, so as not to destroy the steering prematurely.
Only after a week of running it, the steering has some crazy play, especially on the left hand side, as it seems to compound the play on both sides there.
Is there a part number for replacement bearings for the steering? Maybe a mod that someone has come up with?
Cheers
Only after a week of running it, the steering has some crazy play, especially on the left hand side, as it seems to compound the play on both sides there.
Is there a part number for replacement bearings for the steering? Maybe a mod that someone has come up with?
Cheers
12-28-2013, 12:41 AM
#2198
A reply to bedbod . This was posted by Caseymacgyver .
Awesome, glad to hear it. It really is a good car, with the potential to be great. Did the stock rear tensioner have enough range to take up the slack at 18T without any tweaking? Just wanting to confirm for the benefit of others.
I know what you mean with the D3 steering. Although the aluminum rack does increase steering throw and reduce flex, it does nothing to help with slop. In fact, I would argue that it may even make it worse due to 3Racing's poor fitment of the bearing seats. Overall, I think their upgrades are good quality and the accuracy in general has been excellent. However, I have found that their bearing seats are consistently oversized, whereas the plastic ones were flexy, but nice and snug. The rear hubs have been the worst, with the steering rack crossbar being a close 2nd. I ultimately replaced the crossbar with ball links and a turnbuckle.
In any event, I thought I would share some of the improvements that I have used and/or devised which have helped to reduce steering slop to an imperceptible amount on my D3: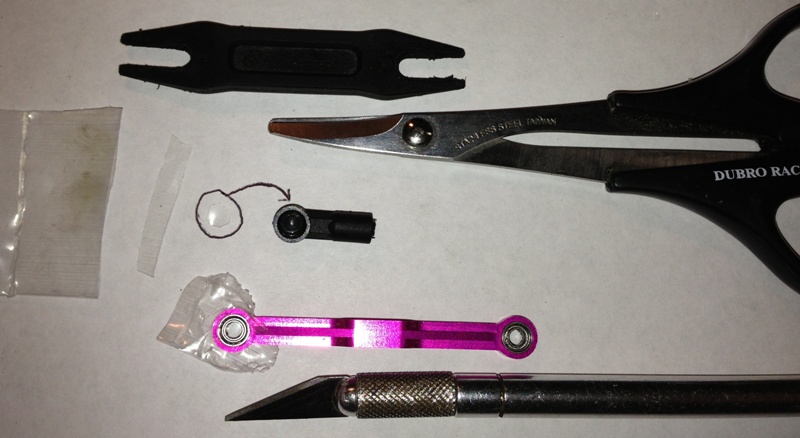
There's been a couple Q's about my steering posts, so here's a bit more info on them. I developed this approach initially because I didn't like the E-clip attachment method on the Tamiya posts, which made it damn hard to shim them properly. They were always either too tight or too loose. Now, they are "Shimmed" snug with a Nylock nut, tightened onto a set screw which is Locktited into the top of the extended post. I'm using THESE in place of the stock steering posts, but there are probably other 5mm posts out there that would do just fine or better. The nut bears on a 5mm axle spacer, over a 0.3X5mm washer that is in contact with the inner bearing race. The thickness of the axle spacer doesn't particularly matter, as long as it extends beyond the top of the post. The ones I had handy are about 6-7mm (0.25" I think), which are definitely longer than needed. The nut makes it easier to set and adjust the tightness without having to trial-and-error with the assorted shims thicknesses. The washer allows the bearing to spin freely without the spacer contacting the outer race under normal operation. At the same time, the spacer effectively helps to limit out-of-plane travel (Wiggle/slop) without additional stress to the inner race, which would tend to deform the balls and accelerate wear on the pivot bearings. Different washer thicknesses can be used (0.1mm, 0.2mm) to change the wiggle-to-drag ratio. I'm using this identical arrangement for my front and rear suspension pivots.
I know what you mean with the D3 steering. Although the aluminum rack does increase steering throw and reduce flex, it does nothing to help with slop. In fact, I would argue that it may even make it worse due to 3Racing's poor fitment of the bearing seats. Overall, I think their upgrades are good quality and the accuracy in general has been excellent. However, I have found that their bearing seats are consistently oversized, whereas the plastic ones were flexy, but nice and snug. The rear hubs have been the worst, with the steering rack crossbar being a close 2nd. I ultimately replaced the crossbar with ball links and a turnbuckle.
In any event, I thought I would share some of the improvements that I have used and/or devised which have helped to reduce steering slop to an imperceptible amount on my D3:
- Only use a ball removal tool to separate your ball links (See pic).
- If bearings do not fit tightly in their seat, place a section of a plastic parts baggy across the seat opening and then pop the bearing in place. The tight spots will stretch the plastic thinner and/or cut itself for you. Use an X-acto knife to cut away any remaining exposed plastic on both sides. I found Teflon tape to be too messy and did not hold up very well here. I'm definitely not a fan of gluing them in their seats either (See pic: One end after popping in, the other post trim).
- Cut 4-5mm square or hex pieces of plastic parts baggy and place in the bottom of EVERY ball cup. Doesn't have to be precise, just big enough to stay in the cup, but not so big that it creases. You want a single layer thickness that really only touches the upper half of the ball. It basically shims the ball down a tiny bit so it sits tighter against the snap ring. They last surprisingly long and typically stay in the cup when separated. I seldom replace them unless they fall out or get contaminated with dirt/grime. I'll usually cut a strip and make a few at a time, because they are very easy to drop while putting in place. Likewise here, I found Teflon tape to be too messy and did not hold up very well. (See pic).
- Get an assortment of 5mm shims (0.1/0.2/0.3mm thick) to use for the steering pivots and wheel axles. Test tightness with all links detached.
- Get an assortment of 3mm shims (0.1/0.2/0.3mm thick) to use on the king-pin, inner and outer hinge pins. Test tightness with all links detached.
- Shimming a bearing too tight to mitigate other sources of slop will likely make it worse. A properly shimmed bearing should show extremely little to no signs of increased roll resistance. If it does, it's too tight, which will knead those little balls out of round in a hurry and just increase the bearing's inherent slop. Make sure you know where the slop is coming from before trying to shim it out.
There's been a couple Q's about my steering posts, so here's a bit more info on them. I developed this approach initially because I didn't like the E-clip attachment method on the Tamiya posts, which made it damn hard to shim them properly. They were always either too tight or too loose. Now, they are "Shimmed" snug with a Nylock nut, tightened onto a set screw which is Locktited into the top of the extended post. I'm using THESE in place of the stock steering posts, but there are probably other 5mm posts out there that would do just fine or better. The nut bears on a 5mm axle spacer, over a 0.3X5mm washer that is in contact with the inner bearing race. The thickness of the axle spacer doesn't particularly matter, as long as it extends beyond the top of the post. The ones I had handy are about 6-7mm (0.25" I think), which are definitely longer than needed. The nut makes it easier to set and adjust the tightness without having to trial-and-error with the assorted shims thicknesses. The washer allows the bearing to spin freely without the spacer contacting the outer race under normal operation. At the same time, the spacer effectively helps to limit out-of-plane travel (Wiggle/slop) without additional stress to the inner race, which would tend to deform the balls and accelerate wear on the pivot bearings. Different washer thicknesses can be used (0.1mm, 0.2mm) to change the wiggle-to-drag ratio. I'm using this identical arrangement for my front and rear suspension pivots.
01-03-2014, 02:36 PM
#2199
If it is the ball cups that cause the wobble then the plastic bag mod works. Also new ball cups from tamiya or yeah racing do the job quite nicely without all that hassle. If it is the steering assembly itself, have you checked if the bottom screws, that hold the steering arms into place on the bathtub chassis, have become loose?
If it is the ball bearings in the steering crank check if one is broken. One of the ball bearings in my steering rack fell apart during one session without warning. It completely crumbled. So I had to replace it.
If it is the housing of the bearings...tough luck. you might wanna try the above plastic bag trick but instead of "tightening up" the ball ends, you could try to put the plastic bag between the bearing and the housing to eliminate the play. Other than that, the Eagle Racing OTA-R31 steering rack works very well for the Sakura, also the TA05 one.
Also check if all the king pin posts in your c hubs and steering arms are still present. When they fall out the suspension and steering become REALLY sloppy.
I have a big problem myself and I need some advice:
If you remembered, I had the problem with a warped chassis that lifted the rear right side up.
I then installed the graphite upper and lower deck. Also my car now has the aluminum suspension arms from yeah racing on the front and the rear. So far, so good.
But I STILL have to screw the rear right damper spring really far down in order to get the car to the same ride height left and right. My left damper spring is almost completely up while my right one is over halfway down.
I am at a loss as of now because I cannot figure out what is causing the massive imbalance. I have no means to weigh the car at all 4 ends independently but I highly doubt that the cars weight is so severly off to one side to cause such a big amount of imbalance between left and right. Also, it only applies to the rear. The front is aligned perfectly.
Of course I am using the same springs left and right. I quadruplechecked that!
The new chassis plate also isnt twisted or anything like that.
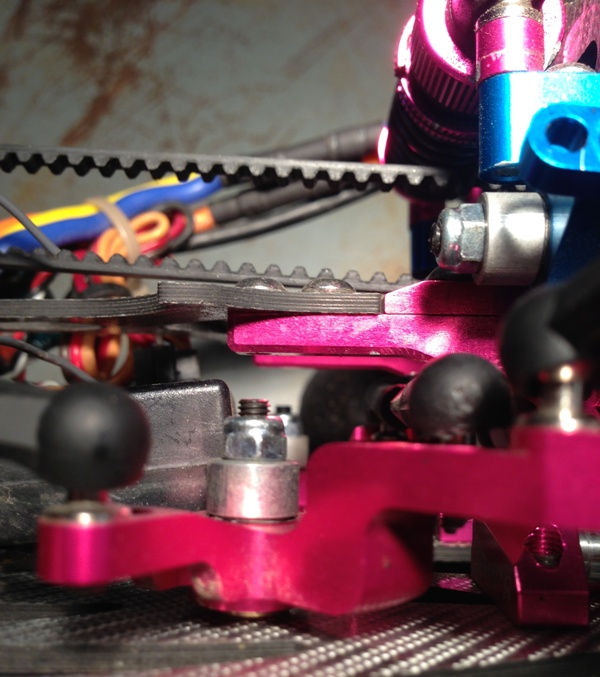
Everything looks nice and flush on the outside:

But underneath it looks like this:


HAALP!
If it is the ball bearings in the steering crank check if one is broken. One of the ball bearings in my steering rack fell apart during one session without warning. It completely crumbled. So I had to replace it.
If it is the housing of the bearings...tough luck. you might wanna try the above plastic bag trick but instead of "tightening up" the ball ends, you could try to put the plastic bag between the bearing and the housing to eliminate the play. Other than that, the Eagle Racing OTA-R31 steering rack works very well for the Sakura, also the TA05 one.
Also check if all the king pin posts in your c hubs and steering arms are still present. When they fall out the suspension and steering become REALLY sloppy.
I have a big problem myself and I need some advice:
If you remembered, I had the problem with a warped chassis that lifted the rear right side up.
I then installed the graphite upper and lower deck. Also my car now has the aluminum suspension arms from yeah racing on the front and the rear. So far, so good.
But I STILL have to screw the rear right damper spring really far down in order to get the car to the same ride height left and right. My left damper spring is almost completely up while my right one is over halfway down.
I am at a loss as of now because I cannot figure out what is causing the massive imbalance. I have no means to weigh the car at all 4 ends independently but I highly doubt that the cars weight is so severly off to one side to cause such a big amount of imbalance between left and right. Also, it only applies to the rear. The front is aligned perfectly.
Of course I am using the same springs left and right. I quadruplechecked that!
The new chassis plate also isnt twisted or anything like that.
Everything looks nice and flush on the outside:

But underneath it looks like this:


HAALP!
Last edited by Erasus; 01-03-2014 at 05:27 PM. Reason: stuff added
01-04-2014, 12:19 AM
#2200
Tech Regular
iTrader: (3)
I would suggest to remove both your shocks and inspect them...I have had the E-clips inside the shock piston come loose inside rendering no damping in them.
Also while the shocks are out, check to make sure there is no binding in the arms....when you lift the arm up, they should fall back down smoothly without any resistance.
If all those check out,..also double check your chassis.
I have heard go people screwing down (tightening) in the screws unevenly and causing warps in the chassis. I would loosen up all connecting points in the rear suspension and top and bottom chassis plates...then place it on a level surface preferably a smooth surface (ie glass or mirror, or setup station) and start tightening down the screws evenly left to right.
Also, by doing that, you might be able to detect if the actual chassis is warped or if it is completely flat. (...on a flat, hard surface)
Do NOT just tighten down a screw completely before you go to another screw. Tighten one side slightly then the opposing side slightly also and do for all those screws to tighten them evenly/squarely between left and right.
If it is the ball cups that cause the wobble then the plastic bag mod works. Also new ball cups from tamiya or yeah racing do the job quite nicely without all that hassle. If it is the steering assembly itself, have you checked if the bottom screws, that hold the steering arms into place on the bathtub chassis, have become loose?
If it is the ball bearings in the steering crank check if one is broken. One of the ball bearings in my steering rack fell apart during one session without warning. It completely crumbled. So I had to replace it.
If it is the housing of the bearings...tough luck. you might wanna try the above plastic bag trick but instead of "tightening up" the ball ends, you could try to put the plastic bag between the bearing and the housing to eliminate the play. Other than that, the Eagle Racing OTA-R31 steering rack works very well for the Sakura, also the TA05 one.
Also check if all the king pin posts in your c hubs and steering arms are still present. When they fall out the suspension and steering become REALLY sloppy.
I have a big problem myself and I need some advice:
If you remembered, I had the problem with a warped chassis that lifted the rear right side up.
I then installed the graphite upper and lower deck. Also my car now has the aluminum suspension arms from yeah racing on the front and the rear. So far, so good.
But I STILL have to screw the rear right damper spring really far down in order to get the car to the same ride height left and right. My left damper spring is almost completely up while my right one is over halfway down.
I am at a loss as of now because I cannot figure out what is causing the massive imbalance. I have no means to weigh the car at all 4 ends independently but I highly doubt that the cars weight is so severly off to one side to cause such a big amount of imbalance between left and right. Also, it only applies to the rear. The front is aligned perfectly.
Of course I am using the same springs left and right. I quadruplechecked that!
The new chassis plate also isnt twisted or anything like that.
HAALP!
01-04-2014, 08:04 AM
#2201
quick reply:
Man you got me really scared, dude! I just checked the chassis and it is mirror smooth and absolutely flat, phew.
also the suspension arms are a dream! they are moving easily and smooth.
it must be the dampers then, i am just wondering why i have the same issue on the exact same side as on my old chassis and my old dampers. it doesnt make much sense...mind boggling.
will keep ya updated about the dampers.
Update: i just swapped the right rear damper with the left one and now it works perfectly fine...wtf
I don`t get it. But at least now everything is fine now. thanks eunique.
update2: naw it sill is uneven, although not so much anymore. I guess i will have to disassemble the entire rear section again to take a look at the stock plastic suspension mounts. perhaps they are the cause...sigh..
Last edited by Erasus; 01-04-2014 at 08:52 AM.
01-05-2014, 10:17 AM
#2202
Erasus , Take some springs from the YeahRacing pack and put them on the rear . It might be a faulty lenght of spring or tension . Can you take a picture from above the chassis to see the electronics distribution ?
01-10-2014, 01:05 PM
#2203
Finally i converted my D3 to RWD , The chassis feels way more realistic now . I am really loving it . Have installed aluminum a-arms from yeah racing , aluminum rear bulkhead,cover and r.bulkhead. Aluminum Steering knuckles . Did a mod on the steering to reduce the slop and worked quite good . Now my only issue is that it seems that i need to tension up a lot the rear belt tensioner in order to make the rear tires to lock under braking , but when i tension it up the car when off throttle has a tend to brake itself by the tension of the belts . Could it be my motor not providing enought braking force ? Please help
01-19-2014, 03:05 AM
#2204
Tech Apprentice
Selling my D3 you guys, I only ran it a handful of times.
http://www.rctech.net/forum/r-c-item...l#post12909642
Let me know what you guys think
http://www.rctech.net/forum/r-c-item...l#post12909642
Let me know what you guys think
01-23-2014, 08:41 PM
#2205
Gotta sell my d3 to finish some other projects. RTR in fantastic shape.
http://www.rctech.net/forum/r-c-item...r-drifter.html
http://www.rctech.net/forum/r-c-item...r-drifter.html