


 2Likes
3Racing Sakura Zero S
 01-14-2013, 02:11 PM
#2326
Touch a finger to the motor and cout 1001,1002 your okay. If it comes out 1001, OHHH $%#* then the motor is running to hot. Not trying to be a smartass here this actually works. If you can keep your finger on it for a count of a least three seconds the temp on average is around 150* The shorter the count the hoter the motor, but as stated earlier the best way is a good cheap temp sensor.
 01-14-2013, 04:01 PM
#2327
You do need to move the hole where the root arm normally mounts to by 3mm centre to centre rearward on a zero chassis. Here's a pic installed in my hybrid:
Part number is SAK-X24/PK
01-14-2013, 06:18 PM
#2328
So if you use a xi mount on a zero you need to move it 3mm one way, or if you use a zero mount on an xi it goes 3mm the other way. Like I said I'll snap a photo when I get home which shows my (poorly) drilled and counter sunk hole from when I had the zero vmm on the xi chassis.
01-14-2013, 07:00 PM
#2329
thanks that will be big help
I'll snap a photo when I get home that shows what you need to do. But the xi based chassis has the motor mount moved 3mm from where it is on the zero. But the only hole that doesn't line up is the motor mount root arm, which is the arm that attaches to the vmm's, and takes the motor top screw, which also screws into the chassis.
So if you use a xi mount on a zero you need to move it 3mm one way, or if you use a zero mount on an xi it goes 3mm the other way. Like I said I'll snap a photo when I get home which shows my (poorly) drilled and counter sunk hole from when I had the zero vmm on the xi chassis.
So if you use a xi mount on a zero you need to move it 3mm one way, or if you use a zero mount on an xi it goes 3mm the other way. Like I said I'll snap a photo when I get home which shows my (poorly) drilled and counter sunk hole from when I had the zero vmm on the xi chassis.
01-15-2013, 02:59 AM
#2330
Sorry its so late. Here's the photo.
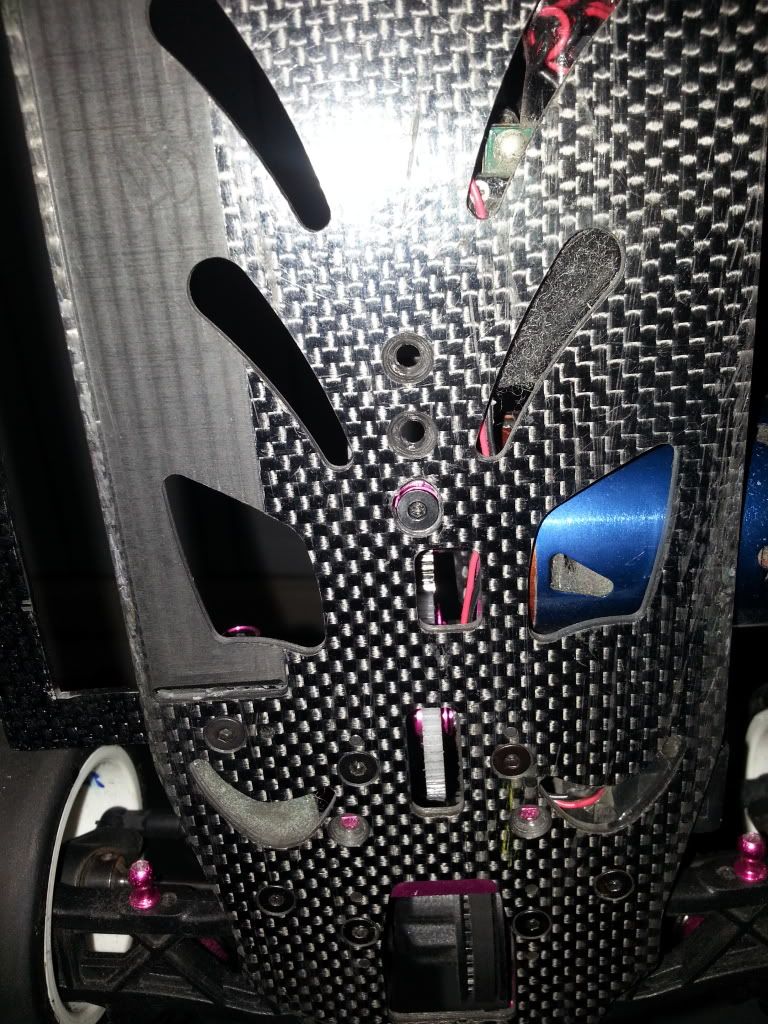
As you can see, there's a new hole a few mm forward of the motor mount root arm mounting hole. The car currently has a xi mount on an xi chassis. The hole further forward is for a zero mount on the xi chassis. So for an xi mount on a zero chassis, you need to make a new hole 3mm rearward of the stock hole. Does that make sense?
As you can see, there's a new hole a few mm forward of the motor mount root arm mounting hole. The car currently has a xi mount on an xi chassis. The hole further forward is for a zero mount on the xi chassis. So for an xi mount on a zero chassis, you need to make a new hole 3mm rearward of the stock hole. Does that make sense?
01-15-2013, 05:29 AM
#2331

As you can see, there's a new hole a few mm forward of the motor mount root arm mounting hole. The car currently has a xi mount on an xi chassis. The hole further forward is for a zero mount on the xi chassis. So for an xi mount on a zero chassis, you need to make a new hole 3mm rearward of the stock hole. Does that make sense?
Oh and an update on my problem. I'm not sure if this is a definitive answer or not as I need to test my theory out some more.
It could possibly be the gears that I'm using that are causing the noise.
I put a new spur & pinion gear in the car earlier today, and testing at a track tonight resulted in a quiet and silky smooth drive train.
Now here's my theory - The other gears I am trying to use have either had little or moderate use in a Tamiya TA05. As the TA05 has the motor in front of the spur gear and the pinion gear has to be reversed, ie grub screw side goes towards the outer end of the motor shaft, I'm believing that the way the gears wear in the ta05 cause the noise and binding feeling due the wear attributes on the teeth face are different between the 2 cars.
There may be still a slight problem with the motor mount as the gears are the most silent when only the bottom motor screw is tightened up, this is not ideal but could explain the binding feeling and added to that the different wear on the face other the teeth causing the noise.
Anyway it now seems like I am moving forward on nailing this problem so I'll do some more testing on the weekend and post updates on my findings.
Cheers
Rob.
01-16-2013, 07:58 PM
#2332
hi all just got a zero s but found that the servo saver keep slipping after a while. . is there any upgrade or should i go with generic alu arm without protection?
01-16-2013, 09:29 PM
#2334
Using a aluminum arm without protection is a bad idea as mentioned above.
Tamiya also makes the alloy outer part of the servo so you can have it protected and minimise the flex from the standard plastic one. http://rcmarket.com.hk/product_info....oducts_id=4983
Cheers
Rob.
01-17-2013, 06:20 AM
#2335
thanks bro
01-19-2013, 05:18 AM
#2336
Tech Adept
Correct me if I'm wrong and let me know if I'm right. Alipo battery with a higher c rating will deliver more current which in turn will equal more speed?
01-19-2013, 05:38 AM
#2337
Tech Master
In theory yes. what you will probably notice most is that the pack doesn't get weak or "fall off" late into the race. A higher c rating will be more consistent over a 6,8, or even 10 minute race provided you have enough milliamps to make the required run time.
01-19-2013, 05:52 AM
#2338
Tech Adept
ok. thanx
01-22-2013, 05:21 AM
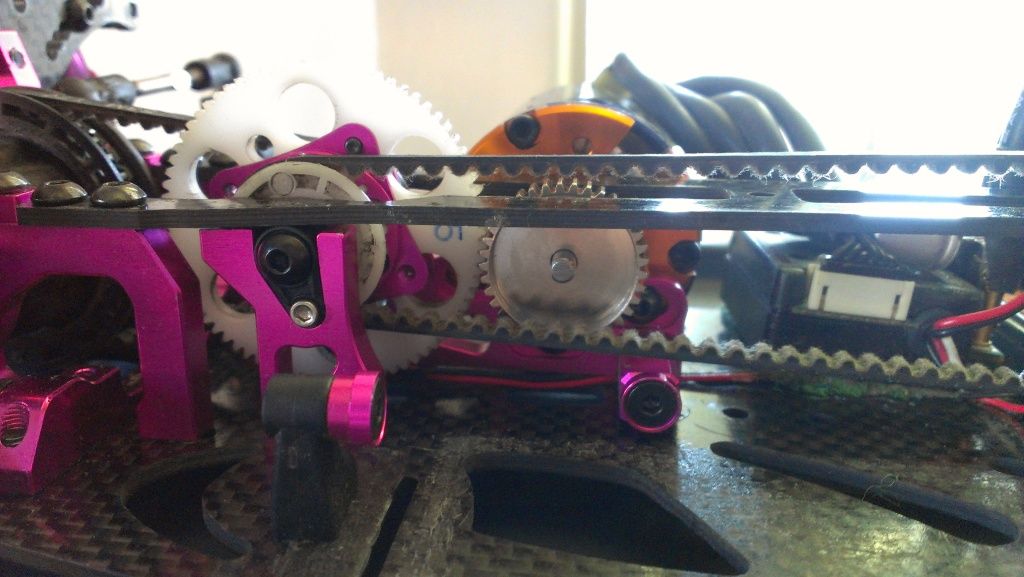
#2339
Hi guys, I'm trying to get a FDR of 4.8 or close in my Sak S, changed the center pulley to 21t with stock spur 80t and pinion of 30t. The problem now is the belts (522t front & 171t rear) are so tight. Any compatible belt that I can replace to overcome this problem?
01-22-2013, 05:30 AM
#2340
Hi guys, I'm trying to get a FDR of 4.8 or close in my Sak S, changed the center pulley to 21t with stock spur 80t and pinion of 30t. The problem now is the belts (522t front & 171t rear) are so tight. Any compatible belt that I can replace to overcome this problem?