


Tamiya TB Evolution V MS


 09-25-2009, 05:48 AM
#182
I was at my local track last night for the weekly Sportmen class race. On this particular night I received some very helpful pointers about gearing and FDR from the veterans. Right before the main I made a change to the pinion gear from a 29T to a 33T and noticed the improvement in speed in my current car (TC5R).
I see that the internal gear ratio of the Evo 5 MS is 2.437 and the Spur that comes with the kit is 96T 64P. It seems that the 96T spur is going to make it a little bit difficult to reach the desired FDR of 4.2. I used the gear chart calculator and found that a 81P Spur / 47P pinion gear combon will give me the 4.2 FDR.
In terms of fitment will this spur/pinion combination work on the Evo 5 MS?
Should I stick with Tamiya branded Spur gears?
Is there another brand of spur gears that will work with this car?
Thanks in advance for you help.
-John
09-25-2009, 06:59 AM
#183
I was at my local track last night for the weekly Sportmen class race. On this particular night I received some very helpful pointers about gearing and FDR from the veterans. Right before the main I made a change to the pinion gear from a 29T to a 33T and noticed the improvement in speed in my current car (TC5R).
I see that the internal gear ratio of the Evo 5 MS is 2.437 and the Spur that comes with the kit is 96T 64P. It seems that the 96T spur is going to make it a little bit difficult to reach the desired FDR of 4.2. I used the gear chart calculator and found that a 81P Spur / 47P pinion gear combon will give me the 4.2 FDR.
In terms of fitment will this spur/pinion combination work on the Evo 5 MS?
Should I stick with Tamiya branded Spur gears?
Is there another brand of spur gears that will work with this car?
Thanks in advance for you help.
-John
I see that the internal gear ratio of the Evo 5 MS is 2.437 and the Spur that comes with the kit is 96T 64P. It seems that the 96T spur is going to make it a little bit difficult to reach the desired FDR of 4.2. I used the gear chart calculator and found that a 81P Spur / 47P pinion gear combon will give me the 4.2 FDR.
In terms of fitment will this spur/pinion combination work on the Evo 5 MS?
Should I stick with Tamiya branded Spur gears?
Is there another brand of spur gears that will work with this car?
Thanks in advance for you help.
-John
The Tamiya spur gears work fine I just find them to be a tad soft so they are a little less forgiving if your gear mesh is a little loose. I personally like the xenon spurs because they are very durable. Here is a link to where you can purchase the spur gears http://www.speedtechrc.com/store/ebp...?catmainid=392
09-25-2009, 08:39 AM
#184
If you want to run 4.2FDR( I take it your running VTA?) you could probably use a 90 spur and 52 pinion, which would give you 4.2 as well. The motor mount upper brace may or may not be in the way of the pinion though, but if it is you can put 1mm shims under the upper braces mounting holes to space it up higher to clear the pinion. I have ran up to 2mm shims under the mounting plate with no effects to the way the car performed. I don't think you can move the motor far enough over for gear mesh running 81/47 but I may be wrong.
The Tamiya spur gears work fine I just find them to be a tad soft so they are a little less forgiving if your gear mesh is a little loose. I personally like the xenon spurs because they are very durable. Here is a link to where you can purchase the spur gears http://www.speedtechrc.com/store/ebp...?catmainid=392
The Tamiya spur gears work fine I just find them to be a tad soft so they are a little less forgiving if your gear mesh is a little loose. I personally like the xenon spurs because they are very durable. Here is a link to where you can purchase the spur gears http://www.speedtechrc.com/store/ebp...?catmainid=392
Thanks for the advice and the link to the site. I'll probably pickup a few of the spur and pinion gears in various sizes. I assume 64P is the way to go vs. 48P.
09-25-2009, 08:53 AM
#185
Timmie - I'm currently running the beginner's class (silver can) but I have my sight's on the VTA class. We have a Fall point series coming up month and I would very much like to participate if my driving skills improve.
Thanks for the advice and the link to the site. I'll probably pickup a few of the spur and pinion gears in various sizes. I assume 64P is the way to go vs. 48P.
Thanks for the advice and the link to the site. I'll probably pickup a few of the spur and pinion gears in various sizes. I assume 64P is the way to go vs. 48P.
Both 48 and 64 pitch work fine, but 64 pitch will let you fine tune your gearing better by being able to make smaller adjustments in your FDR.
When I get home today I'll check out that 90 spur gear fitment on my Evo and post what I come up with. I'm pretty sure I have ran that combo in the past. That way you will know for sure it works and will save you some time.
09-25-2009, 11:12 AM
#186
Ok, The 90 spur and 52 tooth pinion will work with plenty of room as long as you use four, 2mm shims to space the motor mount plate up. Just put one 2mm shim at each one of the 4 bolt holes and then install the motor plate on top. You may want to use slightly longer screws, but I didn't and it works fine. If you are not sure what I mean about using shims to space it up, let me know and I will post a picture of my car.
09-25-2009, 11:40 AM
#187
Ok, The 90 spur and 52 tooth pinion will work with plenty of room as long as you use four, 2mm shims to space the motor mount plate up. Just put one 2mm shim at each one of the 4 bolt holes and then install the motor plate on top. You may want to use slightly longer screws, but I didn't and it works fine. If you are not sure what I mean about using shims to space it up, let me know and I will post a picture of my car.


 10-07-2009, 01:03 PM
#190
My car finally arrived!! I can't wait to start building it. Unfortunatley, due to work and other commitments I won't be able to start till the 13th. Hopefully I'll be able to post pictures of the completed car on the 14th :-).
For now...
Attachment 507144
Attachment 507142
Attachment 507143
For now...
Attachment 507144
Attachment 507142
Attachment 507143
 Its always a beautiful thing to see a shiny new TRF box sitting in front of you
 Have fun!
10-12-2009, 11:11 AM
Have fun!
10-12-2009, 11:11 AM
#191
I've started the buildout of my Evo 5 and have come across some issues/questions. I was hoping to get some support/answer from the folks that have already gone through the build.
Questions 1: When meshing the bevel gear to the differential how much play is accpetable? Depending on the number of shims used I can vary the play from none to a lot. Should I follow the same rule for meshing the pinion to the spur gear? Or should it be real tight with no play. The manual does indicate that too much play can damage the gears. Does this rule apply also for the front bulkhead (bevel & one-way)?
Question 2: The manual indicates that lube/grease be applied between the bevel and differential/one-way. What type of grease should be used? I received a ball diff grease and a ceramic grease with the kit. I also purchased a Anti-Wear grease from Tamiya.
Question 3: I applied Anti-Wear grease on the arm installation (to the suspension blocks) and fr/rr universal shaft. Is this the appropriate grease for this? The reason I ask is that this grease is very 'sticky'. I actually had to wipe off a great deal of it from the arm / suspension block installation as it was causing the arms to bind.
Also...
Timmie - I ordered and received a set of 81T/47T and 90T/52T spur/pinion combos. I'm happy to report that the 81/47 configuration also works. It will require the 1.5-2mm spacer to clear the uppder brace which you have mentioned.
10-12-2009, 12:40 PM
#192
I've started the buildout of my Evo 5 and have come across some issues/questions. I was hoping to get some support/answer from the folks that have already gone through the build.
Questions 1: When meshing the bevel gear to the differential how much play is accpetable? Depending on the number of shims used I can vary the play from none to a lot. Should I follow the same rule for meshing the pinion to the spur gear? Or should it be real tight with no play. The manual does indicate that too much play can damage the gears. Does this rule apply also for the front bulkhead (bevel & one-way)?
Questions 1: When meshing the bevel gear to the differential how much play is accpetable? Depending on the number of shims used I can vary the play from none to a lot. Should I follow the same rule for meshing the pinion to the spur gear? Or should it be real tight with no play. The manual does indicate that too much play can damage the gears. Does this rule apply also for the front bulkhead (bevel & one-way)?
As far as your drivetrain goes, you cannot go by how many shims someone has on their car and expect it to be right. For instance, when I went from the kit plastic diff cases to the carbon ones, I had to lose almost all the shims on the diff because the tolerances were different. So even though the amount of shims someone tells you they have on their car may get you close, it also may be way off for your cars tolerances.
The easiest way I can explain without pictures is to set your pinion gear shaft play first. I would follow what the manual says as far as shims for this as a starting point. Then with it installed in the lower diff housing half, put the top diff housing on and push and pull on the drive cup and see how much front to back play you have. There should be a very small amount. If so then do the other diff housing the same way. When you are done shimming, with both diff housing halves together, spin the pinion shaft to make sure that it is spinning freely and not binding. If you shim this area of the drivetrain too tight, it will bind up here and cause a lot of drag and burn up bearings. If you shim it too loose, the main drive shaft will get in a bind under throttle and braking because it will have side to side play along with forward and rearward. Then you risk damage to the crown and pinion gear, along with vibration of the driveshaft at high drive line rpm.
After those are shimmed correctly, install the built diffs into the the bottom diff housing with the bearing installed but with no shims. With the pinion gear shaft installed push the diff away from the pinion gear until the bearing is against the side of the lower diff housing. Then push the pinion shaft down by its bearings and with a finger do not let the pinion gear move. Now take your other hand and rock the diff back and forth and check how much slack there is with the gear mesh. Think of it as being similar to the method on how you would check the gear mesh of your motor pinion and spur gear mesh. You want the mesh to have just a little bit of play, with both parts shimmed and checking it like I described above it I usually try to get about .50mm/.60mm of movement on the crown gear....(make a small mark on the crown gear if you like and observe the movement of the mark if it helps) So if it has too much slop, just add some shims to the flat side of the crown gear * the side with no teeth* until you get the desired about of clearance. While checking this, it is important to check the free play at a few different positions of the the crown gear to make sure there is indeed the desired play in 360 degrees of rotation of the crown gear. After that, add shims to the the side of the diff facing the crown gear teeth to take out the side to side play of the diff when it is installed in the diff housing. When you feel its pretty good, install the top diff housing and go ahead and bolt it together. Then spin the parts by hand and verify that they spin freely. Then with your pointer finger and thumb, grab both sides of the diff outdrives and check the side to side play with the diff housings bolted together. Also double check the pinion shafts forward and rearward play. You should be good to go then, install the main drive shaft and spin it and it should spin nice and free.
You can run your tolerances a little tighter or looser as both have there pluses and minuses. I'm not going to get into that because this post is long enough But I hope I explained it simple enough on how I do my cars basically. There are some more things you can do to be more precise like plastiguage and removing a little material here and there, but this is the basics and will get your car ready to hit the track.
Question 2: The manual indicates that lube/grease be applied between the bevel and differential/one-way. What type of grease should be used? I received a ball diff grease and a ceramic grease with the kit. I also purchased a Anti-Wear grease from Tamiya.
Question 3: I applied Anti-Wear grease on the arm installation (to the suspension blocks) and fr/rr universal shaft. Is this the appropriate grease for this? The reason I ask is that this grease is very 'sticky'. I actually had to wipe off a great deal of it from the arm / suspension block installation as it was causing the arms to bind.
 Just a little goes a long way. AW grease on the drive shaft cushions will help with longevity of the diff out drives, but if you ever run the car in a dirty environment, make sure you clean them often and re apply. Dirt sticks to it very easily then grinds itself into the out drive. My friend has been using Much More joint grease with great success on his car. It might be worth checking out if you race outside any.
Also...
Timmie - I ordered and received a set of 81T/47T and 90T/52T spur/pinion combos. I'm happy to report that the 81/47 configuration also works. It will require the 1.5-2mm spacer to clear the uppder brace which you have mentioned.
Timmie - I ordered and received a set of 81T/47T and 90T/52T spur/pinion combos. I'm happy to report that the 81/47 configuration also works. It will require the 1.5-2mm spacer to clear the uppder brace which you have mentioned.
glad that it appears you are all set Now get back to building, the weekend is coming
10-12-2009, 10:00 PM
#193
I shimmed my "normal" Evo5 as in the manual, and have no problems at all in about now 3 or 4 years of racing.
The only thing i grease are the universal shafts, and the supension balls.
The gears always run dry !
Greetings from Austria,
Blueman
The only thing i grease are the universal shafts, and the supension balls.
The gears always run dry !
Greetings from Austria,
Blueman
10-13-2009, 11:55 AM
#194
Timmie - Excellent info and advise as usual. I followed your directions and ended up going 0.1mm less shim on both the front and rear diff/one-way. The shims for the bevel gears were set per the manual. I'm now waiting on the spacers (for the upper brace) and my new servo to complete the rest of the build. I took apart the arm/sus block and wiped everything off and started over. Both front and rear are now moving freely.
Blueman - Thanks for the info and advise. The manual called for a 0.3mm shim on both sides of the one-way and diff. There was no play going with this setup. I ended up going 0.1mm less on just one side of both the one-way and diff and got the slight play that was desired.
Blueman - Thanks for the info and advise. The manual called for a 0.3mm shim on both sides of the one-way and diff. There was no play going with this setup. I ended up going 0.1mm less on just one side of both the one-way and diff and got the slight play that was desired.

 10-13-2009, 12:26 PM
#195
Timmie - Excellent info and advise as usual. I followed your directions and ended up going 0.1mm less shim on both the front and rear diff/one-way. The shims for the bevel gears were set per the manual. I'm now waiting on the spacers (for the upper brace) and my new servo to complete the rest of the build. I took apart the arm/sus block and wiped everything off and started over. Both front and rear are now moving freely.
Blueman - Thanks for the info and advise. The manual called for a 0.3mm shim on both sides of the one-way and diff. There was no play going with this setup. I ended up going 0.1mm less on just one side of both the one-way and diff and got the slight play that was desired.
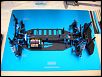
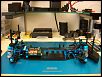
Attachment 509322 Attachment 509323
Blueman - Thanks for the info and advise. The manual called for a 0.3mm shim on both sides of the one-way and diff. There was no play going with this setup. I ended up going 0.1mm less on just one side of both the one-way and diff and got the slight play that was desired.
Attachment 509322 Attachment 509323

You're very welcome, glad to be of help to you. The Evo5MS has been the easiest shaft car I have ever built.The aluminum bulkheads are nice. My gear mesh was spot on building it to kit specs. Until I added a spool to the front. Then, my shimming had to be changed slightly.
Basically where I was coming from before is to always check gear mesh. Its a good practice. When the time comes to replace your aluminum rear diff, make sure you check mesh again. Tamiya parts are machined very well but still there can be tolerance differences because we are dealing with something machined. Extra time taken to do it right the first time will be less time fixing things later. Glad your taking your time
