


 649Likes
Team Associated B6 & B6D thread

 06-07-2017, 10:46 AM - Wikipost
|
|||
|
|||


 03-10-2017, 08:41 AM
#6046
Tech Addict
iTrader: (15)
Check your alloy rear camber mount isn't bent. I have seen that cause different camber left/right. Also, the camber mount keys into the black rear bulkhead piece, but they don't key into the d block or transmission. So if you have a bent screw or elongated hole, the mount will not be sitting perfectly square.
Ray
Ray
Check your camber in 3 different spots on the wheels as wheels, and perhaps the tire glue job, makes things not so straight  If the tires aren't new, check to make sure you haven't had a hard landing and gave the ole wheel a whack. I have had some that twisted the axle hole out of square. You could tell by the wheel ribs being twisted/bent.
Other things.. check your ride height at all 4 arms (inside towards the middle of the car). Set your ride height by adjusting the spring collars. Do not worry about the measuring collar distance. No 2 springs are exactly the same.
Are you running the same mounting options on the camber links (position/height)?
What about hub/caster inserts? double check they are the same and inserted the same.
Spring cups?
Is anything bent/cracked? shock towers, shock mount screws, camber mounts, arm mounts..
If you can't find anything else its time to look at the chassis being warped.
If the tires aren't new, check to make sure you haven't had a hard landing and gave the ole wheel a whack. I have had some that twisted the axle hole out of square. You could tell by the wheel ribs being twisted/bent.Other things.. check your ride height at all 4 arms (inside towards the middle of the car). Set your ride height by adjusting the spring collars. Do not worry about the measuring collar distance. No 2 springs are exactly the same.
Are you running the same mounting options on the camber links (position/height)?
What about hub/caster inserts? double check they are the same and inserted the same.
Spring cups?
Is anything bent/cracked? shock towers, shock mount screws, camber mounts, arm mounts..
If you can't find anything else its time to look at the chassis being warped.
I have checked everything here. the wheels are brand new. I will go through everything else and ensure nothing i bent but I have only been on the track 1 or two times with no major crashes unless things bend easily on this car... I am suspecting it may be what Ray is suggesting or the springs are just not matched (yokomo greens). The funny thing is when i built it everything was true and square and I have an eye for these things so the details are all being checked.
Something is bent or broken. but what....
 03-10-2017, 08:43 AM
#6047
Tech Addict
iTrader: (15)
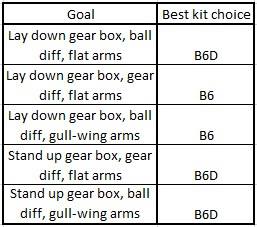
I think part of the reason is that the base setup (which includes the stand-up tranny) is pretty tame. Compounding the problem is that people take that base setup and then throw a laydown in because it's what everyone else is doing, and they think it will provide instant steering (at least that's what *I* was hoping hehe).
What I found was that if you throw the laydown in without making any other changes, you're still going to have understeer (particularly mid-corner), and you're going to be severely lacking rear bite on corner exit. And this assumes you're running your battery 2F (as far rearward as it will go), which requires running without the waterfall. I'm sure most people aren't doing that, so the battery is being run further forward, creating even more issues given that they're still running the kit setup. I didn't try that personally, but I imagine it would fishtail like an untuned OG B4 on an oil slick.
The B6D is a killer kit, but IMO if you're running indoor clay, the hot ticket is:
- 1.5 degrees antisquat (preferrably with the 25g C block)
- laydown tranny
- rear hubs forward
- front gray springs + 32.5wt
There are some other changes that I made for personal taste, but these four will get you a solid planted car with great steering. I wish I could tell you the 25g is or isn't all that important, but I made the 1.5 a/s change when I installed the 25g C block... sorry . I also have the alum D block installed, but I'm running it center... so right now it's just $15 bling.
What I found was that if you throw the laydown in without making any other changes, you're still going to have understeer (particularly mid-corner), and you're going to be severely lacking rear bite on corner exit. And this assumes you're running your battery 2F (as far rearward as it will go), which requires running without the waterfall. I'm sure most people aren't doing that, so the battery is being run further forward, creating even more issues given that they're still running the kit setup. I didn't try that personally, but I imagine it would fishtail like an untuned OG B4 on an oil slick.
The B6D is a killer kit, but IMO if you're running indoor clay, the hot ticket is:
- 1.5 degrees antisquat (preferrably with the 25g C block)
- laydown tranny
- rear hubs forward
- front gray springs + 32.5wt
There are some other changes that I made for personal taste, but these four will get you a solid planted car with great steering. I wish I could tell you the 25g is or isn't all that important, but I made the 1.5 a/s change when I installed the 25g C block... sorry
. I also have the alum D block installed, but I'm running it center... so right now it's just $15 bling.I am doing just that my next run out because steering is not what i thought it would be.. I am expecting the 2* of anti squat, and rear hubs forward will wake her up.
Front gray springs from the white implies stiffer front end, which will keep more weight to the rear but sacrifice steering. It doesn't' push too bad with gray springs?
03-10-2017, 08:55 AM
#6048
Similarly, I had moved the rear shocks from #2 to #1 to help with a rear bite issue on corner exit when I was still running a close-to-kit setup. Once I had made other changes and got the steering I wanted and the rear bite I wanted, the rear end was really nervous on landing. Just for the heck of it, I moved them back to #2 and that's when I felt the whole car hit that I'm not changing anything! sweet spot. I don't know the exact reason why moving them back actually helped settle the rear end (because you'd normally expect the opposite), but I suspect there was some bottoming-out on landings that might have been contributing. Either way, the whole car is right where I want it. I might try mounting the shocks on the front of the rear arms just for giggles, but as it stands, the car does exactly what I want it to throughout the entire lap. Can't ask for much else.
Oh and I don't sauce my tires (for a host of reasons)... I'm getting the steering and bite with this setup while running dry.
03-10-2017, 09:02 AM
#6049
Tech Master
iTrader: (49)
I definitely will check this. Nothing seemed out of wack here and i've removed it many times but I will check that block and reinspect.
I am using wheels and tires that are brand new. The tires aren't even glued yet but when i spin them they are extremely true.
I have checked everything here. the wheels are brand new. I will go through everything else and ensure nothing i bent but I have only been on the track 1 or two times with no major crashes unless things bend easily on this car... I am suspecting it may be what Ray is suggesting or the springs are just not matched (yokomo greens). The funny thing is when i built it everything was true and square and I have an eye for these things so the details are all being checked.
Something is bent or broken. but what....
03-10-2017, 09:54 AM
#6050
Bump stear is kit setup. Only steering adjustment is 1mm on the steering rack.
Kit setup (A)
Gray isn't necessarily "better" than white, but they're more appropriate for my track IMO. I saw most people using them on similar surfaces (med-high bite indoor clay), so I tried them. They're creating excellent corner-entry steering, and they help get the weight back to the rear on corner-exit. Win/win.
With the setup that I posted, it had the tightest turning radius I've ever put on a car. Gobs of steering. The only thing I didn't like was that the rear end was getting a little unsettled on less-than-perfect landings, and the car would dart around a bit. So I could turn a hero lap, but only once or twice over the course of 10 minutes. I put the rear shock back to the #2 position, and everything is exactly where I want it. It's super easy to drive, has great steering, and the rear end is planted as long as you're not mangling throttle+steering input.
Here's an updated setup. At this point, I don't feel like there's really anything else for me to chase on the car for my home track. It's the easiest 2WD I've driven, it generates stupid corner speed, handles 180's great, and is extremely predictable.
03-10-2017, 10:05 AM
#6051
03-10-2017, 10:25 AM
#6053
Tech Addict
iTrader: (15)
I am running b5 aluminum rear hubs so no inserts to play with. I am open to any and all help. Its usually the smallest things that do these things to me.
For my T5m i had the same issue and realized that one of my shocks on one arm was off by one hole from the other arm! talk about a skewed geometry problem.
For my T5m i had the same issue and realized that one of my shocks on one arm was off by one hole from the other arm! talk about a skewed geometry problem.
03-10-2017, 10:33 AM
#6054
IOW, the axle height just gives you a way to lower the ride height without exhausting the available pre-load on the shock springs. It might have other effects, but to my knowledge that's its main purpose.
03-10-2017, 12:33 PM
#6055

That's actually incorrect. In the front end of the car, the axle height is not used to adjust ride height. The spacing of the axle affects suspension geometry from a roll center perspective, and also in terms of bump steer. Raising the axle (more spacers on bottom) will tend to make the car steer a little more aggressively. In the rear of the car, axle height will also affect dogbone plunge, and can be used to free up or tighten up the car. Just like in the front, it is not used for ride height adjustments.
03-10-2017, 10:42 PM
#6057
Tech Addict
iTrader: (15)
Update.. couldn't figure out why one side camber is greater than the other. I will continue to try and reassess.
On a side note. racing at med grip clay and made a few changes that really woke this car up from the dead that I just couldn't believe was happening:
Narrow track, 3* toe, 2* anti squat. so 1* pill in (d) and 1* pill in and up (C)
rear hub position "forward"
1 mm bump steer, 1mm ackerman, type 1
shocks: 32 front (ae white), 27 rear (yokomo green)
racing at OCRC. I will create a set up sheet shortly because this car is on rails.
03-11-2017, 07:38 AM
#6058
Update.. couldn't figure out why one side camber is greater than the other. I will continue to try and reassess.
On a side note. racing at med grip clay and made a few changes that really woke this car up from the dead that I just couldn't believe was happening:
Narrow track, 3* toe, 2* anti squat. so 1* pill in (d) and 1* pill in and up (C)
rear hub position "forward"
1 mm bump steer, 1mm ackerman, type 1
shocks: 32 front (ae white), 27 rear (yokomo green)
racing at OCRC. I will create a set up sheet shortly because this car is on rails.
On a side note. racing at med grip clay and made a few changes that really woke this car up from the dead that I just couldn't believe was happening:
Narrow track, 3* toe, 2* anti squat. so 1* pill in (d) and 1* pill in and up (C)
rear hub position "forward"
1 mm bump steer, 1mm ackerman, type 1
shocks: 32 front (ae white), 27 rear (yokomo green)
racing at OCRC. I will create a set up sheet shortly because this car is on rails.
Thanks
03-11-2017, 07:53 AM
#6059
Update.. couldn't figure out why one side camber is greater than the other. I will continue to try and reassess.
On a side note. racing at med grip clay and made a few changes that really woke this car up from the dead that I just couldn't believe was happening:
Narrow track, 3* toe, 2* anti squat. so 1* pill in (d) and 1* pill in and up (C)
rear hub position "forward"
1 mm bump steer, 1mm ackerman, type 1
shocks: 32 front (ae white), 27 rear (yokomo green)
racing at OCRC. I will create a set up sheet shortly because this car is on rails.
On a side note. racing at med grip clay and made a few changes that really woke this car up from the dead that I just couldn't believe was happening:
Narrow track, 3* toe, 2* anti squat. so 1* pill in (d) and 1* pill in and up (C)
rear hub position "forward"
1 mm bump steer, 1mm ackerman, type 1
shocks: 32 front (ae white), 27 rear (yokomo green)
racing at OCRC. I will create a set up sheet shortly because this car is on rails.
Check shock stroke with a caliper if you've exhausted everything else.
03-11-2017, 08:01 AM
#6060
Do you run stock or mod at OCRC? I run stock, so getting a detailed, complete setup would be great, either way. I don't get many chances to get to the track, so when I do, i'd rather be on the track instead of in the pits wrenching and trying to figure out what to do next. I've spent way too much time doing that already. I want to come race there instead of just practicing, but not having the car dialed in is not as fun. Maybe you can also include your radio and esc settings.
Thanks
Thanks