


 649Likes
Team Associated B6 & B6D thread

 06-07-2017, 10:46 AM - Wikipost
|
|||
|
|||


 10-28-2016, 10:33 AM
#4067
Scott,
Are you talking about shimming under the piston to limit the fully extended length of the rear shock?
If so how much you talking about?
Are you talking about shimming under the piston to limit the fully extended length of the rear shock?
If so how much you talking about?
10-28-2016, 10:45 AM
#4068

Best motor screws and allows you to use a 2.5mm ball end.
10-28-2016, 11:14 AM
#4069
tsair, what drove you to settle on a 23 mm ride height? What compound tires are these primes/electrons?
It seems you are in an interesting position going between slicks and treads in the same day. Is there any sort of track prep or maintenance that occurs during the event?
It seems you are in an interesting position going between slicks and treads in the same day. Is there any sort of track prep or maintenance that occurs during the event?
The number doesn't matter, the point is people use a number, and then stick with it regardless of tire change.
Once it gets dusty, or dries out, we have to switch to mini-pins, but the pins are actually digging into the surface a tiny bit (for convenience sake, I'm just going to say 1mm). So the distance from the surface of the dirt to the bottom of your buggy is probably close to the same with the minipins as it is with the slicks (on the hard, tacky surface).
Obviously the surface isn't perfectly flat, the amount the tire digs in, etc. isn't the same, etc. I'm speaking in generalizations.
Just food for thought. Obviously, do whatever makes you feel happy, whatever works best for you and your buggy, just providing alternative thought on the subject. Experiment.
Age is just a number. Just like your ride height.
 10-28-2016, 01:39 PM
#4070
10-28-2016, 03:57 PM
#4071
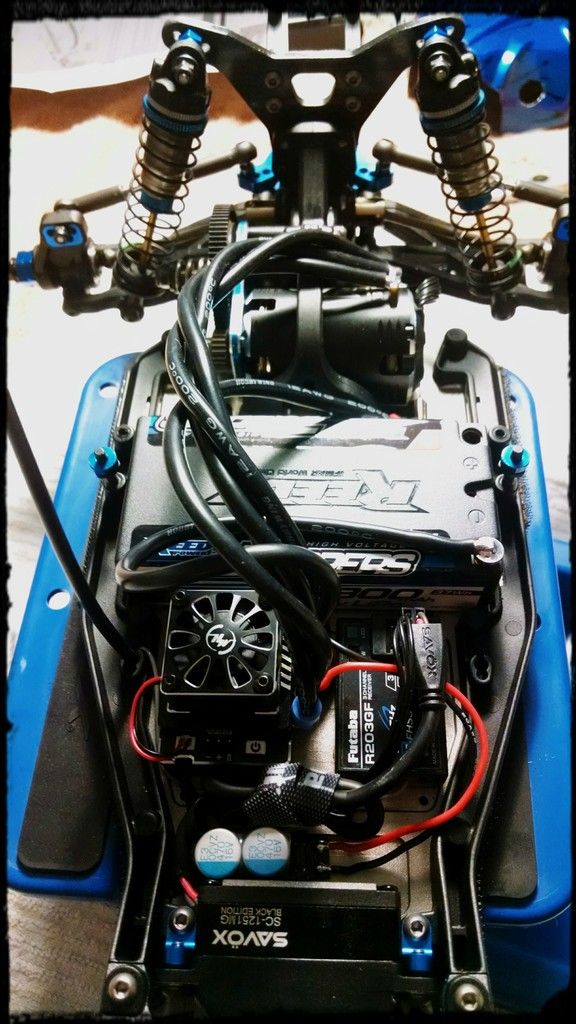
Got my little buggy all wired up this afternoon. I have till this Wednesday to get everything else set up and ready run.. wheels, radio settings, adjustments and weight balancing these next few days...
Looking forward to my first run with this scale at my track.
Looking forward to my first run with this scale at my track.
10-28-2016, 04:51 PM
#4072
Tech Rookie
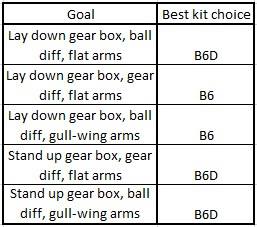
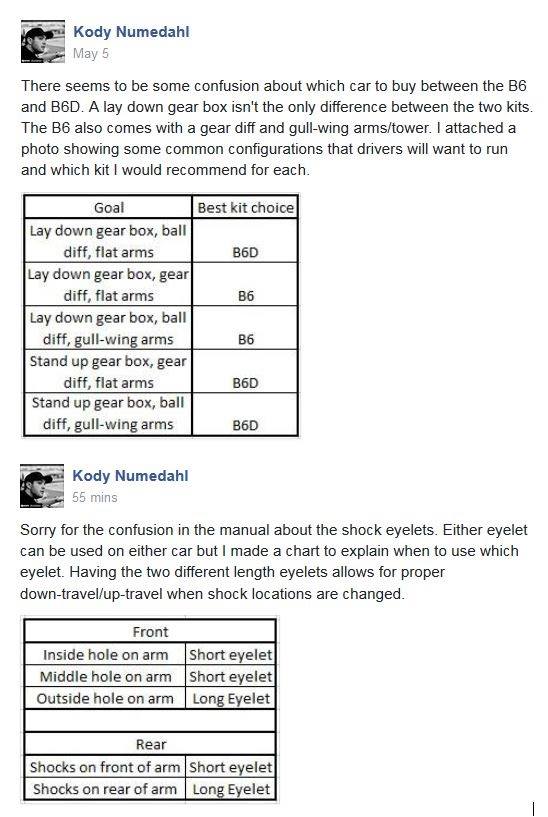
if I want to convert a b6d to a b6 all I have to do is get the gullwing arms, wide shock tower, gear diff, laydown trans, and mount the shocks with the short eyelets on the front of the arm. Correct?
10-28-2016, 09:12 PM
#4074
The C-block inserts are also different. Springs/oils are also completely different if you don't already have some you are planning on using.
10-28-2016, 10:42 PM
#4075
Front axle height shims are different as well. My B6 kit would not allow me to adjust my axle for the dirt setup I was after so I'm assuming it's the same the otherr way. Just a small detail. Ae sells the shim kit to get more adjustment as does schelle and maybe some other companies.
10-29-2016, 03:38 AM
#4076
Tech Adept
I would recommend shortening the negative (-) wire to the battery so you cannot accidentally plug it in to the positive. That's such a nice speedy I would hate for it to ever go up in smoke.
Only speaking from personal experience.
10-29-2016, 03:51 AM
#4077
Thanks man... I'll be paying attention to that detail for sure.
10-29-2016, 06:14 AM
#4078
I was thinking the same thing about shortening the battery leads also from experience. Smoked an LRP back in the day by doing that, in my defense it was on a 22 1.0 with the esc in the stock location and it was very easy to do that even with the wiring being as short as possible. I have been very happy with that servo I bought two more for my other rigs and have that speedo for my B6 as well since I am very happy with the v3.1 in my b5m.
10-29-2016, 05:32 PM
#4079
http://www.lunsfordracing.com/mm5/me...ory_Code=MOTOR
Best motor screws and allows you to use a 2.5mm ball end.
Best motor screws and allows you to use a 2.5mm ball end.
10-29-2016, 09:33 PM
#4080
what would be the benefit of running TLR 22 3. rear hubs on the b6