Go Back  R/C Tech Forums > General Forums > Electric Off-Road
Team Associated B6 & B6D thread >

Team Associated B6 & B6D thread

Community
Wiki Posts
Search
Like Tree649Likes

Team Associated B6 & B6D thread

    Hide Wikipost
Old 06-07-2017, 10:46 AM   -   Wikipost
R/C Tech ForumsThread Wiki: Team Associated B6 & B6D thread
Please read: This is a community-maintained wiki post containing the most important information from this thread. You may edit the Wiki once you have been a member for 90 days and have made 90 posts.
 
Last edit by: RCBuddha
Welcome to the B6 Wiki!

Quick links to all the sections on the first page!

Frequently asked questions - the most common questions you may have answered here!

Aftermarket Parts - parts for the B6 and B6D

Tech Tutorials- tuning guides, ball diff and shock building videos and tutorials

How to's and build-specific posts

Team Associated Laydown transmission conversion for B6D:
Laydown conversion

Instruction Manuals:

B6: B6 Manual and setup sheets

B6D: B6D Manual and setup sheets

How to Sand and Seal carbon fiber:
Sanding and sealing carbon fiber
Sanding and sealing carbon fiber 2
Sanding and sealing carbon fiber 3
Sanding and sealing carbon fiber 4

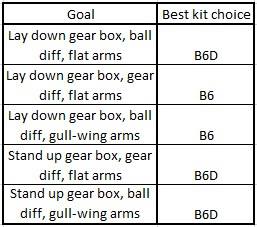
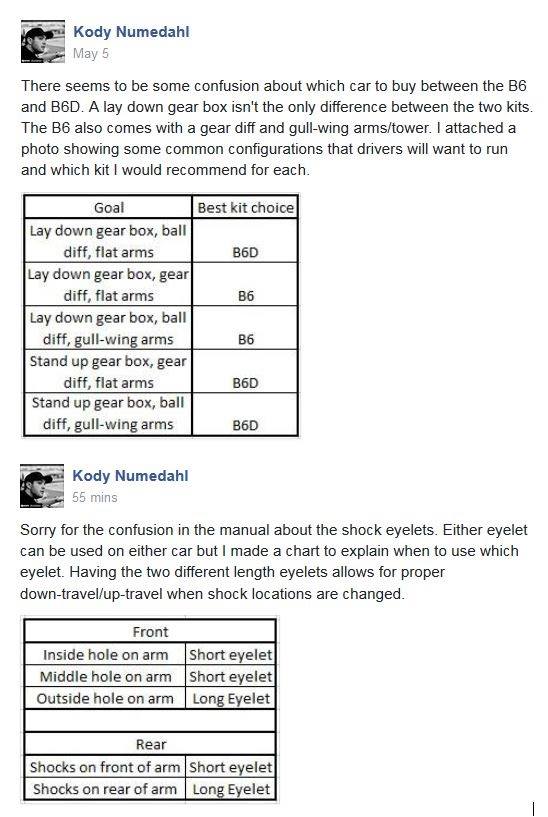
Charts for Quick reference:


1) put inner bearing in hub
2) slide large shim over axle all the way up to the back of the axle
3) slide axle/bone into hub carrier
4) slide small shim onto axle through hub carrier
5) push outter bearing into hub carrier

using that i'm able to put my normal male silverback gorilla wheel nut tightening job and there's no binding. in the pictures that come with the shims (the pic socket posted) it seems like they want you to slide both shims onto the axle before sliding the axle into the hub carrier and like i said, that doesn't work.


I've traditionally done the diff screw head on the left side (driver's side), but have since switched to the Right side (passenger side) regardless of transmission type (3 gear RM vs 3 gear MM and 4 gear MM).

Kdub (Kurt Wenger, former AE designer) had this to say on the matter:

Originally Posted by kdub
I think I count as an authority on the matter. I always run my diff screw on the right side (when sitting "inside" the car). I take off the tire and pull the outer hinge pin to get to the adjustment screw.

The right rear is the way the AE manuals state (or used to state). It really shouldn't matter since you go around turns both left and right.
B6D 3-gear:

Print Wikipost

Thread Tools
 
Search this Thread
 
Old 01-28-2017, 01:32 PM
  #5446  
Tech Fanatic
iTrader: (19)
 
Join Date: May 2005
Location: Riverside, CA
Posts: 887
Trader Rating: 19 (100%+)
Default

Weasely, are you using the short stack reedy 17.5 (#269) or the regular 17.5 (#254)? If you're using the short stacks version, swap the rotor for the 12.5 rotor #273. Since technically the short stack version is for pan car so they put the rpm rotor in it. Try that and 40-45 degrees of timing and about 69-29/30 to start.
Chris Brown is offline  
Old 01-28-2017, 01:49 PM
  #5447  
Tech Apprentice
 
Join Date: Mar 2016
Posts: 62
Default

Dumb question. Does the Speed Secrets cut diff gear require shims?
Bomba is offline  
Old 01-28-2017, 02:14 PM
  #5448  
Tech Fanatic
iTrader: (19)
 
Join Date: May 2005
Location: Riverside, CA
Posts: 887
Trader Rating: 19 (100%+)
Default

No. The diff is held together and the spacing is handled by the outdrives. The idler gear is shavedoing down at the gear but hole where the idler shafts goes is fully in tact.
Chris Brown is offline  
Old 01-28-2017, 03:07 PM
  #5449  
Tech Apprentice
 
Join Date: Mar 2016
Posts: 62
Default

Thanks.
Bomba is offline  
Old 01-28-2017, 06:51 PM
  #5450  
Tech Adept
 
Azzkikin's Avatar
 
Join Date: Apr 2016
Posts: 178
Default

I figured I'd just give my 2 cents on my Reedy motor. I have the M3 17.5 1s with the 272 rotor and I run a 69 spur with 28 or 29. I get great pull down the straights and out of the corners. The 1s is meant to run a higher rpm than the normal 17.5. I don't set the timing by degs, I use the amps and sound of the rpm range. My current track has about 150ft straight and doubles just around corners. Once you find what the motor likes, it's badass.
Azzkikin is offline  
Old 01-28-2017, 09:47 PM
  #5451  
Tech Master
iTrader: (5)
 
Join Date: Dec 2015
Location: San Jose CA
Posts: 1,231
Trader Rating: 5 (100%+)
Default

Originally Posted by Weasely
This is interesting!
I'd like to add my own observations; I'm still getting my head around motors and gearing voodoo for 17.5, so sorry for being long winded.

I have struggled to get the kind of performance out of a reedy 17.5 that other people seem to suggest they are capable of.
(I also run at NorCal, having been to only one practice session on the new track and that double is a buggy-buster!)
I also run a B6 at Norcal, but with the Team Powers motors. FYI, I geared down 2 teeth for the last track ( triple in the middle ) and use the same gearing for the new track with the big double and still have plenty of top end on the straight. Running 69/28 which works out to a FDR of 6.41. You would be 72/29 for a FDR of 6.46.

Most people there are not running a slipper in 17.5, or totally lock out the slipper. Also, I always run a fan on the B6 - you are probably under weight anyways so why not have a $15 fan to protect your motor?
belewis01 is offline  
Old 01-29-2017, 12:28 AM
  #5452  
JAE
Tech Master
iTrader: (30)
 
Join Date: Jun 2015
Posts: 1,974
Trader Rating: 30 (100%+)
Default Removing waterfall

Using the schelle or exotek battery strap WITH turnbuckle and removing the waterfall: does this significantly increase the chance of chassis tweak? I know running no waterfall can, but didn't know if the turnbuckle mitigates the risk.? Thx
JAE is offline  
Old 01-29-2017, 07:27 AM
  #5453  
Tech Fanatic
iTrader: (19)
 
Join Date: May 2005
Location: Riverside, CA
Posts: 887
Trader Rating: 19 (100%+)
Default

I've been running the Exotek battery strap and turnbuckle and haven't noticed any issues. I recently stripped the car down to the chassis as well and checked it. No tweak as of yet. But that's in 17.5 though. I can't speak for mod.
Chris Brown is offline  
Old 01-29-2017, 07:57 AM
  #5454  
Tech Elite
iTrader: (380)
 
Join Date: Aug 2001
Location: NW Indiana
Posts: 4,165
Trader Rating: 380 (99%+)
Default

I just started running the Reedy 17.5 SS with the 273 rotor as well. I did not try the stock rotor, as Nick Waulnet from Associated suggested that I run it with the 273 rotor. I was very happy with the results yesterday. I plan ono putting one in my SC5M as well.
jonski is offline  
Old 01-29-2017, 12:23 PM
  #5455  
Tech Addict
iTrader: (15)
 
Join Date: Jul 2015
Location: CostaMesa,CA
Posts: 506
Trader Rating: 15 (100%+)
Default

dont think that waterfall brace does anything at all.... not sure how a bend like that can provide any bracing behavior at all.

Also, does anyone know when we can expect aluminum rear hubs incorporating the use of 67mm dog bones? i am very interested in trying this out.

Last edited by radioctrlhead; 01-29-2017 at 01:18 PM.
radioctrlhead is offline  
Old 01-29-2017, 12:30 PM
  #5456  
Tech Elite
iTrader: (43)
 
Join Date: Mar 2009
Location: Santa Clarita, CA
Posts: 2,906
Trader Rating: 43 (100%+)
Default

Originally Posted by jonski
I just started running the Reedy 17.5 SS with the 273 rotor as well. I did not try the stock rotor, as Nick Waulnet from Associated suggested that I run it with the 273 rotor. I was very happy with the results yesterday. I plan ono putting one in my SC5M as well.
Whats the difference running a stock rotor and the 273 rotor?
Phillip F is offline  
Old 01-29-2017, 12:35 PM
  #5457  
Tech Adept
iTrader: (9)
 
Stealthpilot's Avatar
 
Join Date: Nov 2004
Location: Huntsville
Posts: 233
Trader Rating: 9 (100%+)
Default

Originally Posted by Phillip F
Whats the difference running a stock rotor and the 273 rotor?
A stock 1s rotor is 12.2mm and the 273 rotor is 12.5mm. Bigger rotors have more torque, and smaller rotors have more rpm.
Stealthpilot is offline  
Old 01-29-2017, 01:44 PM
  #5458  
Tech Initiate
 
Join Date: Feb 2016
Location: New Hampshire
Posts: 42
Default

Any of you guys have a problem with the servo horn hitting the bottom side of the top plate? I ended up shaving the bottom of the top plate a bit to making it work. It's worth noting that I'm not using the stock plastic servo....but I've tried two different 25 tooth servo horns....a Losi and an associated and both times I've had to put the shaved top plate back on (I have two....one shaved and one untouched).
Shecki is offline  
Old 01-29-2017, 02:17 PM
  #5459  
Tech Fanatic
iTrader: (3)
 
tsair's Avatar
 
Join Date: Nov 2014
Posts: 979
Trader Rating: 3 (100%+)
Default

Originally Posted by Shecki
Any of you guys have a problem with the servo horn hitting the bottom side of the top plate? I ended up shaving the bottom of the top plate a bit to making it work. It's worth noting that I'm not using the stock plastic servo....but I've tried two different 25 tooth servo horns....a Losi and an associated and both times I've had to put the shaved top plate back on (I have two....one shaved and one untouched).
Yup, it's a common problem. I shave it too. Make sure the steering link is at 90 deg angles everywhere too, both vertically and horizontally.
tsair is offline  
Old 01-29-2017, 04:19 PM
  #5460  
Tech Initiate
iTrader: (2)
 
Weasely's Avatar
 
Join Date: Jun 2005
Location: Sunnyvale, CA
Posts: 41
Trader Rating: 2 (100%+)
Default

Originally Posted by Chris Brown
Weasely, are you using the short stack reedy 17.5 (#269) or the regular 17.5 (#254)? If you're using the short stacks version, swap the rotor for the 12.5 rotor #273. Since technically the short stack version is for pan car so they put the rpm rotor in it. Try that and 40-45 degrees of timing and about 69-29/30 to start.
It's not a short stack.

I need to give it another chance with more timing now that I have a fan mounted, but I'm doubtful it'll do what I hope it will.
Weasely is offline  


Contact Us - Archive - Advertising - Cookie Policy - Privacy Statement - Terms of Service -

Copyright © 2024 MH Sub I, LLC dba Internet Brands. All rights reserved. Use of this site indicates your consent to the Terms of Use.