Go Back  R/C Tech Forums > General Forums > Electric Off-Road
Team Associated B6 & B6D thread >

Team Associated B6 & B6D thread

Community
Wiki Posts
Search
Like Tree649Likes

Team Associated B6 & B6D thread

    Hide Wikipost
Old 06-07-2017, 10:46 AM   -   Wikipost
R/C Tech ForumsThread Wiki: Team Associated B6 & B6D thread
Please read: This is a community-maintained wiki post containing the most important information from this thread. You may edit the Wiki once you have been a member for 90 days and have made 90 posts.
 
Last edit by: RCBuddha
Welcome to the B6 Wiki!

Quick links to all the sections on the first page!

Frequently asked questions - the most common questions you may have answered here!

Aftermarket Parts - parts for the B6 and B6D

Tech Tutorials- tuning guides, ball diff and shock building videos and tutorials

How to's and build-specific posts

Team Associated Laydown transmission conversion for B6D:
Laydown conversion

Instruction Manuals:

B6: B6 Manual and setup sheets

B6D: B6D Manual and setup sheets

How to Sand and Seal carbon fiber:
Sanding and sealing carbon fiber
Sanding and sealing carbon fiber 2
Sanding and sealing carbon fiber 3
Sanding and sealing carbon fiber 4

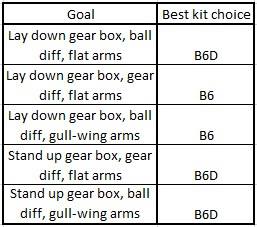
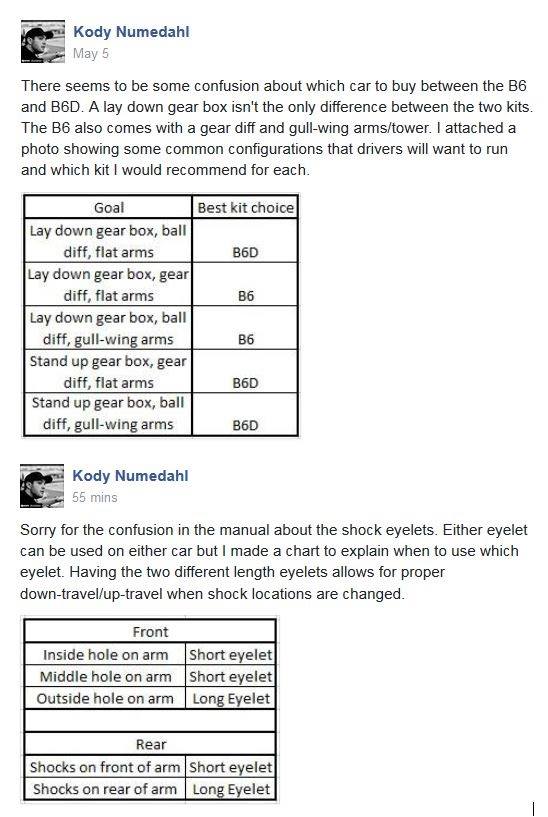
Charts for Quick reference:


1) put inner bearing in hub
2) slide large shim over axle all the way up to the back of the axle
3) slide axle/bone into hub carrier
4) slide small shim onto axle through hub carrier
5) push outter bearing into hub carrier

using that i'm able to put my normal male silverback gorilla wheel nut tightening job and there's no binding. in the pictures that come with the shims (the pic socket posted) it seems like they want you to slide both shims onto the axle before sliding the axle into the hub carrier and like i said, that doesn't work.


I've traditionally done the diff screw head on the left side (driver's side), but have since switched to the Right side (passenger side) regardless of transmission type (3 gear RM vs 3 gear MM and 4 gear MM).

Kdub (Kurt Wenger, former AE designer) had this to say on the matter:

Originally Posted by kdub
I think I count as an authority on the matter. I always run my diff screw on the right side (when sitting "inside" the car). I take off the tire and pull the outer hinge pin to get to the adjustment screw.

The right rear is the way the AE manuals state (or used to state). It really shouldn't matter since you go around turns both left and right.
B6D 3-gear:

Print Wikipost

Thread Tools
 
Search this Thread
 
Old 12-02-2016, 09:07 AM
  #4561  
Tech Regular
iTrader: (7)
 
Join Date: Jan 2013
Posts: 341
Trader Rating: 7 (100%+)
Default

Is everyone doing this mod? Just started my b6d build last night. Caught this on AussieBuilds blog site here

hsp-sandiego is offline  
Old 12-02-2016, 09:12 AM
  #4562  
Tech Initiate
 
ibalderas's Avatar
 
Join Date: Nov 2016
Location: Huntington Beach
Posts: 26
Default

Originally Posted by hsp-sandiego
I am using the Losi servo arm with a Savox with no fitment or rubbing with perfect geometry and the kit setup. Sounds like issues when using the AE Aluminum servo arm.
im using the exotek servo arm NOT AE
ibalderas is offline  
Old 12-02-2016, 10:18 AM
  #4563  
Tech Apprentice
 
Join Date: May 2016
Location: Midwest for now...
Posts: 93
Default

Originally Posted by sport10
Let me save you a little headache. Leave the spacer behind the servo ears and just remove the 2mm spacer behind the ballstud. This is the proper way to fit a savox servo in the B6! You will have fitment problems if you don't have at least one spacer behind the ears. The servo screws without the spacer will hit the plastic posts before the holes for the hold down screws line up. Unless you want to source shorter screws.
This post was right on time as I just purchased a 1258TG...do you remove the 2mm aluminum ball stud washer just for the Savox line of servos, or should it be taken off for all servos to get the servo 2mm forward?
FreeBandz is offline  
Old 12-02-2016, 11:11 AM
  #4564  
Tech Champion
iTrader: (14)
 
Jmuck69's Avatar
 
Join Date: Jan 2010
Location: Atlanta, GA.
Posts: 5,061
Trader Rating: 14 (100%+)
Default

Originally Posted by hsp-sandiego
Is everyone doing this mod? Just started my b6d build last night. Caught this on AussieBuilds blog site here

I have heard this works great if the traction is really high since it takes away forward bite coming out of the turn on power.
Jmuck69 is offline  
Old 12-02-2016, 01:37 PM
  #4565  
Tech Elite
iTrader: (43)
 
Join Date: Mar 2009
Location: Santa Clarita, CA
Posts: 2,906
Trader Rating: 43 (100%+)
Default

Originally Posted by hsp-sandiego
Is everyone doing this mod? Just started my b6d build last night. Caught this on AussieBuilds blog site here

I did it. And it made a little difference. I think you can feel it more if you are running in dirt. I have a b6 and run on clay high bite track.
Phillip F is offline  
Old 12-02-2016, 04:28 PM
  #4566  
Tech Regular
iTrader: (1)
 
stuey's Avatar
 
Join Date: Jan 2006
Posts: 393
Trader Rating: 1 (100%+)
Default

No we are just adjusting the roll centre with the top links axels plus getting the shock correct not seen one top class driver needing to do this
stuey is offline  
Old 12-02-2016, 04:31 PM
  #4567  
Tech Master
 
sport10's Avatar
 
Join Date: Dec 2005
Location: Pensacola, FL
Posts: 1,013
Default

Originally Posted by FreeBandz
This post was right on time as I just purchased a 1258TG...do you remove the 2mm aluminum ball stud washer just for the Savox line of servos, or should it be taken off for all servos to get the servo 2mm forward?
You need to evaluate the alignment for each different servo you use. I am also using a 1258tg servo.
sport10 is offline  
Old 12-02-2016, 06:55 PM
  #4568  
Tech Master
iTrader: (36)
 
Join Date: Apr 2014
Location: Somewhere
Posts: 1,736
Trader Rating: 36 (100%+)
Default

Hi guys i have a question got confused TOE-IN / ANTI-SQUAT pill in manual
BLOCK D mounts (Center DOT) 3º toe -IN and BLOCK C mount (CENTER DOT) 1º Anti-squat
And this is my PILL
BLOCK D mount CENTER DOT 3º and BLOCK C mount 0.5 CENTER-UP what is the total of ANTI-SQUAT?
Can anyone clarify this sorry i can't understand this thanks guys have a great weekends everyone.
raved007 is offline  
Old 12-03-2016, 01:26 AM
  #4569  
Tech Elite
iTrader: (3)
 
aeRayls's Avatar
 
Join Date: Nov 2007
Posts: 2,257
Trader Rating: 3 (100%+)
Default

Originally Posted by raved007
Hi guys i have a question got confused TOE-IN / ANTI-SQUAT pill in manual
BLOCK D mounts (Center DOT) 3º toe -IN and BLOCK C mount (CENTER DOT) 1º Anti-squat
And this is my PILL
BLOCK D mount CENTER DOT 3º and BLOCK C mount 0.5 CENTER-UP what is the total of ANTI-SQUAT?
Can anyone clarify this sorry i can't understand this thanks guys have a great weekends everyone.
You have 3 toe with 1.5 squat

This should be helpful:

https://www.teamassociated.com/pdf/cars_and_trucks/RC10B6D/B6_B6D_Pill-Chart.pdf
aeRayls is offline  
Old 12-03-2016, 03:46 AM
  #4570  
Tech Elite
iTrader: (14)
 
eper's Avatar
 
Join Date: Jan 2010
Location: new milford, CT.
Posts: 2,622
Trader Rating: 14 (100%+)
Default

Originally Posted by Phillip F
I did it. And it made a little difference. I think you can feel it more if you are running in dirt. I have a b6 and run on clay high bite track.
The Kyosho front bulkhead comes with a square spaced that drops right in and is easier then 4 separate spacers. Also I have only been running the .5 and I like that but I haven't tried the 1mm yet. Just a heads up to make assembly easier
eper is offline  
Old 12-03-2016, 04:50 AM
  #4571  
Tech Master
iTrader: (36)
 
Join Date: Apr 2014
Location: Somewhere
Posts: 1,736
Trader Rating: 36 (100%+)
Default

Originally Posted by aeRayls
You have 3 toe with 1.5 squat

This should be helpful:

https://www.teamassociated.com/pdf/c...Pill-Chart.pdf
Thanks for your response
raved007 is offline  
Old 12-03-2016, 06:20 AM
  #4572  
Tech Addict
iTrader: (55)
 
Join Date: Nov 2005
Posts: 724
Trader Rating: 55 (100%+)
Default

Originally Posted by eper
The Kyosho front bulkhead comes with a square spaced that drops right in and is easier then 4 separate spacers. Also I have only been running the .5 and I like that but I haven't tried the 1mm yet. Just a heads up to make assembly easier
I'm sorry, could you clarify...the Kyosho spacer will drop right into the b6d front end? If so, that does seem a lot easier.....would anyone happen to have a P/N? Thanks for the info!!!!
rccars4scott is offline  
Old 12-03-2016, 07:36 AM
  #4573  
R/C Tech Elite Member
iTrader: (112)
 
thecman26's Avatar
 
Join Date: Jul 2006
Location: South Central Kansas
Posts: 8,269
Trader Rating: 112 (100%+)
Default

Originally Posted by rccars4scott
I'm sorry, could you clarify...the Kyosho spacer will drop right into the b6d front end? If so, that does seem a lot easier.....would anyone happen to have a P/N? Thanks for the info!!!!
I think this is it?

https://www.amainhobbies.com/kyosho-...youm502/p13102
thecman26 is offline  
Old 12-03-2016, 09:01 AM
  #4574  
Tech Master
iTrader: (46)
 
jabroni racing's Avatar
 
Join Date: Mar 2005
Location: largo florida
Posts: 1,874
Trader Rating: 46 (100%+)
Default

Question, What does the Differnt size shock Cups do?? To me wouldnt using a thicker one be the same as turning the collar down more(tightening spring & raise ride height) ??
jabroni racing is offline  
Old 12-03-2016, 09:37 AM
  #4575  
Tech Addict
iTrader: (55)
 
Join Date: Nov 2005
Posts: 724
Trader Rating: 55 (100%+)
Default

Thanks a bunch. Ordered.

Originally Posted by thecman26
rccars4scott is offline  


Contact Us - Archive - Advertising - Cookie Policy - Privacy Statement - Terms of Service -

Copyright © 2024 MH Sub I, LLC dba Internet Brands. All rights reserved. Use of this site indicates your consent to the Terms of Use.