Go Back  R/C Tech Forums > General Forums > Electric Off-Road
Team Associated B6 & B6D thread >

Team Associated B6 & B6D thread

Community
Wiki Posts
Search
Like Tree649Likes

Team Associated B6 & B6D thread

    Hide Wikipost
Old 06-07-2017, 10:46 AM   -   Wikipost
R/C Tech ForumsThread Wiki: Team Associated B6 & B6D thread
Please read: This is a community-maintained wiki post containing the most important information from this thread. You may edit the Wiki once you have been a member for 90 days and have made 90 posts.
 
Last edit by: RCBuddha
Welcome to the B6 Wiki!

Quick links to all the sections on the first page!

Frequently asked questions - the most common questions you may have answered here!

Aftermarket Parts - parts for the B6 and B6D

Tech Tutorials- tuning guides, ball diff and shock building videos and tutorials

How to's and build-specific posts

Team Associated Laydown transmission conversion for B6D:
Laydown conversion

Instruction Manuals:

B6: B6 Manual and setup sheets

B6D: B6D Manual and setup sheets

How to Sand and Seal carbon fiber:
Sanding and sealing carbon fiber
Sanding and sealing carbon fiber 2
Sanding and sealing carbon fiber 3
Sanding and sealing carbon fiber 4

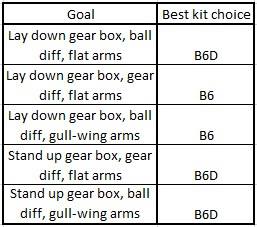
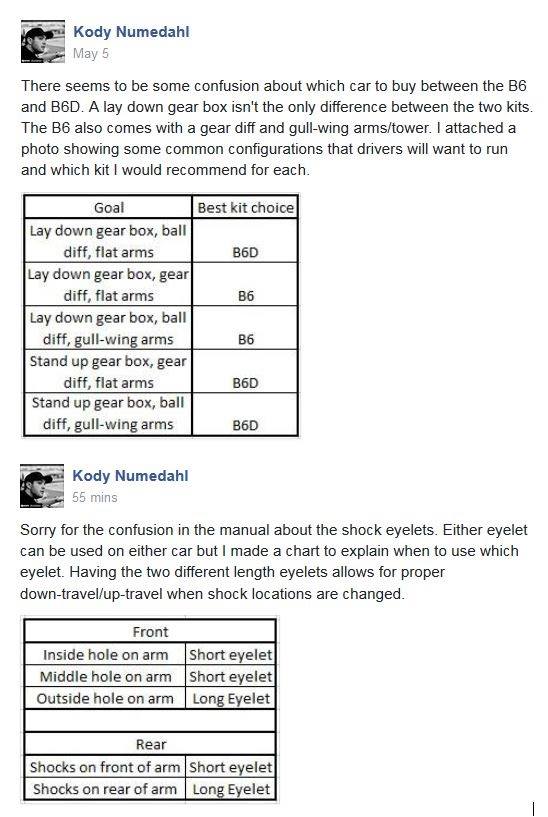
Charts for Quick reference:


1) put inner bearing in hub
2) slide large shim over axle all the way up to the back of the axle
3) slide axle/bone into hub carrier
4) slide small shim onto axle through hub carrier
5) push outter bearing into hub carrier

using that i'm able to put my normal male silverback gorilla wheel nut tightening job and there's no binding. in the pictures that come with the shims (the pic socket posted) it seems like they want you to slide both shims onto the axle before sliding the axle into the hub carrier and like i said, that doesn't work.


I've traditionally done the diff screw head on the left side (driver's side), but have since switched to the Right side (passenger side) regardless of transmission type (3 gear RM vs 3 gear MM and 4 gear MM).

Kdub (Kurt Wenger, former AE designer) had this to say on the matter:

Originally Posted by kdub
I think I count as an authority on the matter. I always run my diff screw on the right side (when sitting "inside" the car). I take off the tire and pull the outer hinge pin to get to the adjustment screw.

The right rear is the way the AE manuals state (or used to state). It really shouldn't matter since you go around turns both left and right.
B6D 3-gear:

Print Wikipost

Thread Tools
 
Search this Thread
 
Old 07-31-2016, 04:40 PM
  #2161  
Tech Elite
iTrader: (43)
 
Join Date: Mar 2009
Location: Santa Clarita, CA
Posts: 2,906
Trader Rating: 43 (100%+)
Default

I hate the nut on the battery strap.... the B5M thumb screw is so much better.
Phillip F is offline  
Old 07-31-2016, 05:21 PM
  #2162  
Tech Apprentice
iTrader: (4)
 
Join Date: Mar 2016
Location: Eastvale, CA
Posts: 91
Trader Rating: 4 (100%+)
Default

Originally Posted by Bforwarned
Have they changed the size of the threads for the battery holder or could you use B5 ones on the battery hold down?
B5's work fine, I switched after the first day.
40yoCaliRacer is offline  
Old 07-31-2016, 05:52 PM
  #2163  
Suspended
iTrader: (61)
 
Join Date: Jan 2011
Posts: 4,121
Trader Rating: 61 (100%+)
Default

Originally Posted by DG Designs
Im assuming you are talking about the transponder? That thing is 13 years old and the wires broke inside the case a long time ago. My soldering skills are just fine. Do i know you? Comments like that usually only come from friends.

Those motor wires look odd to me. Could be just the picture.
Socket is offline  
Old 07-31-2016, 07:23 PM
  #2164  
Tech Addict
iTrader: (15)
 
awidz's Avatar
 
Join Date: Nov 2008
Posts: 506
Trader Rating: 15 (100%+)
Default

Originally Posted by Wildcat1971
rivkin's cars with a tekin motor?
No with the fan mounted like this pic
awidz is offline  
Old 07-31-2016, 08:02 PM
  #2165  
Tech Master
iTrader: (67)
 
BRSracing's Avatar
 
Join Date: Mar 2011
Location: Blue Springs MO
Posts: 1,945
Trader Rating: 67 (100%+)
Default

Originally Posted by BruceR.
Well, finally got the electronics in. Having trouble binding the receiver to the transmitter, but I'll tackle that tomorrow.
with my futaba and reedy 1000z i had to reverse the esc servo setting on the radio to calibrate it.
BRSracing is offline  
Old 07-31-2016, 08:19 PM
  #2166  
Tech Prophet
iTrader: (84)
 
Wildcat1971's Avatar
 
Join Date: Apr 2012
Location: Arizona
Posts: 17,388
Trader Rating: 84 (100%+)
Default

Originally Posted by BRSracing
with my futaba and reedy 1000z i had to reverse the esc servo setting on the radio to calibrate it.
always cracks me up with the weirdness of the futaba. I loved them back in the 80s and early 90s....
Wildcat1971 is offline  
Old 07-31-2016, 08:22 PM
  #2167  
Tech Master
iTrader: (21)
 
suby723's Avatar
 
Join Date: May 2011
Location: Spring Hill Tennessee
Posts: 1,378
Trader Rating: 21 (100%+)
Default

Originally Posted by Wildcat1971
always cracks me up with the weirdness of the futaba. I loved them back in the 80s and early 90s....
#airtronics/Sanwa
suby723 is offline  
Old 07-31-2016, 08:28 PM
  #2168  
Tech Elite
iTrader: (14)
 
Join Date: Jul 2008
Location: SoCal
Posts: 2,162
Trader Rating: 14 (100%+)
Default

Ive never messed with 3 hole pistons. Am i understanding it correct that 2x1.7 will have less high speed compression the 3x1.4. My car feels really good with 27.5 and 2x1.7 other than the chassis slaps a little. Would the 3x1.4 help this but still be fairly soft in the corners?
DG Designs is offline  
Old 07-31-2016, 08:32 PM
  #2169  
Tech Regular
 
Join Date: Jan 2015
Location: Franklin, TN
Posts: 349
Default

Originally Posted by BRSracing
with my futaba and reedy 1000z i had to reverse the esc servo setting on the radio to calibrate it.
Took me a bit to figure it out. Had to change rx mode then turn radio off and back on to bind them. Then, had to reverse both throttle and steering. Other than that, it's all good. My only complaint is that with servo trim set 0, there's no way to put the servo horn on at 90 degrees. So my trim is always off by quite a bit. No big as long as I remember to set my endpoints properly.
BruceR. is offline  
Old 07-31-2016, 11:38 PM
  #2170  
Tech Adept
 
avaldes's Avatar
 
Join Date: Oct 2015
Posts: 165
Default

Use your subtrim in the radio to center the servo. That will allow you to keep the full range of your trim tab.

It's not unusual for JR/Sanwa/Futaba to have different servo directions. Servo reversing has been standard practice for a LONG time.
avaldes is offline  
Old 07-31-2016, 11:39 PM
  #2171  
Tech Elite
iTrader: (43)
 
Join Date: Mar 2009
Location: Santa Clarita, CA
Posts: 2,906
Trader Rating: 43 (100%+)
Default

Originally Posted by BruceR.
Took me a bit to figure it out. Had to change rx mode then turn radio off and back on to bind them. Then, had to reverse both throttle and steering. Other than that, it's all good. My only complaint is that with servo trim set 0, there's no way to put the servo horn on at 90 degrees. So my trim is always off by quite a bit. No big as long as I remember to set my endpoints properly.
You can adjust using subtrim while setting your trim at 0... Then fine tune using trim.
Phillip F is offline  
Old 08-01-2016, 05:07 AM
  #2172  
Tech Rookie
 
Jeremy Otis1's Avatar
 
Join Date: Jan 2008
Posts: 3
Default

Originally Posted by Silverstonev8
I still have mine
Awesome! I believe that charger was called the Reflex? I had the model before that was red with a yellow heat sink. You had to adjust the charge rate with a screw driver. I couldn't afford a power supply so I would use a 12 volt car battery. I ran 1200 Sanyo SC's
Jeremy Otis1 is offline  
Old 08-01-2016, 05:27 AM
  #2173  
Tech Regular
 
Join Date: Jan 2015
Location: Franklin, TN
Posts: 349
Default

Thanks for the tips on using the steering subtrim and setting the trim to 0. So many adjustments on radios these days....the 4PLS is my first 'real' radio since my old Tower Hobbies radio that came with my T3. Off to the Futaba thread.
BruceR. is offline  
Old 08-01-2016, 06:19 AM
  #2174  
Tech Master
iTrader: (67)
 
BRSracing's Avatar
 
Join Date: Mar 2011
Location: Blue Springs MO
Posts: 1,945
Trader Rating: 67 (100%+)
Default

Originally Posted by suby723
#airtronics/Sanwa
I had a M12 like my Futaba 4px much better.
BRSracing is offline  
Old 08-01-2016, 10:00 AM
  #2175  
Tech Rookie
 
Join Date: Jun 2016
Posts: 12
Default

Originally Posted by BruceR.
Took me a bit to figure it out. Had to change rx mode then turn radio off and back on to bind them. Then, had to reverse both throttle and steering. Other than that, it's all good. My only complaint is that with servo trim set 0, there's no way to put the servo horn on at 90 degrees. So my trim is always off by quite a bit. No big as long as I remember to set my endpoints properly.
I had the same problem and now wondering if I did the wrong thing: I left the horn off 90* and lengthened the steering link to 3mm (making sure to center the washers on the link) and left trim at 0... I have a lower end futaba and dont have "sub-trim". My reasoning is that I will still have the same throw in both directions without having to alter EPA's asymmetrically. The toe was dead 0* with the steering turnbuckles at kit length... Anyone care to comment on my strategy?

EDIT: YES, I left the horn leaning towards "passenger side" to accommodate the longer steering link length.
stevewolfie159 is offline  


Contact Us - Archive - Advertising - Cookie Policy - Privacy Statement - Terms of Service -

Copyright © 2024 MH Sub I, LLC dba Internet Brands. All rights reserved. Use of this site indicates your consent to the Terms of Use.