


 333Likes
Xray XB2 2WD Buggy Thread

 05-04-2019, 06:44 PM - Wikipost
|
|||
|
|||
 01-20-2016, 04:28 PM
#1126
Thanks for all the comments on the weight I made  . At the moment I'm still testing it but I could make some of to sell maybe lighter version...
I tried it Tuesday evening and wasn't overwhelmed by it...
The track is medium-lowish carpet and medium sized.
pro's:
+The rear was a bit more planted, it didn't let go easily on slow and tight corners.
+acceleration was a bit more stable.
Con's:
-The rear rolled a bit more so in fast turns the car flipped over more easily.
-Braking took a bit more distance. I really didn't like that.
-The inertia in fast chicanes made the rear of the car lazier.
I made today some 1mm thick steel plate 50g (equivalent to the team setup) to test the weight distribution and compare it :

I'll try next club meeting (tuesday) the difference between the team setup 50g weight and that one in how it drives.
Maybe I'll give a go at a lighter one, any idea what should I aim for ? 30-40g ? I've got time to make another one on friday possibly monday on my spare time.
Jonathan
. At the moment I'm still testing it but I could make some of to sell maybe lighter version...I tried it Tuesday evening and wasn't overwhelmed by it...
The track is medium-lowish carpet and medium sized.
pro's:
+The rear was a bit more planted, it didn't let go easily on slow and tight corners.
+acceleration was a bit more stable.
Con's:
-The rear rolled a bit more so in fast turns the car flipped over more easily.
-Braking took a bit more distance. I really didn't like that.
-The inertia in fast chicanes made the rear of the car lazier.
I made today some 1mm thick steel plate 50g (equivalent to the team setup) to test the weight distribution and compare it :

I'll try next club meeting (tuesday) the difference between the team setup 50g weight and that one in how it drives.
Maybe I'll give a go at a lighter one, any idea what should I aim for ? 30-40g ? I've got time to make another one on friday possibly monday on my spare time.
Jonathan
 01-20-2016, 04:32 PM
#1127

Thanks for all the comments on the weight I made . At the moment I'm still testing it but I could make some of to sell maybe lighter version...
I tried it Tuesday evening and wasn't overwhelmed by it...
The track is medium-lowish carpet and medium sized.
pro's:
+The rear was a bit more planted, it didn't let go easily on slow and tight corners.
+acceleration was a bit more stable.
Con's:
-The rear rolled a bit more so in fast turns the car flipped over more easily.
-Braking took a bit more distance. I really didn't like that.
-The inertia in fast chicanes made the rear of the car lazier.
I made today some 1mm thick steel plate 50g (equivalent to the team setup) to test the weight distribution and compare it :
I'll try next club meeting (tuesday) the difference between the team setup 50g weight and that one in how it drives.
Maybe I'll give a go at a lighter one, any idea what should I aim for ? 30-40g ? I've got time to make another one on friday possibly monday on my spare time.
Jonathan
. At the moment I'm still testing it but I could make some of to sell maybe lighter version...I tried it Tuesday evening and wasn't overwhelmed by it...
The track is medium-lowish carpet and medium sized.
pro's:
+The rear was a bit more planted, it didn't let go easily on slow and tight corners.
+acceleration was a bit more stable.
Con's:
-The rear rolled a bit more so in fast turns the car flipped over more easily.
-Braking took a bit more distance. I really didn't like that.
-The inertia in fast chicanes made the rear of the car lazier.
I made today some 1mm thick steel plate 50g (equivalent to the team setup) to test the weight distribution and compare it :
I'll try next club meeting (tuesday) the difference between the team setup 50g weight and that one in how it drives.
Maybe I'll give a go at a lighter one, any idea what should I aim for ? 30-40g ? I've got time to make another one on friday possibly monday on my spare time.
Jonathan
01-20-2016, 04:32 PM
#1128
Tech Rookie
Ok, so when we talk about the front needing to be -0.75, I guess that is from a starting point of 0.00 which is what comes stock in the kit? Again for AE wheel offset....!
01-20-2016, 05:05 PM
#1129
Could anyone suggest a high bite setup?
01-20-2016, 05:22 PM
#1130
01-20-2016, 06:14 PM
#1131
i have just finished bag 4 on my build. i can say without a doubt, this is the best build i have ever built to date so far.
im taking my time on it because the weather has been terrible and i dont want to finish it and just look at it
im taking my time on it because the weather has been terrible and i dont want to finish it and just look at it
01-20-2016, 06:54 PM
#1132
I was wondering how the ball diff is going for everyone? Just curious on how long the diff rings and the diff balls will last before they need to be replaced.
01-20-2016, 11:44 PM
#1133
 01-21-2016, 02:16 AM
#1134
Tech Master
iTrader: (15)
I run the Malin EOS setup with the differences being no brass bulkhead and a 25g under lipo weight vs the 50g. The rear end of the buggy is absolutely locked in. I had a bit of push on high speed corners but I attribute that to the wrong front tyres (slightly worn stagger rib vs the normal LP cut stagger) The car just went wherever I put it.
Personally I will not be straying too far from this setup as it is a great compromise of grip and rotation.
This was on medium grip carpet.
Personally I will not be straying too far from this setup as it is a great compromise of grip and rotation.
This was on medium grip carpet.
01-21-2016, 04:44 AM
#1135
01-21-2016, 04:59 AM
#1136
I've just proof read the new break-in instructions and setup guide for the ball diff and slipper clutch I had Xray make for the Dirt Edition manual.
Can't share it yet, but it will have short to the point instructions with superb illustrations explaining how to do it the way I've done it personally since the 90's
And hopefully it will be very easy to understand and of great help to those with not so much experience from ball diffs.
Dirt Edition release coming sooooooon

Bent
01-21-2016, 07:02 AM
#1139
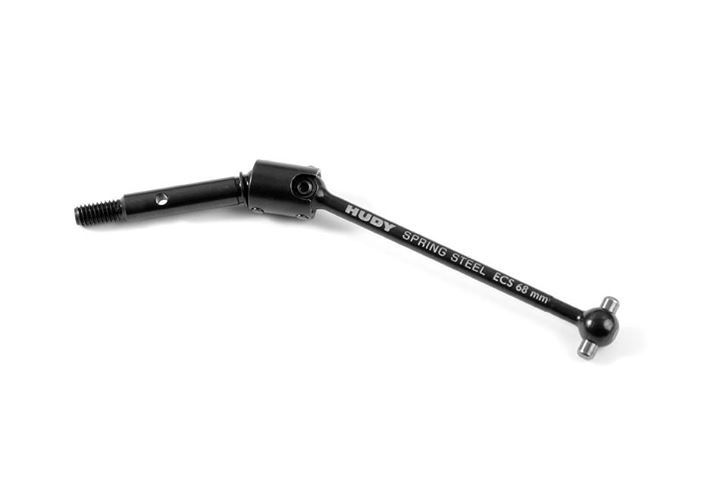
XB4 ECS Drive Shafts
� Decreases vibration
� Improves stability
� Increases steering
� Improves cornering speed
� Improves traction on rear suspension
� Improves landing after jumps
� Easier to drive
The unique XRAY ECS Drive Shaft equalizes the speed between the drive shaft and the wheel. With a unique 2-piece joint between the axle and the wheel, the same extreme wheel turning angle is divided into two shallower angles without joint binding. This means that at the same cornering speed, the inner wheel will not bind or vibrate. Drive through the corner is more stable, more precise, and easier to drive. When used in rear the ECS drive shafts help to improve traction as well. The ECS Drive Shafts help also with improved landing after jumps.
With the ECS drive shafts, wheel vibrations and noise are decreased to minimum, steering is increased, stability of the car is increased and cornering speed and smoothness are noticeably increased as well. A must have option part.
#365200 ECS Front Drive Shaft 81mm - HUDY Spring Steel� (fits XB4)
#365300 ECS Rear Drive Shaft 68mm - HUDY Spring Steel� (fits XB4 & XB2)
http://bit.ly/1JkkL3B


Bent
01-21-2016, 07:37 AM
#1140
Bent, when you build your gear diffs, do you align the notches for the pin, or do you clock them 180deg from each other? I am referring to the molded bump on the case for the drive pins. Does this make sense?