


 219Likes
Tekno RC SCT410.3 Thread

 09-05-2022, 08:19 AM - Wikipost
|
|||
|
|||


 03-07-2016, 03:20 AM
#3166
Tech Initiate
anyone have an idiots guide to using the pills in the back of the truck to adjust antisquat and toe in? i have a load of pills but cant find a guide as to what pills do what? any help appreciated
 03-07-2016, 05:31 AM
#3167
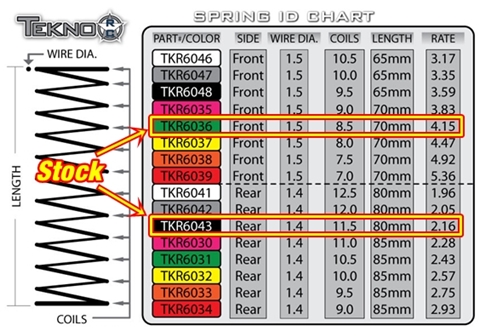
So, if you look at a setup sheet. One dot is a a full 1 degree change. Two dots are .5 change. If you are using the composite C and D blocks. The center hole on C gives you 3 degrees of antisquat and center dot on D would give you 3 toe. So if you were to do 1 dot straight down on C and 1 dot straight right on D you would have 2 degrees of antisquat and 4 degrees of toe. ( all in the center position). Where it gets fun. You can play with the LRC and lower the whole roll center by moving the dots to the corners. I don't have the exact degrees yet but when you put the dots in the corners according to the setup sheets you could lower the rollcenter of the whole rear by 1 degree and still maintain a 3 degree of toe.
03-07-2016, 06:50 AM
#3168
Tech Initiate
yep thats whats throwing me... you can orientate the pills any way up/down etc etc and in the instructions is only explains the orientation of the pills for the stock setup ... but im trying to get to 1 degree anti squat and stock toe in ( which i think is 3 degrees ) using the composite blocks I have.
So, if you look at a setup sheet. One dot is a a full 1 degree change. Two dots are .5 change. If you are using the composite C and D blocks. The center hole on C gives you 3 degrees of antisquat and center dot on D would give you 3 toe. So if you were to do 1 dot straight down on C and 1 dot straight right on D you would have 2 degrees of antisquat and 4 degrees of toe. ( all in the center position). Where it gets fun. You can play with the LRC and lower the whole roll center by moving the dots to the corners. I don't have the exact degrees yet but when you put the dots in the corners according to the setup sheets you could lower the rollcenter of the whole rear by 1 degree and still maintain a 3 degree of toe.
03-07-2016, 08:38 AM
#3169
yep thats whats throwing me... you can orientate the pills any way up/down etc etc and in the instructions is only explains the orientation of the pills for the stock setup ... but im trying to get to 1 degree anti squat and stock toe in ( which i think is 3 degrees ) using the composite blocks I have.
03-07-2016, 09:03 AM
#3170
Tech Initiate
all the way down...... as in I use a pill that shows a single dot in the centre bottom of it? and then when looking at the back of the C block i would be able to see the dot at the bottom? sorry im a bit thick when it comes to these things!
03-07-2016, 09:58 AM
#3171
Anyone tried the Tacon 4800kv 550 sized sensored 4pole motor in the SCT410.3? If so what are your thought.. Seems ok, but going to the track today.. $50 motor had to try it.. ESC is a Hobbywing SCT PRO. Please thet me know any personal experiences..
http://www.ebay.com/itm/HOBBYWING-Xe...EAAOSwrx5UU5Xv
http://www.hobbypartz.com/96m921-sen...66-kv4800.html
http://www.ebay.com/itm/HOBBYWING-Xe...EAAOSwrx5UU5Xv
http://www.hobbypartz.com/96m921-sen...66-kv4800.html
03-07-2016, 12:31 PM
#3173
Yes put the insert in the C block exactly how it shows in the manual. Then on the D block instead of having the dot in the lower inside corners like stock you want it in the upper inside corners, or use the same insert as the C block just turned over so the dot is middle top for 3 degrees toe.
03-07-2016, 12:33 PM
#3174
Tech Initiate
right perfect thank you im on it!
Yes put the insert in the C block exactly how it shows in the manual. Then on the D block instead of having the dot in the lower inside corners like stock you want it in the upper inside corners, or use the same insert as the C block just turned over so the dot is middle top for 3 degrees toe.
03-07-2016, 08:10 PM
#3175
Tekin Pro4 4600KV came in the mail today I picked up on the forums here! And then I raced to Hangar 18 rc shop in Cary, NC to grab a RX8 Gen2 for $199.00.
This was going to be a budget build but. It just does not work out like that in this hobby. I've got right at $1,000 invested so far. that includes truck, esc, motor, radio, (1) battery, cheap charger, tires, wheels, body. And I'm not done . If my wife only knew.
Tekin could have it least thrown in a sensor wire, nor the motor or rx8 came with one lol.
It's almost ready though! After I get some solder tomorrow , I will get to test out all of my hard work, and the wore out finger tips have paid off.
Is 12 gauge wire enough? Or should I use a bigger gauge?

Last edited by tps3443; 03-07-2016 at 09:46 PM.
03-08-2016, 03:20 AM
#3176
Tech Initiate
i run 12 awg , i would match it to what ever guage is coming out of your battery which im guessing is 12 awg anyway that way everything is the same
i used to use 10 awg but it was a pain to solder , needed a better soldering iron and the cables were more of a fiddle to fit on the gold posts neatly.
i used to use 10 awg but it was a pain to solder , needed a better soldering iron and the cables were more of a fiddle to fit on the gold posts neatly.
Tekin Pro4 4600KV came in the mail today I picked up on the forums here! And then I raced to Hangar 18 rc shop in Cary, NC to grab a RX8 Gen2 for $199.00.
This was going to be a budget build but. It just does not work out like that in this hobby. I've got right at $1,000 invested so far. that includes truck, esc, motor, radio, (1) battery, cheap charger, tires, wheels, body. And I'm not done . If my wife only knew.
Tekin could have it least thrown in a sensor wire, nor the motor or rx8 came with one lol.
It's almost ready though! After I get some solder tomorrow , I will get to test out all of my hard work, and the wore out finger tips have paid off.
Is 12 gauge wire enough? Or should I use a bigger gauge?
This was going to be a budget build but. It just does not work out like that in this hobby. I've got right at $1,000 invested so far. that includes truck, esc, motor, radio, (1) battery, cheap charger, tires, wheels, body. And I'm not done . If my wife only knew.
Tekin could have it least thrown in a sensor wire, nor the motor or rx8 came with one lol.
It's almost ready though! After I get some solder tomorrow , I will get to test out all of my hard work, and the wore out finger tips have paid off.
Is 12 gauge wire enough? Or should I use a bigger gauge?
03-08-2016, 03:40 AM
#3177
i run 12 awg , i would match it to what ever guage is coming out of your battery which im guessing is 12 awg anyway that way everything is the same
i used to use 10 awg but it was a pain to solder , needed a better soldering iron and the cables were more of a fiddle to fit on the gold posts neatly.
i used to use 10 awg but it was a pain to solder , needed a better soldering iron and the cables were more of a fiddle to fit on the gold posts neatly.
Flite-test has the perfect demo on this, but it also works with a large wire against a solid post to, just a slightly different initial approach.
Wire Wrap Solder Method
03-08-2016, 03:48 AM
#3178
Tech Regular

Good vid though
03-08-2016, 04:04 AM
#3179
Tekin Pro4 4600KV came in the mail today I picked up on the forums here! And then I raced to Hangar 18 rc shop in Cary, NC to grab a RX8 Gen2 for $199.00.
This was going to be a budget build but. It just does not work out like that in this hobby. I've got right at $1,000 invested so far. that includes truck, esc, motor, radio, (1) battery, cheap charger, tires, wheels, body. And I'm not done . If my wife only knew.
Tekin could have it least thrown in a sensor wire, nor the motor or rx8 came with one lol.
It's almost ready though! After I get some solder tomorrow , I will get to test out all of my hard work, and the wore out finger tips have paid off.
Is 12 gauge wire enough? Or should I use a bigger gauge?
This was going to be a budget build but. It just does not work out like that in this hobby. I've got right at $1,000 invested so far. that includes truck, esc, motor, radio, (1) battery, cheap charger, tires, wheels, body. And I'm not done . If my wife only knew.
Tekin could have it least thrown in a sensor wire, nor the motor or rx8 came with one lol.
It's almost ready though! After I get some solder tomorrow , I will get to test out all of my hard work, and the wore out finger tips have paid off.
Is 12 gauge wire enough? Or should I use a bigger gauge?
12g wire is plenty. Many like larger gauge but Tekin has said publicly that 12g is more than enough for 1/8 scale applications. I have used the stock Tekin wire that comes with the ESC but I like Deans Wet Noodle or similar.
03-08-2016, 04:08 AM
#3180
Tech Initiate
ah cool will take a look cheers
It's not hard to solder large wires at all if you use the wire wrap method for soldering things together.
Flite-test has the perfect demo on this, but it also works with a large wire against a solid post to, just a slightly different initial approach.
Wire Wrap Solder Method
Flite-test has the perfect demo on this, but it also works with a large wire against a solid post to, just a slightly different initial approach.
Wire Wrap Solder Method
