


 219Likes
Tekno RC SCT410.3 Thread

 09-05-2022, 08:19 AM - Wikipost
|
|||
|
|||


 03-17-2015, 04:41 PM
#1
Constantly updating this post to give the most accurate information.
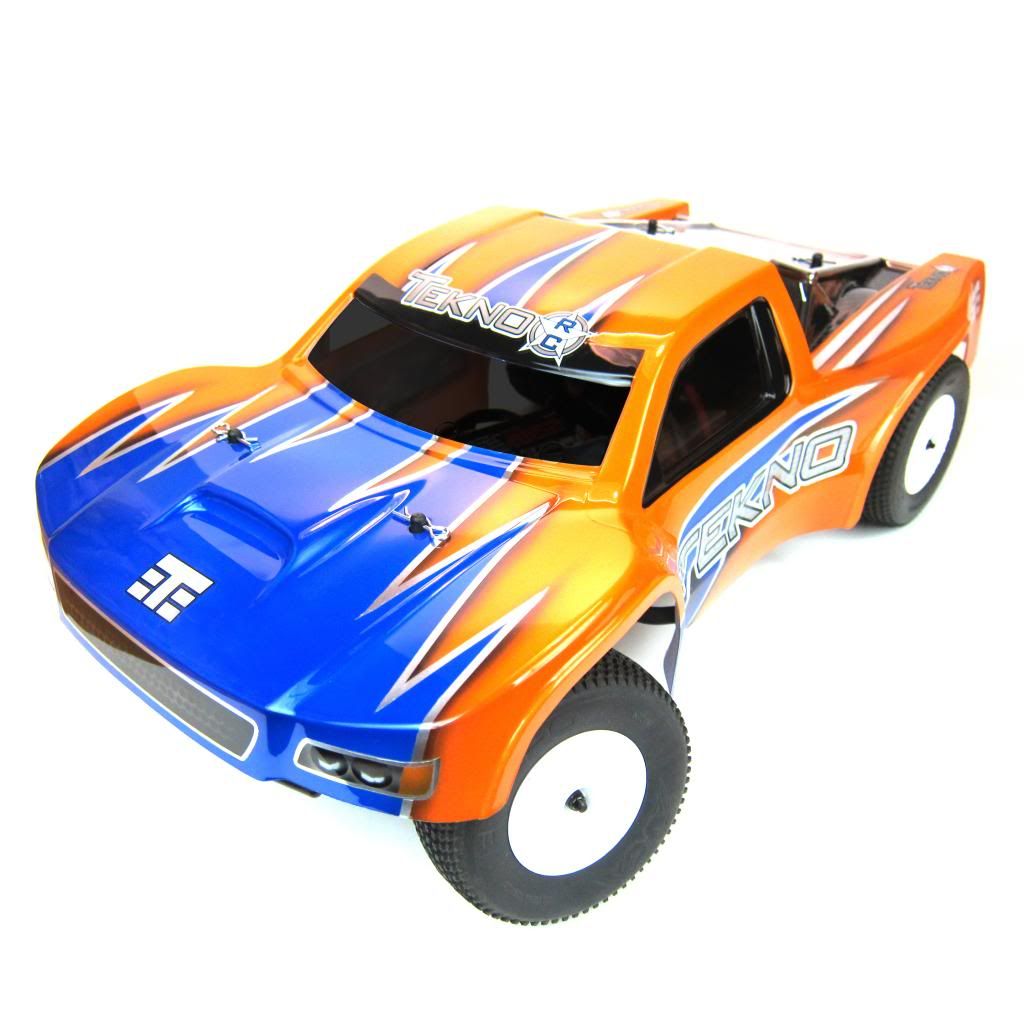
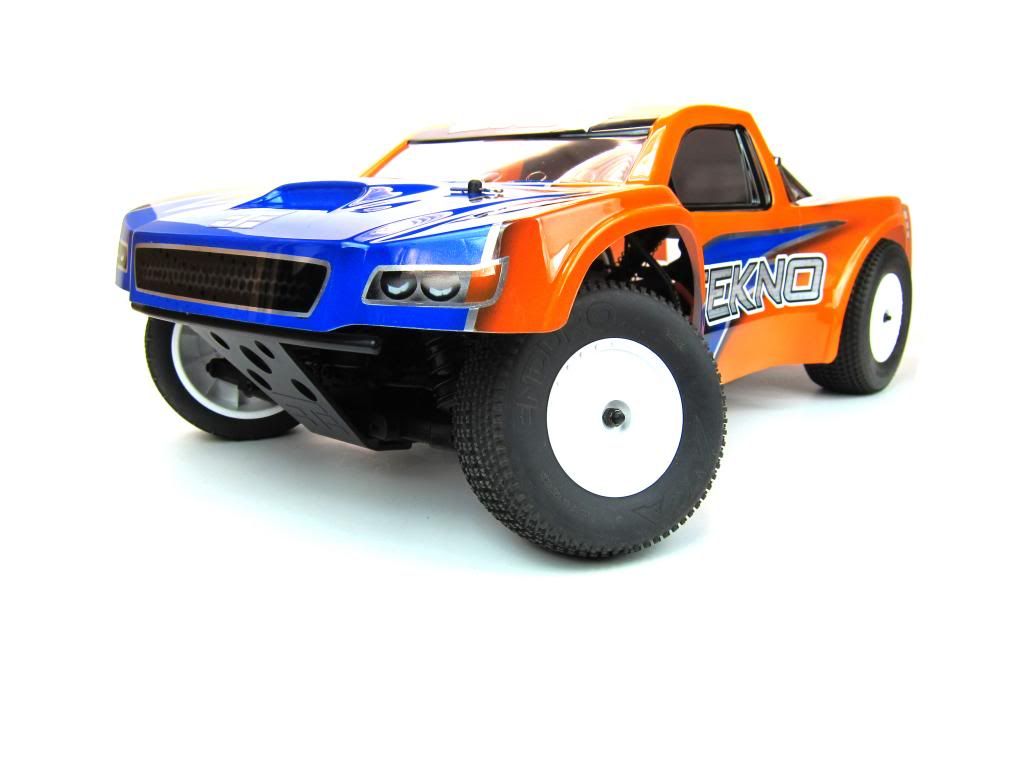
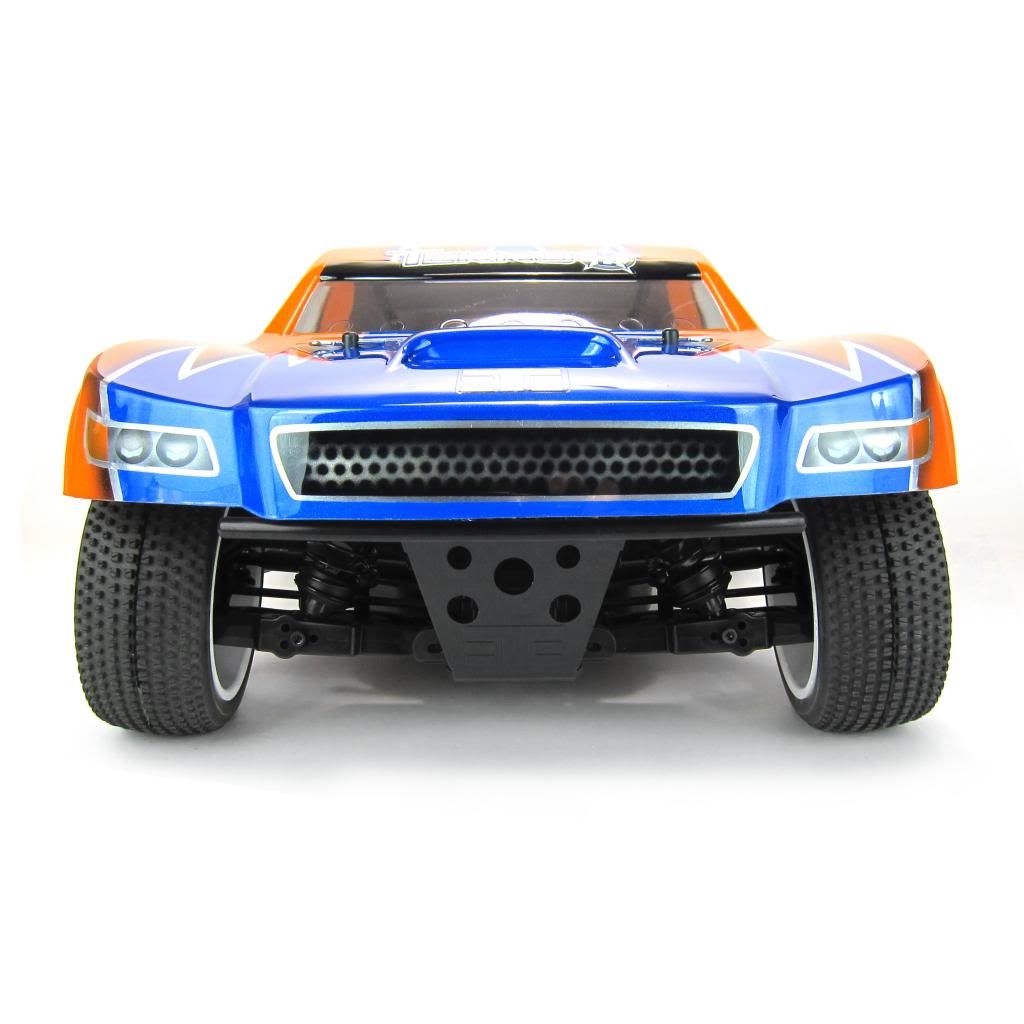
Tekno RC is proud to announce the newest revision to our stable of innovative RC vehicles – The SCT410.3 1/10th 4×4 Competition Short Course Truck. The SCT410.3 is an updated version of the original SCT410 with a slew of new parts and improvements. The SCT410.3 leapfrogs over the 4×4 SC competition in terms of performance, durability, and value. We have our customers’ best interests at heart so there is a clear path to simply upgrade your original SCT410. But there’s nothing like a fresh new kit that goes together like butter so pick up the SCT410.3 race kit and unleash it on the competition!
With the SCT410.3, we wanted to improve performance and increase value to the customer without increasing the price or compromising on the great qualities of the original. To do this, we went through the entire platform and made changes accordingly.
SCT410.3 New Features and Improvements:
Drivetrain Improvements:
The diffs feature smoother gears and a new 1-piece composite diff cross pin.
The old steel driveshaft has been replaced with a new tapered aluminum design.
All of the outdrives and couplers are now lightened.
Angled rear gearbox with larger bearings is now standard.
Results – dramatically reduced rotating mass, improved acceleration and efficiency.
Suspension Improvements:
All new front and rear suspension geometry.
New reduced height front and rear shock towers.
New V2 hinge pin brace system for incredible adjustability.
New front arms feature a flat bottom for increased durability and clearance.
New rear arms feature the flat bottom but are also 4mm longer.
New rear hubs with reduced offset to match the longer rear arms.
New longer rear sway bar.
New clamping spring perches with captured shock boots.
New droop adjustment screws are now standard.
Results – lower CG, increased adjustability, increased stability, and increased consistency.
Weight, Durability, and other Improvements:
Lightened black anodized 4mm CNC chassis is now standard.
Aluminum pivot balls throughout.
Aluminum suspension and spindle bushings are now standard.
New lighter camber link rod ends and turnbuckles.
LCG Lightened Motor mount is now standard.
M5 stub axles are now standard.
Split center diff mount makes maintenance a breeze.
Lightened metal clamping 12mm wheel hexes are now standard.
Revised front bumper increases ground clearance.
Larger 6x13x5mm (vs. 6x12x4mm) outer wheel bearings front and rear increases durability.
Spindles feature adjustable stops for more precise steering control.
Compatibility with existing parts and options.
Results – lower CG, improved handling, improved acceleration, and improved durability.
As you can see, the changes are extensive and meticulous. This provides our customers with the best handling 4×4 SC kit that also happens to be the best value on the market.
Full Feature List:
Chassis:
4mm CNC aluminum black anodized chassis.
Super narrow layout – widest point is only 125mm (less than 5”) mudguard-to-mudguard.
Class leading front and rear clearance (short chassis overhang) provides better bump handling and jump landing.
Adjustable, LCG lightweight body mounting system fits most popular SC bodies (Losi, AE, etc.).
Lightweight, extremely durable front and rear bumper system.
Integrated battery tray/mud guard, battery is sunken into chassis for a super low CG.
Integrated electronics tray/mud guard for easy removal of electronics.
Spacious, enclosed, easy access radio box with integrated transponder mount.
Adjustable chassis brace system for fine tuning flex with front, center, and rear braces.
Motor Mount:
2-piece CNC aluminum motor mount with precision dual clamping gear mesh adjustment.
Split center diff mount for easy maintenance.
Lightweight direct-to-diff mount design.
Uses standard MOD 1 pinion.
Differentials and Drivetrain:
3 fluid filled adjustable super lightweight diffs.
Newly redesigned precision diff gears with innovative 1-piece cross-pin design for increased durability.
Less rotating mass = better acceleration.
Lightweight straight center driveline for maximum efficiency and reduced wear.
CV driveshafts with captured pins on all 4 wheels.
Standard 12mm hexes fits most popular SC wheels (SCTE offset).
Shocks:
16mm bore hard anodized shocks – Biggest-in-class!
4mm 7075 aluminum shock towers are standard.
Innovative conical piston design (not just tapered) provides varied compression and rebound rates.
Fully adjustable long travel suspension geometry maximizes stability and traction while providing superior cornering and on-power steering.
CNC aluminum threaded shock bodies.
4mm hardened steel polished shafts.
Triple guide design for true consistent shaft action.
Options for vented cap, emulsion, or standard shock configurations out of the box.
Optional springs and sway bars available.
Suspension and Steering:
Bulletproof suspension arms – thicker and stronger than the competition.
Adjustable front arm sweep and angle to make the car more aggressive (swept forward), or easier to drive (swept back).
‘Narrow pivot’ steering posts provide ‘0 bump’ geometry with almost 0 steering slop.
Adjustable hinge pin braces are standard (toe, anti-squat, kick-up, front arm sweep).
4mm inner, 3.5mm outer hinge pins, polished for smooth action.
Adjustable Ackermann and bump-steer (bump in, 0 bump, bump out).
Steering system is fully supported on precision ball bearings. No bushings here.
Straight rod ends and lightweight turnbuckles.
Other Features:
Exceptional wear characteristics. Leave the slop and warping to the other guys.
Easily adjust anti-squat, rear toe, front arm angle, front arm sweep, roll center, toe, camber, wheelbase, Ackermann, bump steer, suspension geometry out of the box..
Extremely easy to work on with minimal screw count.
Shares many parts with the EB/NB/ET/NT48 = less parts in your toolbox.
All metric hex hardware.
100% Tekno RC Designed and Tested in Southern California.
Specifications:
Length: 530mm
Wheelbase: 323-335mm
Width: 296mm
Weight: ~2850g (6.3lb) out of the box RTR
(RTR weight equipped w/ Tekin RX8, Pro4 motor, 300g battery, rx, etc)
Diff Ratio: F/R – 10/40t, Center – 44t
Battery tray dimensions: 50x148mm
Kit/RTR: Kit
Needed to complete:
2 channel radio/transmitter
ESC and Pro4 SCT motor
High torque steering servo
2s LiPo battery
SC tires, wheels (SCTE offset) & CA glue
SC body of your choice, paint for body
Hex tools (1.5, 2.0, 2.5mm), nut drivers (5.0, 5.5, 7.0, 8.0mm), pliers, other tools
GENERAL BUILD TIPS
----Use Threadlock! Tekno Vehicles have many metal-to-metal contacts throughout, prevent screws from backing out with a light dab of threadlocker on each screw that threads into metal (do not use threadlock on screws that thread into plastic)
----When building you diffs, take your time to make sure they go together correctly for a smooth and long lasting diff. Check out Ryan's videos below for tips on building and making them smoother
----Be careful when using a power screwdriver on screws that thread into plastic. Use a low clutch setting, and if necessary use a normal hex tool to check tightness
----Use a dab of grease when building each of the CVDs, and make sure a film covers the entire 'ball' of each CVD before installing into axle. Will drastically increase CVD life as well as improve handling
----Use a product such as Protek Premium Blue O-ring grease or Associated Green Slime on shock and diff O-rings to prevent swelling and oil seepage
----When building shocks, the best method we've found for consistent shock builds every time is a little different than whats in the manuals. First, place and seat the bladder into the shock cap. Fill the shocks with desired fluid and pump to remove trapped air. Thread cap onto body about 2-3 turns. Push shaft slowly into body for desired rebound, and hold in position while slowly screwing the body into the cap with the bleed screw facing down or to the side. Wipe away oil and the shock is ready!
*For the ultimate in identical shocks, use a calipers when setting your rebound. I measure the distance between the lowest shaft guide and the top of the shaft threads. For the Buggy shocks, I set this distance at 16mm for the Rear shocks and 14mm for the Front shocks to achieve minimal rebound and to get the least amount of air in the shock when its built.
STEERING LIMITERS
Yes, we know people like lots of steering. Our pro drivers tell us this all the time . Something to keep in mind though about steering...
The design of the EB/NB line of vehicles has more steering throw than any other vehicle on the market. Probably by a good 5 or more degrees. At first we thought this was a huge advantage. Lately, through constant testing, we have found the cars are faster and waaaaay more consistent with less steering throw.
So if you're not using the built in steering stops, you're doing yourself a huge disservice. We are using 4 steering limiter washers on the EB/NB/SC and the results have been awesome. Yes, the turning radius is reduced, but lap times and consistency have proven this is a non-factor.
Here's what goes wrong with too much steering throw:
Rear end washes out when landing jumps
Rear end continues to come around exiting corners
Feels like you are struggling for traction at times
Bump handling is unpredictable
Initial steering is extremely twitchy
And other issues to be sure
Here's what's going on. The last 5+ degrees of steering throw happen very quickly and the servo has very very little leverage on the wheels at full throw. This causes the inside wheel to act erratically and get tossed left/right at the whims of the track surface. Without a positive stop there, the inside wheel is going crazy and causing inconsistencies with the handling. The CV's can accommodate this extreme working angle, but there is more chatter which creates further issues.
Even if you just limit your EPA, the inside wheel is still free to move too far when the conditions arise. So install the washers first, then reset your EPA to match.
There are literally dozens of other adjustments that will result in more steering if desired (shocks, springs, ride height, sway bars, diffs, camber links, toe, etc.). By first limiting the throw, you can focus on creating more 'setup steering'. Think of setup steering as being more consistent vs. mechanical steering (i.e. throw).
Additionally, you won't be fighting the car so you will be spending less time tuning something bad out and more time tuning good stuff in.
NERF BAR INSTALLATION
Quote from Shark413
I just wanted to point out one thing that is not mentioned in the manual (at least I don't think it is). The nerf bars look the same but they are not symmetrical and are actually two different sizes. I noticed this while playing around with the air guards. The side pods on the Tekno SCT410 are made just wide enough to contain the battery (left side) and servo/esc (right side). And the chassis is just wide enough to provide support for the battery and motor. Since the side pods are of different sizes (width) the nerf bars had to also be of different sizes so that the overall width is symmetrical. Just another example of great Tekno design, they could have made the chassis and side pods symmetrical but it would not have been an efficient use of space/materials and the balance would not be as good. Also the nerf bars have a taper, and the flat side needs to be facing up so the air guards fit flush (see the pictures below) and you get max ground clearance.

You can clearly see the nerf bar on the left is shorter.
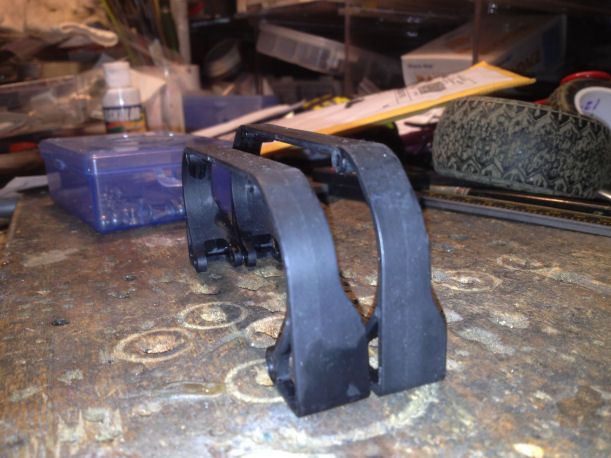
Another angle. And you can see the taper in the nerf bar, one side is flat the other is curved. Flat side should be facing up.

Shorter nerf bar needs to be on the right side.
Diff Gasket Tip. The gasket fits really snug in the ring gears of the front and rear diffs and the holes in the gasket are precisely the size of the holes in the ring gear. So, install the gasket in the ring gear at an angle and get the first hole aligned perfectly before working the rest of the gasket in. You can smear a little bit of black grease on both sides of the gasket first. Once the gasket is fully seated, you can not turn it within the ring gear.
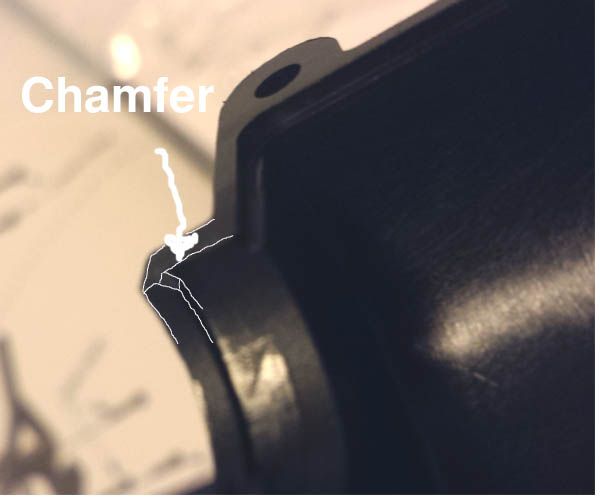
Outer Diff Shims Tip. Getting the diff in the housings with one shim on each side can be challenging. They are delicate, thin, and have nothing to keep them in place while you try to install the diff. It's very easy to buckle/bend one or miss getting it in the housing. What you can do to make installation easier is to cut a .5mm x 30-40 degree chamfer on the inside of each of the four corners of the bearing lip of each diff housing halve (8 total for front diff, 8 total for rear diff). [See pic below] This allows a bit of alignment assistance to get the diff installed without damaging the shims.
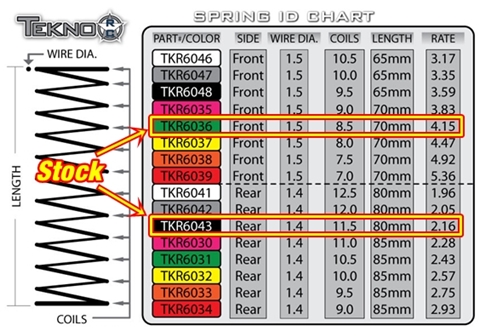
SPRING CHART

I also found this chart comparing Losi 8ight and Hot Bodies D8 springs, both of which fit Tekno shocks.
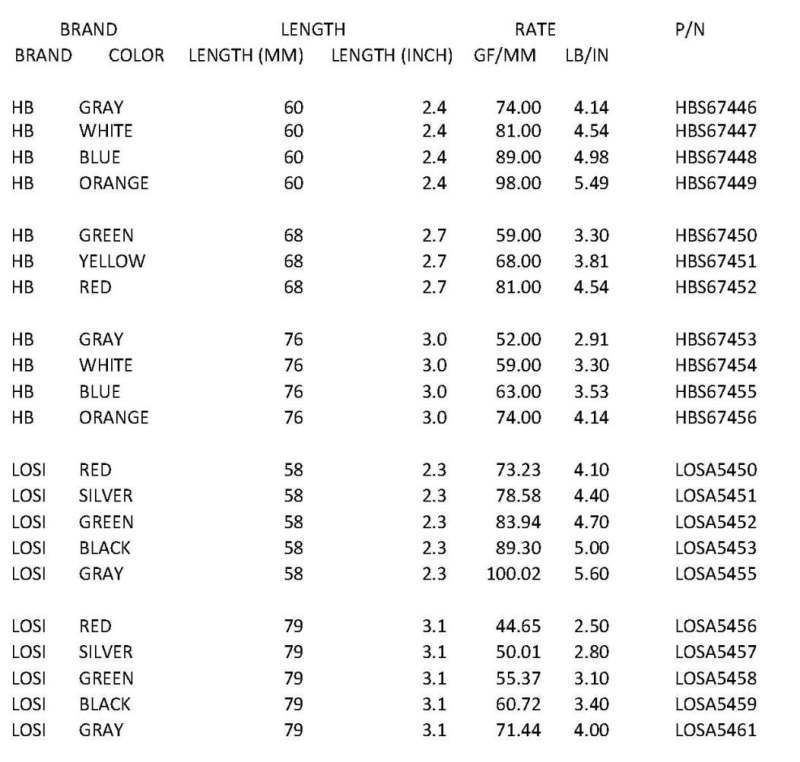
I made a chart of the Kyosho springs.
Here's a chart of all the available springs together.
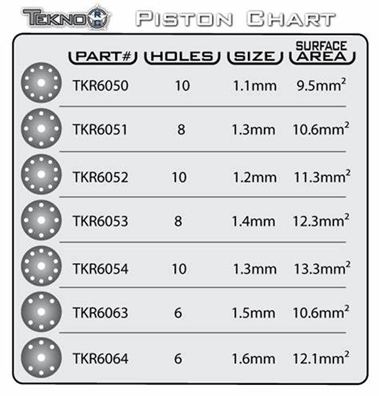
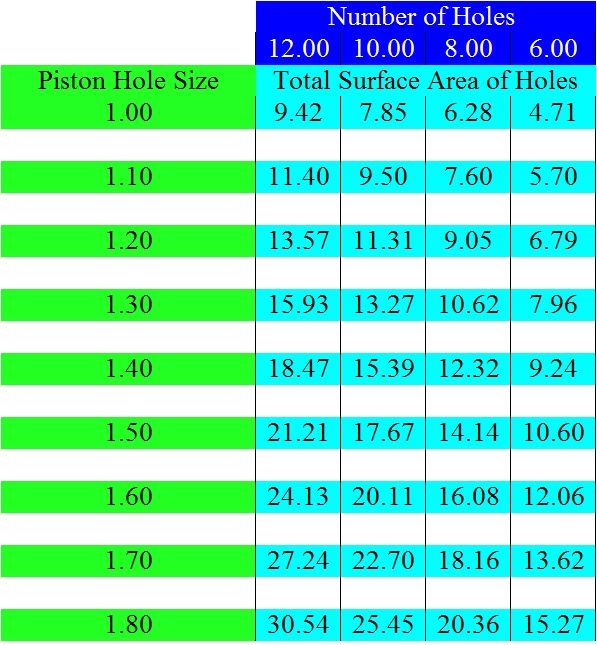
PISTON CHART
BEARING CHART

Avid RC now makes a bearing kit.
http://avidrc.com/flexkit/?kit=524&kitname=SCT410
WHEEL FITMENT
The SCT410 was designed to run SCTE and SC104x4 wheels. We have found that some wheels made to fit these trucks have slight differences from manufacturer to manufacturer. If your wheel rubs the steering link screw you can remove the all of the bumpsteer washers above the ballend to lower the head of the screw. If it still hits you can remove the washers under the ballend (be sure to adjust your bumpsteer setting on the ackermann plate to compensate). If it still rubs after that running a cap head screw in place of the socket head should remove any chance of the wheel hitting the screw. Here's a list of wheels that fit with and without modification.

GEARING RECOMMENDATIONS
These recommendations are based on 2s lipo setups and are guidelines only. If you're switching to this vehicle from another that you had achieved a speed you liked I highly recommend visiting this site -http://scriptasylum.com/rc_speed/top_speed.html, inputting your old/current vehicles information, recording that data, then input the SCT410 info and adjust the pinion gear until you are close to your original top speed. NOTE: when running the split diff the smallest pinion you can fit is a 14 tooth.
Small track (50-100 ft straight)
3600-4000 kv 13-16 tooth pinion
4400-4800 kv 12-15 tooth pinion
5000-5400 kv 11-14 tooth pinion
Medium track (100-150 ft straight)
3600-4000 kv 15-18 tooth pinion
4400-4800 kv 14-17 tooth pinion
5000-5400 kv 13-16 tooth pinion
Large track (150-200 ft straight)
3600-4000 kv 16-19 tooth pinion
4400-4800 kv 15-18 tooth pinion
5000-5400 kv 14-17 tooth pinion
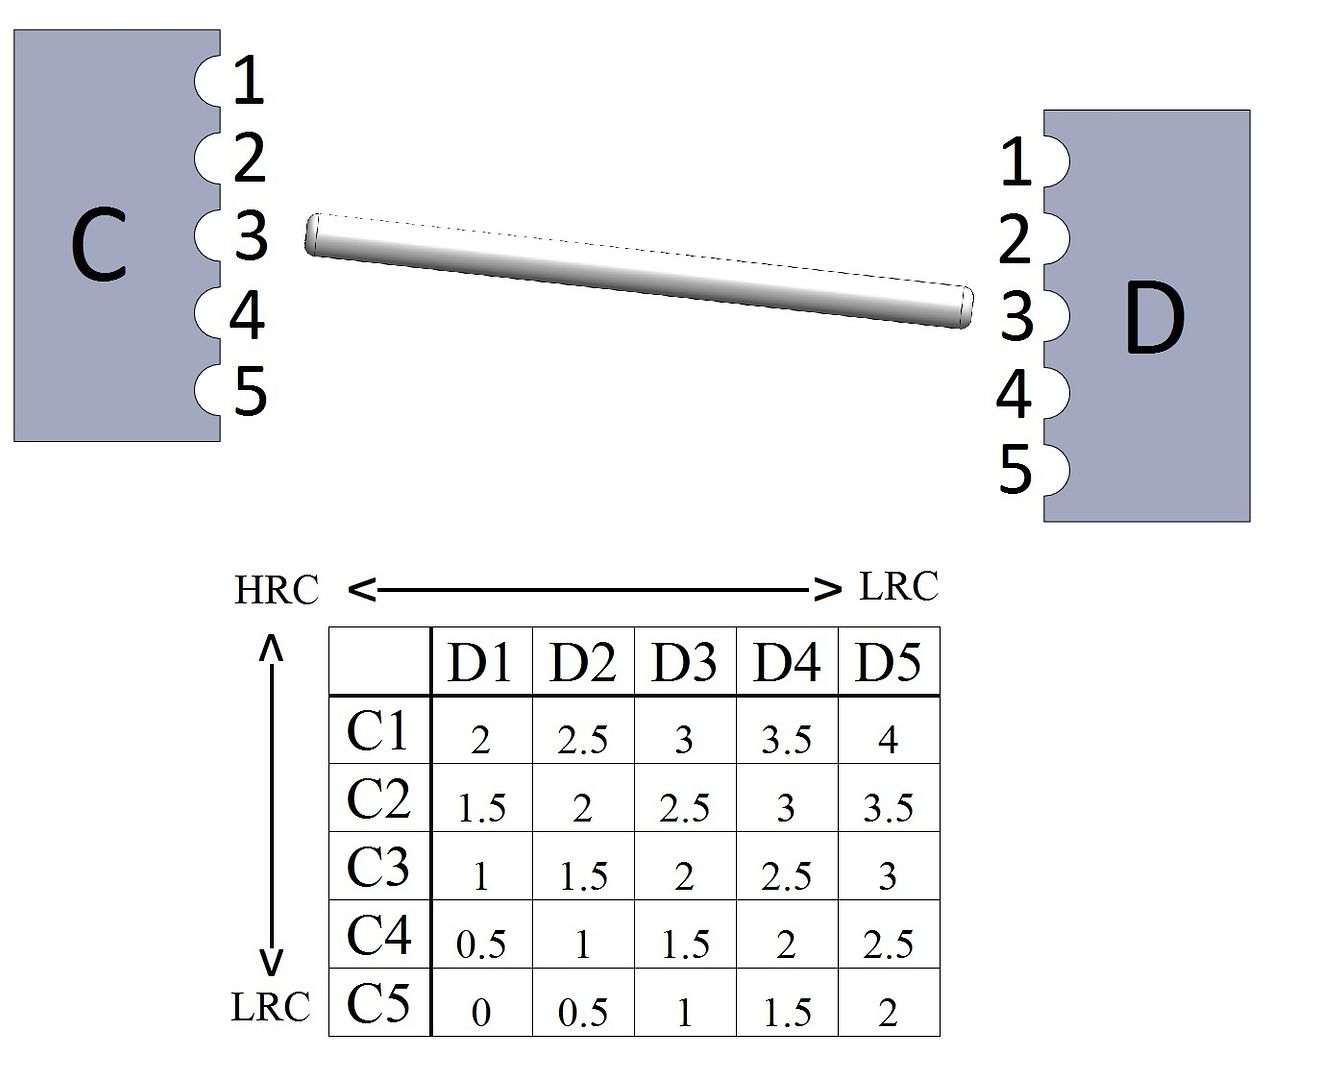
INNER HINGE PIN ADJUSTMENTS
The SCT410 has adjustable hinge pin holders that allow users to fine tune their truck for different tracks, conditions, or driving styles.
You can adjust the amount of front arm "sweep" in 0.5 degree increments from 2 degree forward to 2 degree back.
This picture is top down, looking at the left side of the hingepin blocks.

You can adjust the amount of arm kick-up in 0.5 degree increments from 8 degrees up to 12 degrees. This in turn also adjusts your total caster angle from 18-22 degrees.
You can adjust the rear toe angle in 0.5 degree increments from 1 degrees up to 5 degrees.
This picture is top down, looking at the left side of the hingepin blocks.

You can adjust the rear anti squat angle in 0.5 degree increments from 1 degree up to 5 degrees with the stock plastic hingepin holders and 0 to 4 degrees with the addition of the aluminum C block.
Plastic brace
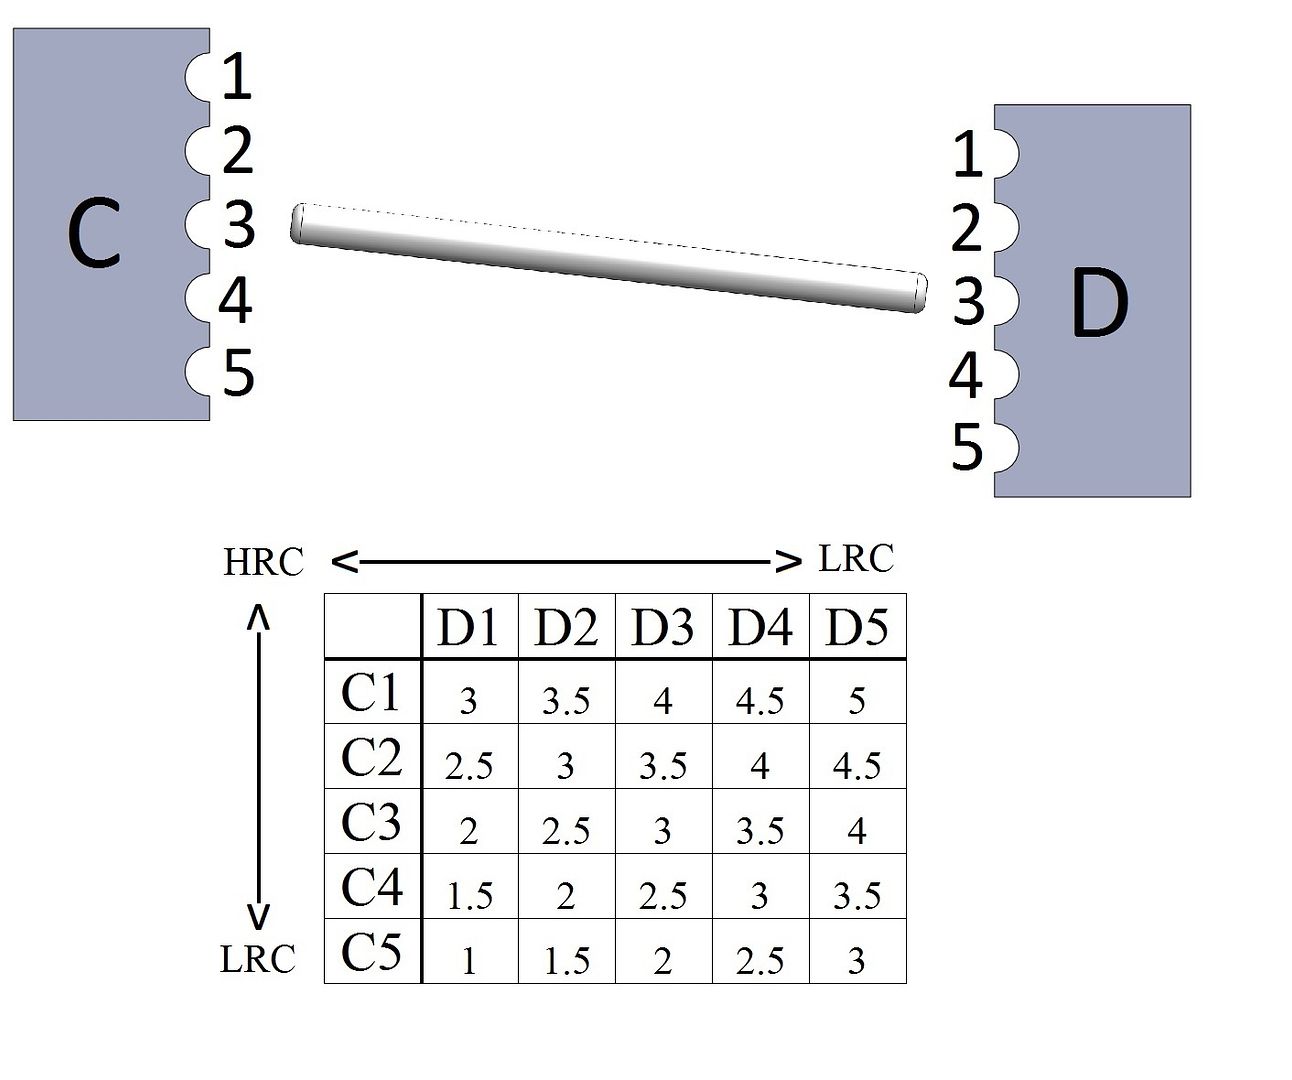
Aluminum brace
Arm Sweep
The purpose of sweeping the arm forward or backward is mostly to sweep the driveshafts forward or backward. When the driveshafts are angled it changes how the car reacts on and off power. (This goes for the rear driveshafts as well.)
When the driveshafts are swept forwards, the stub axles are being twisted down toward the ground, pushing down on the tires and lifting the front of the chassis. This can be helpful in really bumpy sections to keep the front up and not dig in. It will also create more weight transfer to the front during braking which will increase your off-power steering.
When the driveshafts are swept backwards, the stub axles are now being twisted up, lifting the tires and pushing the chassis down. We've found that the biggest benefit to sweeping the arms back is jump landing. With the arms back, the car kind of "sucks" itself to the ground. It settles much faster and allows you to get on the throttle immediately. During breaking and off throttle the chassis will stay a little flatter front to back and either feel "pushy" or more controlled into the corner.
You can adjust the rear sweep by changing the wheelbase.
It's possible to have toe in on the rear and have the axles swept backwards (not on our car, I'm just making a generalization), but it doesn't handle well. It will squat really hard on acceleration and the nose will dip under braking. If any of you have ever driven a Revo with the long wheelbase rear arms you know what I'm talking about
BODY FITMENT
Most aftermarket bodies now have several sets of dimples that mark where the body posts are for different manufacturers. Our posts can be adjusted to directly line up with those of the Losi SCTE, Traxxas Slash, and the Durango. Any body designed for a 1/10th scale SC truck will fit, you just may have to find the body post locations on your own.
Skid plates
LeadFinger RC makes a makes a stainless steel skid-plate. Here's a link to the store.

APE-RC makes a stainless steel skid-plate. Here's a link to his online store.

T-Bone Racing makes several bumpers/skids in different sizes for the front and rear of the truck.

Here's a link to the Tekno section of their online store.
DE-Racing's rear skid plate

http://www.deracing.net/store/index....product_id=301
ALUMINUM HEXES
The stock kit comes with an aluminum hex that is secured to the axle with a setscrew, PN: TKR5571M.
There are two versions of clamping hexes that Tekno makes, PN: TKR1654X, originally designed for the Slash and SC104x4, and PN: TKR5571A. TKR1654X will however increase your track width by 1mm per side. If you are running SCTE wheels your truck will still be ROAR legal width with the wider hexes. If you are running SC10 4X4 wheels you will be over the ROAR maximum with the wider hexes. With the narrower hexes and moving the arms inner hingepins in it might be possible that some the manufactures wheels for the SC104x4 may be legal.
NOTE: Tekno's hex kit comes with shims that are designed to go between the drive pin and the bearing. They are there to take up any slop due to manufacturing tolerances. They may or may not be needed. It is normal for one wheel to need one or two shims and another to need zero. Install the hex without any shims and install the wheel as if you were going to run the car. If there is excessive play, add one shim and retest. The goal is to have just a tick of free play, you do not want it so tight that it binds up.

17mm HEXES
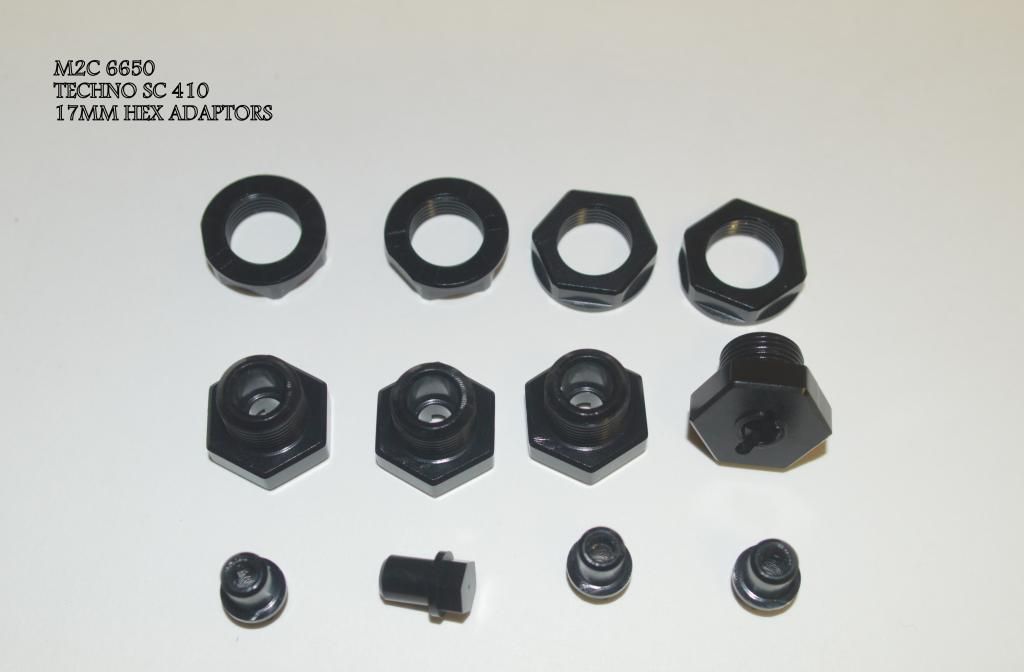
Ok guys, we couldn't decide to use a slide on the pin or side load for
these hexes, so we just did both.
these hexes are made to fit the 6 mm axle.
the retaining nuts can be used with either loading method, but is not
necessary for the the side load model.
the only issue was that due to the hole location in the axle, you may not be
able to use the 6 mm shim. I had to make it like that to make it fit.
LIST OF COMPATIBLE ALUMINUM SERVO HORNS:
OFNA-
23T OFN10772
24T OFN10774
25T OFN10776
Serpent-
23T SER600463
24T SER600464
25T SER600465

Hot Bodies-
23T HBS67167
24T HBS67168
25T HBS67169
Tekno-
23T TKR5251B
24T TKR5252B
25T TKR5253B

VPPro
http://www.vpprousa.com/rc-parts-acc...category_id=22

OTHER STEERING UPGRADES
APE-RC makes a stainless steel ackermann plate.
 It's available here.
Tekno makes an aluminum ackermann plate.

Available direct, your LHS, or your favorite online store.
MISCELLANEOUS TOOLS
APE-RC has a great shock tool set that can be purchased here.

CAMBER LINK INFO
The camber links need a 4mm turnbuckle wrench for adjustment. We've found that some wrenches work exceptionally well.-
-The Losi stamped steel wrench (the one included with the 22 series of vehicles)
-The Hudy wrench

-The Tekno Wrench

Inner camber link adjustment
This is a quote from Shark413
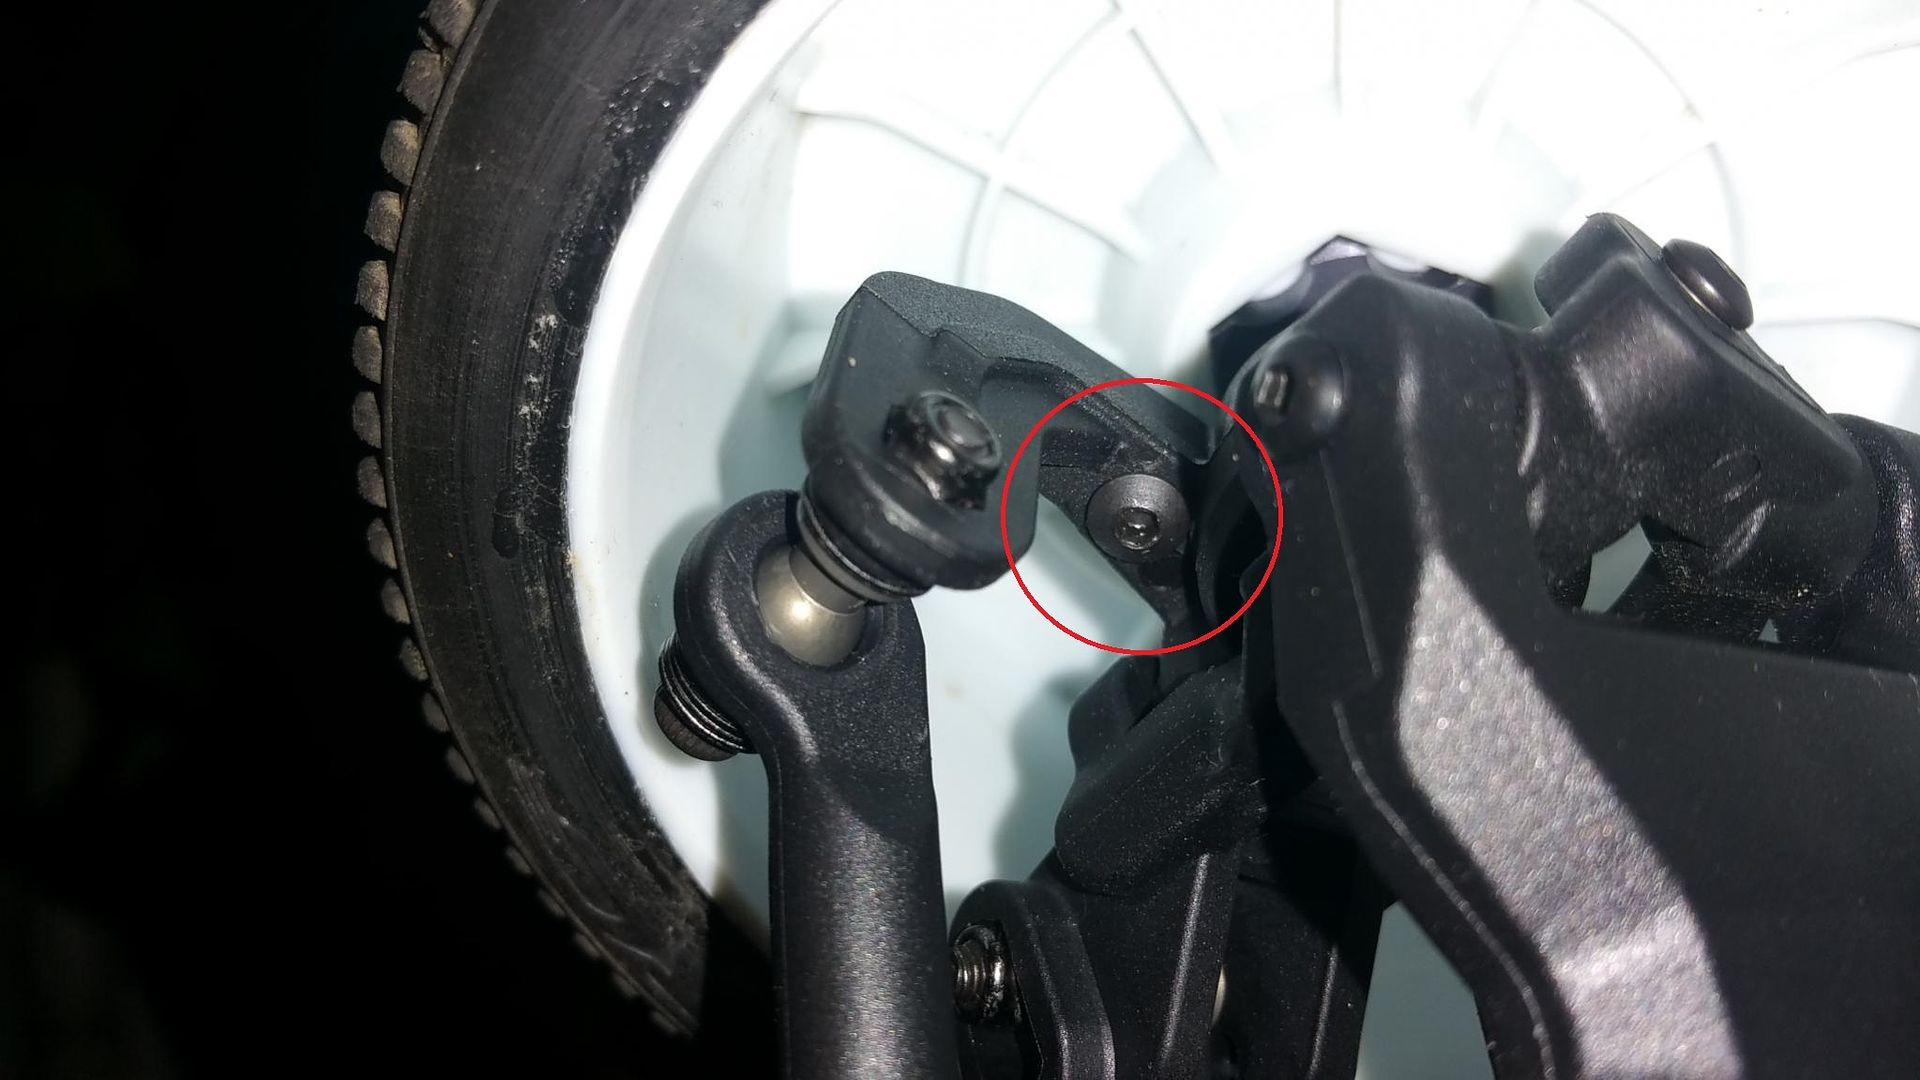
I also want to thank Cain for his feedback on the rear inner camber link mounting screws. At first I didn't think it was a huge problem, but then I went to adjust the inner link mount and found it was a royal pain to remove the screw. Per the instructions I have the screw head facing the rear (towards the rear bumper) it is almost impossible to get a normal 2.5mm hex wrench in there without removing the upper rear bumper mount. Cain suggested turning the screw around for easier access. I decided to take his advice and turned the screws around and I just wanted to post a few pictures to better explain the issue and fix. Cain I knew you wouldn't let me down, thanks again.

This is the problem. This is the rear inner camber link mounting screw when installed per the instructions.

If you want to make adjustments, you can't get a hex wrench on the screw head.
You can get a short allen wrench or ball end hex wrench in there to loosen the screw, but.....

If you want to move the screw to a different hole it hits the upper rear bumper mount.
By reversing the screw you can remove it once you remove the nut. Installing it requires you to hold the nut with pilers as you tighten the screw.
And this is what it looks like all bolted down. You can now access the screw/nut and are able to adjust the screw location without removing the bumper mount.
CAMBER/STEERING LINKS
Stock lengths-
Front- 4x56mm
Rear- 4x56mm
Steering- 4x56mm
Optional Titanium links can be found at Lunsford-
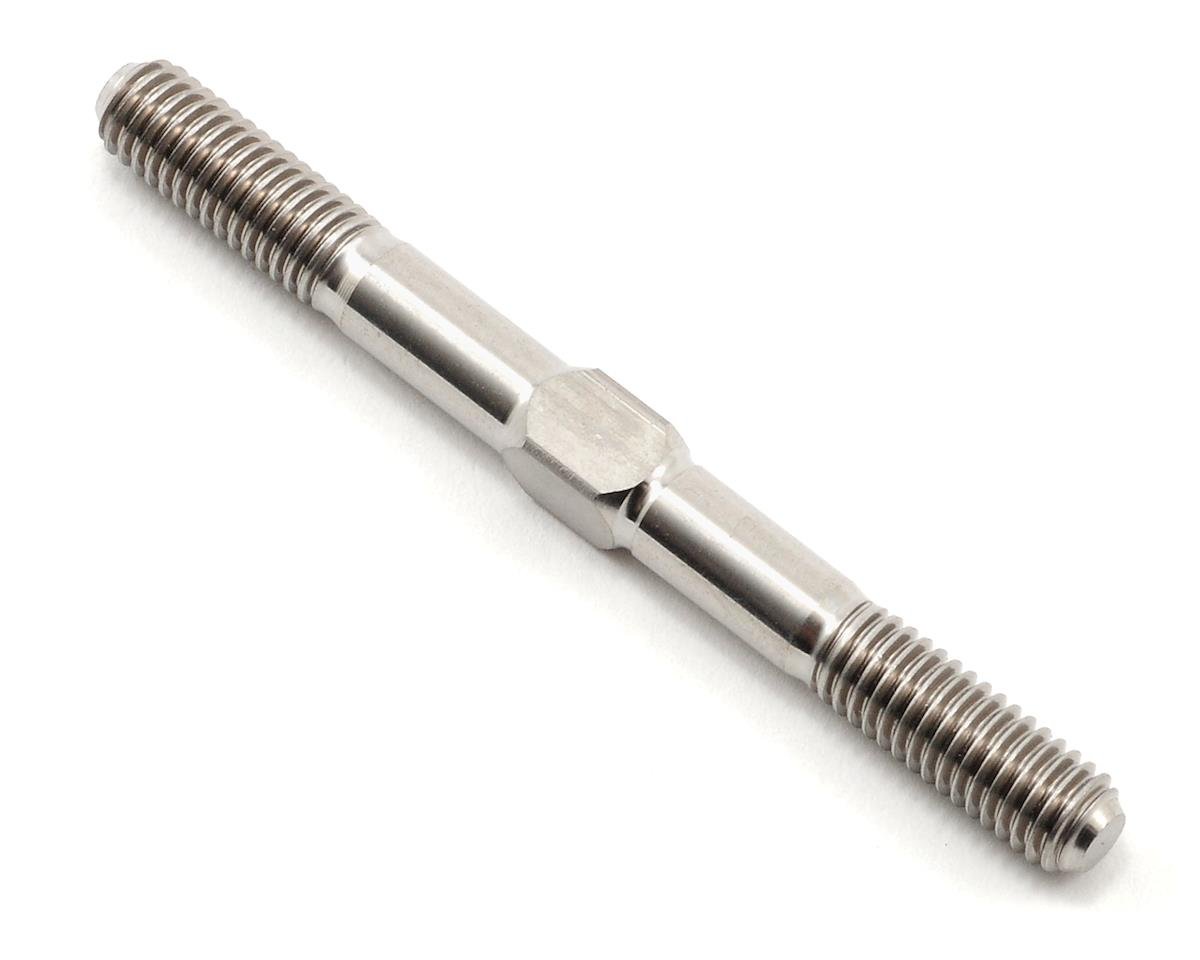
LNS1455
Lunsford 4x55mm Titanium Turnbuckle
Durango Makes aluminum links that can fit-

TDR310215 - 4x60mm
Lightweight parts and chassis modding
Carbon Towers
Tekno 5mm thick rear carbon tower

Tekno 5mm thick front carbon tower

ALTERNATIVE CHASSIS
The stock chassis, TKR5288, is stamped 4mm black anodized aluminum with cutouts.

The stock EB48 chassis is milled 7075 hard anodized aluminum with a number of cutouts. It decreases weight, increases flex, and maintains stock hole locations and chassis thickness.

The original SCT chassis, TKR5001, is stamped 4mm 7075 black anodized aluminum with a minimum amount of cutouts.

M2CRacing released 2 new chassis-
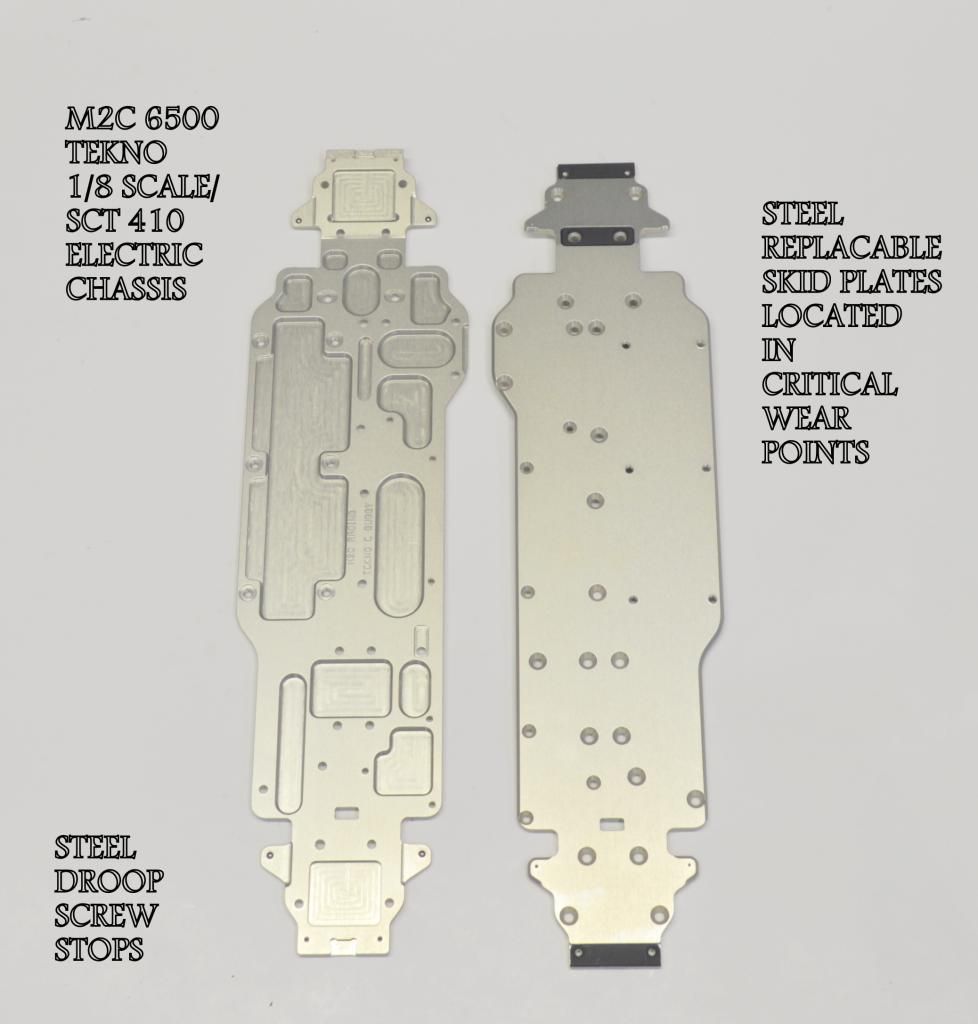
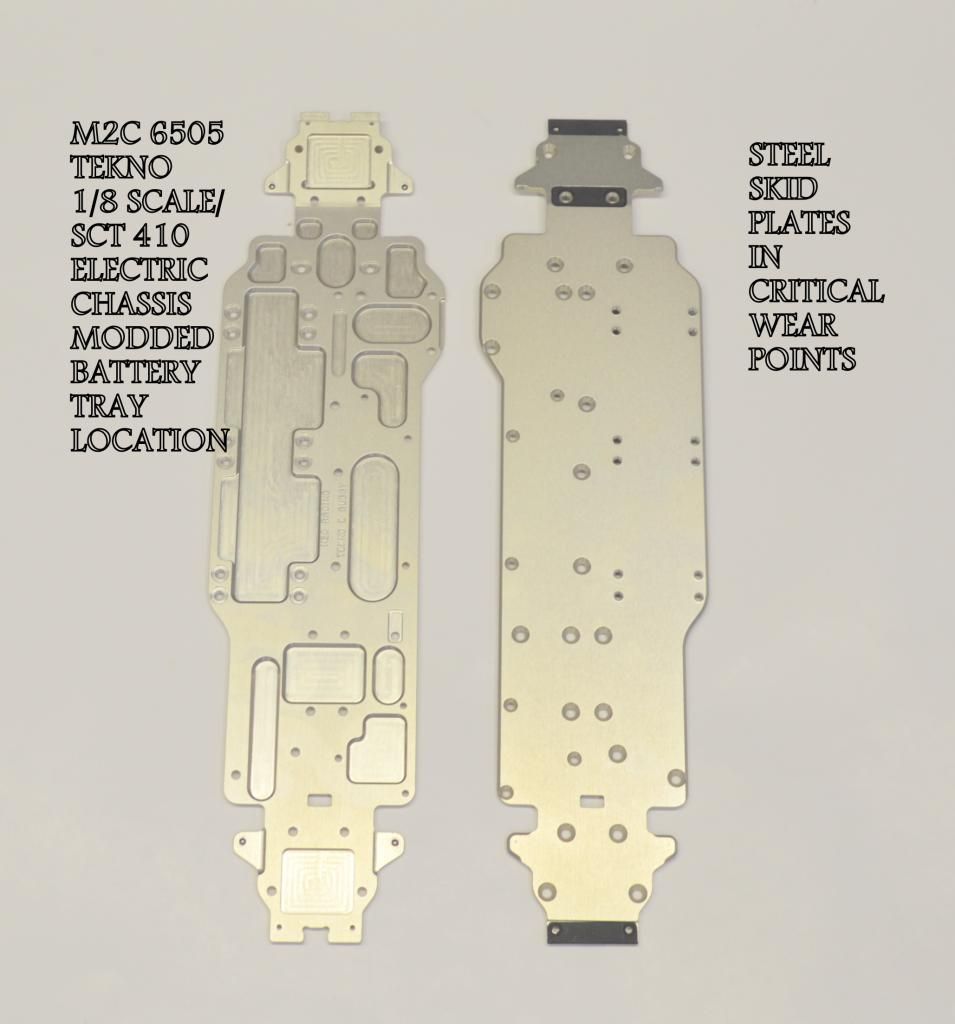
M2C RACING is pleased to announce the release of our Tekno Electric
chassis for the 1/8 scale and sct410.
We will have 2 models. The standard design and the modded model which
will move the battery tray back 10 mm.
These chassis are made using 1/8 inch(3.25mm) thick 7075 aircraft grade materials and clear anodized.
use of the material greatly increases the overall life of the chassis.
we have tested and tweeked these chassis to provide the racers a top notch chassis that will perform very well on all surfaces.
This model is made for the tracks with a high wear situations like the tracks we have out West, up north and in Canada
It is important to note that these skid plates fit flush to the bottom of the chassis and will not effect the droop settings and cause you to
scrub speed on the landings.
FEATURES:
We have adopted this model so that if you wish you can cut off the front bumper to help the vehicle not to get upset on landings
and increase ground clearance.
front and rear skid plates.
It is advised you replace the skid plate when the edge of the skid plate wears down to 1 mm.
This will make the chassis last much longer.
hardened droop stops to prevent chassis wear and droop changes.
m2c 6501 (front and rear skid plate)
m2c 6502 (front rear skid plate)
And be sure to take advantage of our 20% off discount coupon
m2ccoupon
just copy and paste in the coupon box as you check out.
Battery Mod
Several people are modding their battery tray to move the battery back to the front of the brake servo mount. Here's an example by sramos.
Heres the jist of what i did. the rubber that goes along the side of battery tray is from a rubber pipe couple i picked home from home depot and cut off and glued in. put a big enough foam in rear to keep well away from diff.


OVERDRIVE OPTION
A track with loose conditions is where you'll see the biggest benefit of running an overdrive setup. To achieve this you will need to run the truggy ring and pinion in the rear of the buggy.
You have to use both the pinion and ring gear from the truggy. The truggy's ring gear has a different offset to mate up with the smaller 9t pinion gear.
I built up a whole truggy diff so that I could quickly swap out the diff and pinion gear at the track. It's more expensive that way but the time it saves you at the track is worth it.
For those that are thinking of trying the truggy gears in the rear, here's a couple of tips/things to be aware of -
-You'll need to go up 1 tooth on your pinion gear or you'll lose a noticeable amount of top speed.
-You may want to strongly consider going up in your center diff oil if you're running 5k or less.
-Be aware that your buggy will jump with more of a "nose up attitude" then before.
-Your buggy will now have a slight drag brake off-power coming from the rear end.
ALUMINUM SCREW LISTING
From MattP-
I just made a list of all the screws, washers and nuts needed to convert a Tekno ride over to all aluminum screws. I listed the stock replacement Tekno screw part number first with details beside each. Only screws I did not list for an aluminum swap are the diff screws holding the ring/spur on to the diff. That's a high load bearing screw and steel is a better choice there.
Tekno Screw List:
Tekno #1523 3x10mm Flat Head 2
Tekno #1529 3x20mm Cap Head 20
Tekno #1341 4x6mm Flat Head 6
Tekno #1525 3x14mm Cap Head 18
Tekno #1524 3x12mm Cap Head 10
Tekno #1333 3x40mm Flat Head 4
Tekno #1327 3x16mm Flat Head 4
Tekno #1443 4x10mm Button Head 11
Tekno #1522 3x8mm Cap Head 9
Tekno #1445 4x14mm Button Head 6
Tekno #1447 4x16mm Button Head 2
Tekno #1401 3x6mm Button Head 8
Tekno #1448 4x18mm Button Head 2
Tekno #1343 4x10mm Flat Head 12
Tekno #1322 3x8mm Flat Head 11
Tekno #1344 4x12mm Flat Head 12
Tekno #1346 4x15mm Flat Head 2
Tekno #1325 3x14mm Flat Head 3
Tekno #1407 3x16mm Button Head 1
3x8mm Washer 20
4x9mm Washer 2
3mm Locknuts 20
3mm Flanged Locknuts 8
Part list for all the Tekno screws cross referenced over to blue aluminum at Fastenerexpress.com:
Only thing not listed are the washers.
M3 x .5 x 8mm Socket Head Cap Screws - Blue Qty. 25
Item Number: 30968
$6.01
M3 x .5 x 12mm Socket Head Cap Screws - Blue Qty. 25
Item Number: 30974
$6.47
M3 x .5 x 20mm Socket Head Cap Screws - Blue Qty. 25
Item Number: 30989
$7.51
M3 x .5 x 16mm Button Head Socket Screws - Blue Anodized Qty. 25
Item Number: 30671
$6.82
M3 x .5 x 6mm Flat Head Socket Screws - Blue Qty. 25
Item Number: 30750
$5.78
M3 x .5 x 10mm Flat Head Socket Screws - Blue Qty. 25
Item Number: 30756
$6.24
M3 x .5 x 16mm Flat Head Socket Screws - Blue Qty. 25
Item Number: 30765
$6.82
M4 x .7 x 10mm Button Head Socket Screws - Blue Anodized Qty. 25
Item Number: 30604
$8.44
M4 x .7 x 14mm Button Head Socket Screws - Blue Anodized Qty. 25
Item Number: 30610
$9.59
M4 x .7 x 16mm Button Head Socket Screws - Blue Anodized Qty. 25
Item Number: 30613
$10.16
M4 x .7 x 18mm Button Head Socket Screws - Blue Anodized 25 Pieces
Item Number: 30622
$10.75
M4 x .7 x 10mm Flat Head Socket Screws - Blue Qty. 25
Item Number: 30717
$7.51
M4 x .7 x 12mm Flat Head Socket Screws - Blue Qty. 25
Item Number: 30720
$7.98
M4 x .7 x 14mm Flat Head Socket Screws - Blue Qty. 25
Item Number: 30723
$8.44
M4 x .7 x 6mm Flat Head Socket Screws - Blue Qty. 25
Item Number: 30711
$11.21
3mm Hex Lock Nut Aluminum,Low Profile 5.5mm Hex - Blue Qty. 25
Item Number: 30147
$14.09
M3 x .5 x 14mm Socket Head Cap Screws - Blue Qty. 25
Item Number: 30977
$6.57
M3 x .4 x 6mm Button Head Socket Screws - Blue Anodized Qty. 25
Item Number: 30646
$5.78
M3 x .5 x 14mm Flat Head Socket Screws - Blue Qty. 25
Item Number: 90193
$6.70
Total with all screws having a count of 25 is $162.58
MAINTENANCE AND TUNING VIDEOS
-Differential Build Tips
https://www.youtube.com/watch?v=Pf9ZgSoXeAs
-De-burring Spider Gears for smoother diffs
https://www.facebook.com/lutzrc/videos/939349629433682/
-Camber Links
https://www.youtube.com/watch?v=EUqK8TyzZIY
-Steering Endpoints
https://www.youtube.com/watch?v=8mw4rkTeWbQ
-Adjusting Sway Bars
https://www.youtube.com/watch?v=PUaia9xTGLI
I will keep updating it as information becomes available. Thanks
Tekno RC is proud to announce the newest revision to our stable of innovative RC vehicles – The SCT410.3 1/10th 4×4 Competition Short Course Truck. The SCT410.3 is an updated version of the original SCT410 with a slew of new parts and improvements. The SCT410.3 leapfrogs over the 4×4 SC competition in terms of performance, durability, and value. We have our customers’ best interests at heart so there is a clear path to simply upgrade your original SCT410. But there’s nothing like a fresh new kit that goes together like butter so pick up the SCT410.3 race kit and unleash it on the competition!
With the SCT410.3, we wanted to improve performance and increase value to the customer without increasing the price or compromising on the great qualities of the original. To do this, we went through the entire platform and made changes accordingly.
SCT410.3 New Features and Improvements:
Drivetrain Improvements:
The diffs feature smoother gears and a new 1-piece composite diff cross pin.
The old steel driveshaft has been replaced with a new tapered aluminum design.
All of the outdrives and couplers are now lightened.
Angled rear gearbox with larger bearings is now standard.
Results – dramatically reduced rotating mass, improved acceleration and efficiency.
Suspension Improvements:
All new front and rear suspension geometry.
New reduced height front and rear shock towers.
New V2 hinge pin brace system for incredible adjustability.
New front arms feature a flat bottom for increased durability and clearance.
New rear arms feature the flat bottom but are also 4mm longer.
New rear hubs with reduced offset to match the longer rear arms.
New longer rear sway bar.
New clamping spring perches with captured shock boots.
New droop adjustment screws are now standard.
Results – lower CG, increased adjustability, increased stability, and increased consistency.
Weight, Durability, and other Improvements:
Lightened black anodized 4mm CNC chassis is now standard.
Aluminum pivot balls throughout.
Aluminum suspension and spindle bushings are now standard.
New lighter camber link rod ends and turnbuckles.
LCG Lightened Motor mount is now standard.
M5 stub axles are now standard.
Split center diff mount makes maintenance a breeze.
Lightened metal clamping 12mm wheel hexes are now standard.
Revised front bumper increases ground clearance.
Larger 6x13x5mm (vs. 6x12x4mm) outer wheel bearings front and rear increases durability.
Spindles feature adjustable stops for more precise steering control.
Compatibility with existing parts and options.
Results – lower CG, improved handling, improved acceleration, and improved durability.
As you can see, the changes are extensive and meticulous. This provides our customers with the best handling 4×4 SC kit that also happens to be the best value on the market.
Full Feature List:
Chassis:
4mm CNC aluminum black anodized chassis.
Super narrow layout – widest point is only 125mm (less than 5”) mudguard-to-mudguard.
Class leading front and rear clearance (short chassis overhang) provides better bump handling and jump landing.
Adjustable, LCG lightweight body mounting system fits most popular SC bodies (Losi, AE, etc.).
Lightweight, extremely durable front and rear bumper system.
Integrated battery tray/mud guard, battery is sunken into chassis for a super low CG.
Integrated electronics tray/mud guard for easy removal of electronics.
Spacious, enclosed, easy access radio box with integrated transponder mount.
Adjustable chassis brace system for fine tuning flex with front, center, and rear braces.
Motor Mount:
2-piece CNC aluminum motor mount with precision dual clamping gear mesh adjustment.
Split center diff mount for easy maintenance.
Lightweight direct-to-diff mount design.
Uses standard MOD 1 pinion.
Differentials and Drivetrain:
3 fluid filled adjustable super lightweight diffs.
Newly redesigned precision diff gears with innovative 1-piece cross-pin design for increased durability.
Less rotating mass = better acceleration.
Lightweight straight center driveline for maximum efficiency and reduced wear.
CV driveshafts with captured pins on all 4 wheels.
Standard 12mm hexes fits most popular SC wheels (SCTE offset).
Shocks:
16mm bore hard anodized shocks – Biggest-in-class!
4mm 7075 aluminum shock towers are standard.
Innovative conical piston design (not just tapered) provides varied compression and rebound rates.
Fully adjustable long travel suspension geometry maximizes stability and traction while providing superior cornering and on-power steering.
CNC aluminum threaded shock bodies.
4mm hardened steel polished shafts.
Triple guide design for true consistent shaft action.
Options for vented cap, emulsion, or standard shock configurations out of the box.
Optional springs and sway bars available.
Suspension and Steering:
Bulletproof suspension arms – thicker and stronger than the competition.
Adjustable front arm sweep and angle to make the car more aggressive (swept forward), or easier to drive (swept back).
‘Narrow pivot’ steering posts provide ‘0 bump’ geometry with almost 0 steering slop.
Adjustable hinge pin braces are standard (toe, anti-squat, kick-up, front arm sweep).
4mm inner, 3.5mm outer hinge pins, polished for smooth action.
Adjustable Ackermann and bump-steer (bump in, 0 bump, bump out).
Steering system is fully supported on precision ball bearings. No bushings here.
Straight rod ends and lightweight turnbuckles.
Other Features:
Exceptional wear characteristics. Leave the slop and warping to the other guys.
Easily adjust anti-squat, rear toe, front arm angle, front arm sweep, roll center, toe, camber, wheelbase, Ackermann, bump steer, suspension geometry out of the box..
Extremely easy to work on with minimal screw count.
Shares many parts with the EB/NB/ET/NT48 = less parts in your toolbox.
All metric hex hardware.
100% Tekno RC Designed and Tested in Southern California.
Specifications:
Length: 530mm
Wheelbase: 323-335mm
Width: 296mm
Weight: ~2850g (6.3lb) out of the box RTR
(RTR weight equipped w/ Tekin RX8, Pro4 motor, 300g battery, rx, etc)
Diff Ratio: F/R – 10/40t, Center – 44t
Battery tray dimensions: 50x148mm
Kit/RTR: Kit
Needed to complete:
2 channel radio/transmitter
ESC and Pro4 SCT motor
High torque steering servo
2s LiPo battery
SC tires, wheels (SCTE offset) & CA glue
SC body of your choice, paint for body
Hex tools (1.5, 2.0, 2.5mm), nut drivers (5.0, 5.5, 7.0, 8.0mm), pliers, other tools
GENERAL BUILD TIPS
----Use Threadlock! Tekno Vehicles have many metal-to-metal contacts throughout, prevent screws from backing out with a light dab of threadlocker on each screw that threads into metal (do not use threadlock on screws that thread into plastic)
----When building you diffs, take your time to make sure they go together correctly for a smooth and long lasting diff. Check out Ryan's videos below for tips on building and making them smoother
----Be careful when using a power screwdriver on screws that thread into plastic. Use a low clutch setting, and if necessary use a normal hex tool to check tightness
----Use a dab of grease when building each of the CVDs, and make sure a film covers the entire 'ball' of each CVD before installing into axle. Will drastically increase CVD life as well as improve handling
----Use a product such as Protek Premium Blue O-ring grease or Associated Green Slime on shock and diff O-rings to prevent swelling and oil seepage
----When building shocks, the best method we've found for consistent shock builds every time is a little different than whats in the manuals. First, place and seat the bladder into the shock cap. Fill the shocks with desired fluid and pump to remove trapped air. Thread cap onto body about 2-3 turns. Push shaft slowly into body for desired rebound, and hold in position while slowly screwing the body into the cap with the bleed screw facing down or to the side. Wipe away oil and the shock is ready!
*For the ultimate in identical shocks, use a calipers when setting your rebound. I measure the distance between the lowest shaft guide and the top of the shaft threads. For the Buggy shocks, I set this distance at 16mm for the Rear shocks and 14mm for the Front shocks to achieve minimal rebound and to get the least amount of air in the shock when its built.
STEERING LIMITERS
Yes, we know people like lots of steering. Our pro drivers tell us this all the time . Something to keep in mind though about steering...
The design of the EB/NB line of vehicles has more steering throw than any other vehicle on the market. Probably by a good 5 or more degrees. At first we thought this was a huge advantage. Lately, through constant testing, we have found the cars are faster and waaaaay more consistent with less steering throw.
So if you're not using the built in steering stops, you're doing yourself a huge disservice. We are using 4 steering limiter washers on the EB/NB/SC and the results have been awesome. Yes, the turning radius is reduced, but lap times and consistency have proven this is a non-factor.
Here's what goes wrong with too much steering throw:
Rear end washes out when landing jumps
Rear end continues to come around exiting corners
Feels like you are struggling for traction at times
Bump handling is unpredictable
Initial steering is extremely twitchy
And other issues to be sure
Here's what's going on. The last 5+ degrees of steering throw happen very quickly and the servo has very very little leverage on the wheels at full throw. This causes the inside wheel to act erratically and get tossed left/right at the whims of the track surface. Without a positive stop there, the inside wheel is going crazy and causing inconsistencies with the handling. The CV's can accommodate this extreme working angle, but there is more chatter which creates further issues.
Even if you just limit your EPA, the inside wheel is still free to move too far when the conditions arise. So install the washers first, then reset your EPA to match.
There are literally dozens of other adjustments that will result in more steering if desired (shocks, springs, ride height, sway bars, diffs, camber links, toe, etc.). By first limiting the throw, you can focus on creating more 'setup steering'. Think of setup steering as being more consistent vs. mechanical steering (i.e. throw).
Additionally, you won't be fighting the car so you will be spending less time tuning something bad out and more time tuning good stuff in.

NERF BAR INSTALLATION
Quote from Shark413
I just wanted to point out one thing that is not mentioned in the manual (at least I don't think it is). The nerf bars look the same but they are not symmetrical and are actually two different sizes. I noticed this while playing around with the air guards. The side pods on the Tekno SCT410 are made just wide enough to contain the battery (left side) and servo/esc (right side). And the chassis is just wide enough to provide support for the battery and motor. Since the side pods are of different sizes (width) the nerf bars had to also be of different sizes so that the overall width is symmetrical. Just another example of great Tekno design, they could have made the chassis and side pods symmetrical but it would not have been an efficient use of space/materials and the balance would not be as good. Also the nerf bars have a taper, and the flat side needs to be facing up so the air guards fit flush (see the pictures below) and you get max ground clearance.
You can clearly see the nerf bar on the left is shorter.
Another angle. And you can see the taper in the nerf bar, one side is flat the other is curved. Flat side should be facing up.
Shorter nerf bar needs to be on the right side.
Diff Gasket Tip. The gasket fits really snug in the ring gears of the front and rear diffs and the holes in the gasket are precisely the size of the holes in the ring gear. So, install the gasket in the ring gear at an angle and get the first hole aligned perfectly before working the rest of the gasket in. You can smear a little bit of black grease on both sides of the gasket first. Once the gasket is fully seated, you can not turn it within the ring gear.
Outer Diff Shims Tip. Getting the diff in the housings with one shim on each side can be challenging. They are delicate, thin, and have nothing to keep them in place while you try to install the diff. It's very easy to buckle/bend one or miss getting it in the housing. What you can do to make installation easier is to cut a .5mm x 30-40 degree chamfer on the inside of each of the four corners of the bearing lip of each diff housing halve (8 total for front diff, 8 total for rear diff). [See pic below] This allows a bit of alignment assistance to get the diff installed without damaging the shims.
SPRING CHART
I also found this chart comparing Losi 8ight and Hot Bodies D8 springs, both of which fit Tekno shocks.

I made a chart of the Kyosho springs.

Here's a chart of all the available springs together.
Alright guys, I got tired of referring to 3 different spring charts to compare different brands so I compiled all of them and sorted them by spring rate. Please feel free to pass this along.
It will also print nicely on a 8.5x11 piece of paper to keep in your track bag for quick reference while at the track. Also, if anyone wants any other springs added (I think I got most of the popular ones) please let me know and if you find any errors please let me know.
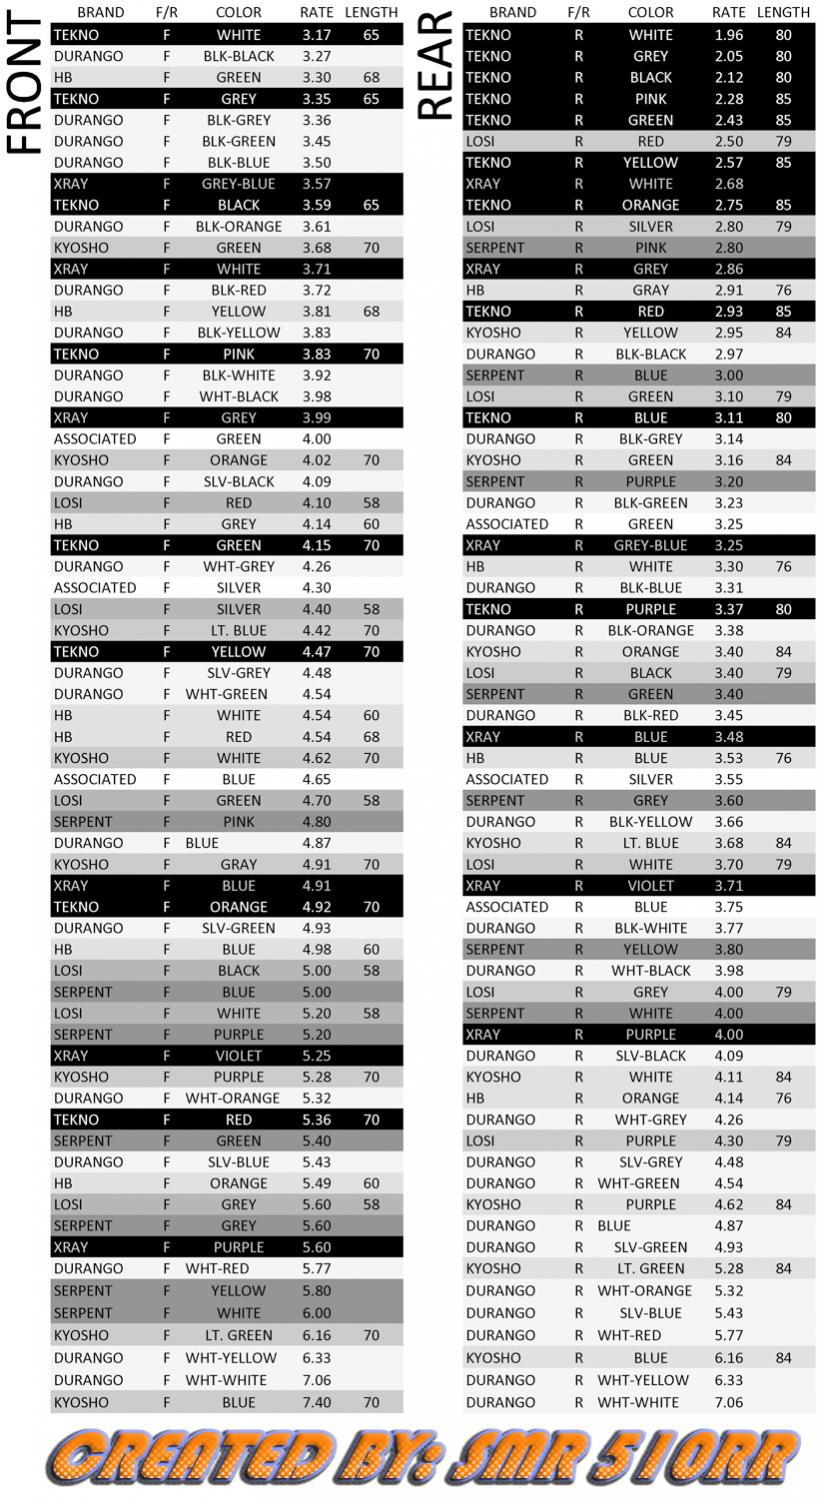
It will also print nicely on a 8.5x11 piece of paper to keep in your track bag for quick reference while at the track. Also, if anyone wants any other springs added (I think I got most of the popular ones) please let me know and if you find any errors please let me know.
BEARING CHART
Avid RC now makes a bearing kit.
http://avidrc.com/flexkit/?kit=524&kitname=SCT410
WHEEL FITMENT
The SCT410 was designed to run SCTE and SC104x4 wheels. We have found that some wheels made to fit these trucks have slight differences from manufacturer to manufacturer. If your wheel rubs the steering link screw you can remove the all of the bumpsteer washers above the ballend to lower the head of the screw. If it still hits you can remove the washers under the ballend (be sure to adjust your bumpsteer setting on the ackermann plate to compensate). If it still rubs after that running a cap head screw in place of the socket head should remove any chance of the wheel hitting the screw. Here's a list of wheels that fit with and without modification.
GEARING RECOMMENDATIONS
These recommendations are based on 2s lipo setups and are guidelines only. If you're switching to this vehicle from another that you had achieved a speed you liked I highly recommend visiting this site -http://scriptasylum.com/rc_speed/top_speed.html, inputting your old/current vehicles information, recording that data, then input the SCT410 info and adjust the pinion gear until you are close to your original top speed. NOTE: when running the split diff the smallest pinion you can fit is a 14 tooth.
Small track (50-100 ft straight)
3600-4000 kv 13-16 tooth pinion
4400-4800 kv 12-15 tooth pinion
5000-5400 kv 11-14 tooth pinion
Medium track (100-150 ft straight)
3600-4000 kv 15-18 tooth pinion
4400-4800 kv 14-17 tooth pinion
5000-5400 kv 13-16 tooth pinion
Large track (150-200 ft straight)
3600-4000 kv 16-19 tooth pinion
4400-4800 kv 15-18 tooth pinion
5000-5400 kv 14-17 tooth pinion
INNER HINGE PIN ADJUSTMENTS
The SCT410 has adjustable hinge pin holders that allow users to fine tune their truck for different tracks, conditions, or driving styles.
You can adjust the amount of front arm "sweep" in 0.5 degree increments from 2 degree forward to 2 degree back.
This picture is top down, looking at the left side of the hingepin blocks.

You can adjust the amount of arm kick-up in 0.5 degree increments from 8 degrees up to 12 degrees. This in turn also adjusts your total caster angle from 18-22 degrees.

You can adjust the rear toe angle in 0.5 degree increments from 1 degrees up to 5 degrees.
This picture is top down, looking at the left side of the hingepin blocks.

You can adjust the rear anti squat angle in 0.5 degree increments from 1 degree up to 5 degrees with the stock plastic hingepin holders and 0 to 4 degrees with the addition of the aluminum C block.
Plastic brace

Aluminum brace

Arm Sweep
The purpose of sweeping the arm forward or backward is mostly to sweep the driveshafts forward or backward. When the driveshafts are angled it changes how the car reacts on and off power. (This goes for the rear driveshafts as well.)
When the driveshafts are swept forwards, the stub axles are being twisted down toward the ground, pushing down on the tires and lifting the front of the chassis. This can be helpful in really bumpy sections to keep the front up and not dig in. It will also create more weight transfer to the front during braking which will increase your off-power steering.
When the driveshafts are swept backwards, the stub axles are now being twisted up, lifting the tires and pushing the chassis down. We've found that the biggest benefit to sweeping the arms back is jump landing. With the arms back, the car kind of "sucks" itself to the ground. It settles much faster and allows you to get on the throttle immediately. During breaking and off throttle the chassis will stay a little flatter front to back and either feel "pushy" or more controlled into the corner.
You can adjust the rear sweep by changing the wheelbase.
It's possible to have toe in on the rear and have the axles swept backwards (not on our car, I'm just making a generalization), but it doesn't handle well. It will squat really hard on acceleration and the nose will dip under braking. If any of you have ever driven a Revo with the long wheelbase rear arms you know what I'm talking about
BODY FITMENT
Most aftermarket bodies now have several sets of dimples that mark where the body posts are for different manufacturers. Our posts can be adjusted to directly line up with those of the Losi SCTE, Traxxas Slash, and the Durango. Any body designed for a 1/10th scale SC truck will fit, you just may have to find the body post locations on your own.
Skid plates
LeadFinger RC makes a makes a stainless steel skid-plate. Here's a link to the store.
APE-RC makes a stainless steel skid-plate. Here's a link to his online store.
T-Bone Racing makes several bumpers/skids in different sizes for the front and rear of the truck.
Here's a link to the Tekno section of their online store.
DE-Racing's rear skid plate
http://www.deracing.net/store/index....product_id=301
ALUMINUM HEXES
The stock kit comes with an aluminum hex that is secured to the axle with a setscrew, PN: TKR5571M.
There are two versions of clamping hexes that Tekno makes, PN: TKR1654X, originally designed for the Slash and SC104x4, and PN: TKR5571A. TKR1654X will however increase your track width by 1mm per side. If you are running SCTE wheels your truck will still be ROAR legal width with the wider hexes. If you are running SC10 4X4 wheels you will be over the ROAR maximum with the wider hexes. With the narrower hexes and moving the arms inner hingepins in it might be possible that some the manufactures wheels for the SC104x4 may be legal.
NOTE: Tekno's hex kit comes with shims that are designed to go between the drive pin and the bearing. They are there to take up any slop due to manufacturing tolerances. They may or may not be needed. It is normal for one wheel to need one or two shims and another to need zero. Install the hex without any shims and install the wheel as if you were going to run the car. If there is excessive play, add one shim and retest. The goal is to have just a tick of free play, you do not want it so tight that it binds up.
17mm HEXES

Ok guys, we couldn't decide to use a slide on the pin or side load for
these hexes, so we just did both.
these hexes are made to fit the 6 mm axle.
the retaining nuts can be used with either loading method, but is not
necessary for the the side load model.
the only issue was that due to the hole location in the axle, you may not be
able to use the 6 mm shim. I had to make it like that to make it fit.
LIST OF COMPATIBLE ALUMINUM SERVO HORNS:
OFNA-
23T OFN10772
24T OFN10774
25T OFN10776
Serpent-
23T SER600463
24T SER600464
25T SER600465
Hot Bodies-
23T HBS67167
24T HBS67168
25T HBS67169
Tekno-
23T TKR5251B
24T TKR5252B
25T TKR5253B
VPPro
http://www.vpprousa.com/rc-parts-acc...category_id=22
OTHER STEERING UPGRADES
APE-RC makes a stainless steel ackermann plate.
It's available here.Tekno makes an aluminum ackermann plate.
Available direct, your LHS, or your favorite online store.
MISCELLANEOUS TOOLS
APE-RC has a great shock tool set that can be purchased here.
CAMBER LINK INFO
The camber links need a 4mm turnbuckle wrench for adjustment. We've found that some wrenches work exceptionally well.-
-The Losi stamped steel wrench (the one included with the 22 series of vehicles)
-The Hudy wrench
-The Tekno Wrench
Inner camber link adjustment
This is a quote from Shark413
I also want to thank Cain for his feedback on the rear inner camber link mounting screws. At first I didn't think it was a huge problem, but then I went to adjust the inner link mount and found it was a royal pain to remove the screw. Per the instructions I have the screw head facing the rear (towards the rear bumper) it is almost impossible to get a normal 2.5mm hex wrench in there without removing the upper rear bumper mount. Cain suggested turning the screw around for easier access. I decided to take his advice and turned the screws around and I just wanted to post a few pictures to better explain the issue and fix. Cain I knew you wouldn't let me down, thanks again.
This is the problem. This is the rear inner camber link mounting screw when installed per the instructions.
If you want to make adjustments, you can't get a hex wrench on the screw head.
You can get a short allen wrench or ball end hex wrench in there to loosen the screw, but.....
If you want to move the screw to a different hole it hits the upper rear bumper mount.
By reversing the screw you can remove it once you remove the nut. Installing it requires you to hold the nut with pilers as you tighten the screw.
And this is what it looks like all bolted down. You can now access the screw/nut and are able to adjust the screw location without removing the bumper mount.
CAMBER/STEERING LINKS
Stock lengths-
Front- 4x56mm
Rear- 4x56mm
Steering- 4x56mm
Optional Titanium links can be found at Lunsford-
LNS1455
Lunsford 4x55mm Titanium Turnbuckle
Durango Makes aluminum links that can fit-
TDR310215 - 4x60mm
Lightweight parts and chassis modding
I started a spreadsheet where you can see the weight difference between the stock vs. option parts. You can view it here:
https://docs.google.com/spreadsheet/...EE&usp=sharing
https://docs.google.com/spreadsheet/...EE&usp=sharing
Tekno 5mm thick rear carbon tower
Tekno 5mm thick front carbon tower
ALTERNATIVE CHASSIS
The stock chassis, TKR5288, is stamped 4mm black anodized aluminum with cutouts.
The stock EB48 chassis is milled 7075 hard anodized aluminum with a number of cutouts. It decreases weight, increases flex, and maintains stock hole locations and chassis thickness.
The original SCT chassis, TKR5001, is stamped 4mm 7075 black anodized aluminum with a minimum amount of cutouts.
M2CRacing released 2 new chassis-


M2C RACING is pleased to announce the release of our Tekno Electric
chassis for the 1/8 scale and sct410.
We will have 2 models. The standard design and the modded model which
will move the battery tray back 10 mm.
These chassis are made using 1/8 inch(3.25mm) thick 7075 aircraft grade materials and clear anodized.
use of the material greatly increases the overall life of the chassis.
we have tested and tweeked these chassis to provide the racers a top notch chassis that will perform very well on all surfaces.
This model is made for the tracks with a high wear situations like the tracks we have out West, up north and in Canada
It is important to note that these skid plates fit flush to the bottom of the chassis and will not effect the droop settings and cause you to
scrub speed on the landings.
FEATURES:
We have adopted this model so that if you wish you can cut off the front bumper to help the vehicle not to get upset on landings
and increase ground clearance.
front and rear skid plates.
It is advised you replace the skid plate when the edge of the skid plate wears down to 1 mm.
This will make the chassis last much longer.
hardened droop stops to prevent chassis wear and droop changes.
m2c 6501 (front and rear skid plate)
m2c 6502 (front rear skid plate)
And be sure to take advantage of our 20% off discount coupon
m2ccoupon
just copy and paste in the coupon box as you check out.
Battery Mod
Several people are modding their battery tray to move the battery back to the front of the brake servo mount. Here's an example by sramos.
Heres the jist of what i did. the rubber that goes along the side of battery tray is from a rubber pipe couple i picked home from home depot and cut off and glued in. put a big enough foam in rear to keep well away from diff.
OVERDRIVE OPTION
A track with loose conditions is where you'll see the biggest benefit of running an overdrive setup. To achieve this you will need to run the truggy ring and pinion in the rear of the buggy.
You have to use both the pinion and ring gear from the truggy. The truggy's ring gear has a different offset to mate up with the smaller 9t pinion gear.
I built up a whole truggy diff so that I could quickly swap out the diff and pinion gear at the track. It's more expensive that way but the time it saves you at the track is worth it.
For those that are thinking of trying the truggy gears in the rear, here's a couple of tips/things to be aware of -
-You'll need to go up 1 tooth on your pinion gear or you'll lose a noticeable amount of top speed.
-You may want to strongly consider going up in your center diff oil if you're running 5k or less.
-Be aware that your buggy will jump with more of a "nose up attitude" then before.
-Your buggy will now have a slight drag brake off-power coming from the rear end.
ALUMINUM SCREW LISTING
From MattP-
I just made a list of all the screws, washers and nuts needed to convert a Tekno ride over to all aluminum screws. I listed the stock replacement Tekno screw part number first with details beside each. Only screws I did not list for an aluminum swap are the diff screws holding the ring/spur on to the diff. That's a high load bearing screw and steel is a better choice there.
Tekno Screw List:
Tekno #1523 3x10mm Flat Head 2
Tekno #1529 3x20mm Cap Head 20
Tekno #1341 4x6mm Flat Head 6
Tekno #1525 3x14mm Cap Head 18
Tekno #1524 3x12mm Cap Head 10
Tekno #1333 3x40mm Flat Head 4
Tekno #1327 3x16mm Flat Head 4
Tekno #1443 4x10mm Button Head 11
Tekno #1522 3x8mm Cap Head 9
Tekno #1445 4x14mm Button Head 6
Tekno #1447 4x16mm Button Head 2
Tekno #1401 3x6mm Button Head 8
Tekno #1448 4x18mm Button Head 2
Tekno #1343 4x10mm Flat Head 12
Tekno #1322 3x8mm Flat Head 11
Tekno #1344 4x12mm Flat Head 12
Tekno #1346 4x15mm Flat Head 2
Tekno #1325 3x14mm Flat Head 3
Tekno #1407 3x16mm Button Head 1
3x8mm Washer 20
4x9mm Washer 2
3mm Locknuts 20
3mm Flanged Locknuts 8
Part list for all the Tekno screws cross referenced over to blue aluminum at Fastenerexpress.com:
Only thing not listed are the washers.
M3 x .5 x 8mm Socket Head Cap Screws - Blue Qty. 25
Item Number: 30968
$6.01
M3 x .5 x 12mm Socket Head Cap Screws - Blue Qty. 25
Item Number: 30974
$6.47
M3 x .5 x 20mm Socket Head Cap Screws - Blue Qty. 25
Item Number: 30989
$7.51
M3 x .5 x 16mm Button Head Socket Screws - Blue Anodized Qty. 25
Item Number: 30671
$6.82
M3 x .5 x 6mm Flat Head Socket Screws - Blue Qty. 25
Item Number: 30750
$5.78
M3 x .5 x 10mm Flat Head Socket Screws - Blue Qty. 25
Item Number: 30756
$6.24
M3 x .5 x 16mm Flat Head Socket Screws - Blue Qty. 25
Item Number: 30765
$6.82
M4 x .7 x 10mm Button Head Socket Screws - Blue Anodized Qty. 25
Item Number: 30604
$8.44
M4 x .7 x 14mm Button Head Socket Screws - Blue Anodized Qty. 25
Item Number: 30610
$9.59
M4 x .7 x 16mm Button Head Socket Screws - Blue Anodized Qty. 25
Item Number: 30613
$10.16
M4 x .7 x 18mm Button Head Socket Screws - Blue Anodized 25 Pieces
Item Number: 30622
$10.75
M4 x .7 x 10mm Flat Head Socket Screws - Blue Qty. 25
Item Number: 30717
$7.51
M4 x .7 x 12mm Flat Head Socket Screws - Blue Qty. 25
Item Number: 30720
$7.98
M4 x .7 x 14mm Flat Head Socket Screws - Blue Qty. 25
Item Number: 30723
$8.44
M4 x .7 x 6mm Flat Head Socket Screws - Blue Qty. 25
Item Number: 30711
$11.21
3mm Hex Lock Nut Aluminum,Low Profile 5.5mm Hex - Blue Qty. 25
Item Number: 30147
$14.09
M3 x .5 x 14mm Socket Head Cap Screws - Blue Qty. 25
Item Number: 30977
$6.57
M3 x .4 x 6mm Button Head Socket Screws - Blue Anodized Qty. 25
Item Number: 30646
$5.78
M3 x .5 x 14mm Flat Head Socket Screws - Blue Qty. 25
Item Number: 90193
$6.70
Total with all screws having a count of 25 is $162.58
MAINTENANCE AND TUNING VIDEOS
-Differential Build Tips
https://www.youtube.com/watch?v=Pf9ZgSoXeAs
-De-burring Spider Gears for smoother diffs
https://www.facebook.com/lutzrc/videos/939349629433682/
-Camber Links
https://www.youtube.com/watch?v=EUqK8TyzZIY
-Steering Endpoints
https://www.youtube.com/watch?v=8mw4rkTeWbQ
-Adjusting Sway Bars
https://www.youtube.com/watch?v=PUaia9xTGLI
I will keep updating it as information becomes available. Thanks
Last edited by Matthew_Armeni; 01-31-2016 at 02:01 PM.

 03-17-2015, 07:55 PM
#5
Mine is already in pre-order 
03-17-2015, 11:12 PM
#7
http://www.horizonhobby.com/xxx-sct-...clear-losb8087
XXX-SCT Body, Clear*(LOSB8087)
Yes it's a Losi
XXX-SCT Body, Clear*(LOSB8087)
Yes it's a Losi
03-19-2015, 12:26 AM
#8
All the full actual details are here, complete with manual and part change lists.
http://www.teknorc.com/shop/tkr5507-...-course-truck/
http://www.teknorc.com/shop/tkr5507-...-course-truck/
03-19-2015, 02:02 AM
#9
Tech Regular
iTrader: (7)
All the full actual details are here, complete with manual and part change lists.
http://www.teknorc.com/shop/tkr5507-...-course-truck/
http://www.teknorc.com/shop/tkr5507-...-course-truck/
03-19-2015, 02:33 AM
#10
If you want to immediately upgrade everything, then yes, getting a new truck is probably the best thing to do (though still more expensive...but then you have 2 trucks).

 03-19-2015, 04:35 AM
#12
As many SCT410 owners are looking at this and trying to weigh options. What are the chances that a "geometry update kit" will be released? I know a lot of people that have the lightened drive train, 7075 chassis, and other option parts that have been available. But to bundle up the hinge pin holders with the square pills and the new arms and hubs, or any other newly introduced features would be a nice gesture to support the many 1.0 folks out here.
03-19-2015, 06:50 AM
#14
Is a composite cross pin a good idea? Sounds like they are introducing a failure point. How much weight could you possibly save with a composite pin vs a steel one? All the other updates sound good.