


motor mount keeps moving all the time (1/8 e-buggy)
 08-27-2012, 04:50 PM
#16
Can't that diff be flipped so a normal pinion can be fitted?
Have a machinist make a thicker plate with a broader foot?
That's a Durango right? Don't they have a E buggy? Can that plate be retrofitted?
Have a machinist make a thicker plate with a broader foot?
That's a Durango right? Don't they have a E buggy? Can that plate be retrofitted?
 08-27-2012, 04:59 PM
#18
Thanks, no way the "box" is enough IMO. The contact area of the mount is 5,5mm x 6mm around each screw. It's like putting a giant on needles 
What's more the mount has two parts on each side so it's not rigid like a closed box. I'm not a pro but just by looking it from underneath you can tell it's too tiny to support such a weight. The motor is creating a lever effect too so it doesn't help.
What's more the mount has two parts on each side so it's not rigid like a closed box. I'm not a pro but just by looking it from underneath you can tell it's too tiny to support such a weight. The motor is creating a lever effect too so it doesn't help.
I really like the Venom mount TBH. Except for the M3 mounting screws, M4 is the only way to go IMO.
It is made of much thicker material and forms a better "box" joining the front and rear uprights. I wish you could order just the mount and I wish you could order it from somewhere other than AUS...
 08-28-2012, 06:15 AM
#22
Keep me updated. I got the same advice so I thoroughly cleaned the threads on both the screws and the mount, used a good deal of loctite and reassembled.
I made some suggestions for redesigning the mount. The easiest would be to make the mount thicker giving it more contact area on the base of the mount and the chassis. Mike suggested that the box that is formed by the front upright and the top plate forms a strong enough structure to support the motor. I am personally of a different opinion and hope that a solution is discovered soon.
I made some suggestions for redesigning the mount. The easiest would be to make the mount thicker giving it more contact area on the base of the mount and the chassis. Mike suggested that the box that is formed by the front upright and the top plate forms a strong enough structure to support the motor. I am personally of a different opinion and hope that a solution is discovered soon.
08-28-2012, 07:42 AM
#23
Tech Champion

Thread Starter
 08-28-2012, 11:18 AM
#24
I've worked with Loctite products and the Henkel Corp. for many years. Their products work very well when used properly.
Surprisingly, our RC cars are made up mostly of what Loctite considers to be inactive metals...Cadium plated steel, aluminum, anodized aluminum, zinc, magnesium, titanium, stainless. Even standard steel screws have a black oxide coating (another inactive material). Most of the time, typical blue Loctite works OK since it does cure to a glue like substance and provides some amount of sealing (blue Loctite is actually recommended for 1/4" to 3/4" hardware. If fully and properly cured, it is actually too strong for smaller screws typically used in RC). But, to get the full effect and strength that it is designed for, primer should be used for these materials listed.
I suggest you spray out the threads with motor spray and let the part dry. Use Loctite primer and purple Loctite (purple is what is recommended for smaller screws). To reach full cure, you need to give it 24 hours.
Knowing you've had trouble with these particular screws, I'd likely use small lock washers for the next enduro in addition to the Loctite
08-28-2012, 12:59 PM
#25
Cleaning out the threads with motor spray may not be sufficient. Soak the mount in acetone for a day or so. Acetone dissolves acrylics and acrylates and will remove all the loctite residue.
Something I learned from rebuilding automotive engines is that for a screw under repeated stress (think: connecting rod bearing cap) not to come loose, the stress on the screw (holding force, tensile force in pounds - or KG for you) must be greater than the cyclic load. If you've got 3MM screws going into the mount (aside from it being aluminum). you may not be able to torque them tight enough if they are standard hex drive (limited to a 2MM hex). I suggest you get some Torx drive screws so you can apply more torque. You can get 3MM Torx screws from CRC.
Then, of course there is the more obvious solution of re-drilling and tapping for 4MM screws, though that may be impossible if the mount isn't big enough.
Less obvious is drilling and tapping for additional screws.
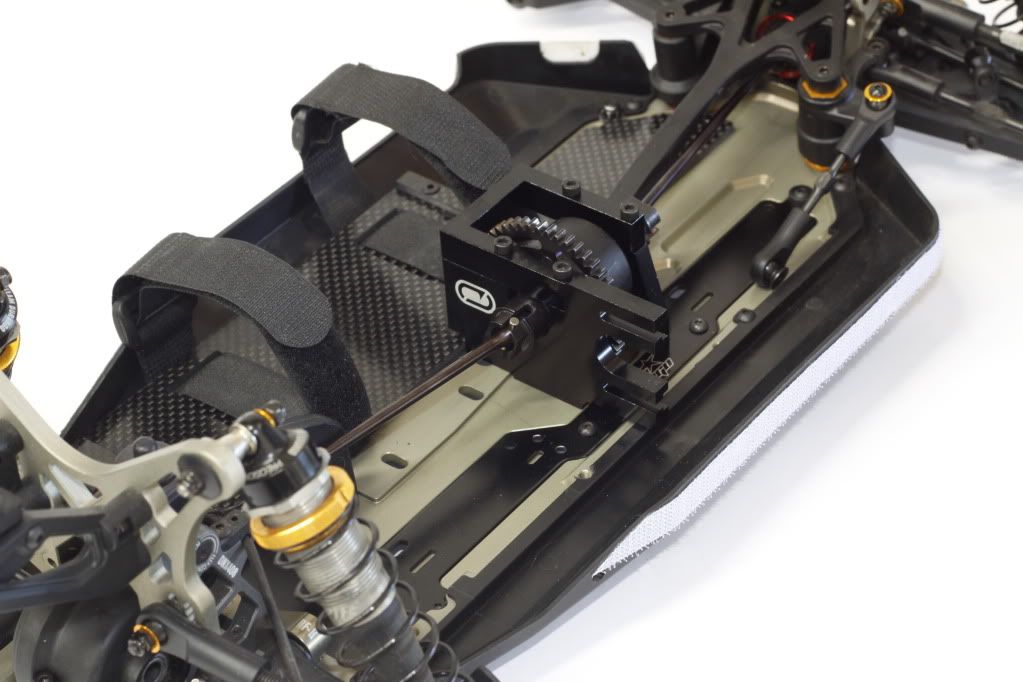
Part of your flex issue is the motor having off the mount causing the mount to flex on the chassis. There is a way to reduce or eliminate this via a brace that forms a third side of a triangle. I made such a brace on my first E-8 conversion where I had the motor mounted on top of the driveline rather than to one side. You can see it if you look at this picture. It is coming down at an angle in front of the pinion and spur. Of course most of my suggestions involve some use of machining tools.
Something I learned from rebuilding automotive engines is that for a screw under repeated stress (think: connecting rod bearing cap) not to come loose, the stress on the screw (holding force, tensile force in pounds - or KG for you
) must be greater than the cyclic load. If you've got 3MM screws going into the mount (aside from it being aluminum). you may not be able to torque them tight enough if they are standard hex drive (limited to a 2MM hex). I suggest you get some Torx drive screws so you can apply more torque. You can get 3MM Torx screws from CRC.Then, of course there is the more obvious solution of re-drilling and tapping for 4MM screws, though that may be impossible if the mount isn't big enough.
Less obvious is drilling and tapping for additional screws.
Part of your flex issue is the motor having off the mount causing the mount to flex on the chassis. There is a way to reduce or eliminate this via a brace that forms a third side of a triangle. I made such a brace on my first E-8 conversion where I had the motor mounted on top of the driveline rather than to one side. You can see it if you look at this picture. It is coming down at an angle in front of the pinion and spur. Of course most of my suggestions involve some use of machining tools.
08-28-2012, 02:12 PM
#26
Tech Champion
Thread Starter
Thanks a lot for your help, I'll try different suggestions and let you know how it goes .
.
08-28-2012, 03:31 PM
#28
Tech Champion
Thread Starter
Thanks a lot for your help, I'll try different suggestions and let you know how it goes


The hole in the chassis isn't exactly round anymore because the screw ripped it when the mount became loose
Do you think there is enough material to re-thread it in M4? I'm sad I paid 140€ for a conversion kit that doesn't work.. The car didn't even cost me so much
The hole in the chassis isn't exactly round anymore because the screw ripped it when the mount became loose
Do you think there is enough material to re-thread it in M4? I'm sad I paid 140€ for a conversion kit that doesn't work.. The car didn't even cost me so much
08-28-2012, 06:16 PM
#29
Looks like enough material to tap it out, but it is hard to say for sure just by looking at a picture. You should be able to get full depth threads with a 4mm thread. Drill size for 4x0.7 bolt is 3.3mm which is larger than existing holes (2.5mm before tapping and threads cut 0.5mm). Drilling out the chassis will also fix the oval shape hole that is in there.
08-28-2012, 06:45 PM
#30
Thanks a lot for your help, I'll try different suggestions and let you know how it goes
The hole in the chassis isn't exactly round anymore because the screw ripped it when the mount became loose
Do you think there is enough material to re-thread it in M4? I'm sad I paid 140� for a conversion kit that doesn't work.. The car didn't even cost me so much
The hole in the chassis isn't exactly round anymore because the screw ripped it when the mount became loose
Do you think there is enough material to re-thread it in M4? I'm sad I paid 140� for a conversion kit that doesn't work.. The car didn't even cost me so much
I thoroughly cleaned all the holes and used new screws on the bottom and top of the mount. Red loctite on the bottom screws and blue on the top.
I might spring for the Venom kit if this doesn't work out...